The OutcomeLogix application is a web-based application that you work with from an internet browser. All of the application pages have the same layout and parts.
| |
|---|
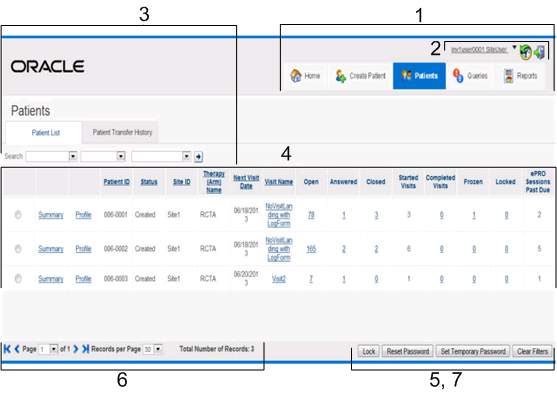
Navigation in OutcomeLogix pages
|
|---|
|
|---|
1—Navigation icons
Always visible, each icon provides access to a different functional area of the OutcomeLogix application. Only icons for functions that you have permission to use appear.
- Home—Navigate to the Dashboard or your custom Homepage from any place in the application.
- Create Patient—Create and enroll a patient.
- Patients—View the Patients List page, which displays the status of forms and visits for each patient, lets you navigate to a specific visit, and provides a link to the Patient Summary and Profile pages of each patient. To view transferred patients, click the Patient Transfer History tab.
- Queries—View the Query List page and work with queries. Queries are errors, warnings, or questions related to data that does not meet certain criteria.
- Reports—View the standard reports you can run or design a new, ad hoc report.
- Export Data—Open the Export Data page. You can export data in any language supported by the study in PDF format or Microsoft Excel spreadsheet software format (XLS).
- Call Center—View the Call Center List page.
- Administration—View the Administration page to access the administrative functions.
|
2—Utilities
Always visible in the upper right of the page. These utilities do not appear on pages viewed by patients.
- User Name/Role—Click to navigate to your User Profile page.
- Down arrow—Click to use these utilities.
- History—Display a list of the last few pages you opened; click a page to reopen it.
- Help—Display the online User Guide or page-level Help; view contact information for the Help Desk; or display the software and database versions.
- Status Legend—Display the status icons and their meanings for forms and queries.
- Logout—Log out of the OutcomeLogix application.
- History icon—Display a list of the last few pages you opened; click a page to reopen it.
- Logout icon—Log out of the OutcomeLogix application.
|
3—Page Title bar
The title of the currently selected page. The Page Title bar might also include the following:
- Tabs—Display a closely related page. For example, the Patient Summary page includes a tab for the Patient Forms page.
- Search and Filter drop-down lists—Filter the data to include on the page.
|
4—Content-specific functionality
Applicable to the content of the page.
- Column sorting—Sort the information that appears in columns with underlined headings.
- When patient IDs are numeric, the application sorts them in ascending order beginning with 0.
- When patient IDs are alphanumeric, the application sorts them alphabetically. For example: S1, S10, S2.
- Lists—List information pertaining to sites, users, and patient visits, such as the queries associated with data.
- Detail—Display detailed information about a selected item in a separate pane below the list or as an expansion of the selected record.
|
5—Action buttons and Status and Review icons
- Action buttons—Apply to the page as a whole; for example, the Submit, Add, Back, and Update buttons.
- Status and Review icons—Use after selecting a patient, visit, form, or item to change the status or track review. The active icons are determined by the rights assigned to your role.
- Clear Filters button—Clear filters or data sorts.
|
6—Paging and display options
- View the list page by page—Use the next page (>), previous page (<), last page (>>), and first page (<<) buttons.
- View a specific page—From the Page drop-down list, select a page number.
- Change the number of displayed rows on the page—From the Records per Page drop-down list, select the number of rows to include.
|
7—Navigation
- Cancel button—Close a dialog box.
- Esc key—Close a dialog box.
|