7 Adding Custom Plugins
This chapter describes how to extend the BI Mobile App Designer functionality using custom or third-party plug-ins to integrate content generated by other applications into BI Mobile Apps.
This chapter includes the following sections:
7.1 What Are BI Mobile App Designer Plug-in Extensions
BI Mobile App Designer supports adding JavaScript plug-in extensions to the app editor to add custom components to your apps. The custom components are then included when you run the app. After you add a plug-in, during design time, an icon for your plug-in displays in the layout editor's Insert menu. You can then drag and drop the custom component to the app page as you do any other app component.

The Mobile App Designer Plug-in SDK contains an environment to develop Oracle BI Mobile App Designer plugin components. The kit contains the plug-in javascript file, the development server, and sample data. You can develop and test a plug-in from your desktop.
After you install the prerequisite software and set up your environment, you are ready to download the SDK with sample data. After you download the SDK you are ready to design your plug-in. You can test your plug-in on your desktop before deploying to your environment.
After testing, upload your plugin to the Plugin Gallery and it is immediately available within the Mobile App Designer.
7.2 Exploring the Sample Plugins
Sample plugins are provided with your BI Mobile App Designer installation. These samples demonstrate the custom functionality you can achieve by adding your own plug-in components. Explore these samples to inspire you to design your own.
For more details, see:
7.3 Setting Up Your Development Environment
This section describes the tasks required to set up your environment and the files included in the SDK.
7.3.1 Download and Install the Prerequisites
To work with the SDK environment, you must install the following software. These steps are only required the first time you work with the SDK:
Download Node.js from the Node.js website:
The Plug-in SDK was developed with version v0.10.18; ensure that you install v0.10.0 or later.
After installing Node.js, run the following node package manager (npm) command to install the Grunt command:
$ (sudo) npm install -g lru-cache grunt-cli
If you are behind a firewall, then provide the https proxy server setting to run the command as follows:
For Linux or Mac:
$ (sudo) https_proxy=http://<your https proxy server>:<proxy port>/ npm install -g lru-cache grunt-cli
For Windows:
c:\> set HTTPS_PROXY=http://<https proxy server>:<proxy port>/c:\> npm install lru-cache grunt-cli
7.3.2 Download the SDK with Sample Data
Now that your environment is set up, the next step is to download the SDK from the Mobile App Designer with some sample data. You download the SDK from within the Mobile App Designer. You can either create a new app or open an existing app. The key is to ensure that the data used by the app you choose is appropriate for the plug-in that you are designing:
To download the SDK:
-
Create a new app or open an app in edit mode that uses sample data appropriate for your plug-in. For example, if your plug-in creates a map visualization that requires country and city codes in the data source, ensure that the app data source includes these fields.
-
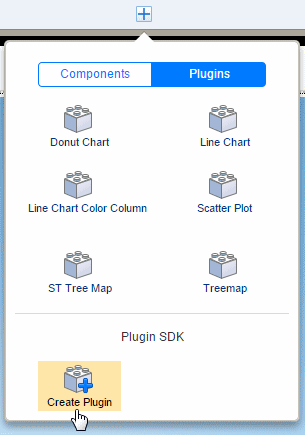
Click Add Component and choose Plug-ins.
-
Under Plug-in SDK, click Create Plug-in.
-
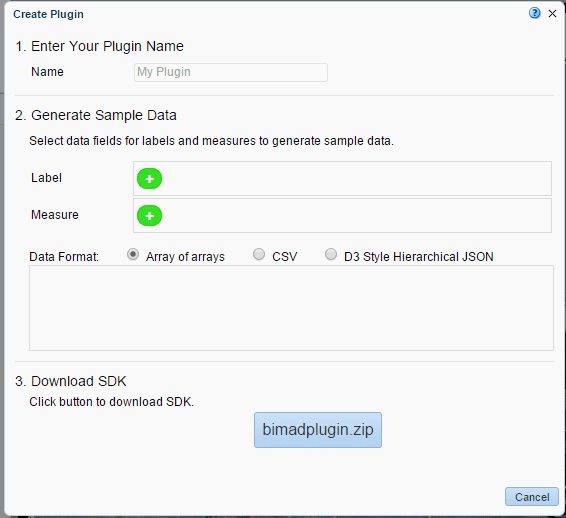
In the Create Plugin dialog, enter the following
-
Plugin Name - enter a name for this plug-in.
-
Label fields - click the + to select data fields from your data source to provide sample data for label fields
-
Measure fields - click the + to select data fields from your data source to provide sample data for measure fields. When you add a measure field, you must also select an aggregation formula. Sum, Count, and Average are supported.
-
Data Format - select the format for the sample data generation.
-
-
Click bimadplugin.zip to download the SDK to your local environment.
7.3.3 Files Included in the SDK
The following items are included in the SDK download:
Plugin file (<your_plugin_name>.js)
Your plugin file is located under the top level of the current directory. When you download the SDK from the Mobile App Designer, the data fields and data structure that you selected are coded in the Sample.js file. Use any text editor to finish coding the sample plug-in file. Once you start the development server, the changes are immediately applied.
Gruntfile.js controls the development server.
You do not need to make any changes to this file unless you want to rename your plugin file or start with a different .js file in another location. To specify a new file name or location, rename the pluginFile variable value in the gruntfile.js.
The sample data that you chose during the download the step is put in this folder.
If you wish to test additional sample data with your plugin, you can put csv files in the data folder to use for testing. Although the BI Mobile App Designer supports data from various sources, in the SDK environment, the data must be provided through a csv file.
Note that each data file must contain the same data that your plugin specifies. If the plugin definition contains two data field entries, then the csv file must be two columns in the same order as the field entries.This SDK server does not provide any sorting, reordering or regrouping at the time of serving data.
These files are required to maintain the environment; do not edit or delete them.
Use this folder to include any images, cascading style sheets (.css files), or Javascript files that your plug-in requires.
7.4 Coding the Custom Plug-in
This section provides the specification of the plug-in structure and describes the APIs provided for use with the plug-in. It contains the following topics:
7.4.1 Plug-in Structure
The plug-in file is a simple JavaScript file. It has a basic structure that must be followed to ensure Mobile App Designer can use it. The basic components are:
Table 7-1 Overview of the plug-in file components
| Component | Description |
|---|---|
|
id |
(Required) Unique ID for the plug-in |
|
component |
(Required) Comprises the plug-in name, tooltip and icon |
|
remoteFiles |
(Optional) Supported .css and JavaScript files |
|
properties |
(Required) The plug-in's defined properties, for example, the fields and data that are used for rendering |
|
fields |
The data fields you selected from the data source |
|
dataType |
Defines the data structure based on your choice of d3hierachy, CSV, or arrayOfArrays |
|
render |
(Required) the main function of the plug-in |
|
refresh |
(Optional) Function called to refresh the data when data changed by click event |
Following is a basic sample plug-in file:
{
  id: 'com.oracle.xdo.Sample', //Change this default id to unique value before development
  component: {
    'name': 'Sample',
    'tooltip': 'Insert Sample'
  },
  properties: [
    {key: "width", label: "Width", type: "length", value: "500px"},
    {key: "height", label: "Height", type: "length", value: "400px"}
  ],
//These are the fields you selected from your data source
  fields: [
    {name: "Brand", caption: "Drop Brand Field Here", fieldType: "label", dataType: "string"},
    {name: "LOB", caption: "Drop LOB Field Here", fieldType: "label", dataType: "string"},
    {name: "Product Type", caption: "Drop Product Type Field Here", fieldType: "label", dataType: "string"},
    {name: "Revenue", caption: "Drop Revenue Field Here", fieldType: "measure", dataType: "number", formula: "summation"}
  ],
//dataType can be d3hierarchy or 'arrayOfArrays' depending on your selection
  dataType: 'd3hierarchy',
  render: function (context, containerElem, data, fields, props) {
    containerElem.innerHTML = '<h1>My First Plugin</h1>';

    var tableStr = '<div id="'+this.id+'_table">';
    tableStr += '<table>';

    data.forEach(function(row, rowNo, rows) {
      tableStr += '<tr>';
      row.forEach(function(col, colNo, cols) {
        tableStr += '<td>'+col+'<td>';
      });
      tableStr += '<tr>';
    });
    tableStr += '</table>';
    tableStr += '</div>';

    containerElem.innerHTML += tableStr;
  },
  refresh: function (context, containerElem, data, fields, props) {
    var tableStr = '<table>';

    data.forEach(function(row, rowNo, rows) {
      tableStr += '<tr>';
      row.forEach(function(col, colNo, cols) {
        tableStr += '<td>'+col+'<td>';
      });
      tableStr += '<tr>';
    });
    tableStr += '</table>';

    // update table with a bit of fancy transition
    $(document.getElementById(this.id+"_table")).html(tableStr).hide().fadeIn(1000);
  }
}
Following are more detailed descriptions of the JavaScript object fields:
- id
-
The
idis an identification string. Oracle recommends using the reverse domain name to avoid any naming conflicts, for example: "com.example.helloworld". - component
-
The following fields comprise the
componentobject:- name
-
The name of the component. Example: "Hello World"
- icon
-
The icon is the image that displays in the app designer Insert menu to represent the plug-in. This field takes a URL that points to the icon image. Example: "http://www.example.com/img/smile.gif"
- tooltip
-
The tooltip message to display for the icon image. Example: "Hello World Plugin".
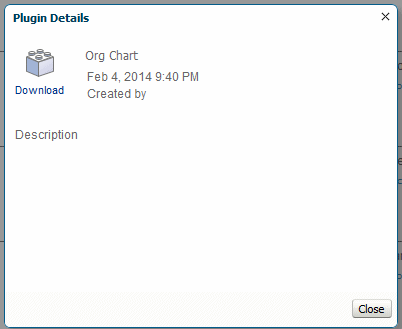
- description
-
Optional description of the plug-in. The description displays in the Plug-in Gallery.
- author
-
Optional author entry. The author displays in the Plug-in Gallery.
- cssClass
-
(Optional) Component CSS class selector to identify the plug-in components.
- render
-
The render function renders the plug-in contents. The render function passes the following parameters:
- context
-
Object containing the following information:
- id
-
The
idis an assigned instantiated component ID string. The system assures this ID is unique in the same template. Oracle recommends using this ID as a prefix or suffix to the HTML element that the plug-in code generates. This practice prevents ID conflicts. - reportLocale
-
The locale assigned to the app layout.
- containerElem
-
The container HTML element. The contents must be set to this element. This provides the Mobile App Designer the pointer to where your plug-in visualization is to be rendered.
- data
-
The variable that data is loaded into depending on the data structure you chose.
- fields
-
See Fields Support.
- props
-
Current properties. See Property Support.
7.4.2 Property Support
To add optional custom properties that display and can be set on the Properties pane of the App Designer, define them under the properties component. Array of property definition object can be set to this field. Construct the properties definition object from the following values.
- key
-
A string value that specifies the property key. This value must be unique.
- label
-
A string value that specifies the label displayed for this property in the Mobile App Designer Properties pane.
- type
-
A string value that specifies the property type. The App Designer uses this value to open the appropriate editor to edit the property. The following values are supported for type:
-
string - creates a text entry box to enter string data.
-
number - creates a text entry box to enter numeric data.
-
bool - creates a True/False (boolean) choice option.
-
length - creates text entry box to enter length data and select units in px, in, cm, or pt.
-
color - displays a color-chooser for color selection.
-
font - displays the list of supported fonts for selection.
-
fontsize - displays the font size selector.
-
lov - creates a list of values. See options for creating the name-value pairs.
-
- value
-
The initial value of the property. The value must follow the format of the type specified.
- options
-
This parameter is valid only when the property type is "lov". The options parameter contains label-value pairs to define the list of values.
-
label - the label for each list item
-
value - the value for the label
-
7.4.2.1 Predefined Properties
The app editor sets the following property settings:
-
width: set based on available space
-
height: set based on available space
-
padding: 0px 0px 0px 0px
-
margin: 0px 0px 0px 0px
-
border-top: 0px none #000000
-
border-left: 0px none #000000
-
border-right: 0px none #000000
-
border-bottom: 0px none #000000
These properties can be updated within the app editor at design time.
7.4.3 Fields Support
The sample JavaScript file generated by the SDK includes the fields definitions for the fields that you specified in the download dialog.
These fields enable users to drag-and-drop data columns from the data source to your plug-in for custom visualizations of the data. The field information is specified in the fields component of the plug-in structure. The field definition consists of name, caption, fieldType, and dataType. A field can have a fieldType of label or measure. For measure fields, additionally specify a formula.
7.4.3.1 Defining the Data Fields
The following example shows data field definitions:
{
  id: "com.oracle.xdo...",
  component: {
    name: "Field Test"
  }
  fields:
  [
    {name: "labelField", caption: "Drop Label Field Here", fieldType:"label", dataType:"string"},
    {name: "dataField", caption: "Drop Data Field Here", fieldType:"measure", dataType: "number", formula: "summation"}
  ],
}
For each field the following is defined. You can update these attributes in the plug-in file.
-
name
-
caption - text that the app editor displays for the field. For example: "Drop Label Field Here".
-
fieldType - valid values are "label" and "measure".
-
dataType - the following data types are supported:
-
string (text string, default)
-
number (number, including integer and float)
-
date (XML date format)
The data type of the element that you drag and drop from the data model structure in the app editor must match the dataType defined here.
-
-
formula - when the
fieldTypeis "measure" specify a default formula. The following are supported:-
count
-
count-distinct
-
summation
-
average
-
maximum
-
minimum
-
first
-
last
-
Users can update Field properties in the App Designer's property editor. This information can then be accessed by the fields variable in the render function arguments at run time.
-
field - path to the field in the data source
-
fieldFormula - the field formula; must be null when fieldType="label"
-
fieldType - the field type: "label" or "measure" (copied from the definition)
-
dataType - the data type: "string", "number", or "date" (copied from the definition)
-
label - the label string specified n the Property editor
7.4.4 JavaScript APIs That Can Be Used in Custom Plug-ins
The following JavaScript APIs are available to use in custom plug-ins:
-
Captures tapped (selected) field information to send to the system.
-
Returns the pixel value from the length string value. The system uses 96 dots per inch (dpi), which is the same as most browsers.
7.4.4.1 handleClickEvent Method
This method captures the tapped (or selected) field information to send to the system.
- Signature
-
xdo.api.handleClickEvent(info)
This method takes the following parameter:
- info
-
Clicked field information object.
The structure of the object is:
Object Structure
{
  id: [component id],
  [
    {
      field: [xpath to the element],
      value: [filter value]
    },
    {
      field: [xpath to the element],
      value: [filter value]
    },
  ]
7.4.4.2 getPixelValue Method
This method returns the pixel value from the length string value. The system uses 96 dpi, which is the same as most browsers.
- Signature
-
xdo.api.getPixelValue(lengthString)
The method takes one parameter:
- lengthString
-
A string value that specifies the length. Supported units are "px", "pt", "in", and "cm".
7.5 Accessing Data at Run Time
Typically, calculated data is stored in the rows variable of the render function. To leverage D3.js libraries, use a JavaScript object.
7.5.1 Accessing Data Stored in rows Array
At runtime, calculated data is stored in the rows variable of the render function. The rows variable is an array type and each rows element has another array for keeping column information. The following render function implementation displays data in HTML:
 render: function(context, containerElem, rows, fields, props) {
   // setup column
   var html = '<table>';
   for (var i=0, rowCount=rows.length; i<rowCount; i++)
   {
     html += "<tr>";
     var col = rows[i];
     for (var j=0, colCount=col.length; j<colCount; j++)
     {
       html += "<td>";
       html += col[j];
       html += "</td>";
     }
     html += "</tr>";
   }
  html += '</table>';
  containerElem.innerHTML = html;
 }
7.5.2 Accessing Data Through a JavaScript Object
To support visualizations using the D3.js JavaScript library, pass data using the "d3hierarchy" datatype. With this data type, the render function is called with a JavaScript object instead of arrays of rows. The JavaScript object has obj.node and obj.children for node or obj.value and obj.value for leaf.
For example:
node example
{
  name: "root"
  children: [
     {name: "child A", value: 1}
     {name: "child B", value: 2}
  ]
}
To use this data type, add dataType: "d3hierarchy" to the plugin definition.
For example:
{
  id: "com.oracle.xdo...",
  component: {
    name: "Field Test"
  }
  dataType: "d3hierarchy",
  fields:
  [
    {name: "labelField", caption: "Drop Label Field Here", fieldType:"label", dataType:"string"},
    {name: "dataField", caption: "Drop Data Field Here", fieldType:"measure", dataType: "number", formula: "summation"}
  ],
  render: function(context, containerElem, node, fields, props) {
    // setup column
    var html = node.value
    ....
If no data field information is defined in the plug-in definition, null is passed to the node (or rows) argument.
7.6 Testing Your Plug-in
To start the development server, run the following command:
$ grunt server
This command starts the Web server with port 9000 and opens the plug-in simulator page.
7.7 Preparing Your Plug-in for Upload
To create the archive file appropriate for uploading to the Plugin Gallery, run the following command:
$ grunt archive
This command packages up the required files and creates a .xmp file that can be uploaded to the Plugin gallery.
7.8 Uploading to the Plug-in Gallery
To make your plug-in available in the BI Mobile App Designer, upload it to the plug-in gallery. You also manage your plug-ins from the Plug-in Gallery. Access the plug-in gallery from the BI Mobile App Designer Administration page. You must have Administrator privileges to access the Administration page.
Alternative Upload Method:
If you prefer to upload from your development session, you can run the command$ grunt deploy
At the prompts, enter:
-
server URL
-
administrator username and password
-
the destination plugin directory on the server
The deploy command deploys the plugin to the destination folder and creates a .session file in your project. The .session captures the session information you entered enabling you to run the deploy command again without re-entering this information.
7.8.1 Accessing the Plug-in Gallery
To access the BI Mobile App Designer Administration page and the Plugin Gallery:
-
In your application URL, change the context node to /"mobile"
For example, if you are logged in through Oracle BI EE, your URL will look similar to:
http://www.hostname:port/analytics.dll
Replace everything after
http://www.hostname:port
with /mobile
that is:
http://www.hostname:port/mobile
-
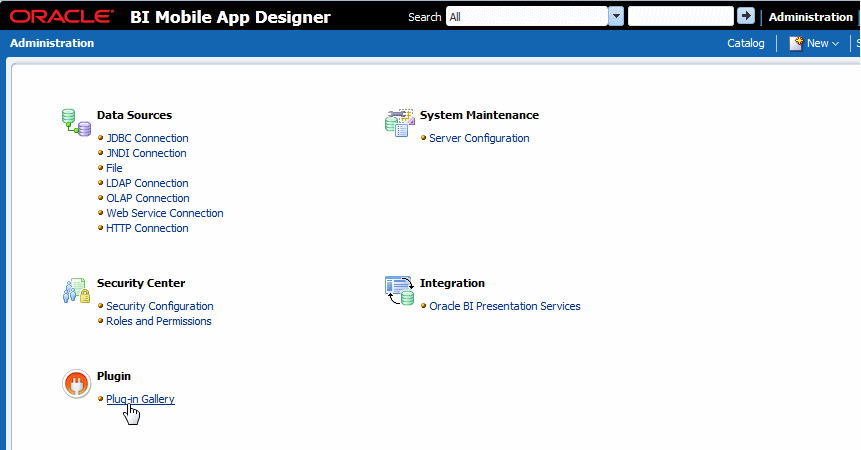
On the Oracle BI Mobile App Designer page, click Administration to launch the Administration page.
-
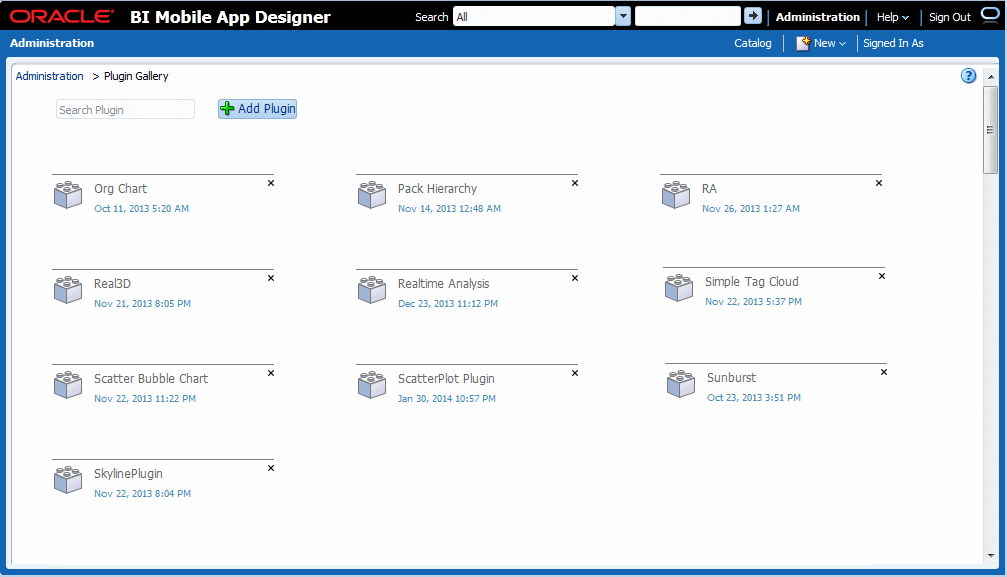
On the Administration page click Plugin Gallery as shown in Figure 7-1.
7.8.2 Uploading Plug-ins
To upload a new plug-in to the Plug-in Gallery:
-
On the Plug-in Gallery page, click Add Plugin.
-
In the Add Plugin dialog drag the plug-in file from your file system to the dialog, or use the Browse button to locate and select it. from your file system.
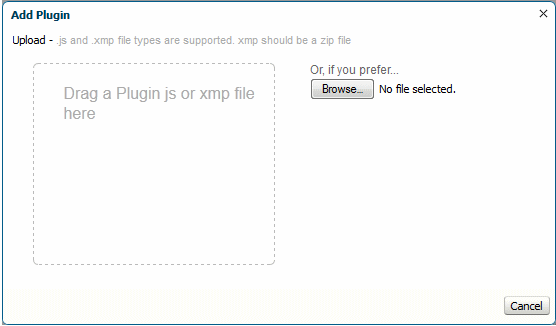
-
Click Upload.
-
The plug-in is now visible in the Plug-in Gallery and available in the Mobile App Designer.