7 Configuring High Availability for Oracle Adaptive Access Manager Components
This chapter introduces Oracle Adaptive Access Manager and describes how to design and deploy a high availability environment for it.
Oracle Adaptive Access Manager is built on a J2EE-based, multi-tier deployment architecture that separates the platform's presentation, business logic, and data tiers. Because of this separation of tiers, Oracle Adaptive Access Manager can rapidly scale with the performance needs of the customer. The architecture can leverage the most flexible and supported cross-platform J2EE services available: a combination of Java, XML and object technologies. This architecture makes Oracle Adaptive Access Manager a scalable, fault-tolerant solution.
This chapter includes the following topics:
-
Section 7.1, "Oracle Adaptive Access Manager Component Architecture"
-
Section 7.2, "Oracle Adaptive Access Manager High Availability Concepts"
-
Section 7.3, "Oracle Adaptive Access Manager High Availability Configuration Steps"
7.1 Oracle Adaptive Access Manager Component Architecture
Figure 7-1 shows the single instance architecture for Oracle Adaptive Access Manager.
Figure 7-1 Oracle Adaptive Access Manager Single Instance Architecture
Description of "Figure 7-1 Oracle Adaptive Access Manager Single Instance Architecture"
In the Oracle Adaptive Access Manager single instance architecture, end users access customer web applications, which communicate with the OAAM Server application and its policies using SOAP. Alternately, an OAAM proxy can be set up so that end users communicate with that machine, which then communicates with the OAAM_Server application using HTTP(S). Authorized end users can access the customer web application. The OAAM_ADMIN component is used for administration and configuration of the OAAM_SERVER application. The administrator responsible for administering and configuring the OAAM_Server application uses a web browser to access the OAAM_ADMIN application. An Oracle RAC database holds policy and configuration information.
7.1.1 Oracle Adaptive Access Manager Component Characteristics
Oracle Adaptive Access Manager consists of the following two components:
-
OAAM_ADMIN: This component is used for administration and configuration of OAAM_SERVER application. This component is developed using the Oracle JAVA ADF Framework the Identity Management shell and deployed as Web applications in a J2EE container. It is packaged as an EAR file.
-
OAAM_SERVER: This component contains the OAAM Admin and OAAM Server sub-components within a single web application. The OAAM_SERVER component is packaged as an EAR file and is composed of Servlets and JSPs in addition to Java classes. The subcomponents of OAAM_SERVER are described below by layer:
-
Presentation Layer: typically a Web application serving JSPs, servlets, and so on. The presentation layer provides the strong authenticator functionality; it uses the interfaces provided by the business layer (SOAP or Java native) to access its services.
-
Business Logic Layer: contains the core application logic that implements the risk analyzing engine. This layer provides Java and SOAP interfaces for the presentation layer. When the Java interface is used, the business logic layer and presentation layer can be part of a single web application. With the SOAP interface, these layers are deployed as different applications.
-
Data Access Layer: contains data access components to connect to the supported relational databases. Oracle Adaptive Access Manager uses Oracle's TopLink, which provides a powerful and flexible framework for storing Java objects in a relational database.
-
-
OAAM_OFFLINE: This component is a standalone application. OAAM Offline has its own database. This database has an identical schema to that of the OAAM Online version. It is used to load customer data to perform risk analysis and tune rules. OAAM Offline can support both login and transaction data.
You can also use the following components in an Oracle Adaptive Access Manager 11g deployment:
-
Fusion Middleware Control / Enterprise Manager Grid Control: Oracle Adaptive Access Manager integrates with the Enterprise Manager Grid Control to display performance metrics and deployment topology. Oracle Adaptive Access Manager uses DMS and Discovery Mbeans to integrate with Enterprise Manager. Enterprise Manager is also used to enhance component tracing and configure auditing.
Enterprise Manager can also be used to view log files for each Managed Server in the domain and increase the tracing to Debug, Trace, and Info levels.
-
Data repositories: Oracle Adaptive Access Manager uses the RDBMS database as its data store. Oracle Adaptive Access Manager supports and works on the following database technologies:
-
Oracle Real Application Clusters
-
Oracle Data Guard
-
Replication Streams
-
Database Partitioning
Oracle Adaptive Access Manager uses RCU to creates its schema in the database.
-
7.1.1.1 Oracle Adaptive Access Manager State Information
The OAAM_Server component includes the OAAM Server subcomponent and the OAAM Admin subcomponent.
-
OAAM Server is a stateful application that stores the state in HTTP session.
-
OAAM Admin is a stateful application that stores its session information in the database.
The OAAM_Admin component is an ADF and Identity Management UI shell-based application. It is a stateless application, and its application state is maintained by the ADF framework.
The OAAM_OFFLINE component is a stateful application that stores the state in HTTP session.
7.1.1.2 Oracle Adaptive Access Manager Runtime Processes
You can perform the following runtime tasks using the Oracle Adaptive Access Manager Administration Console:
-
Customer Care application tasks
-
System configuration tasks involving policies, groups, and properties
-
Viewing session data information
-
Viewing the System Statistics dashboard
For example, you can perform the following administration flows:
-
Recent user query:
-
View recent logins and session details.
-
Perform a query.
-
Click Session Details.
-
Log out.
-
-
Manual CSR and Agent Case creation:
-
To reset customer care, log in.
-
Create a case.
-
Reset the customer.
-
Log out.
-
You can also perform runtime processing with the Oracle Adaptive Access Manager Server.
7.1.1.3 Oracle Adaptive Access Manager Process Lifecycle
The following runtime processing occurs with Oracle Adaptive Access Manager Server:
-
Oracle Adaptive Access Manager is deployed and integrated with the customer's application.
-
The user will access the customer's application and enter user credentials.
-
Based on the system and rules configured in OAAM, different login flows will be presented, for example:
User Registration: Registration Flows
-
Flow R1: Login (New User), enter password, personalize device, skip Questions Registration, log out.
-
Flow R2: Login, enter password, skip Registration, log out.
-
Flow R3: Login, enter password, personalize device, continue Questions Registration, log out.
-
Flow R4: Login, enter password, personalize device, continue Questions Registration, enter invalid answers, validation, log out
-
Flow R5: Login (New Device and New User), enter password, personalize device, continue Questions Registration, log out.
Login Flow:
-
Flow L1: Login, enter wrong password, Login screen.
-
Flow L2: Login, enter correct password, Challenge On may be presented, answer correctly, logged in.
-
Flow L3: Login, enter correct password, Challenge On presented, answer incorrectly, Challenge On presented again, answer correctly, logged in.
-
Flow L4: Login, enter correct password, Challenge On presented, answer incorrectly, Challenge On presented again, answer incorrectly, Challenge On presented again, answer correctly, logged in.
-
Flow L5: Login, enter correct password, Challenge On presented, answer incorrectly, Challenge On presented again, answer incorrectly, login blocked.
-
Flow L6: Login, enter correct password, login blocked (login screen).
-
Flow L7: Login, enter correct password, logged in.
-
Flow LNU1Login as a new user: Login, enter correct password, logged in.
-
Flow LND1: Existing user, login with a new device, enter correct password, logged in.
-
Flow LNUD1: New user, login with a new device, enter correct password, logged in.
In Session Transaction Flow: Login, enter password, create transaction, update transaction, log out.
-
-
OAAM tracks and registers the following data elements:
-
User login
-
User names
-
Devices (cookies, browser headers, and flash data supplied)
-
IP addresses
-
Transaction data
-
-
OAAM will trigger the appropriate policy based on login behavior.
As J2EE applications, you can start the Oracle Adaptive Access Manager Server and Administration Console using the WebLogic Server user interface and command line tools.
The Oracle Adaptive Access Manager Server supports a health check request (a ping request over HTTP) that can be used by a load balancer for death detection.
Oracle Adaptive Access Manager is instrumented for server side metrics (using DMS) and this information is published to the Administration Console. When DMS metrics collection is enabled, monitoring the agent and server component metrics can serve as a proxy for component monitoring. In addition, Oracle Adaptive Access Manager supports fine-grained real time activity tracing, which can also serve as a proxy for component monitoring.
7.1.1.4 Oracle Adaptive Access Manager Configuration Artifacts
Oracle Adaptive Access Manager stores its configuration information in the database. To change these configuration properties, use the Oracle Adaptive Access Manager Administration Console.
Oracle Adaptive Access Manager does not store any configuration information on the file system or in the exploded EAR file.
7.1.1.5 Oracle Adaptive Access Manager Deployment Artifacts
Oracle Adaptive Access Manager supports the no-stage mode of deployment staging. That is, all deployment files are local.
7.1.1.6 Oracle Adaptive Access Manager External Dependencies
Oracle Adaptive Access Manager has an external dependency on the RDBMS database, where it stores its configuration information.
Oracle Adaptive Access Manager uses WebLogic Server multi data sources and Gridlink data source for Oracle RAC databases.
Oracle Adaptive Access Manager uses the standard Oracle TopLink object caching mechanism.
Oracle Adaptive Access Manager follows standard session object serialization to maintain the persistent state of an object.
Oracle Adaptive Access Manager is not dependent on any hostname, IP address, or port. It will work on a container-specific port or hostname.
7.1.1.7 Oracle Adaptive Access Manager Log File Location
Oracle Adaptive Access Manager is a J2EE application deployed on WebLogic Server. All log messages are logged in the server log file of the WebLogic Server that the application is deployed on. The default location of the server log is:
WL_HOME/user_projects/domains/domainName/servers/serverName/logs/
serverName-diagnostic.log
7.2 Oracle Adaptive Access Manager High Availability Concepts
This section provides conceptual information about using Oracle Adaptive Access Manager in a high availability two-node cluster.
7.2.1 Oracle Adaptive Access Manager High Availability Architecture
Figure 7-2 shows the Oracle Adaptive Access Manager high availability architecture:
Figure 7-2 Oracle Adaptive Access Manager High Availability Architecture
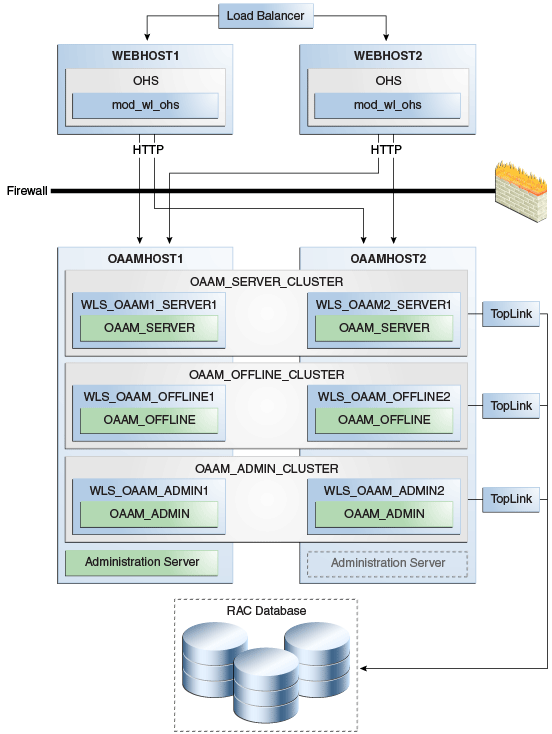
Description of "Figure 7-2 Oracle Adaptive Access Manager High Availability Architecture"
In Figure 7-2, the load balancer receives incoming requests and routes them to WEBHOST1 or WEBHOST2 in the web tier. These hosts have Oracle HTTP Server installed. Oracle HTTP Server, using the WebLogic plugin mod_wl_ohs.conf, then forwards requests to the WebLogic managed servers on OAAMHOST1 and OAAMHOST2.
OAAMHOST1 and OAAMHOST2 contain managed servers that host the Oracle Adaptive Access Manager Server, the Oracle Adaptive Access Manager Admin, and the Oracle Adaptive Access Manager Offline applications. The managed servers are configured in a cluster which enables the Access Servers to work in an active-active manner.
The Administration Server runs on OAAMHOST1 and contains the Administration Console and the Oracle Enterprise Manager Fusion Middleware Control.
An Oracle RAC database provides high availability in the data tier.
Only one OAAM Server cluster, one OAAM Offline cluster, and one OAAM Administration cluster are supported per WebLogic Server domain. In addition, Oracle Adaptive Access Manager-related clusters cannot span WebLogic Server domains.
A single instance Oracle Adaptive Access Manager deployment satisfies the following high availability requirements:
-
Load handling
-
External connection management and monitoring
-
Recovery
-
Fault containment
-
Fault diagnostics
-
Oracle Adaptive Access Manager Admin / Server offline
A multiple instance Oracle Adaptive Access Manager deployment satisfies the following additional high availability requirements:
-
Redundancy
-
Client connection failover / continuity
-
Client load balancing
-
State management
Oracle recommends using an external load balancing router for inbound HTTP connections.
Web sessions open persistent TCP connections to the Oracle Adaptive Access Manager Administration Console and servers. This requires that load balancing router and firewall connection timeouts are sufficiently large to avoid premature termination of TCP connections.
7.2.1.1 Starting and Stopping the Cluster
Each Oracle Adaptive Access Manager Administration Console and Server instance is a peer of other instances. Because all initialization happens before the Server is ready to receive requests and because of built in throttling capabilities, surge conditions are dealt with gracefully without any significant impact of the performance characteristics of the Oracle Adaptive Access Manager 11gR2 Access Server.
When the cluster stop, new requests are denied and existing requests can complete before the Oracle Adaptive Access Manager Administration Console and Server application shuts down. If a forced shutdown occurs, Oracle Adaptive Access Manager 11gR1 recovers any corrupted or invalid data that the shutdown causes.
Oracle Adaptive Access Manager components are pure J2EE applications and do not have any start or stop functionality of their own. Instead, they rely on container-specific startup and shutdown functionality.
Oracle Adaptive Access Manager components deploy to WebLogic Server Managed Server nodes. You restart the components using Node Manager.
7.2.1.2 Cluster-Wide Configuration Changes
Since Oracle Adaptive Access Manager stores the entire configuration in database, the propagation of configuration changes to all the cluster members transparent. All Oracle Adaptive Access Manager components are notified of change events from the internal layer, which are then taken up by the components. To ensure atomicity of the change, Oracle Adaptive Access Manager components reload their entire configuration every time a change happens.
Oracle Adaptive Access Manager configuration applies to every instance in a cluster.
Adding and removing Oracle Adaptive Access Manager Administration Console and Server instances is transparent to other Oracle Adaptive Access Manager instances in the cluster.
An Oracle Adaptive Access Manager cluster can have any number of instances. There is no restriction on the number of instances per cluster.
Online application redeployment does not cause any problems.
7.2.2 Protection from Failures and Expected Behaviors
The following features protect an Oracle Adaptive Access Manager high availability configuration from failure:
-
Session state for the cluster is maintained in memory, which provides replication and failover for all session state information.
-
Oracle Adaptive Access Manager Servers support a heartbeat check - a ping request over HTTP. In addition, the WebLogic Node Manager on the Managed Server can monitor the application and restart it if it is not running. Restarting an Oracle Adaptive Access Manager Server has no impact on any other running components or cluster members.
-
When a WebLogic Server node fails, external connection failover is based on the configuration and is based on the retry timeout as well as the number of retries.
-
When the load balancing router or proxy server detects a WebLogic Server node failure, subsequent client connections are routed to the active instance, which picks up the session state for further processing.
-
An Oracle Adaptive Access Manager session does not have a direct impact on an Oracle RAC database node failure, because WebLogic Server maintains the state of its database connections.
7.3 Oracle Adaptive Access Manager High Availability Configuration Steps
This section provides high-level instructions for setting up a maximum high availability deployment for Oracle Adaptive Access Manager. This deployment includes two Oracle HTTP Servers, which distribute requests to two OAAM servers. These OAAM servers interact with an Oracle Real Application Clusters (Oracle RAC) database. If any single component fails, then the remaining components will continue to function.
This section includes the following topics:
-
Section 7.3.1, "Prerequisites for Oracle Adaptive Access Manager Configuration"
-
Section 7.3.2, "Run the Repository Creation Utility to Create the OAAM Schemas in a Database"
-
Section 7.3.4, "Installing and Configuring the Oracle Adaptive Access Manager Application Tier"
-
Section 7.3.5, "Configuring the Database Security Store for the Domain"
-
Section 7.3.6, "Creating boot.properties for the Administration Server on OAAMHOST1"
-
Section 7.3.7, "Create the Oracle Adaptive Access Manager Administration User"
-
Section 7.3.10, "Configure Oracle Adaptive Access Manager on OAAMHOST2"
-
Section 7.3.13, "Configure Oracle Adaptive Access Manager to Work with Oracle HTTP Server"
-
Section 7.3.14, "Validating the Oracle Adaptive Access Manager Configuration"
-
Section 7.3.15, "Scaling Up and Scaling Out the Oracle Adaptive Access Manager Topology"
7.3.1 Prerequisites for Oracle Adaptive Access Manager Configuration
Before you configure Oracle Adaptive Access Manager for high availability, you must:
-
Run the Repository Creation Utility to create the OAAM schemas in a database. See Section 7.3.2, "Run the Repository Creation Utility to Create the OAAM Schemas in a Database".
-
Install Oracle WebLogic Server on OAAMHOST1 and OAAMHOST2. See Section 7.3.3, "Installing Oracle WebLogic Server"
-
Install and configure the Oracle Identity Management executables on OAAMHOST1 and OAAMHOST2. See Follow the steps in Section 7.3.4, "Installing and Configuring the Oracle Adaptive Access Manager Application Tier".
7.3.2 Run the Repository Creation Utility to Create the OAAM Schemas in a Database
The schemas you create depend on the products you want to install and configure. Use the Repository Creation Utility (RCU) that is version compatible with the product you are installing. See the Oracle Fusion Middleware Installation Planning Guide for Oracle Identity and Access Management and Oracle Fusion Middleware Repository Creation Utility User's Guide to run RCU.
7.3.3 Installing Oracle WebLogic Server
Before you install the Oracle WebLogic Server, ensure that your machines meet the system, patch, kernel, and other requirements as specified in Oracle Fusion Middleware Installation Guide for Oracle WebLogic Server.
To install Oracle WebLogic Server on OAAMHOST1 and OAAMHOST2, start the installer then complete these steps:
-
On the Welcome screen, click Next.
-
On the Choose Middleware Home Directory screen, select Create a New Middleware Home.
For Middleware Home Directory, enter:
ORACLE_BASE
/product/fmwNote:
ORACLE_BASE is the base directory under which Oracle products are installed. The recommended value is/u01/app/oracle.Click Next.
-
On the Register for Security Updates screen, enter your contact information so that you can be notified of security updates.
Click Next.
-
On the Choose Install Type screen, select Custom.
Click Next.
-
On the Choose Products and Components screen, select the JRE/JDK and click Next.
-
On the Choose Product Installation Directories screen, accept the directory ORACLE_BASE
/product/fmw/wlserver_10.3.Click Next.
-
On the Installation Summary screen, click Next.
-
On the Installation Complete screen, deselect Run Quickstart.
Click Done.
7.3.4 Installing and Configuring the Oracle Adaptive Access Manager Application Tier
This section describes how to install Oracle Fusion Middleware components on OAAMHOST1 and OAAMHOST2.
7.3.4.1 Install Oracle Fusion Middleware for Identity Management
Perform these steps to install Oracle Fusion Middleware components on OAAMHOST1 and OAAMHOST2.
If the /etc/oraInst.loc file exists, verify that its contents are correct. Specifically, check that the inventory directory is correct and that you have write permissions for that directory. If the /etc/oraInst.loc file does not exist, you can skip this step.
Start the installer for Oracle Fusion Middleware as follows:
OAAMHOST1> runInstaller
When the installer prompts you for a JRE/JDK location, enter the Oracle SDK location created in the WebLogic Server installation, for example, ORACLE_BASE/product/fmw/JRE_JDK_version then proceed as follows:
-
On the Welcome screen, click Next.
-
On the Prerequisite Checks screen, verify that the checks complete successfully, then click Next.
-
On the Specify Installation Location screen, enter the following values:
-
Oracle Middleware Home: Select the previously installed Middleware home from the list for MW_HOME for example:
/u01/app/oracle/product/fmw
-
Oracle Home Directory:
-
Enter
iamas the Oracle Home directory name when installing the Oracle Identity and Access Management Suite in theIAM_ORACLE_HOME.
-
Click Next.
-
-
On the Installation Summary screen, click Install.
-
On the Installation Complete screen, click Finish.
7.3.4.1.1 Configure Oracle Access Manager on OAAMHOST1
This section creates the domain on OAAMHOST1.
Start the configuration wizard by running the command:
ORACLE_HOME/oracle_common/common/bin/config.sh
Then continue with the following steps:
-
In the Welcome screen, select Create a New WebLogic Domain then click Next.
-
In the Select Domain Source Screen:
Select Generate a domain configured automatically to support the following products:
And select the following products:
-
Oracle Enterprise Manager
-
Oracle JRF (selected by default)
-
Oracle Adaptive Access Manager - Server
-
Oracle Adaptive Access Manager Admin Server
Click Next.
-
-
In the Specify Domain and Location screen enter:
-
Domain name: IDM_Domain
-
Domain Directory: Accept the default.
-
Application Directory: Accept the default.
Click Next.
-
-
In the Configure Administrator Username and Password screen, enter the username and password to be used for the domain's administrator and click Next.
-
In the Configure Server Start Mode and JDK screen, make the following selections:
-
WebLogic Domain Startup Mode: Select Production Mode.
-
JDK Selection: Select the JRE/JDK.
-
-
In the Configure JDBC Component Schema screen, select all of the data sources, then select Configure selected data sources as RAC multi data sources.
Click Next.
-
In the Configure RAC Multi Data Source Component Schema screen, select the first data source, OAAM Admin Server, and enter the following:
-
Data source: OAAM Admin Server
-
Service Name:
oaam.example.com -
User Name: OAAM_OAAM (assuming OAAM was used as the RCU prefix)
-
Password: The password for above account
In the top right box, click Add to add an Oracle RAC host. Enter the following information:
-
Host Name: OAAMDBHOST1
-
Instance Name: oaamdb1
-
Port: 1521
Click Add again to add the second database host and enter the following information:
-
Host Name: OAAMDBHOST2
-
Instance Name: oaamdb2
-
Port: 1521
Deselect this data source. Select the next data source, OAAM Admin MDS Schema, and enter the following information:
-
Data Source: OAAM Admin MDS Schema
-
Service Name:
oaam.example.com -
User Name: OAAM_MDS (assuming OAAM was used as the RCU prefix)
-
Password: Password for the OAAM_MDS account.
In the top right box, click Add to add an Oracle RAC host. Enter the following information:
-
Host Name: OAAMDBHOST1
-
Instance Name: oaamdb1
-
Port: 1521
Click Add again to add the second database host and enter the following information:
-
Host Name: OAAMDBHOST2
-
Instance Name: oaamdb2
-
Port: 1521
Deselect this data source. Select the next data source, OAAM Server, and enter the following information:
-
Data Source: OAAM Server
-
Service Name:
oaam.example.com -
User Name: OAAM_OAAM (assuming OAAM was used as the RCU prefix)
-
Password: Password for the OAAM_OAAM account.
In the top right box, click Add to add an Oracle RAC host. Enter the following information:
-
Host Name: OAAMDBHOST1
-
Instance Name: oaamdb1
-
Port: 1521
Click Add again to add the second database host and enter the following information:
-
Host Name: OAAMDBHOST2
-
Instance Name: oaamdb2
-
Port: 1521
Deselect this data source. Select the next data source, OWSM MDS Schema, and enter the following information:
-
Data Source: OWSM MDS Schema
-
Service Name:
oaam.example.com -
User Name: OAAM_MDS (assuming OAAM was used as the RCU prefix)
-
Password: Password for the OAAM_MDS account.
In the top right box, click Add to add an Oracle RAC host. Enter the following information:
-
Host Name: INFRADBHOST1
-
Instance Name: oaamdb1
-
Port: 1521
Click Add again to add the second database host and enter the following information:
-
Host Name: INFRADBHOST2
-
Instance Name: oaamdb2
-
Port: 1521
Deselect this data source.
Click Next.
-
-
In the Test Component Schema screen, the configuration wizard attempts to validate the data source.
If the data source validation succeeds, click Next.
If it fails, click Previous, correct the issue, and try again.
-
In the Select Optional Configuration screen, select:
-
Administration Server
-
Managed Server Clusters and Machines
Click Next.
-
-
In the Customize Server and Cluster Configuration screen, select Yes, and click Next.
-
In the Configure the Administration Server screen, enter the following values:
-
Name: AdminServer
-
Listen Address: Enter the virtual hostname of the Administration Server, for example: OAAMHOST1.example.com
-
Listen Port: 7001
-
SSL listen port: Not applicable
-
SSL enabled: leave unchecked
Click Next.
-
-
On the Configure Managed Servers screen, create three entries for each OAAMHOST in the topology: one for OAAM Server, OAAM Admin Server, and OAAM Offline server.
Select the OAAM_SERVER entry and change the entry to the following values:
-
Name: WLS_OAAM1_SERVER1
-
Listen Address: OAAMHOST1.example.com
-
Listen Port: 14300
-
SSL Listen Port: 14301
-
SSL Enabled: Selected
For the second OAAM_SERVER, click Add and supply the following information:
-
Name: WLS_OAAM2_SERVER2
-
Listen Address: OAAMHOST2.example.com
-
Listen Port: 14300
-
SSL Listen Port: 14301
-
SSL Enabled: Selected
Select the OAAM Offline entry and change the entry to the following values:
-
Name: WLS_OAAM_OFFLINE1
-
Listen Address: OAAMHOST1.example.com
-
Listen Port: 14400
-
SSL Listen Port: 14401
-
SSL Enabled: Selected
For the second OAAM Offline, click Add and supply the following information:
-
Name: WLS_OAAM_OFFLINE2
-
Listen Address: OAAMHOST2.example.com
-
Listen Port: 14400
-
SSL Listen Port: 14401
-
SSL Enabled: Selected
Select the OAAM_ADMIN_SERVER entry and change the entry to the following values:
-
Name: WLS_OAAM_ADMIN1
-
Listen Address: OAAMHOST1.example.com
-
Listen Port: 14200
-
SSL Listen Port: 14201
-
SSL Enabled: Selected
For the second OAAM_ADMIN_SERVER, click Add and supply the following information:
-
Name: WLS_OAAM_ADMIN2
-
Listen Address: OAAMHOST2.example.com
-
Listen Port: 14200
-
SSL Listen Port: 14201
-
SSL Enabled: Selected
Leave all other fields at the default settings.
Click Next.
-
-
In the Configure Clusters screen, create a cluster by clicking Add.
Enter name: OAAM_SERVER_CLUSTER
Create a second cluster by clicking Add.
Enter name: OAAM_Offline_Cluster
Create a third cluster by clicking Add.
Enter name: OAAM_Admin_Cluster
Leave all other fields at the default settings.
Click Next.
-
On the Assign Servers to Clusters screen, associate the managed servers with the cluster, as follows:
-
Click the cluster name OAAM_SERVER_CLUSTER in the right window.
-
Click the managed server WLS_OAAM1_SERVER1, then click the arrow to assign it to the cluster.
-
Repeat for managed server WLS_OAAM2_SERVER2.
Then:
-
Click the cluster name OAAM_OFFLINE_Cluster in the right window.
-
Click the managed server WLS_OAAM_OFFLINE1, then click the arrow to assign it to the cluster.
-
Repeat for managed server WLS_OAAM_OFFLINE2.
Then:
-
Click the cluster name OAAM_Admin_Cluster in the right window.
-
Click the managed server WLS_OAAM_ADMIN1, then click the arrow to assign it to the cluster.
-
Repeat for managed server WLS_OAAM_ADMIN2.
Click Next.
-
-
On the Configure Machines screen, create a machine for each host in the topology. Click the UNIX tab if your hosts use a UNIX-based operating system. Otherwise, click the Machines tab. Supply the following information:
-
Name: Name of the host. The best practice is to use the DNS name (OAAMHOST1)
-
Node Manager Listen Address: The DNS name of the machine (OAAMHOST1.example.com)
-
Node Manager Port: A port for Node Manager to use.
Click Next.
-
-
In the Assign Servers to Machines screen, indicate which managed servers will run on the machines just created.
For OAAMHOST1:
-
Click the machine OAAMHOST1 in the right window.
-
Click the managed server WLS_OAAM1_SERVER1 in the left window.
-
Click the arrow to assign the managed server to the host OAAMHOST1.
-
Click the managed server WLS_OAAM_OFFLINE1 in the left window.
-
Click the arrow to assign the managed server to the host OAAMHOST1.
-
Click the managed server WLS_OAAM_ADMIN1 in the left window.
-
Click the arrow to assign the managed server to the host OAAMHOST1.
For OAAMHOST2:
-
Click the machine OAAMHOST2 in the right window.
-
Click the managed server WLS_OAAM2_SERVER2 in the left window.
-
Click the arrow to assign the managed server to the host OAAMHOST2.
-
Click the managed server WLS_OAAM_OFFLINE2 in the left window.
-
Click the arrow to assign the managed server to the host OAAMHOST2.
-
Click the managed server WLS_OAAM_ADMIN2 in the left window.
-
Click the arrow to assign the managed server to the host OAAMHOST2.
Click Next.
-
-
On the Configuration Summary screen, click Create to begin the creation process.
7.3.5 Configuring the Database Security Store for the Domain
You must configure the database security store after you configure the domain but before you start the Administration Server. See Section 7.3.5, "Configuring the Database Security Store for the Domain" for more information.
7.3.6 Creating boot.properties for the Administration Server on OAAMHOST1
This section describes how to create a boot.properties file for the Administration Server on OAAMHOST1. The boot.properties file enables the Administration Server to start without prompting for the administrator username and password.
To create the boot.properties file:
-
Start the Admin Server.
-
On OAAMHOST1, go the following directory:
MW_HOME/user_projects/domains/domainName/servers/AdminServer/security
For example:
cd /u01/app/oracle/product/fmw/user_projects/domains/IDMDomain/servers/AdminServer/security
-
Use a text editor to create a file called
boot.propertiesunder thesecuritydirectory. Enter the following lines in the file:username=adminUser password=adminUserPassword
Note:
When you start the Administration Server, the username and password entries in the file get encrypted.For security reasons, minimize the time the entries in the file are left unencrypted. After you edit the file, you should start the server as soon as possible so that the entries get encrypted.
-
Stop the Administration Server if it is running.
See the "Starting and Stopping Oracle Fusion Middleware" chapter of the Administrator's Guide for information on starting and stopping WebLogic Servers.
-
Start the Administration Server on OAAMHOST1 using the startWebLogic.sh script located under the
MW_HOME/user_projects/domains/domainName/bindirectory. -
Validate that the changes were successful by opening a web browser and accessing the following pages:
-
WebLogic Server Administration Console at:
http://oaamhost1.example.com:7001/console
-
Oracle Enterprise Manager Fusion Middleware Control at:
http://oaamhost1.example.com:7001/em
Log into these consoles using the
weblogicuser credentials. -
7.3.7 Create the Oracle Adaptive Access Manager Administration User
To create an Administrative user, which will be used to access the OAAM console:
-
Log into the WebLogic Administration Console using this URL:
http://oaamhost1.example.com:7001/console
-
From the Domain Structure menu, click Security Realms and then myrealm.
-
Click the Users and Groups tab.
-
Click the Users sub tab.
-
Click New.
-
Enter these values:
-
Name: Name for the user, for example:
oaamadmin -
Provider: Default Authenticator
-
Password/Confirmation: Password for user
Click OK.
-
-
After the user is created, click the user name.
-
Click on the Groups sub tab.
-
Assign the user to the following groups:
-
OAAMCSRGroup
-
OAAMCSRManagerGroup
-
OAAMInvestigatorGroup
-
OAAMInvestigationManagerGroup
-
OAAMRuleAdministratorGroup
-
OAAMEnvAdminGroup
-
OAAMSOAPServicesGroup
Click Save.
-
7.3.8 Start OAAMHOST1
This section describes the steps for starting OAAMHOST1.
7.3.8.1 Create the Node Manager Properties File on OAAMHOST1
Before you can start managed servers from the console, you must create a Node Manager property file. You do this by running the script setNMProps.sh, which is located in the MW_HOME/oracle_common/common/bin directory. For example:
MW_HOME/oracle_common/common/bin/setNMProps.sh
7.3.8.2 Start Node Manager
Start Node Manager by issuing the following command:
MW_HOME/wlserver_10.3/server/bin/startNodeManager.sh
7.3.8.3 Start Oracle Adaptive Access Manager on OAAMHOST1
To start Oracle Adaptive Access Manager on OAAMHOST1, follow these steps:
-
Log into the WebLogic Administration Console using this URL:
http://oaamhost1.example.com:7001/console
-
Supply the WebLogic administrator username and password.
-
Select Environment - Servers from the Domain Structure menu.
-
Click the Control tab.
-
Click the servers WLS_OAAM1_SERVER1, WLS_OAAM_OFFLINE1, and WLS_OAAM_ADMIN1.
-
Click Start.
-
Click OK to confirm that you want to start the servers.
7.3.9 Validating OAAMHOST1
Validate the implementation by connecting to the OAAM Administration Server at the following URL:
http://OAAMHOST1.example.com:14200/oaam_admin
The implementation is valid if the OAAM Admin console login page is displayed and you can login using the oaamadmin account you created in Section 7.3.7, "Create the Oracle Adaptive Access Manager Administration User."
Validate the implementation by connecting to the OAAM Server at:
http://OAAMHOST1.example.com:14300/oaam_server
The implementation is valid if the OAAM Server login page appears.
7.3.10 Configure Oracle Adaptive Access Manager on OAAMHOST2
Once the configuration has succeeded on OAAMHOST1, you can propagate it to OAAMHOST2. You do this by packing the domain using the pack script on OAAMHOST1, and unpacking the domain using the unpack script on OAAMHOST2.
Both scripts reside in the MW_HOME/oracle_common/common/bin directory.
On OAAMHOST1, enter:
pack.sh -domain=$MW_HOME/user_projects/domains/IDM_Domain \
    -template=/tmp/idm_domain.jar -template_name="OAAM Domain" -managed=true
This creates a file called idm_domain.jar in the /tmp directory. Copy this file to OAAMHOST2.
On OAAMHOST2, enter:
unpack.sh -domain=$MW_HOME/user_projects/domains/IDM_Domain \
    -template=/tmp/idm_domain.jar
7.3.11 Start OAAMHOST2
Now you will start OAAMHOST2.
This section describes the steps for starting OAAMHOST2.
7.3.11.1 Create the Node Manager Properties File on OAAMHOST2
Before you can start managed servers from the console, you must create a Node Manager property file. You do this by running the script setNMProps.sh, which is located in the MW_HOME/oracle_common/common/bin directory. For example:
MW_HOME/oracle_common/common/bin/setNMProps.sh
7.3.11.2 Start Node Manager
Start Node Manager by issuing the following command:
MW_HOME/wlserver_10.3/server/bin/startNodeManager.sh
7.3.11.3 Start Oracle Adaptive Access Manager on OAAMHOST2
To start Oracle Adaptive Access Manager on OAAMHOST2, follow these steps:
-
Log into the WebLogic Administration Console using this URL:
http://oaamhost2.example.com:7001/console
-
Supply the WebLogic administrator username and password.
-
Select Environment - Servers from the Domain Structure menu.
-
Click the Control tab.
-
Click the servers WLS_OAAM2_SERVER2, WLS_OAAM_OFFLINE2,and WLS_OAAM_ADMIN2.
-
Click Start.
-
Click OK to confirm that you want to start the servers.
7.3.12 Validating OAAMHOST2
Validate the implementation by connecting to the OAAM Administration Server at the following URL:
http://OAAMHOST2.example.com:14200/oaam_admin
The implementation is valid if OAAM Admin console login page is displayed and you can login using the oaamadmin account you created in Section 7.3.7, "Create the Oracle Adaptive Access Manager Administration User."
Validate the implementation by connecting to the OAAM Server at:
http://OAAMHOST2.example.com:14400/oaam_server
The implementation is valid if the OAAM Server login page is displayed.
7.3.13 Configure Oracle Adaptive Access Manager to Work with Oracle HTTP Server
To configure Oracle Adaptive Access Manager to work with Oracle HTTP Server, follow these steps:
7.3.13.1 Update Oracle HTTP Server Configuration
On WEBHOST1 and WEBHOST2, create a file named oaam.conf in the this directory:
ORACLE_INSTANCE/config/OHS/ohs1/moduleconf
Create the file with the following lines:
NameVirtualHost *:7777
<VirtualHost *:7777>

    ServerName oaam.example.com:7777
    ServerAdmin you@your.address
    RewriteEngine On
    RewriteOptions inherit

    <Location /oaam_server>
       SetHandler weblogic-handler
       WebLogicCluster oaamhost1.example.com:14300,oaamhost2.example.com:14300
    </Location>

    <Location /oaam_offline>
       SetHandler weblogic-handler
       WebLogicCluster oaamhost1.example.com:14400,oaamhost2.example.com:14400
       WebLogicPort 7001
    </Location>

    <Location /oaam_admin>
       SetHandler weblogic-handler
       WebLogicCluster oaamhost1.example.com:14200,oaamhost2.example.com:14200
       WebLogicPort 7001
    </Location>

</VirtualHost>
7.3.13.2 Restart Oracle HTTP Server
Restart the Oracle HTTP Server on WEBHOST1 and WEBHOST2:
WEBHOST1>opmnctl stopall
WEBHOST1>opmnctl startall

WEBHOST2>opmnctl stopall
WEBHOST2>opmnctl startall
7.3.13.3 Change Host Assertion in WebLogic
Because the Oracle HTTP Server acts as a proxy for WebLogic, by default certain CGI environment variables are not passed through to WebLogic. These include the host and port. You must tell WebLogic that it is using a virtual site name and port so that it can generate internal URLs appropriately.
To do this, log into the WebLogic Administration Console at:
http://oaamhost1.example.com:7001/console
Then perform these steps:
-
Select Clusters from the home page, or select Environment > Clusters from the Domain Structure menu.
-
Click Lock and Edit in the Change Center window to enable editing.
-
Click the Cluster Name (OAAM_SERVER_CLUSTER).
-
In the General tab, set WebLogic Plug in to Enabled by checking the box in the Advanced Properties section.
-
Click Save.
-
Select HTTP and enter the following values:
-
Frontend Host:
oaam.example.com -
Frontend HTTP Port: 7777
-
Frontend HTTPS Port: Set to SSL port on the load balancer or the Oracle HTTP Server SSL port if using SSL communication.
This ensures that HTTPS URLs created within WebLogic are directed to port 443 or 80 on the load balancer.
-
-
Click Save.
-
Select Clusters from the home page, or select Environment > Clusters from the Domain Structure menu.
-
Click the Cluster Name (oaam_admin_cluster).
-
In the General tab, set WebLogic Plug in to Enabled by checking the box in the Advanced Properties section.
-
Click Save.
-
Select HTTP and enter the following values:
-
Frontend Host:
oaam.example.com -
Frontend HTTP Port: 7777
-
Frontend HTTPS Port: Set to SSL port on the load balancer or the Oracle HTTP Server SSL port if using SSL communication.
-
-
Click Save.
-
Click Activate Changes in the Change Center window to save the changes.
-
Restart managed servers WLS_OAAM1_SERVER1, WLS_OAAM2_SERVER2, WLS_OAAM_OFFLINE1, WLS_OAAM_OFFLINE2, WLS_OAAM_ADMIN1 and WLS_OAAM_ADMIN2 as follows:
-
Log into the WebLogic Administration Console using this URL:
http://oaamhost1.example.com:7001/console
-
Supply the WebLogic administrator username and password.
-
Select Environment - Servers from the Domain Structure menu.
-
Click the Control tab.
-
Click the servers WLS_OAAM1_SERVER1, WLS_OAAM2_SERVER2, WLS_OAAM_OFFLINE1, WLS_OAAM_OFFLINE2, WLS_OAAM_ADMIN1, and WLS_OAAM_ADMIN2.
-
Click Shutdown - Force shutdown now.
-
Click Yes to confirm that you want to stop the servers.
-
Select Environment - Servers from the Domain Structure menu.
-
Click the Control tab.
-
Click the servers WLS_OAAM1_SERVER1, WLS_OAAM2_SERVER2, WLS_OAAM_OFFLINE1, WLS_OAAM_OFFLINE2, WLS_OAAM_ADMIN1, and WLS_OAAM_ADMIN2.
-
Click Start.
-
Click Yes to confirm that you want to start the servers.
-
-
Restart the Administration Server.
7.3.14 Validating the Oracle Adaptive Access Manager Configuration
Log into the Oracle Adaptive Access Manager Administration Console at http://oaam.example.com:7777/oaam_admin using the oaamadmin account you created.
Log into the Oracle Adaptive Access Manager server at http://oaam.example.com:7777/oaam_offline using the oaamadmin account and the password test.
Also, log into the Oracle Adaptive Access Manager server at http://oaam.example.com:7777/oaam_server using the oaamadmin account and the password test.
Complete the steps that the 7.7 Post-Installation Steps section of the Oracle Fusion Middleware Installation Guide for Oracle Identity and Access Management describes.
7.3.15 Scaling Up and Scaling Out the Oracle Adaptive Access Manager Topology
This section describes how to scale up and scale out an Oracle Adaptive Access Manager high availability topology. Perform a scale up operation to add a new Oracle Adaptive Access Manager managed server instance is added to a node already running one or more server instances. Perform a scale out operation to add a new Oracle Adaptive Access Manager managed server instance to a new node.
7.3.15.1 Scaling Up Oracle Adaptive Access Manager
To scale up OAAM, use the same procedure for both the OAAM server and the OAAM Administration Server.
Log in to the Oracle WebLogic Server console at: http://oaamhost1.example.com:7001/console. Then proceed as follows:
-
From the Domain Structure window of the Oracle WebLogic Server Administration Console, expand the Environment node and then Servers. The Summary of Servers page appears.
-
Click Lock & Edit from the Change Center menu.
-
Select an existing server on the host that you want to extend, for example:
WLS_OAAM1_SERVER1orWLS_OAAM_ADMIN1. -
Click Clone.
-
Enter the following information:
-
Server Name: A new name for the server, for example:
WLS_OAAM3. -
Server Listen Address: The name of the host on which the managed server will run.
-
Server Listen Port: The port the new managed server will use. This port must be unique within the host.
-
-
Click OK.
-
Click the newly-created server WLS_OAAM3.
-
Set the SSL listen port. This should be unique on the host that the managed server will be running on.
-
Click Save.
-
Disable hostname verification for the new managed server. Before starting and verifying the
WLS_OAAM3managed server, you must disable hostname verification. You can re-enable it after you have configured server certificates for the communication between the Oracle WebLogic Administration Server and the Node Manager inOAAMHOSTn.If the source server from which the new one was cloned had already disabled hostname verification, these steps are not required, as the hostname verification settings were propagated to the cloned server. To disable hostname verification:
-
In the Oracle Fusion Middleware Enterprise Manager Console, select Oracle WebLogic Server Administration Console.
-
Expand the Environment node in the Domain Structure pane.
-
Click Servers. The Summary of Servers page appears.
-
Select WLS_OAAM3 in the Names column of the table. The Settings page for server appears.
-
Click the SSL tab.
-
Click Advanced.
-
Set Hostname Verification to
None. -
Click Save.
-
-
Click Activate configuration from the Change Center menu.
7.3.15.2 Scaling Out Oracle Adaptive Access Manager
Scale out is very similar to scale up, but first requires the software to be installed on the new node. Proceed as follows:
-
Install Oracle WebLogic Server on the new host as described in Section 5.4.1.2, "Installing Oracle WebLogic Server."
-
Install Oracle Fusion Middleware Identity Management components on the new host. See Section 7.3.4, "Installing and Configuring the Oracle Adaptive Access Manager Application Tier."
-
Log in to the WebLogic console at
http://oaamhost1.example.com:7001/console. -
From the Domain Structure pane of the Administration Console, expand the Environment node and then Servers. The Summary of Servers page appears.
-
Click Lock & Edit from the Change Center menu.
-
Select an existing server on the host you want to extend, for example:
WLS_OAAM1_SERVER1orWLS_OAAM_ADMIN1. -
Click Clone.
-
Enter the following information:
-
Server Name: A new name for the server, for example:
WLS_OAAM3 -
Server Listen Address: The name of the host on which the managed server will run.
-
Server Listen Port: The port the new managed server will use. This port must be unique within the host.
-
-
Click OK.
-
Click the newly-created server WLS_OAAM3.
-
Set the SSL listen port. This should be unique on the host that the managed server will be running on.
-
Click Save.
-
Disable hostname verification for the new managed server. Before starting and verifying the
WLS_OAAM3managed server, you must disable hostname verification. You can re-enable it after you have configured server certificates for the communication between the Oracle WebLogic Administration Server and the Node Manager inOAAMHOSTn.If the source server from which the new one was cloned had already disabled hostname verification, these steps are not required, as the hostname verification settings were propagated to the cloned server. To disable hostname verification:
-
In the Oracle Fusion Middleware Enterprise Manager Console, select Oracle WebLogic Server Administration Console.
-
Expand the Environment node in the Domain Structure pane.
-
Click Servers. The Summary of Servers page appears.
-
Select WLS_OAAM3 in the Names column of the table. The Settings page for server appears.
-
Click the SSL tab.
-
Click Advanced.
-
Set Hostname Verification to
None. -
Click Save.
-
-
Click Activate configuration from the Change Center menu.
-
Pack the domain on
OAAMHOST1using the command:pack.sh -domain=ORACLE_BASE/admin/IDM_Domain/aserver/IDM_Domain -template =/tmp/idm_domain.jar -template_name="OAAM Domain" -managed=true
The
pack.shscript is located inMW_HOME/oracle_common/common/bin. -
Unpack the domain on the new host using the command:
unpack.sh -domain=ORACLE_BASE/admin/IDM_Domain/mserver/IDM_Domain -template=/tmp/idm_domain.jar -template_name="OAAM Domain" -app_dir=ORACLE_BASE/admin/IDM_Domain/mserver/applications
The
unpack.shscript is located inMW_HOME/oracle_common/common/bin. -
Before you can start managed servers from the console, you must create a node manager properties file on
OAAMHOST2by running the scriptsetNMProps.sh. ThesetNMProps.shscript is located inMW_HOME/oracle_common/common/bin. Type:MW_HOME/oracle_common/common/bin/setNMProps.sh -
Start Node Manager and the new managed server on the new host
-
Now that the new managed server has been created and started, the web tier will start to direct requests to it. Best practice, however, is to inform the web server that the new managed server has been created.
You do this by updating the file
oaam.confon each of the web tiers. This file resides in the directory:ORACLE_INSTANCE/config/OHS/component_name/moduleconf.Add the new server to the
WebLogicClusterdirective in the file. For example, change:<Location /oaam_admin> SetHandler weblogic-handler WebLogicCluster oaamhost1.example.com:14200,oaamhost2.example.com:14200 </Location>to:
<Location /oaam_admin>
    SetHandler weblogic-handler
    WebLogicCluster
oaamhost1.example.com:14200,oaamhost2.example.com:14200,oaamhost3.example.com:14300
</Location>