4 Setting Up Role or Group Support
Provisioning Gateway Role/Group support provides the capability to manage provisioning rights for specific applications and users. These provisioning rights are configured and managed in the Oracle Enterprise Single Sign-On Administrative Console. To set up Role/Group support, open the Oracle Enterprise Single Sign-On Administrative Console by clicking Start > Programs > Oracle> Logon Manager Console.
Two panels are available to manage provisioning rights:
-
A Provisioning tab, which is located on the individual application panel. This tab enables you to manage provisioning rights for specific applications.
-
A Provisioning Manager node, located in the Oracle Enterprise Single Sign-On Administrative Console tree (left pane). This node enables you to manage provisioning rights for users.
4.1 Using the Provisioning Tab
To access the Provisioning tab, expand Applications on the left side of the Oracle Enterprise Single Sign-On Administrative Console and double-click any application. Click the Provisioning tab.
From this tab, you can add or remove permissions. You can also select the level of access rights (add, modify, or delete applications) for those permissions.
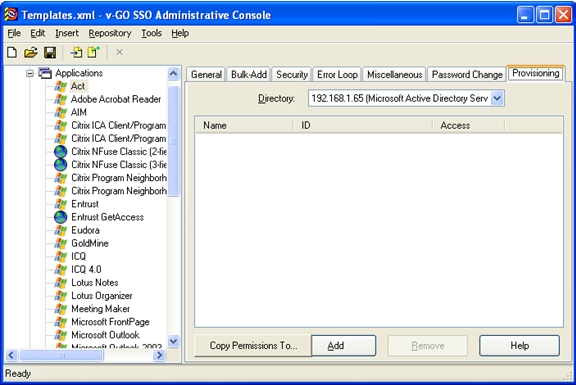
| Control | Value |
|---|---|
| Directory | Enables you to select the target directory server. |
| Name | Lists the groups or users who currently have access to this item. |
| ID | Lists the user's account name. |
| Access | Indicates the permissions that have been granted to the user or group (Add, Modify or Delete Logon). To change a user or group's access rights, right-click the user or group and select Add Logon, Modify Logon, or Delete Logon from the shortcut menu. |
| Copy Permissions To | Enables you to apply the provisioning rights for the current application to multiple applications. Click this button to display a dialog listing all the applications. Select the applications that you want these provisioning rights to be copied to. Use Ctrl+click or Shift+click to select multiple entries. Click OK. |
| Remove | Removes selected users or groups from the list. Select a user or group to remove; use Ctrl+click or Shift+click to select multiple entries. |
4.1.1 Adding Users or Groups
The dialog that you use to add users or groups depends upon which directory server is being used:
-
LDAP
-
Active Directory or AD LDS (ADAM)
4.1.1.1 LDAP
Use the Add Users and Groups dialog to select the individual users or user groups that are to be added to the access list for the current configuration item (Add Logon, Modify Logon, or Delete Logon).
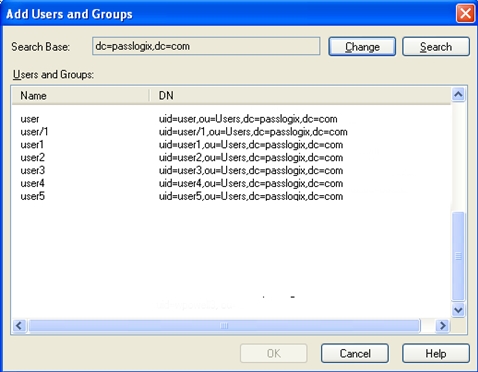
| Control | Value |
|---|---|
| Search Base | The base (highest-level) directory to begin searching for user or group accounts. All subdirectories of the base directory are searched. Enter a location or click Change to browse the directory tree. |
| Change | Displays the Select Search Base dialog to browse for a base directory for the search. Use this dialog to browse to and select the base (highest-level) directory to search for user and group names. Click OK when finished. |
| Search | Begin searching the base directory for users and groups. |
| Users or Groups | Lists the search results. Select the names to be added to the access list for the current configuration item. Use Ctrl+click or Shift+click to select multiple entries. Click OK when finished to copy your selections to the access list. |
4.1.1.2 Active Directory and AD LDS (ADAM)
Use the Select User or Group dialog to select the individual users or user groups that are to be added to the access list for the current configuration item (Add Logon, Modify Logon, or Delete Logon).
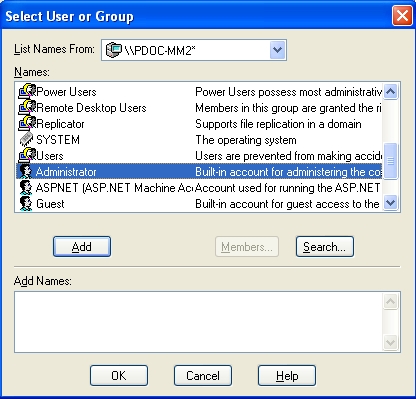
| Controls | Value |
|---|---|
| List Names From | Select an Active Directory domain or server. |
| Names | Lists the names of users and groups for the selected domain or server. Select one or more names to add to the access list. |
| Add | Copies users and groups selected in the Names list to the Add Names list. Use Ctrl+click or Shift+click to select multiple entries. |
| Members | When a group is selected the Names list, displays the Global Group Membership dialog, which lists the members of the selected group. |
| Search | When a group is selected the Names list, displays the Global Group Membership dialog, which lists the members of the selected group. |
| Add Names | Displays the names of the users or groups that you have you have added so far. Click OK to add these names to the access list for the current configuration item.
You can type or edit user names in this list. However, entries are checked for invalid account names, and duplicate account selections are automatically removed when you click OK. |