1 Configuring and Diagnosing
Windows Application Templates
This chapter explains the concepts necessary to understand how and why you should configure Windows application templates to solve specific sign-on scenarios, as well as the recommended best-practice procedures for configuring and testing Windows application forms, and diagnosis and resolution steps for the most common issues that may cause the Agent to erratically detect and/or respond to application forms. It covers the following topics:
Tip:
If the troubleshooting steps in this chapter do not resolve your issue, you can troubleshoot further by tracing and logging the activity of Logon Manager and submitting the logged information to Oracle Support for analysis. For this purpose, Oracle provides the Trace Controller utility, from Oracle Support. For information on how to use the utility, see the "Using the Trace Controller Utility" topic in the Enterprise Single Sign-On Suite Administrator's Guide.1.1 Overview of a Sign-On Event
Logon Manager can be configured to detect and respond to a wide range of sign-on events, such as logon, password change, and variations of thereof; support is provided for a diverse range of forms, fields, controls, and event flows.
In order to recognize application windows, the Agent constantly monitors the currently logged in user's Windows message queue and responds as follows:
-
Agent detects the window. For each new window it detects, the Agent does the following:
-
Searches through all of the available Windows application templates to find a match for the values of the identification criteria defined in the template. (These include the window title, window class, and executable name.)
-
Selects the first template whose configuration matches the criteria presented by the window.
-
Begins the response process.
-
-
Agent responds to the form within the detected window. The Agent follows the configuration stored in the template to determine how to interact with the fields and controls in the form. Typically, the Agent does the following:
-
(Optional) Performs the actions, such as setting field focus, which might be required by the application to invoke or activate the logon or password change form.
-
Retrieves the associated credentials from the user's store (if they exist) and populates the appropriate fields. (If the credentials don't exist, the Agent prompts the user to store them.)
-
Performs the actions necessary to submit the credentials to the application for processing, such as pressing the Logon button.
-
(Optional) Detects any follow-up forms or dialogs, such as new password confirmation, and performs the required action.
-
1.2 Understanding Window Detection
Whenever the Agent detects the instantiation of a new window through the Windows message queue or the User Interface Automation (UIA) API, the Agent examines the values of the following characteristics of the window and compares them to the values stored in each available application template in order to uniquely identify the window and the form it contains:
-
Window title
-
Window class
-
Executable name (also referred to as a module name or an AppPath key)
-
Automation element ID (if using the UIA API)
Note:
An application template is a set of configuration options that instruct the Logon Manager Agent how to detect and respond to application windows and the forms they contain.If a window other than the target window shares the values of these identifying criteria with the target window, the Agent may erroneously respond to such a window in addition to the target window. In such cases, you must use matching to more precisely constrain the allowable values of these criteria so that the resulting configuration uniquely identifies the target window and form to the Agent. For more information on matching, see Using Matching to Improve Response Accuracy.
If a match is found, the Agent responds to the form as defined in the first matched template, i.e., logs the user on or initiates password change.
1.2.1 Detection of Java, SAP, and Windows 8 Metro Applications
To detect and interact with Java, SAP, and Windows 8 Metro ("Modern UI") applications, Logon Manager utilizes the Microsoft User Interface Automation (UIA) API to programmatically access their fields and controls. The UIA Helper Object (UIAHO) parses the user interface structure tree of the target window and monitors it for changes, as well as interacts with the controls in order to complete the desired task (populate fields, submit form, and so on).
The UIA API exposes the fields and controls visible to the user as automation elements organized into a tree structure rooted at the Windows desktop. The UIA Helper Object filters this tree to only detect and interact with the elements of the target application window, as configured in the application template.
When configuring a UIA-driven application template in Logon Manager, take note of the target element IDs, which take the following form:
A:B:C...:n
where A is the ID of the target window, B is the ID of the target element, and so on. The colon indicates the next level in the element tree's hierarchy.
1.3 Understanding Form Response
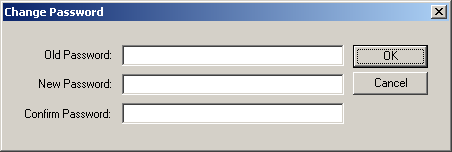
Once the Agent recognizes an application window, it checks for the presence of fields and controls that comprise a "form," such as a logon form, or a password change form. A logon form, for example, typically contains at least a user name field, a password field, and a button that submits the credentials to the application. An example logon form is shown below.

1.3.1 Supported Form Types
As of the release date of this document, Logon Manager supports the following types of forms in Windows applications:
-
Logon
-
Logon success (a message confirming successful logon)
-
Logon failure (a message indicating the injected credentials have been rejected)
-
Password change
-
Password confirmation (a dialog requesting confirmation of the new password)
-
Password change success (a dialog confirming successful password change)
-
Password change failure (a dialog indicating the new password was rejected)
The same application window may contain different forms depending on the invoked function (i.e., logon or password change); thus, a single template can contain definitions for the multiple forms that the window can display. For most applications, you need to only define the forms to which you want Logon Manager to respond.
Note:
Defining a form comprises providing unique identification criteria, specifying the action to take when the form is detected, and the specific way in which the action (e.g., injecting credentials) should be performed.Logon Manager can automatically populate the appropriate fields in a form with credentials retrieved from the user's credential store, as well as operate the form's controls to submit the credentials to the application for processing. Configuration options that instruct the Agent how to interact with the form's fields and controls are stored in the template.
1.3.2 Supported Form Response Methods
Depending on the design of the target application, Logon Manager can use one of the following methods to interact with the fields and controls in the target form.
1.3.2.1 Control IDs
This is the default and preferred form interaction method for most Windows applications. This method uses the Windows API to identify and interact with the fields and controls within the form. In a Windows API-compliant application, each field and control exposes a unique Control ID to the operating system. The Agent detects these Control IDs and binds to them specific sign-on functions that signify the purpose of the object represented by the Control ID, such as the password field or the "submit" button.
Note:
If some or all of the Control IDs exposed by the application are non-unique or dynamic, the Agent can substitute ordinals - sequential ID numbers assigned to each item in the window from top to bottom, left to right - to uniquely identify the detected fields and controls.If a field or control does not expose its Control ID, or if there are additional actions required to complete the sign-on event, such as selecting a check box or manually setting focus on a specific field, you may also have to use the "SendKeys" method, in tandem with Control IDs, to interact with the target form.
Note:
For Windows 8 "Metro" applications, the Agent interacts with the applications via a helper object (UIAHO) that utilizes the Microsoft User Interface Automation (UIA) API. You must select the "UI Automation" component when installing Logon Manager for this functionality to be available.1.3.2.2 "SendKeys"
This method allows the Agent to interact with the target application by emulating user input, such as keystrokes and mouse clicks. Use this method if the Agent is unable to programmatically detect or interact with the target fields and controls. For example, if an application does not expose Control IDs for any of its fields and controls, you will need to send individual keystrokes to populate the fields, mouse clicks or Tab keystrokes to toggle between fields, and a final mouse click to engage the Logon button.
Note:
If you configure a form definition to use the "Control IDs" method and Logon Manager fails to inject credentials programmatically due to application incompatibility, by default Logon Manager will automatically fall back to the "SendKeys" method and retry injection, which could result in credentials being injected into the wrong window or application. You can disable this fallback behavior by following the steps in Disabling Automatic "SendKeys" Fallback.1.3.2.3 Control IDs with "SendKeys"
This method is a "best-of-both-worlds" combination of the two above methods and is the preferred way of solving sign-on scenarios that require actions that cannot be performed programmatically. Control IDs are used to interact with the form wherever possible, while keystrokes and mouse clicks are sent to accomplish tasks such as setting field focus, selecting a check box, and other actions that the Agent cannot perform programmatically within the target application.
Note:
To achieve this "mixed" mode, configure the form to initially use the "SendKeys" response method, then configure the desired "SendKeys" actions; while configuring the actions, enable the Inject directly into control option for actions that you wish to retain the "Control IDs" programmatic response method.For example, if fields must be populated in a specific order due to cascading validation (i.e., the password field becomes active only once the user name field has been populated), you would use Control IDs to inject credentials into the fields, but send a Tab keystroke via "SendKeys" between each field injection to advance field focus.
1.4 Determining the Optimal Configuration for a Form
When Configuring a Form, use the information in this section to determine its optimal configuration based on the requirements and features of the target application.
1.4.1 Determining the Optimal Configuration for a Logon Form
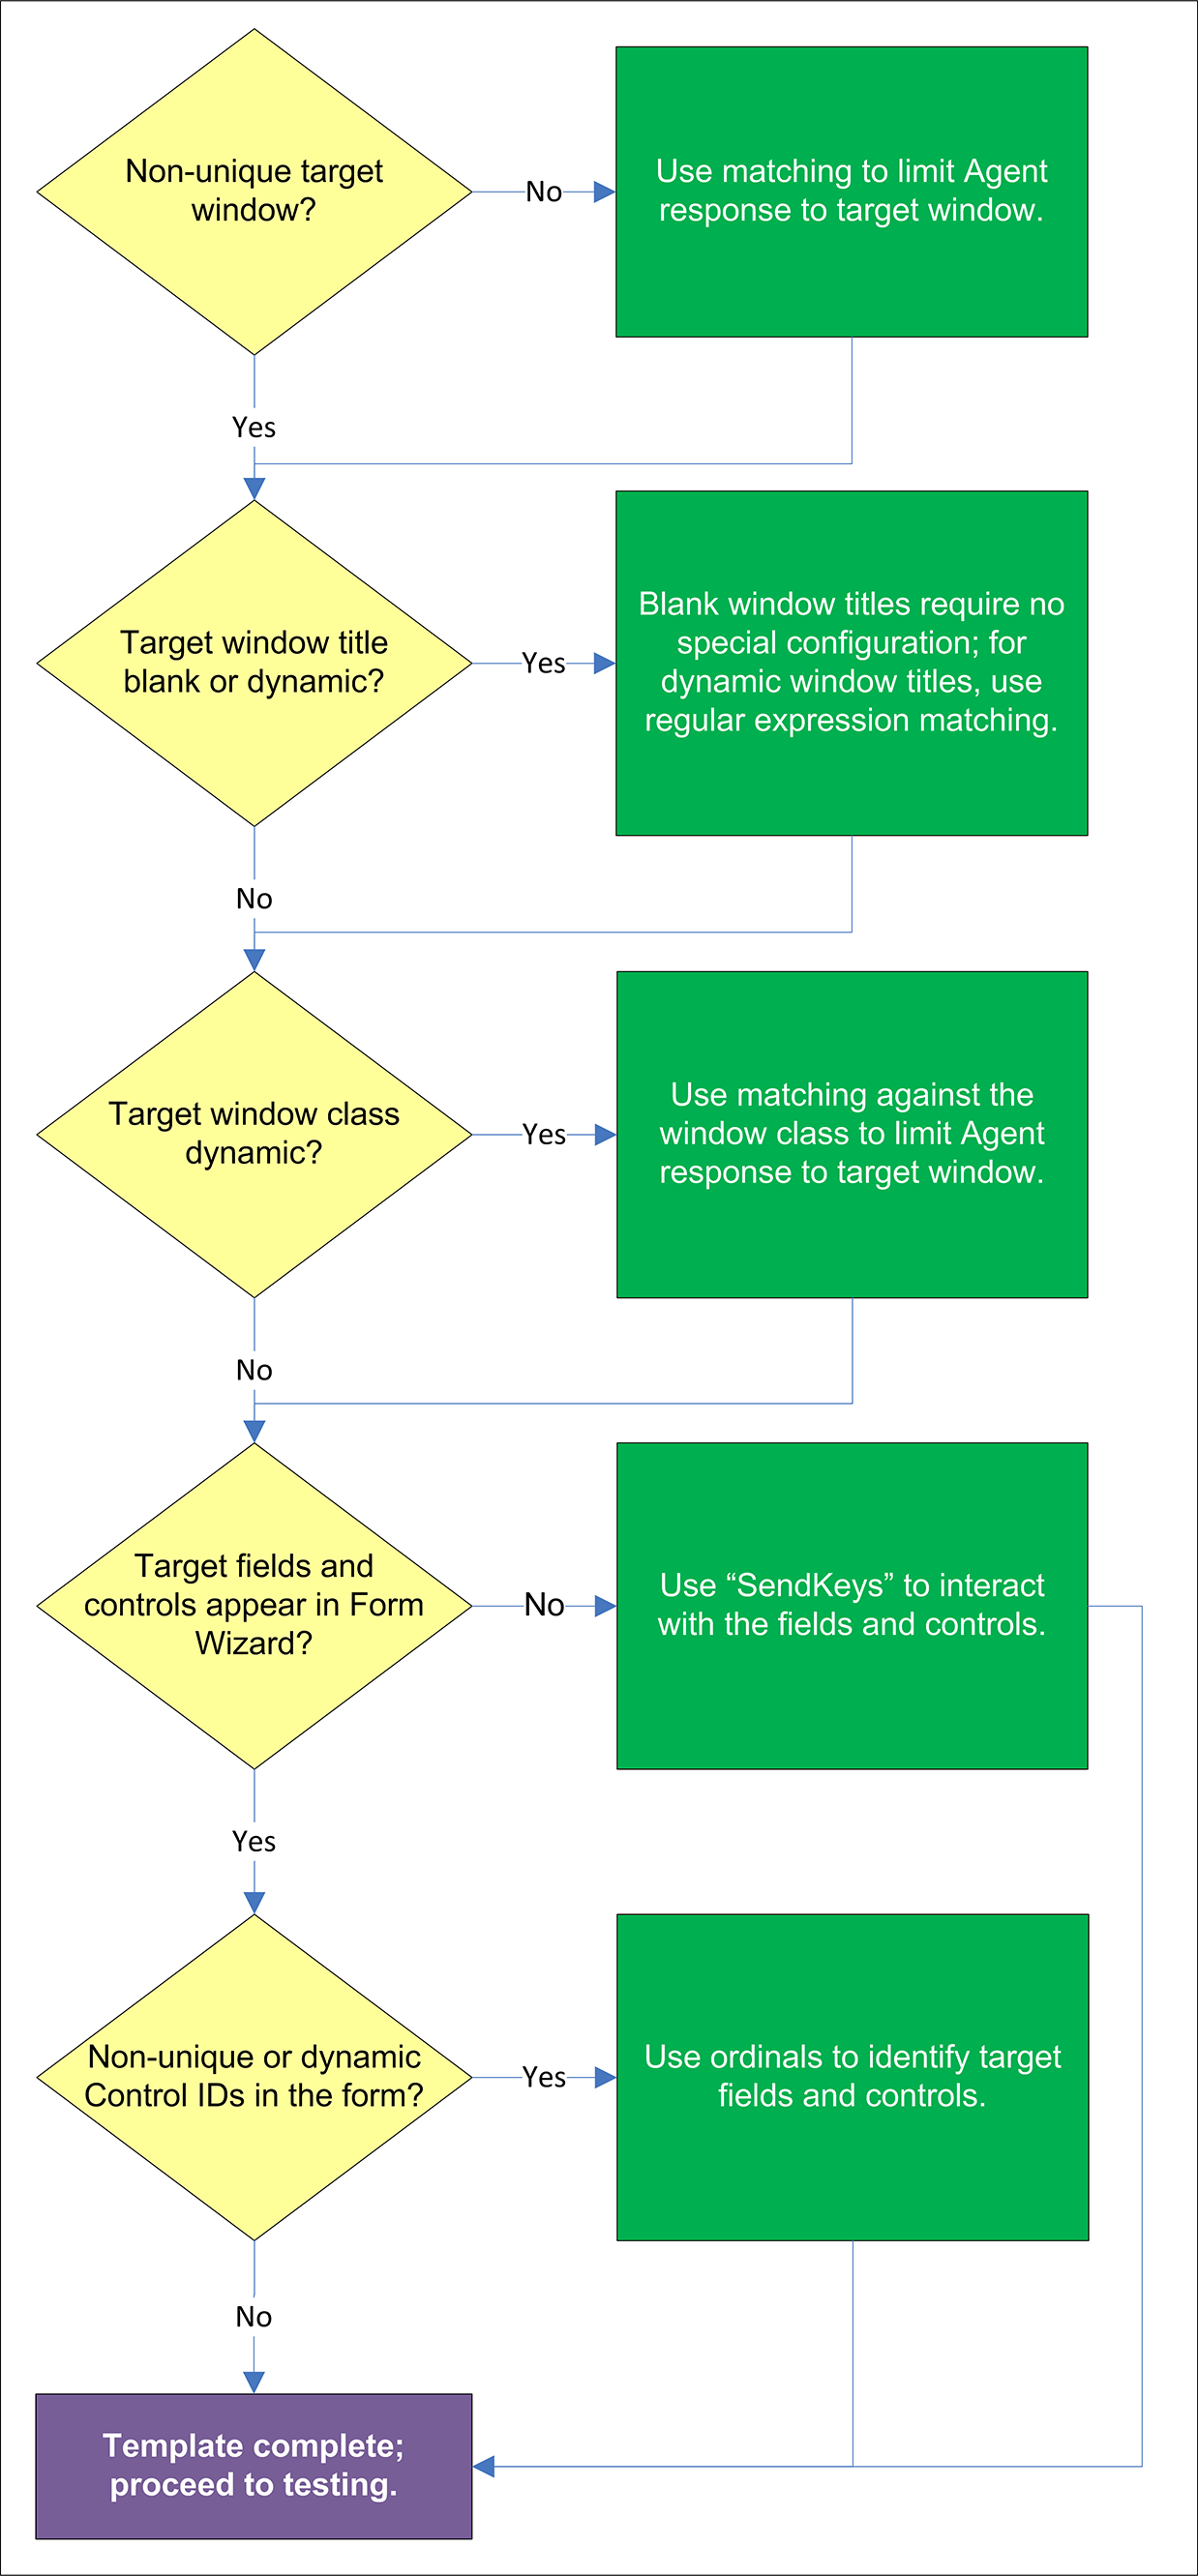
1.4.1.1 Non-unique target window?
If the Agent cannot uniquely distinguish the target window from others, (i.e., another window whose window title, class, and/or module name are identical to those of the target window), the Agent might erroneously respond to such a window in addition to the target window. For more information on the causes of this issue and steps for resolving it, see Troubleshooting Window Detection.
1.4.1.2 Target window title blank or dynamic?
Blank window titles require no special configuration; dynamic text in the window title can be matched using either regular expressions or environment variables. For more information, see Using Matching to Improve Response Accuracy.
1.4.1.3 Target window class dynamic?
If the window class of the target window is partially or fully dynamic, you must use matching to allow the Agent to uniquely identify the target window by its title. For more information, see Using Matching to Improve Response Accuracy.
1.4.1.4 Target fields and controls appear in the Form Wizard?
In most situations, the Form Wizard successfully detects and displays the credential fields and controls present in the target window. If no fields or controls are visible in the Form Wizard, or if the items listed do not correspond to any of the fields or controls in the target window, you may need to use "SendKeys" to interact with that field or control. For more information, see Supported Form Response Methods.
1.4.1.5 Non-unique or dynamic Control IDs in the form?
Once you have identified the credential fields and controls that you wish to enable for sign-on, check that their Control IDs are unique. If you discover duplicates, Logon Manager's response to the application might be unreliable; in such cases, use ordinals to interact with the fields and controls in question. For more information, see Supported Form Response Methods.
1.4.2 Determining the Optimal Configuration for a Password Change Form
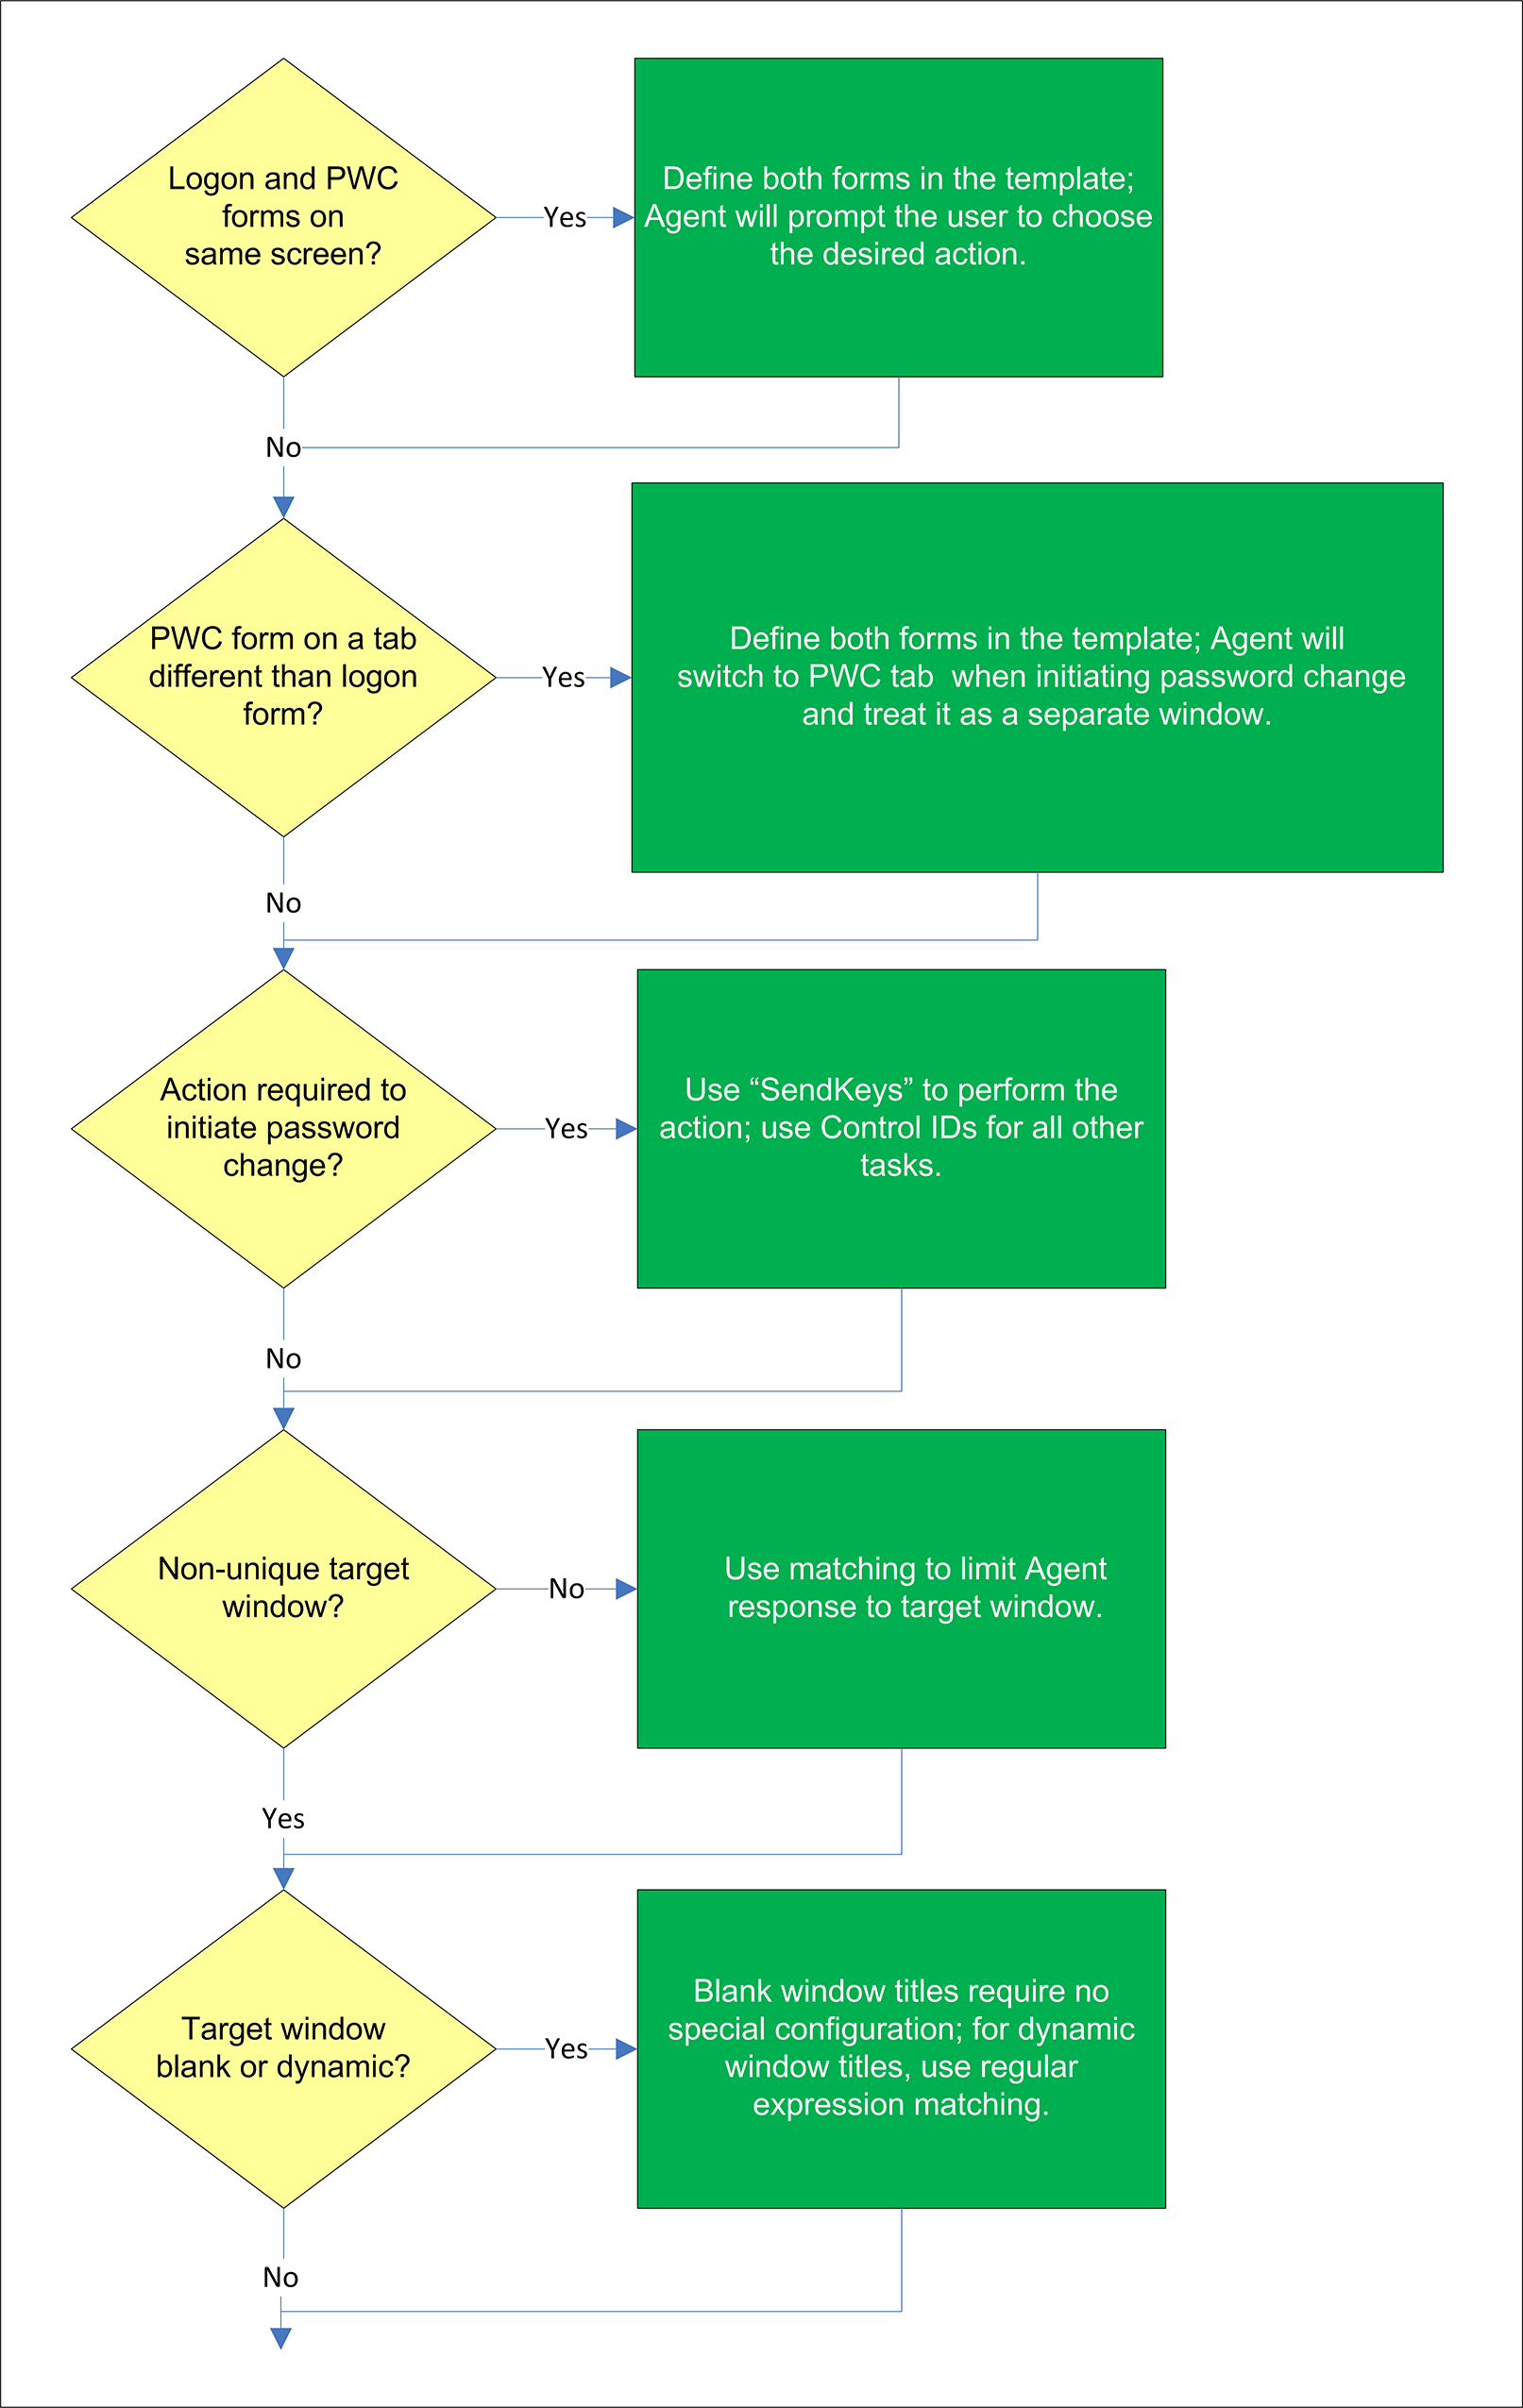
1.4.2.1 Logon and password change forms on the same screen?
Some applications might present password change forms that also contain logon-related fields or controls, such as a user name field or a Change Password button. For example, the logon screen shown below contains a Change button.
This Change button, in turn, invokes the password change screen.
If the Auto Submit feature is enabled and the Agent responds to such application, the user is logged in automatically without being given the option to change the password.
In order to allow the user to select the desired course of action, define the logon and password change forms in the template. The Agent will prompt the user for the desired course of action (logon or password change) when it responds to an application with consolidated logon and password change forms.
Note:
You also have the option to configure a grace period for the "action chooser" feature, during which the Agent will automatically assume that logon is the preferred action and log the user on without prompting to choose the desired action. This option, named Action Chooser Grace Period, is available in the Miscellaneous tab in the application template.1.4.2.2 Password change form on a tab different than logon form?
Define the logon and password change forms in the template. The Agent will automatically switch to the password change tab when password change is initiated, and treat the password change form tab as a separate window.
Note: Only applications that implement tabs in full compliance with the WinAPI specification are supported.
1.4.2.3 Action required to initiate password change?
If the form requires an action to initiate password change, such as selecting a checkbox, and the Agent is unable to perform that action programmatically, you may need to use "SendKeys" to complete the action by sending keystrokes and/or mouse clicks to the application. For more information, see Supported Form Response Methods.
1.4.2.4 Non-unique target window?
If the Agent cannot uniquely distinguish the target window from other, similar windows, (i.e., when another window is instantiated whose window title, class, and module name are identical to those of the target window), the Agent might erroneously respond to such a window in addition to the target window. For more information on the causes of this issue and steps for resolving it, see Troubleshooting Window Detection.
1.4.2.5 Target window title blank or dynamic?
Blank window titles require no special configuration; dynamic text in the window title can be matched using either regular expressions or environment variables. For more information, see Using Matching to Improve Response Accuracy.
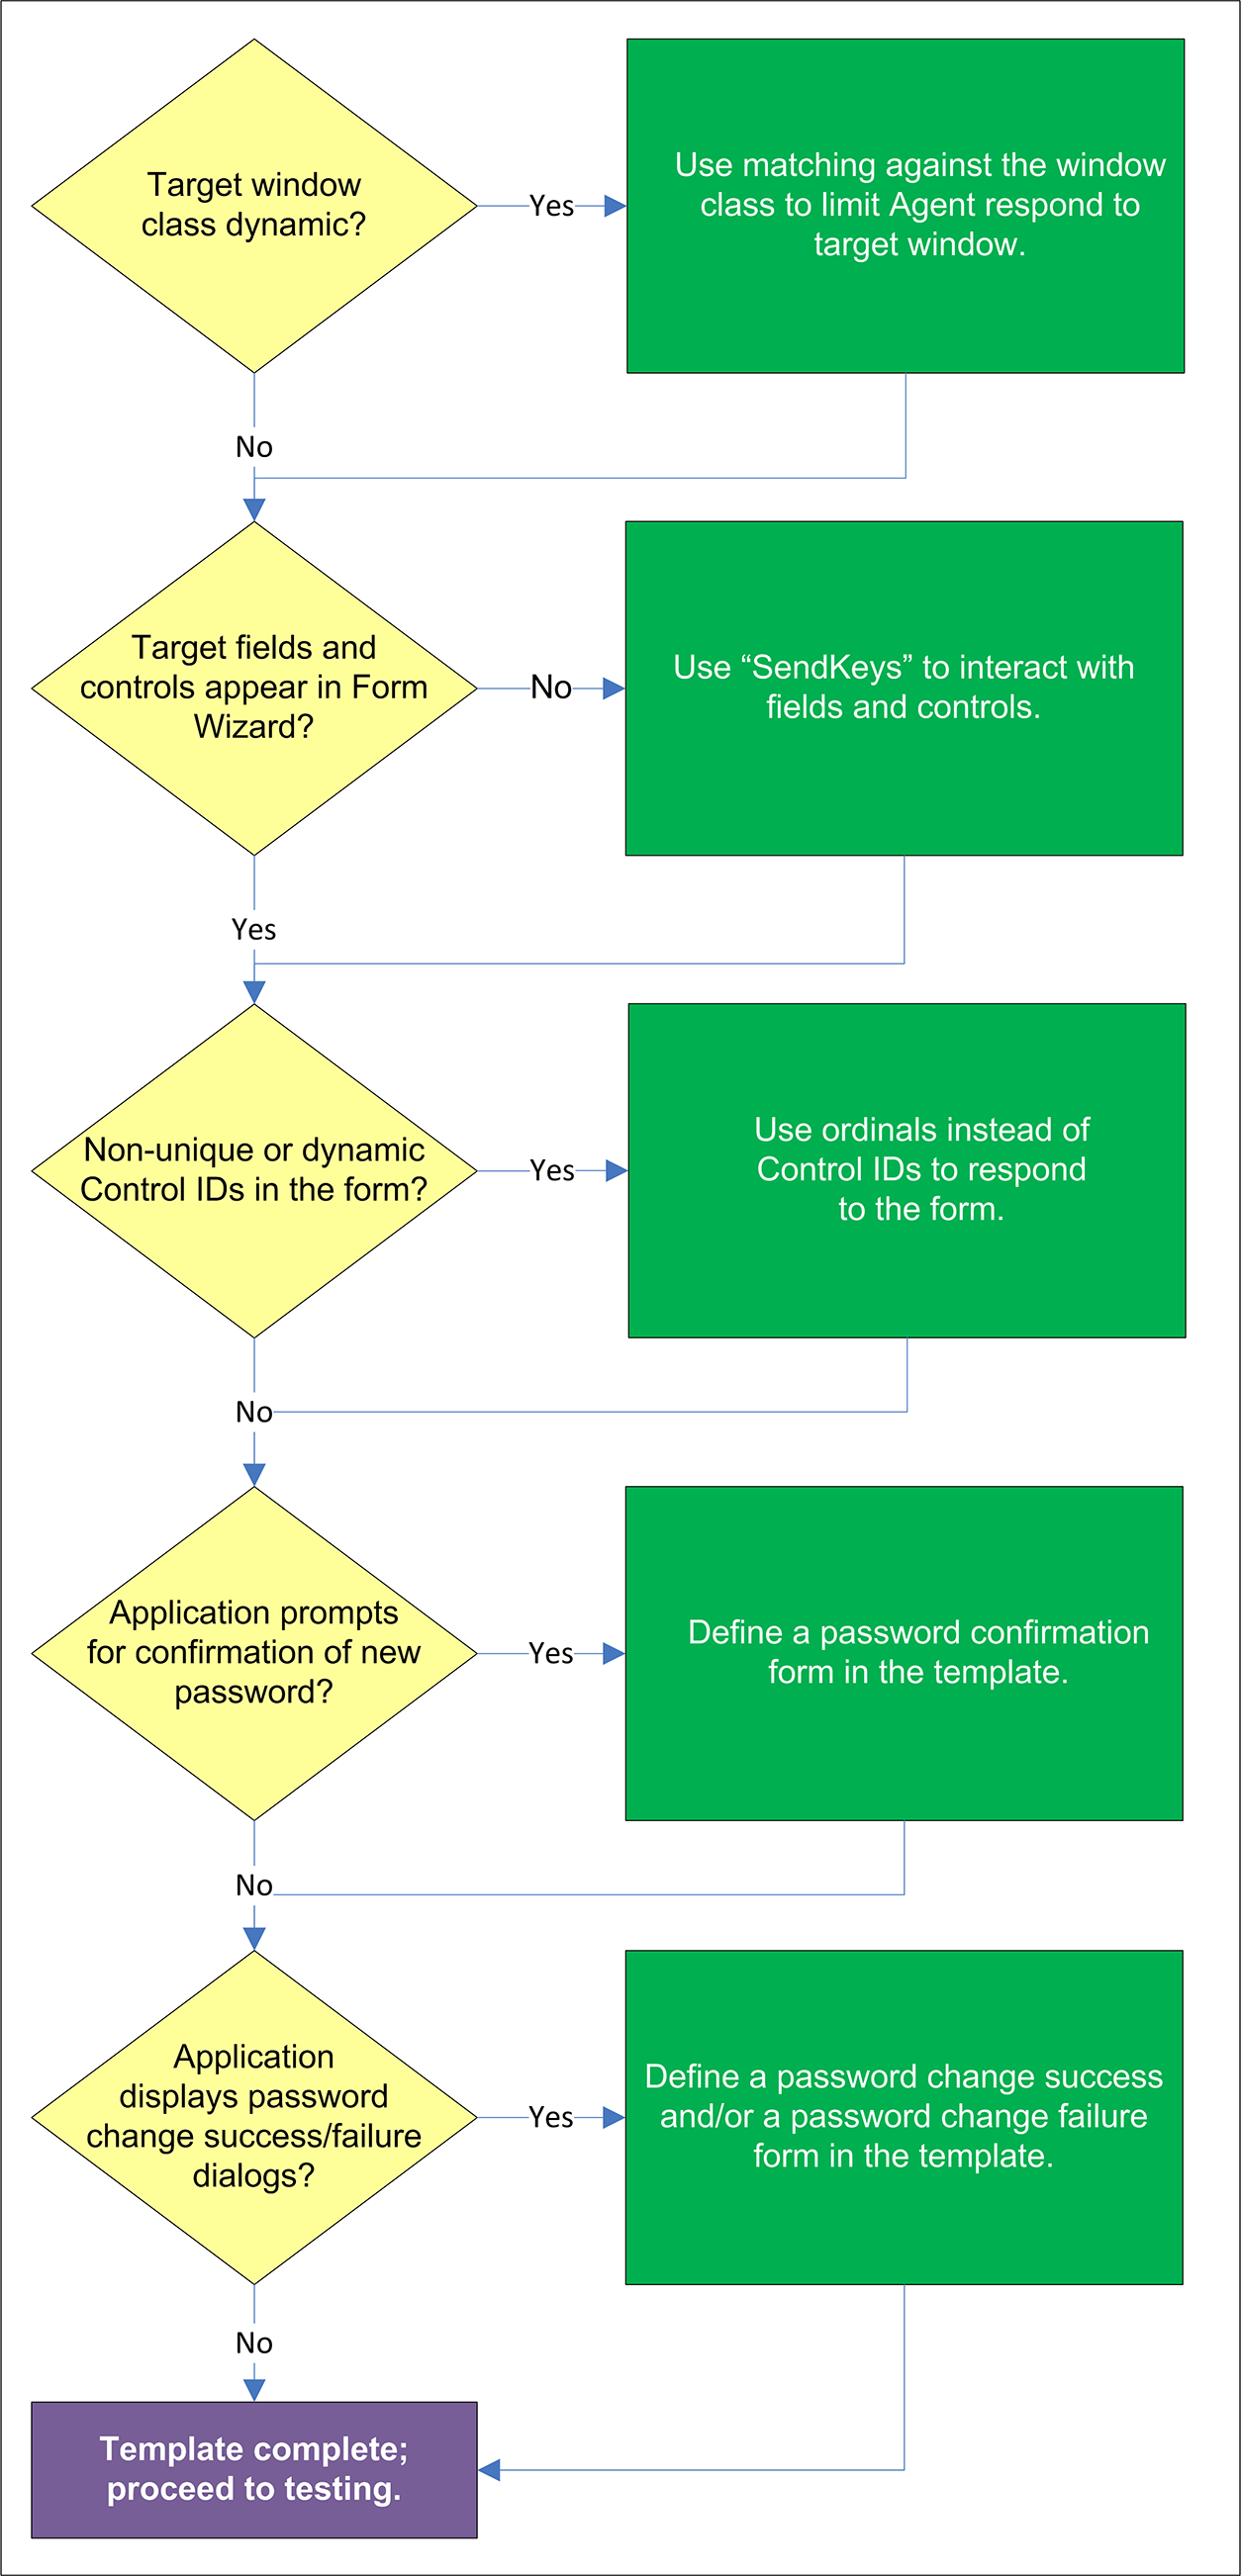
1.4.2.6 Target window class dynamic?
If the window class of the target window is partially or fully dynamic, you must use matching to allow the Agent to uniquely identify the target window by its title. For more information, see Using Matching to Improve Response Accuracy.
1.4.2.7 Target fields and controls appear in the Form Wizard?
In most situations, the Form Wizard successfully detects and displays the credential fields and controls present in the target window. If no fields or controls are visible in the Form Wizard, or if the items listed do not correspond to any of the fields or controls in the target window, you may need to use "SendKeys" to interact with that field or control. For more information, see Supported Form Response Methods.
1.4.2.8 Non-unique or dynamic Control IDs in the form?
Once you have identified the credential fields and controls that you wish to enable for sign-on, check that their Control IDs are unique. If you discover duplicates, Logon Manager's response to the application might be unreliable; in such cases, use ordinals to interact with the fields and controls in question. For more information, see Supported Form Response Methods.
1.4.2.9 Application requires confirmation of new password?
Some applications prompt the user to confirm the new password when performing a password change. If the target application displays such a dialog, configure the password change form, then configure a "Confirm Password" form that will respond to the confirmation dialog. For instructions, see Configuring a Form.
1.4.2.10 Application displays a password change success and/or failure dialogs?
Some application display a message indicating whether password change was a success or a failure. In such cases, define a password change success or a password change failure form in the application template. For instructions, see Configuring a Form.
1.5 Configuring a Form
The procedures in this section use concepts and terminology explained earlier in this guide. When performing the procedures in this section, refer to Determining the Optimal Configuration for a Formto make configuration decisions that best suit the target application. Before completing the steps in this section, make sure Logon Manager is running.
1.5.1 Configuring a Form Using Control IDs
To configure a Windows application form that will use the Control IDs response method, do the following:
-
Open the Logon Manager Administrative Console. By default, the shortcut is located at Start > Programs > Oracle > ESSO Administrative Console.
-
In the left-hand tree, select the Applications node and do one of the following:
-
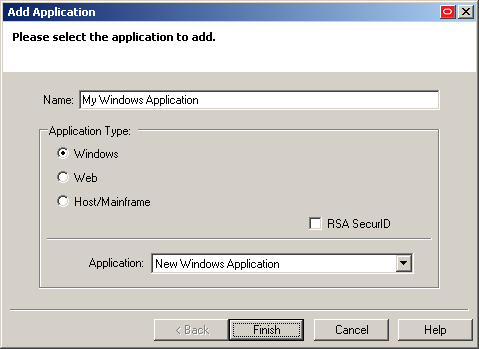
If you want to create a new template and define the logon form, click Add in the right-hand pane; in the Add Application dialog, enter a descriptive name for the template and click Finish. The new template appears in the list of stored templates.
Caution:
If two or more application templates are named such that the name of one of the templates occurs in the beginning of the name of another template, the Agent will erroneously use the template with the shortest name to respond to all of the affected applications. To avoid this behavior, ensure that your template names do not begin with the same string of text. -
If you want to add a logon form definition to an existing template, expand the Applications node and select the desired template (the template appears in the right-hand pane) and click Add at the bottom of the pane.
-
-
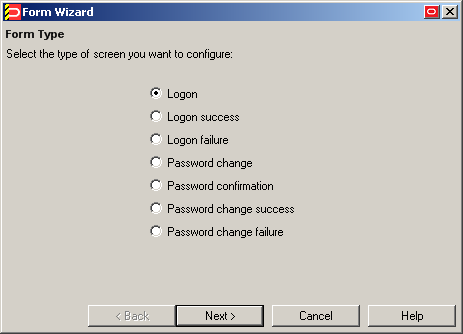
In the Form Wizard that appears, configure the fields and controls that you want the Agent to interact with when responding to the target form. In the "Form Type"screen, select the desired form type and click Next.
-
In the "Target Computer" screen, choose one of the following:
-
Local Computer - for a target application running on the local machine.
-
Remote Computer - for a target application running on a different machine on which Logon Manager has been installed. You must manually enable remote configuration in Logon Manager on the remote machine in order to use this option; see the Oracle Enterprise Single Sign-On Logon Manager Administrator's Guide for instructions.
-
-
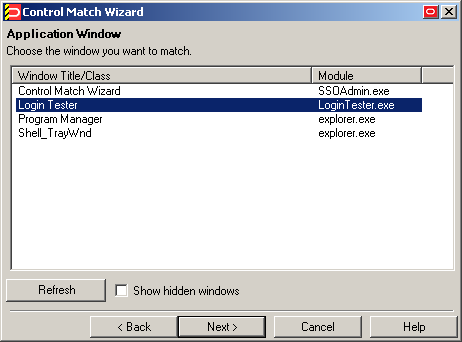
In the "Application Window" screen, select the appropriate application type from the Application type drop-down menu, then select the window that contains the target form. A thick red border appears around the chosen window to indicate your selection.
Note:
If you see two or more windows that share the same value for any of the parameters, the Agent might erroneously respond to all of those windows, instead of only the target window. For more information on this issue, see Troubleshooting Window Detection. -
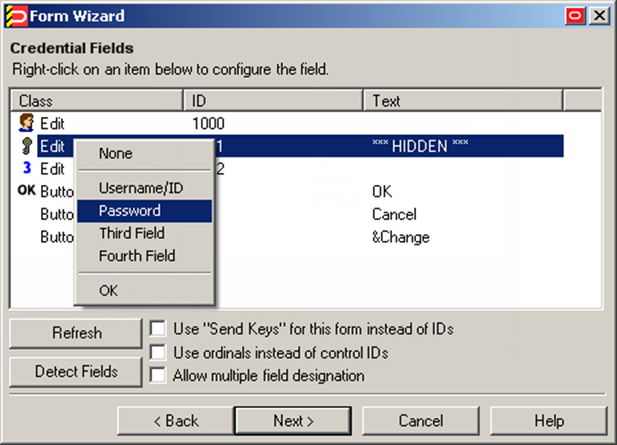
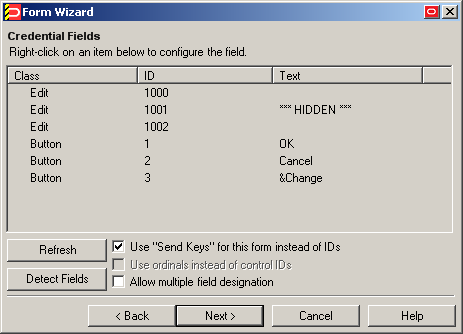
In the "Credential Fields" screen, select and configure the target fields and controls from among the objects in the list as follows:
-
(Optional) If your form requires the injection of the same data into multiple fields (e.g., injecting the password into a Password and a Confirm Password field), enable the Allow multiple field designation option.
-
Right-click each desired field or control and select its function from the context menu.
Caution:
While the Detect Fields feature is accurate the majority of the time, Oracle recommends always configuring fields and controls manually for guaranteed accuracy. -
If the application requires that Logon Manager interacts with its fields and controls using the "SendKeys" method, which emulates user input such as keystrokes and mouse clicks, select Use "SendKeys" for this form instead of IDs. To determine whether your application requires this option, see Understanding Form Response.)
-
If the application requires that Logon Manager addresses its fields and controls via ordinals rather than Control IDs, select Use ordinals instead of control IDs. (To determine whether your application requires this option, see Understanding Form Response.)
-
-
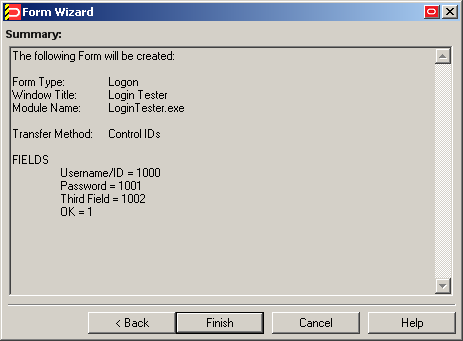
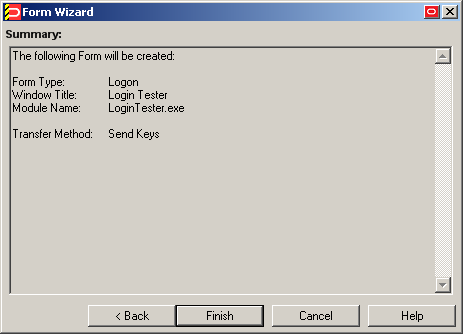
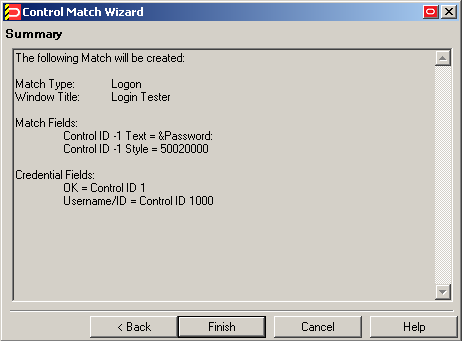
In the "Summary" screen, review your configuration choices. If you want to change any of the options you selected, click Back, otherwise, click Finish.
-
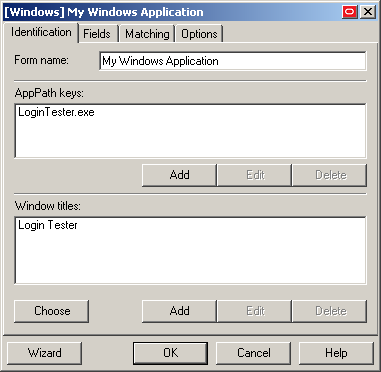
In the template properties dialog that appears, click OK to save the new form definition.
Note:
If you want to configure additional options for the template and you are familiar with their locations and functionalities, you may do so now, if you desire. Configuration procedures for options present in this dialog are included later in this guide. -
Publish your changes to the repository as described in Publishing a Template to the Repository, if applicable.
1.5.2 Configuring a Form Using "SendKeys"
To configure a Windows application form that will use the SendKeys response method, do the following:
-
Open the Logon Manager Administrative Console. By default, the shortcut is located at Start > Programs > Oracle > ESSO Administrative Console.
-
In the left-hand tree, select the Applications node and do one of the following:
-
If you want to create a new template and define the logon form, click Add in the right-hand pane; in the New Application dialog, enter a descriptive name for the template and click Finish. The new template appears in the list of stored templates.
Caution:
If two or more application templates are named such that the name of one of the templates occurs in the beginning of the name of another template, the Agent will erroneously use the template with the shortest name to respond to all of the affected applications. To avoid this behavior, ensure that your template names do not begin with the same string of text. -
If you want to add a logon form definition to an existing template, expand the Applications node and select the desired template (the template appears in the right-hand pane), then click Add at the bottom of the pane.
-
-
In the Form Wizard that appears, configure the fields and controls that you want the Agent to interact with when responding to the target form. In the "Form Type"screen, select the desired form type and click Next.
-
In the "Target Computer" screen, choose one of the following:
-
Local Computer - for a target application running on the local machine.
-
Remote Computer - for a target application running on a different machine on which Logon Manager has been installed. You must manually enable remote configuration in Logon Manager on the remote machine in order to use this option; see the Oracle Enterprise Single Sign-On Logon Manager Administrator's Guide for instructions.
-
-
In the "Application Window" screen, select the appropriate application type from the Application type drop-down menu, then select the window that contains the target form. A thick red border appears around the chosen window to indicate your selection.
Note:
If you see two or more windows that share the same value for any of the parameters, the Agent might erroneously respond to all of those windows, instead of only the target window. For more information on this issue, see Troubleshooting Window Detection. -
In the "Credential Fields" screen, select the Use "Send Keys" for this form instead of IDs check box and click Next.
-
In the "Summary" screen, review your configuration choices. If you want to change any of the options you selected, click Back, otherwise, click Finish.
-
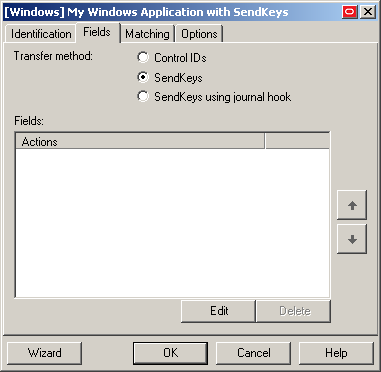
In the template properties dialog that appears, select the Fields tab.
-
Click Edit to display the SendKeys editor dialog.
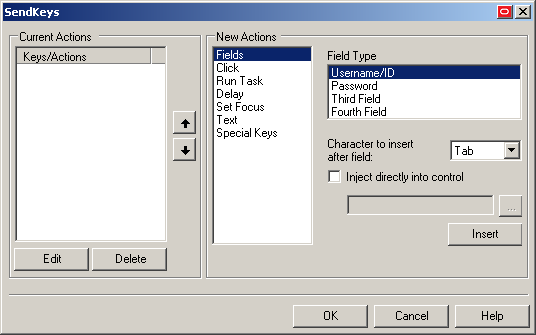
-
Configure your SendKeys actions as desired. For detailed descriptions of each option, see the Console help.
Note:
To configure an action as programmatic (i.e., using the Control IDs response method) while the form is in "SendKeys" mode, enable the Inject directly into control option for the action. -
When you have finished, click OK to save your changes and dismiss the SendKeys editor dialog.
Note:
If you want to configure additional options for the template and you are familiar with their locations and functionalities, you may do so now, if you desire. Configuration procedures for options present in this dialog are included later in this guide. -
Click OK in the form properties dialog to save your form configuration.
-
Publish your changes to the repository as described in Publishing a Template to the Repository, if applicable.
1.5.4 Using Matching to Improve Response Accuracy
Matching is a mechanism that allows Logon Manager to uniquely distinguish a window and the form it contains from other windows and forms that may be encountered in a session. The term "matching" refers to the comparison of the values of certain parameters, such as window title or a field label, to the value stored in a template.
For example, an application might instantiate dialog boxes that serve different purposes, such as informative messages, wizards, and logon forms, but share the same window title and class; in such a case, you would configure matching against unique elements within the form to limit Agent response to that specific form.
Logon Manager allows you to match against the values of the following criteria:
-
Window title, including blank and partially or fully dynamic values
-
Window class, including constriction to specific values
-
Executable name (also referred to as a module name)
-
A field, control, or a text string
1.5.4.1 Matching for a Blank or Dynamic Value
You can use regular expressions supported by the Microsoft .NET Framework to formulate the text pattern that the Agent should recognize as a match for a criterion. Wildcards, such as ? (single character) and * (any combination of characters, excluding space), are the most commonly used regular expressions.
For example:
-
Je???e will match both Jeanne and Jessie. It will not, however, match Jeanine, because neither the length of the string nor character order match.
-
Je*e will match against all words that begin with Je and end with e; all three examples above are matches in this case.
-
Afx:400000:0:10011:0:* will match against all window classes whose last six digits are variable. Afx:400000:0:10011:0:130927 would be a match in this case.
If the target criterion, (for example, a window title) contains one or more system variables, such as the currently logged in user name, you can use the variable name as part of the matching text pattern. For example, the following pattern will result in a match against a window title that begins with Password Expired - and includes the currently logged on user's name in uppercase:
Password Expired - %UC%%DOMAINUSER%
To match against:
-
A partially or fully dynamic value, use regular expressions, environment variables, and static text, as appropriate, to create a text string that will cause a successful match against the target parameter value.
-
Against a blank value, specify the null regular expression ^$ as the value.
Note:
Blank window titles are supported automatically; they do not require any special configuration.
Before completing the procedures in this section, do the following:
-
Launch the Logon Manager Administrative Console.
-
In the tree in the left-hand pane, expand the Applications node and select the desired template.
-
In the right-hand pane, select the General tab.
-
Click Edit to bring up the form properties dialog.
-
Continue to the desired procedure:
1.5.4.2 Matching Against a Window Title
To match against one or more static or dynamic window titles, do the following:
-
In the template properties dialog, select the Identification tab.
-
In the "Window Titles" section, do one of the following:
-
To add a new matching rule, click Add.
-
To modify an existing matching rule, select the rule in the list and click Edit.
-
-
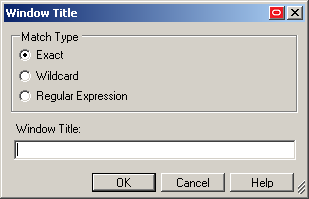
In the "Window Title" dialog, select the desired matching type:
-
Exact matches the string strictly as entered. Use with static window titles.
-
Wildcard allows matching using a combination of text and a wildcard. Use with blank or dynamic window titles.
-
Regular expression allows matching using a combination of text and regular expressions. Use with dynamic window titles.
For more information, see Matching for a Blank or Dynamic Value.
-
-
Enter the desired text string against which the Agent will perform the match.
-
Click OK to add the new matching rule.
-
Click OK to close the properties dialog.
1.5.4.3 Matching Against a Window Class
To match against one or more static or dynamic window classes, do the following:
-
In the form properties dialog, select the Matching tab.

-
Specify the allowable window classes as follows:
-
If you don't know the exact value(s) of the class(es) you want to specify, click Choose in the Allowable Class field, select the target window in the dialog that appears, and click OK. The class of the selected window populates the Allowable Class field.
-
If you know the exact value(s) of the class(es) you want the Agent to recognize, enter them as a comma-delimited list into the Allowable Class field. If you want to match against one or more dynamic window classes, select the Regular Expression check box and include the desired regular expressions in the list.
-
-
Specify the window classes you want the Agent to ignore (i.e., never respond to) as follows:
-
If you don't know the exact value(s) of the class(es) you want to specify, click Choose in the Ignore this window class field, select the target window in the dialog that appears, and click OK. The class of the selected window populates the Ignore this Window Class field.
If you know the exact value(s) of the class(es) you want the Agent to recognize, enter them as a comma-delimited list into the Ignore this Window Class field. If you want to match against one or more dynamic window classes, select the Regular Expression check box and include the desired regular expressions in the list.
-
-
Click OK to close the properties dialog.
1.5.4.4 Matching Against an Executable Name
To match against a specific executable name, do the following:
Note:
Matching against executable names supports exact matching only. Wildcards or regular expressions are not supported.-
In the form properties dialog, select the Identification tab.
-
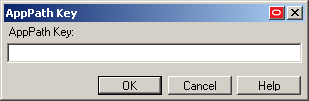
In the "AppPath Keys" section, do one of the following:
-
To add a new matching rule, click Add.
-
To modify an existing matching rule, select the rule in the list and click Edit.
-
-
In the "AppPath Key" dialog, enter the desired value and click OK.
-
Click OK to close the template properties dialog.
1.5.4.5 Matching Against a Field, Control, or Text String
Use the Matching tab to map user credentials of the currently selected logon to other logon, password-change or password-confirmation forms (referred to here as target forms) within the same application. The Agent uses the match criteria you supply to distinguish among similar forms that use the same credential data. This lets the Agent apply a single set of user credentials appropriately to these multiple forms. You can use also use matching to identify forms that the Agent should ignore.
To match for a specific field or control, do the following:
-
In the template properties dialog, select the Matching tab.
-
In the "Matches" section, do one of the following:
-
To add a new matching rule, click Add.
-
To modify an existing matching rule, select the rule in the list and click Edit.
-
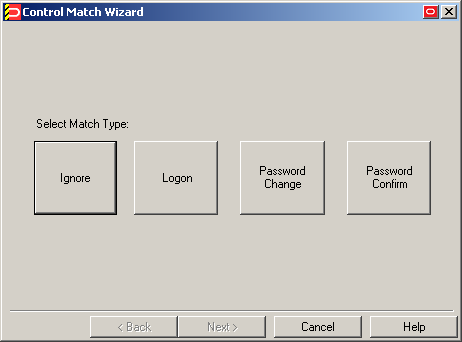
-
In the Control Match Wizard that appears, select the desired matching type.
-
In the "Application Window" screen, select the target window.
-
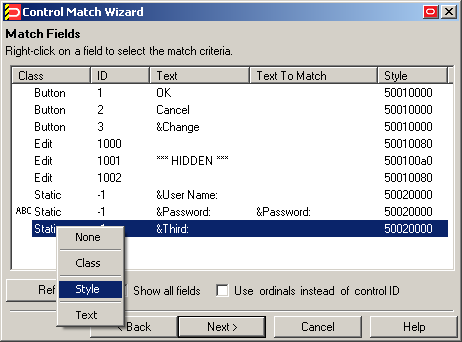
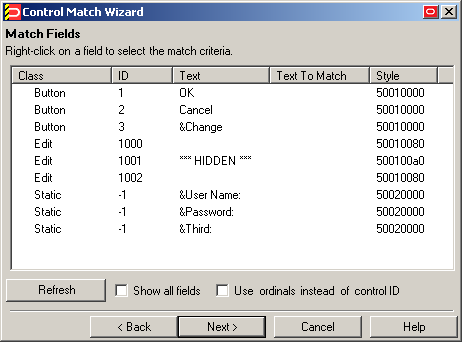
In the "Match Fields" screen that appears, configure the desired match rules. For each field, control, or text string that you want to match against, select the desired item in the list and right-click it, then select the desired match criterion from the context menu:
-
Class: instructs the Agent to match against the numeric class value of this item.
-
Style: instructs the Agent to match against the numeric style value of this item.
-
Text: instructs the Agent to match against the text presented by this item. When prompted, enter the desired match string into the dialog box that appears and click OK.
When you have made your selections, click Next.
-
-
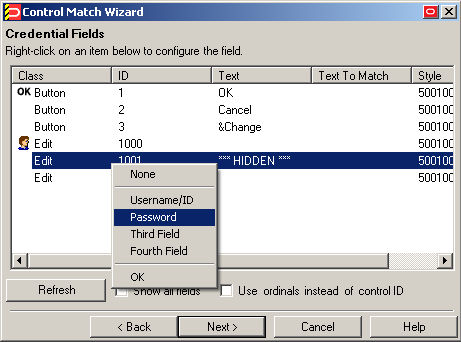
In the "Credential Fields" screen, select and configure the credential fields and controls that the Agent will use to complete the logon upon a successful match:
-
Right-click each desired field or control and select its function from the context menu.
Note:
If a "submit" button (usually labeled OK, Logon, etc.) is not visible in the list, Logon Manager will still send a "submit" action to the application after injecting credentials. -
If the application requires that Logon Manager interacts with its fields and controls using the "SendKeys" method, which emulates user input such as keystrokes and mouse clicks, select Use "SendKeys" for this form instead of IDs. (To determine whether your application requires this option, see Understanding Form Response.)
-
If the application requires that Logon Manager addresses its fields and controls via ordinals rather than Control IDs, select Use ordinals instead of control IDs. (To determine whether your application requires this option, see Understanding Form Response.)
-
Click Next.
-
-
In the "Summary" screen, review your configuration choices. If you want to change any of the options you selected, click Back; otherwise, click Finish.
1.5.5 Configuring an Application as a Service Logon
If an application window changes its contents after it has been initially detected by Logon Manager, you must configure it as a service logon.
Note:
Enabling this option will cause Logon Manager to actively poll the application's window for updates, consuming additional CPU time (compounding with each additional window being polled), and should only be used if all other detection options have been exhausted.To configure the application as a service logon, do the following:
-
Open the desired template.
-
Select the Miscellaneous tab and check the Service Logon check box.
-
Obtain the application's window class:
-
Select the General tab,
-
In the list of form definitions, select the logon form and click Edit.
-
In the form properties dialog, select the Matching tab and note down the value present in the Allowable Class field - this is the window class detected in the application by Logon Manager.
-
-
Save your changes and push the updated template to the repository, if applicable.
-
Add the application's window class to the list of window classes the Agent will recognize as system services:
-
Load your global Agent settings set.
-
In the left-hand tree, navigate to Global Agent Settings > End-User Experience > Application Response > Windows Application.
-
Select the check box next to the Supported Window Classes for Services option, if it is not already selected.
-
In the field next to the above option, add the window class you noted down in step 3c to the list of existing classes, separated by a semicolon.
-
-
Save your changes and push the updated Supported Window Classes for Services setting to the repository as part of your administrative overrides.
1.5.6 Disabling Automatic "SendKeys" Fallback
If Logon Manager is unable to respond to an application programmatically (i.e., using the "Control IDs" method), by default it will automatically fall back to the "SendKeys" response method and retry injection. In certain scenarios, this automatic fallback behavior might be undesirable - for example, Logon Manager might inadvertently inject credentials into the wrong window or application, exposing the credentials to the end-user. To disable this automatic fallback behavior, do one of the following:
-
To disable automatic "SendKeys" fallback for a specific form definition, disable the Fall back to SendKeys if direct injection fails option in the Options tab in that form's properties dialog.
-
To disable automatic "SendKeys" fallback globally, set the Allow fallback from control IDs to SendKeys option under Global Agent Settings > <Target Settings Set> > User Experience > Application Response to No and publish your changes to the repository.
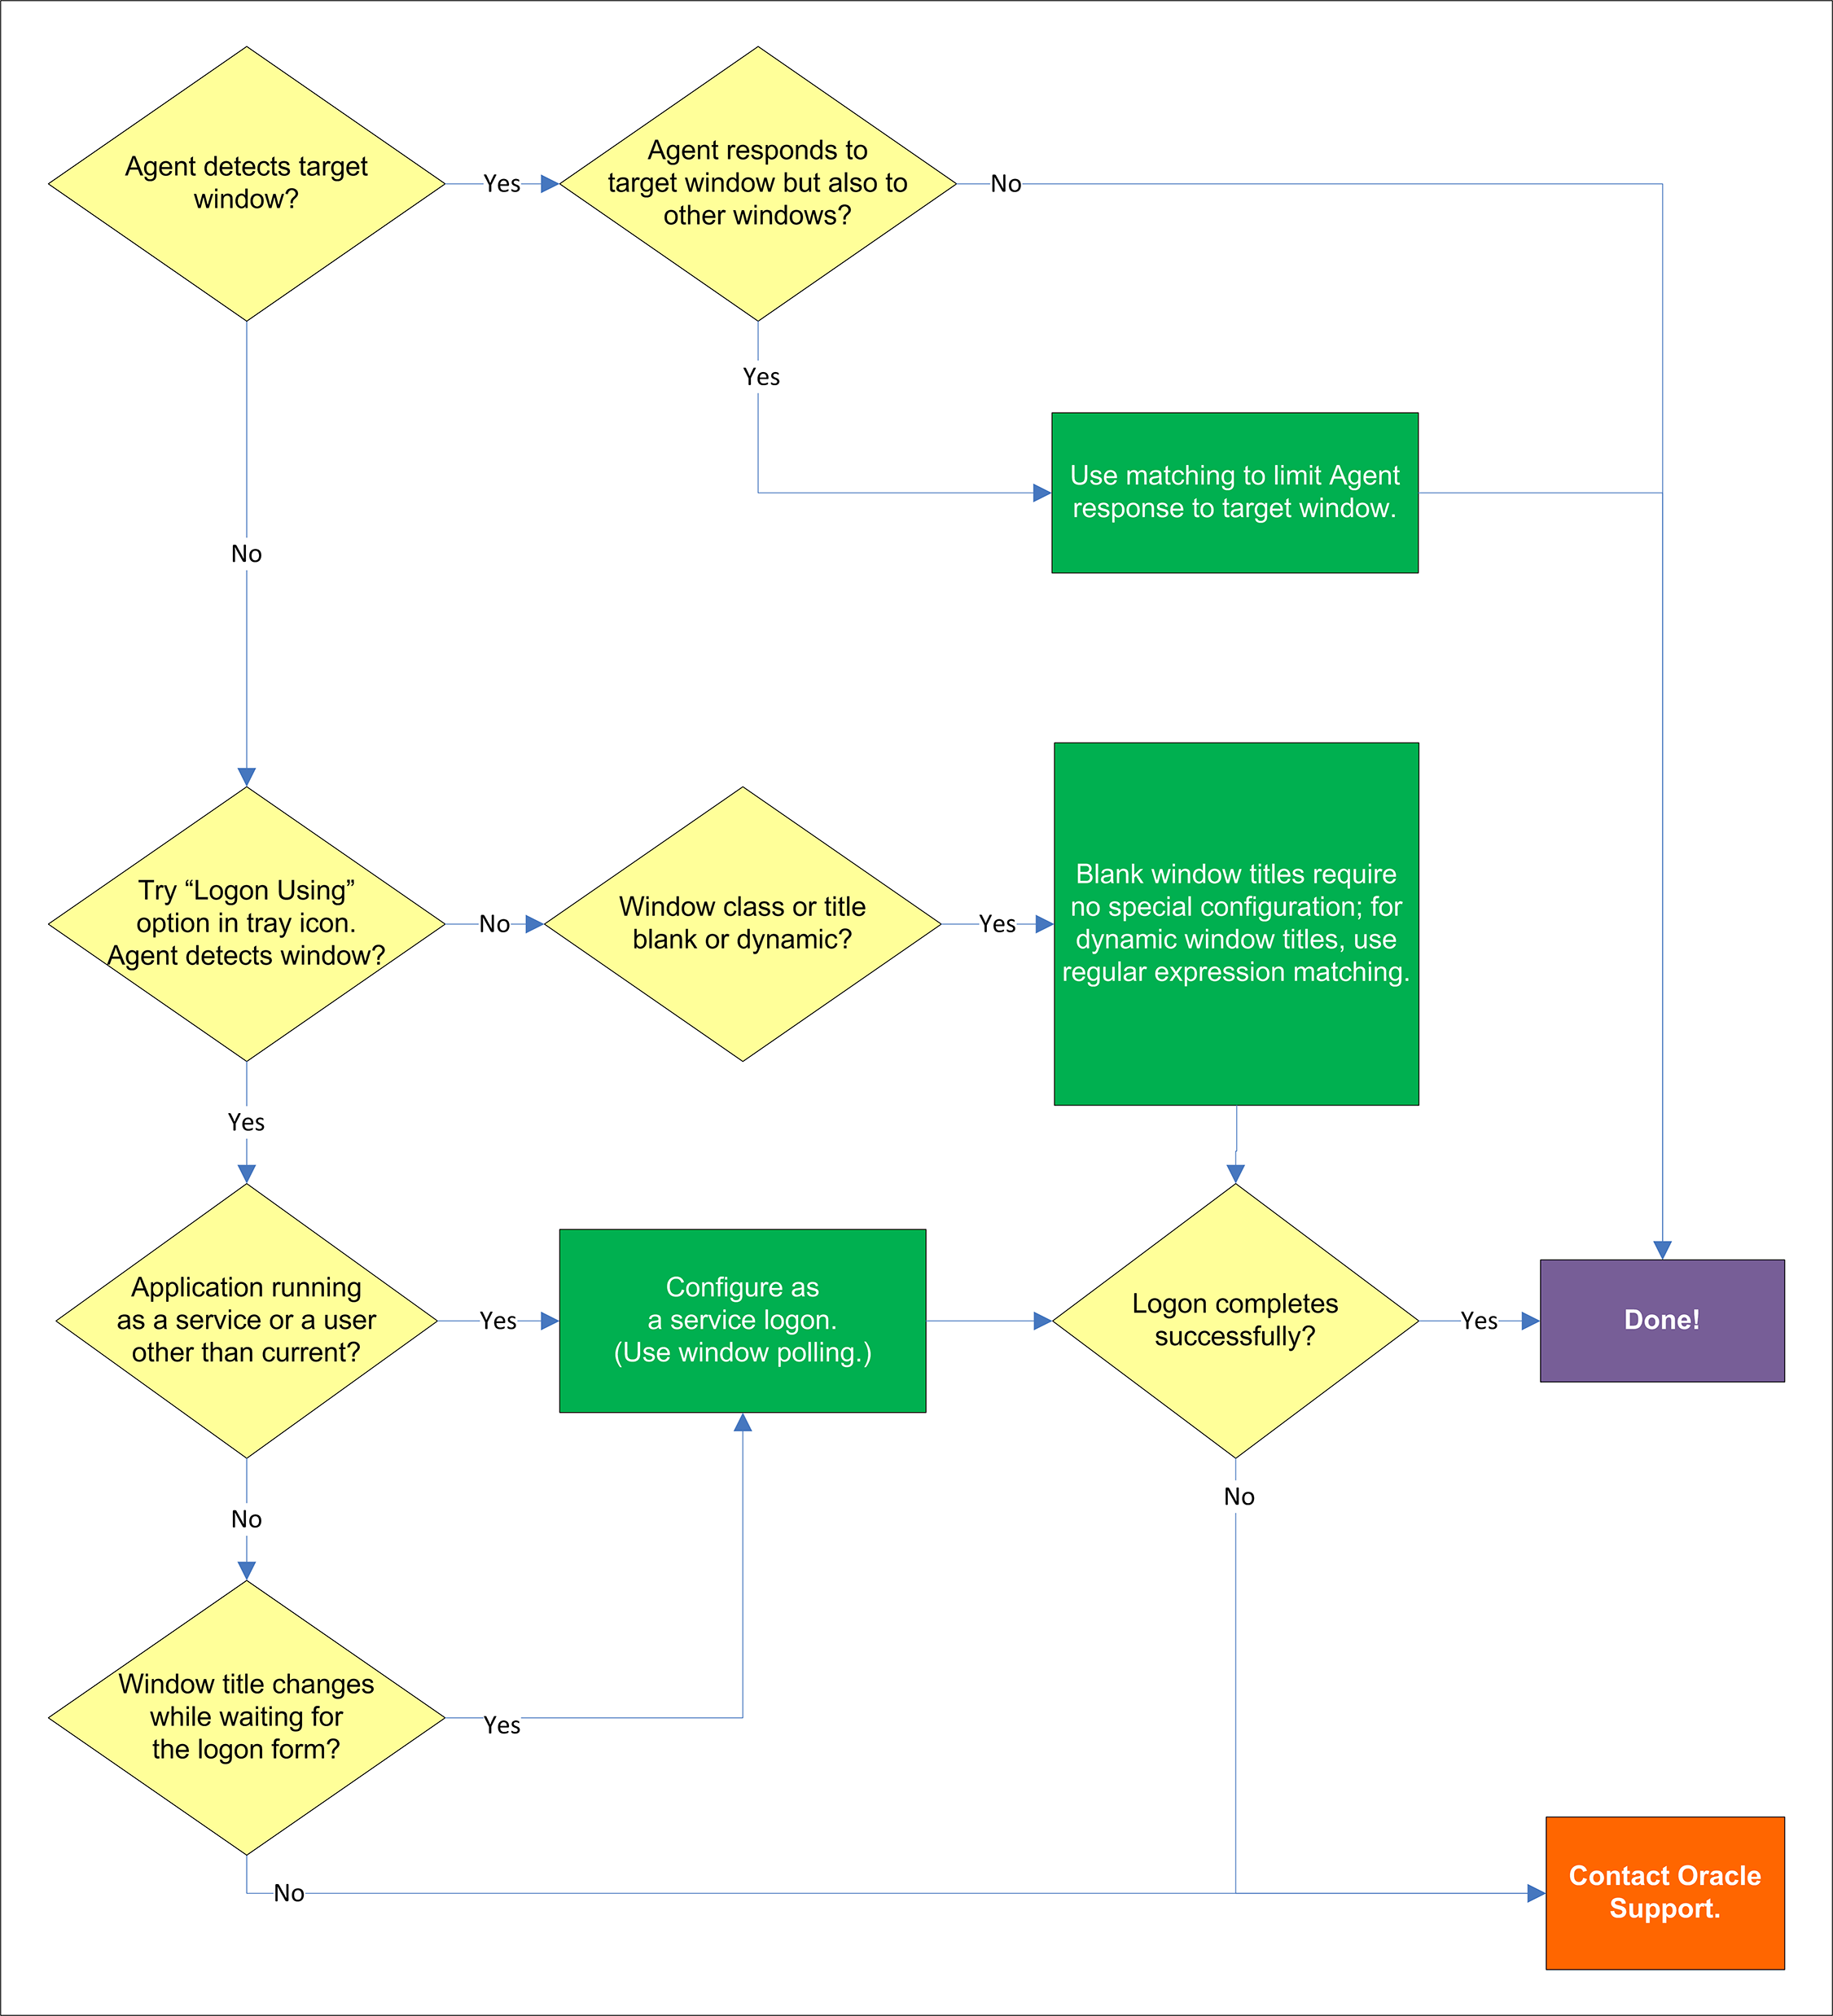
1.6 Testing the Configuration of a Form
Once you have created and configured a form, complete the following steps to test it before publishing:
-
In the left-hand tree, expand the Applications node and navigate to the target template.
-
Right-click the target template and select Test from the context menu.
-
In the "Logon Manager Template Test Manager" window that appears, do the following:
-
In the Forms pane, select the target form.
-
Follow the instructions displayed in the Interactions pane.
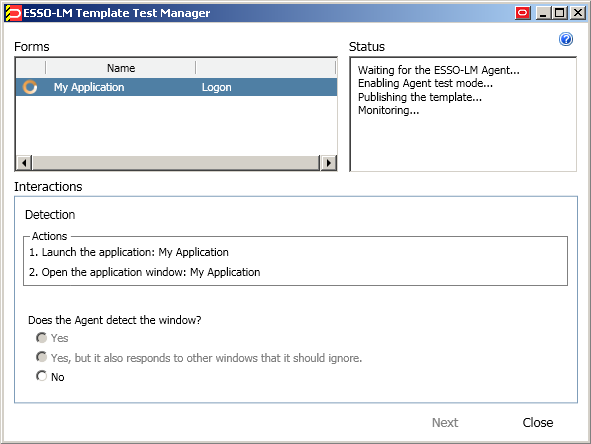
-
If the Agent responds to the application as desired and the test has completed successfully, click Finish; If the Agent is not responding to the application as desired, click Close and follow the troubleshooting flowcharts in this section to determine and correct the problem, then repeat steps 1-3 to test the corrected configuration.
-
1.6.1 Testing the Configuration of a Logon Form
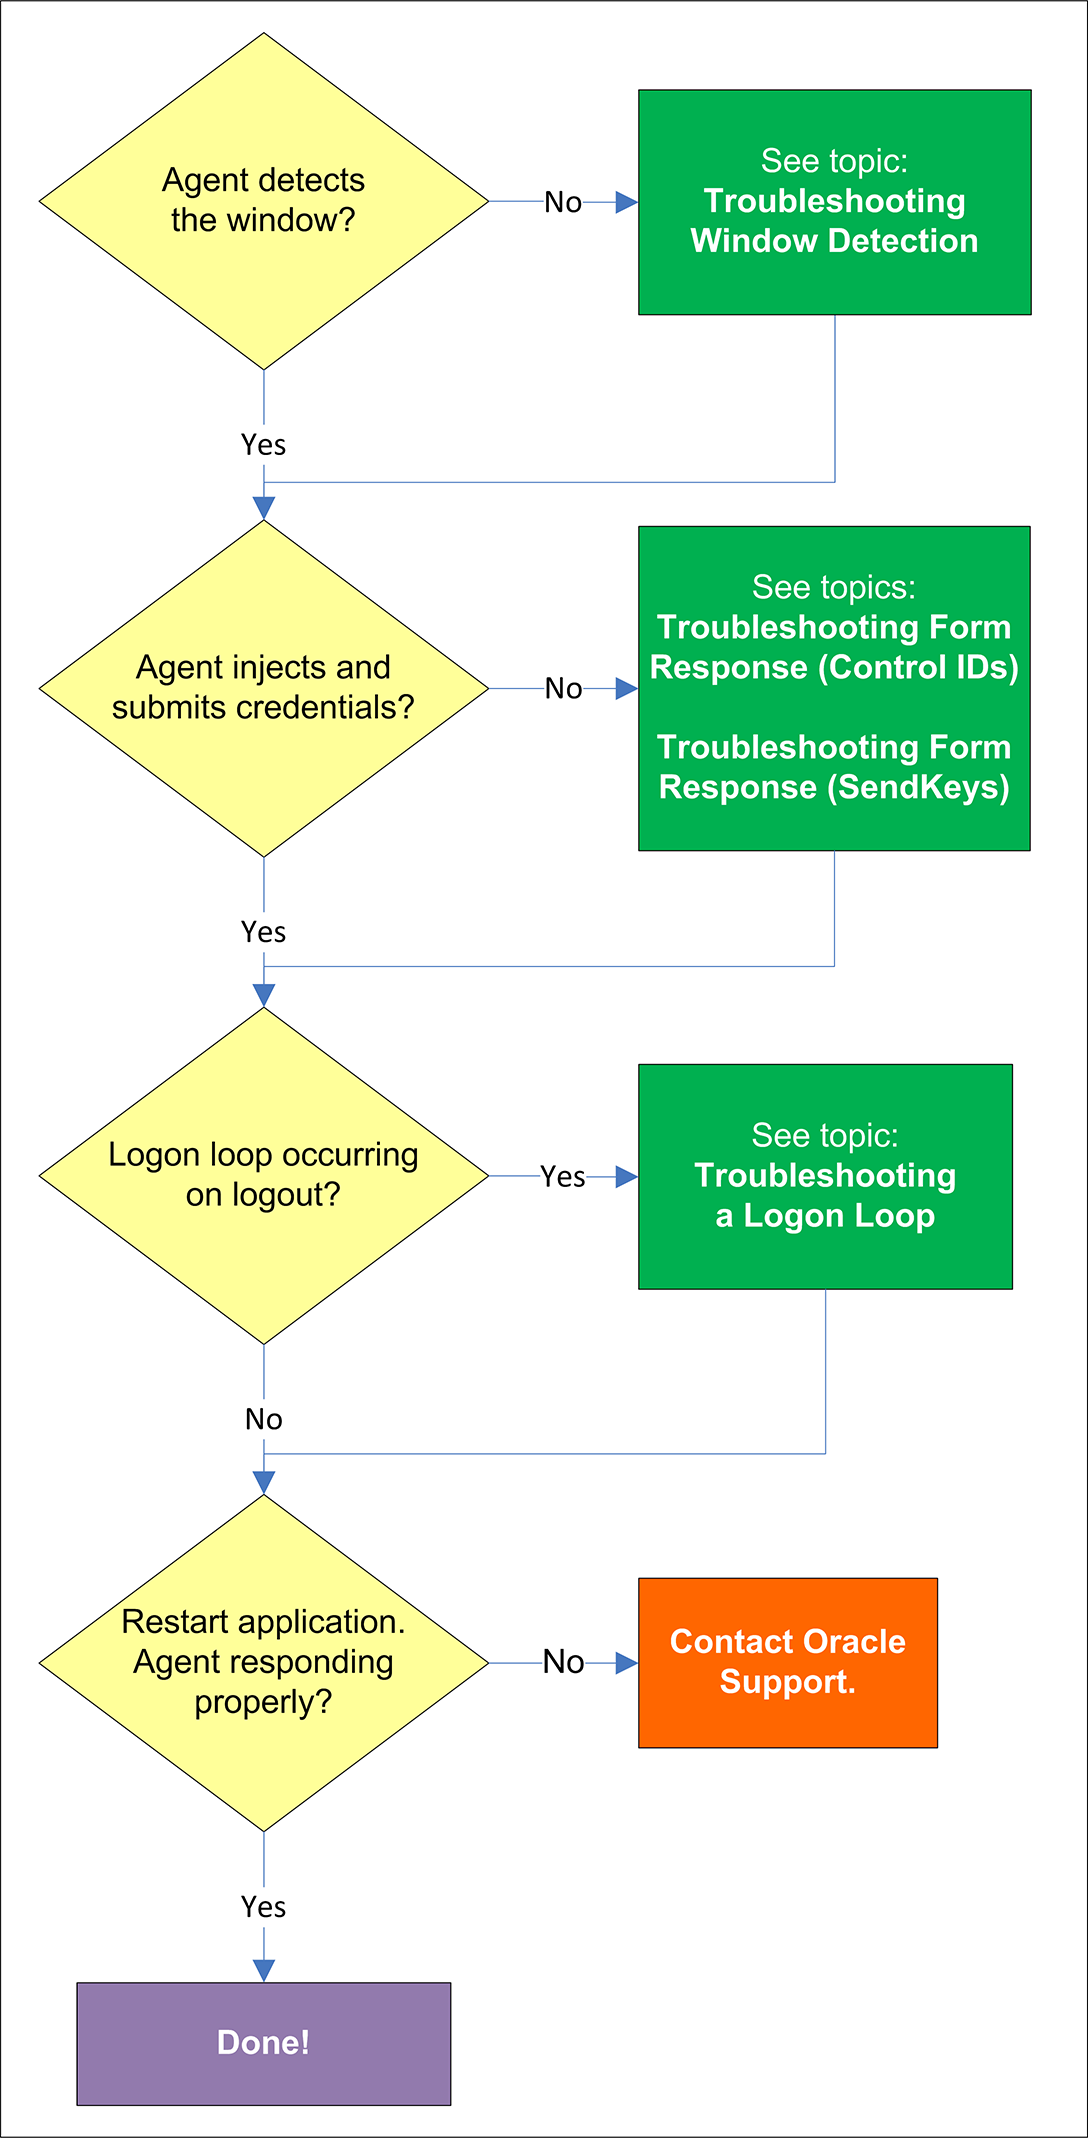
1.6.1.1 Agent detects window?
Once the Agent has been provided with the template, it will automatically respond to the target application, unless the automatic response feature has been explicitly disabled. If the Agent fails to respond to the application, seeTroubleshooting Window Detection.
1.6.1.2 Agent injects credentials?
If credentials have been stored for the target application in the user's store, the Agent will inject them into the appropriate fields upon successful application detection. The Agent will also automatically submit the credentials unless the "Auto-Submit" feature has been explicitly disabled. If credential injection fails, see Troubleshooting Form Response When Using Control IDs and Troubleshooting Form Response When Using "SendKeys".
1.6.1.3 Logon loop occurring on logout?
Some applications display their logon screen upon logout, which causes the Agent to enter a logon loop and effectively prevents the user from logging out of the application unless the Agent is shut down. If this happens, see Troubleshooting a Logon Loop.
1.6.1.4 Agent responding properly after application is restarted?
If the target application is shut down and restarted, the Agent should respond to the application and log the user on. If logon does not occur, it is possible that the application is running in the system space instead of the user space and thus requires active polling instead of passive message queue monitoring by the Agent. If this is the case, you must follow the instructions in Configuring an Application as a Service Logon.
1.6.2 Testing the Configuration of a Password Change Form
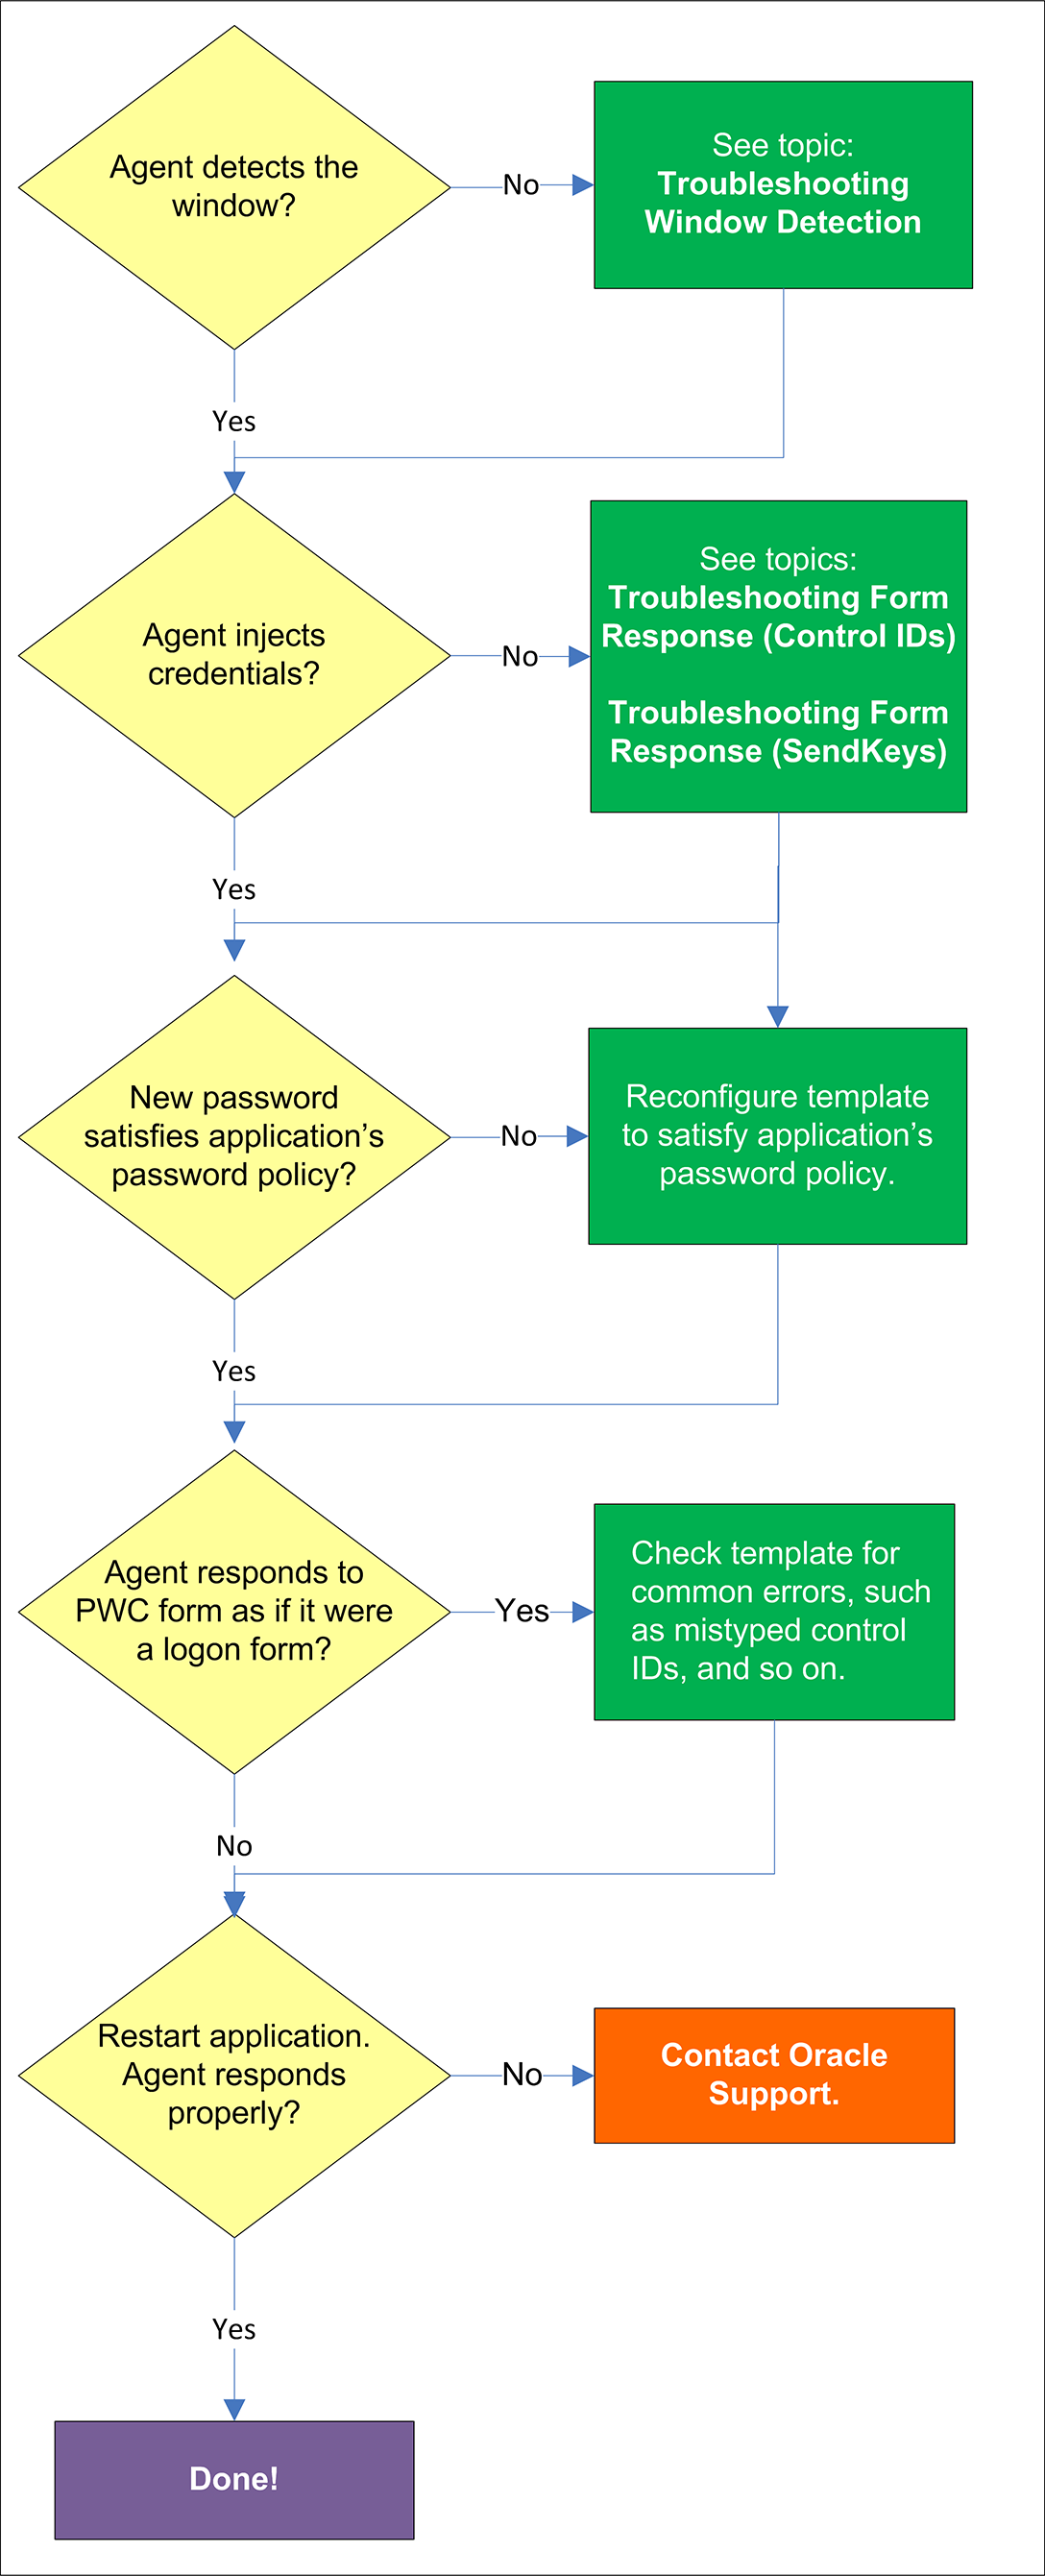
1.6.2.1 Agent detects the window?
Once the Agent has been provided with the template, it will automatically respond to the target application, unless the automatic response feature has been explicitly disabled. If the Agent fails to respond to the application, see Understanding Window Detection.
1.6.2.2 Agent injects and submits credentials?
When the Agent detects the password change, it injects credentials into the appropriate fields and submits them to the application, unless the Auto Submit feature has been explicitly disabled. If credential injection is erratic or does not occur at all, see Troubleshooting Form Response When Using Control IDs and Troubleshooting Form Response When Using "SendKeys".
1.6.2.3 New password satisfies application's password policy?
If the new password generated by Logon Manager does not satisfy the application's own password policy, password change will be unsuccessful. If you determine this to be the case, compare the password generation policy currently deployed to the Agent with the password policy of the target application and correct any inconsistencies that may cause password change failure.
1.6.2.4 Agent responds to password change form as if it were a logon?
If the Agent responds to the password change form as if it were a logon form (i.e., Agent injects and submits the user's currently stored credentials), check for the following;
-
Configuration mistakes in the template, such as incorrect form type, incorrect field and control definitions, and so on.
-
Check whether the password change form has a dynamic window title or class, and configure the template accordingly.
-
If you are using matching, check whether you are using the correct matching type and examine your matching strings for errors.
1.7 Publishing a Template to the Repository
Once you have successfully tested your application template, you can distribute it to end-user machines by publishing it to the selected target container within your repository, either in a directory-style hierarchy (default), or as a flat configuration file.
Note:
For more information on deploying Logon Manager with a repository and best practices for structuring the repository tree, see the guide Deploying Logon Manager with a Directory-Based Repository guide for your platform.Before performing this procedure, make sure you are familiar with the structure and configuration of your repository.
To select and publish the desired templates and other configuration objects to the repository:
-
Launch the Logon Manager Administrative Console.
-
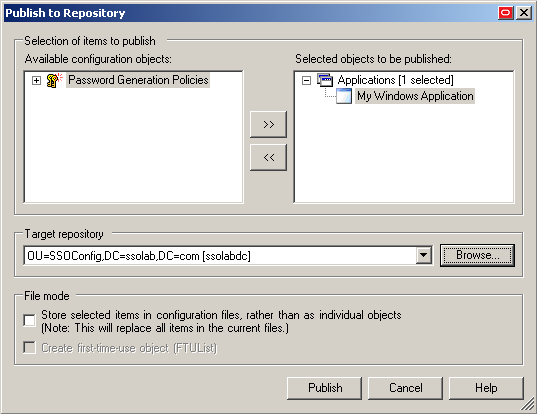
Right-click the Applications node and select Publish… from the context menu. The "Publish to Repository" dialog appears.
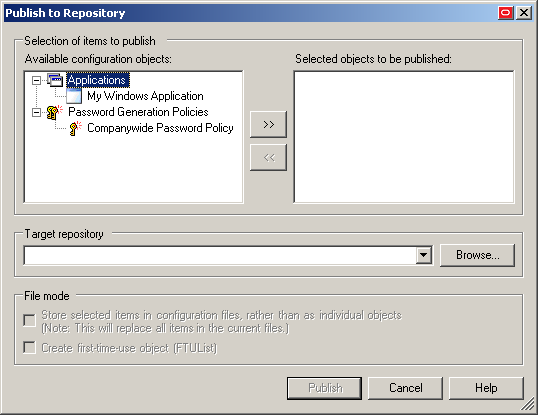
-
In the Available configuration objects list, navigate to and select the desired objects.
Note:
Only categories for which objects have been configured will appear in this list. For example, if no password generation policies exist, the corresponding category will not appear in this list. -
Click >> to move the selected objects to the Selected objects to be published list. (To remove an object from this list and not publish it, select the object and click <<.)
-
Select the target container to which you want to publish the selected objects.
If you have previously published to the desired container, select it from the Target Repository drop-down list.
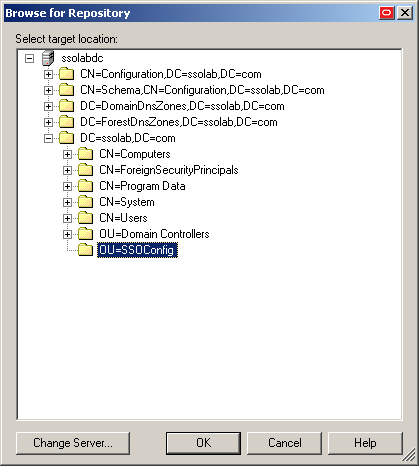
If you have not previously published to the desired container, or if the target container path does not appear in the Target Repository drop-down list, you must use the Browse feature to find and select the target container:
-
Click Browse to browse the directory tree.
Note:
If you are not already connected to the directory, the Console will prompt you to provide the required connection information. -
In the "Browse for Repository" dialog that appears, navigate to and select the target container.
Note:
If you want to create a new container, right-click the desired parent container, select New Container from the context menu, enter the desired name for the new container, and click OK to complete the process.
-
-
(Optional) If your environment calls for storing configuration objects in flat-format, select the check box Store selected items in configuration files, rather than as individual objects.
Note:
Selecting this option will overwrite all items stored in existing configuration files, if present in the target container. -
(Optional) If you want to create the first-time use object (FTUList), select the corresponding check box.
Note: This option only becomes active if you choose to store your configuration objects in flat format in step 6.:
-
Click Publish. The Console publishes the selected objects to the target repository.
Caution:
Do not attempt to dismiss the dialog or close the Console until the publishing process completes. The dialog will disappear automatically when the objects have been published.
For more information on the publishing process, see the Logon Manager Administrative Console help.
1.8 Troubleshooting Window Detection
Use the steps below to diagnose erratic window detection.
1.8.1 Agent detects the window?
If the Agent does not detect the window, first ensure that the Auto-Recognize option in the Options tab of the target form definition's properties dialog is enabled; if it is, proceed to the next step.
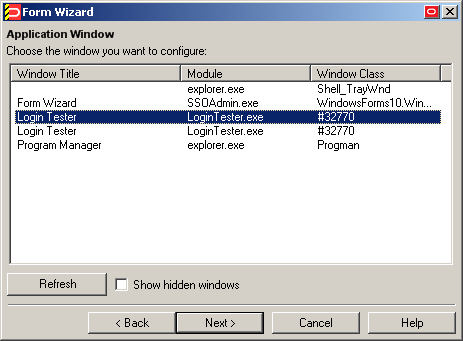
1.8.2 Agent responds to target window but also to other windows?
Since the Agent will respond to all windows that possess the characteristics defined in the template, a default form configuration (created by simply completing the Form Wizard) may result in undesired response to windows that should be otherwise ignored. It is critical to configure the template to be as specific as possible so that the Agent can uniquely identify the target window.
Note:
This situation is sometimes referred to as a "duplicate event model" because the Agent is facing multiple sign-on events which it cannot uniquely distinguish from one another.To decide whether more granular response control is necessary, examine the list in the Form Wizard window for duplicate window titles, module names, and window classes when creating a template. In the following example, two instances of the "Login Tester" application share their module (parent process) names and window class values, and will thus appear as the same application to the Agent.
In such cases, you must use matching to place more specific constraints on the values of the criteria that uniquely identify the window and form to the Agent.
1.8.3 Agent detects window when using the "Logon Using Logon Manager" tray icon option?
Manually invoke window detection by using the Logon Using Logon Manager option from the Agent's system tray icon, then do one of the following:
-
If the Agent detects the window, you may have to configure the application as a service logon; continue to the next step.
-
If the Agent does not detect the target window even when you manually invoke detection by using the Logon Using Logon Manager option from the Agent's tray icon, review the template for common configuration errors, such as a mistyped window title or class; also, determine whether the window title and/or class are dynamic, and reconfigure the template as appropriate.
1.8.4 Application running as a service or a user other than the current?
If the application is running in the system space (under the SYSTEM account), rather than in the user space (under the currently logged in user's account), or the application has been launched under a user account different from the currently logged in user, you must configure it as a service logon. This allows the Agent to actively poll the application instead of passively responding to events in the currently logged on user's Windows message queue. For instructions, see Configuring an Application as a Service Logon.
1.8.5 Window title changes after detection?
If the title of the target window changes after the Agent has detected the window but before it begins responding to the window (for example, if the window title changes when the logon form is invoked), you must configure the application as a service logon. This allows the Agent to actively poll the application instead of passively responding to events in the currently logged on user's Windows message queue. For instructions, see Configuring an Application as a Service Logon.
1.9 Troubleshooting Form Response When Using Control IDs
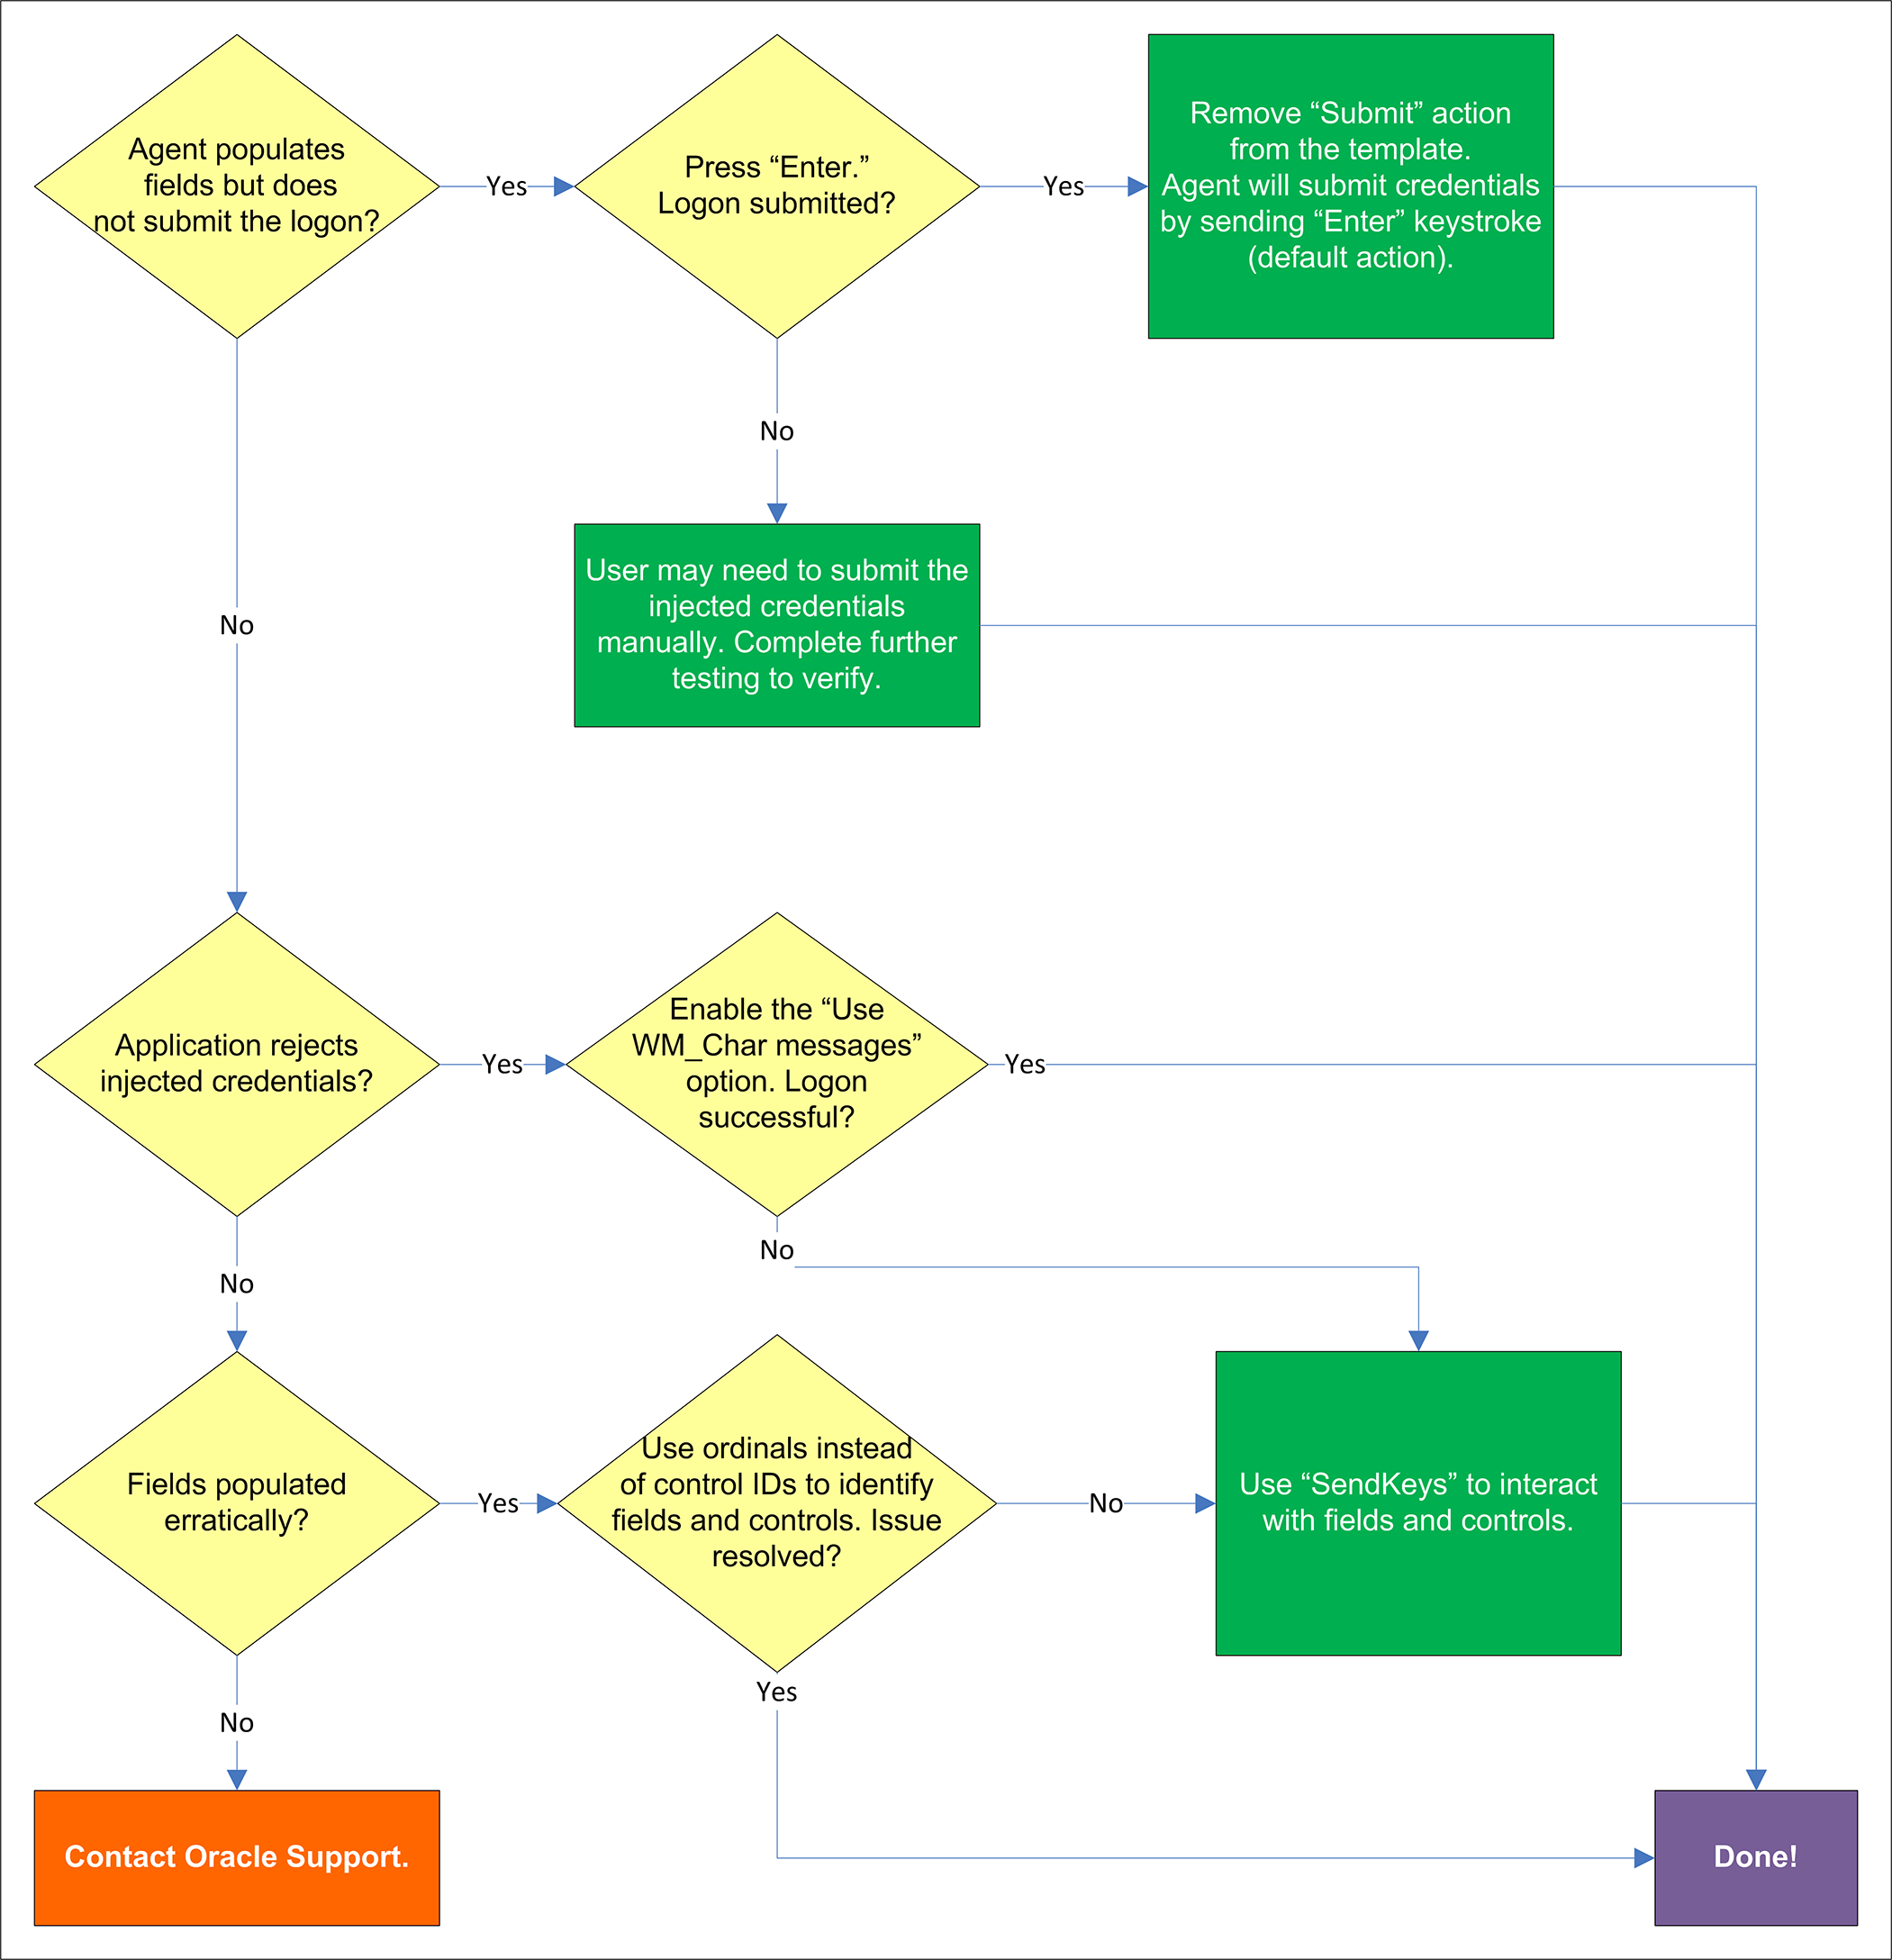
1.9.1 Agent populates fields but does not submit the logon?
If the credentials are inserted by not automatically submitted, first check that the Auto-Submit option is enabled for the application. If Auto Submit is enabled but the Agent still does not submit them to the application, press Enter after the Agent has populated the fields and see whether the credentials are submitted. If the credentials are submitted, remove the Submit action from the template - this will allow the Agent to use its default submit action, the Enter keystroke.
1.9.2 Application rejects injected credentials?
If the application rejects the submitted credentials, enable WM_CHAR-style messaging in the application template - this causes the Agent to use an alternate API to interact with the fields and controls in the window. To do so, select the General tab in the template, select the target form, click Edit, and select the Use WM_CHAR messages to fill controls check box in the Options tab of the form properties dialog.
1.9.3 Fields populated erratically?
If the Agent populates the fields erratically, i.e., inserts wrong, truncated, garbled, or blank values, one or more of the target Control IDs might be dynamic. In such case, use ordinals instead of Control IDs to uniquely identify fields and controls within the form. Ordinals are sequential ID numbers assigned by the Agent to each object in the window, from top to bottom, left to right, which allow the Agent to uniquely identify the detected fields and controls separately from Control IDs.
To switch a form from using Control IDs to using ordinals, select the form in the General tab in the template, click Edit, and click Wizard in the form properties dialog. Then, follow the steps in Configuring a Form Using Control IDs to re-create the form definition but select the Use ordinals instead of control IDs check box when you arrive at the "Credential Fields" screen. The new configuration choices you make in the wizard will overwrite the existing form definition.
If the issue persists even when using ordinals, consider using the "SendKeys" method of interacting with the application. For more information, see Configuring a Form Using "SendKeys".
1.10 Troubleshooting Form Response When Using "SendKeys"
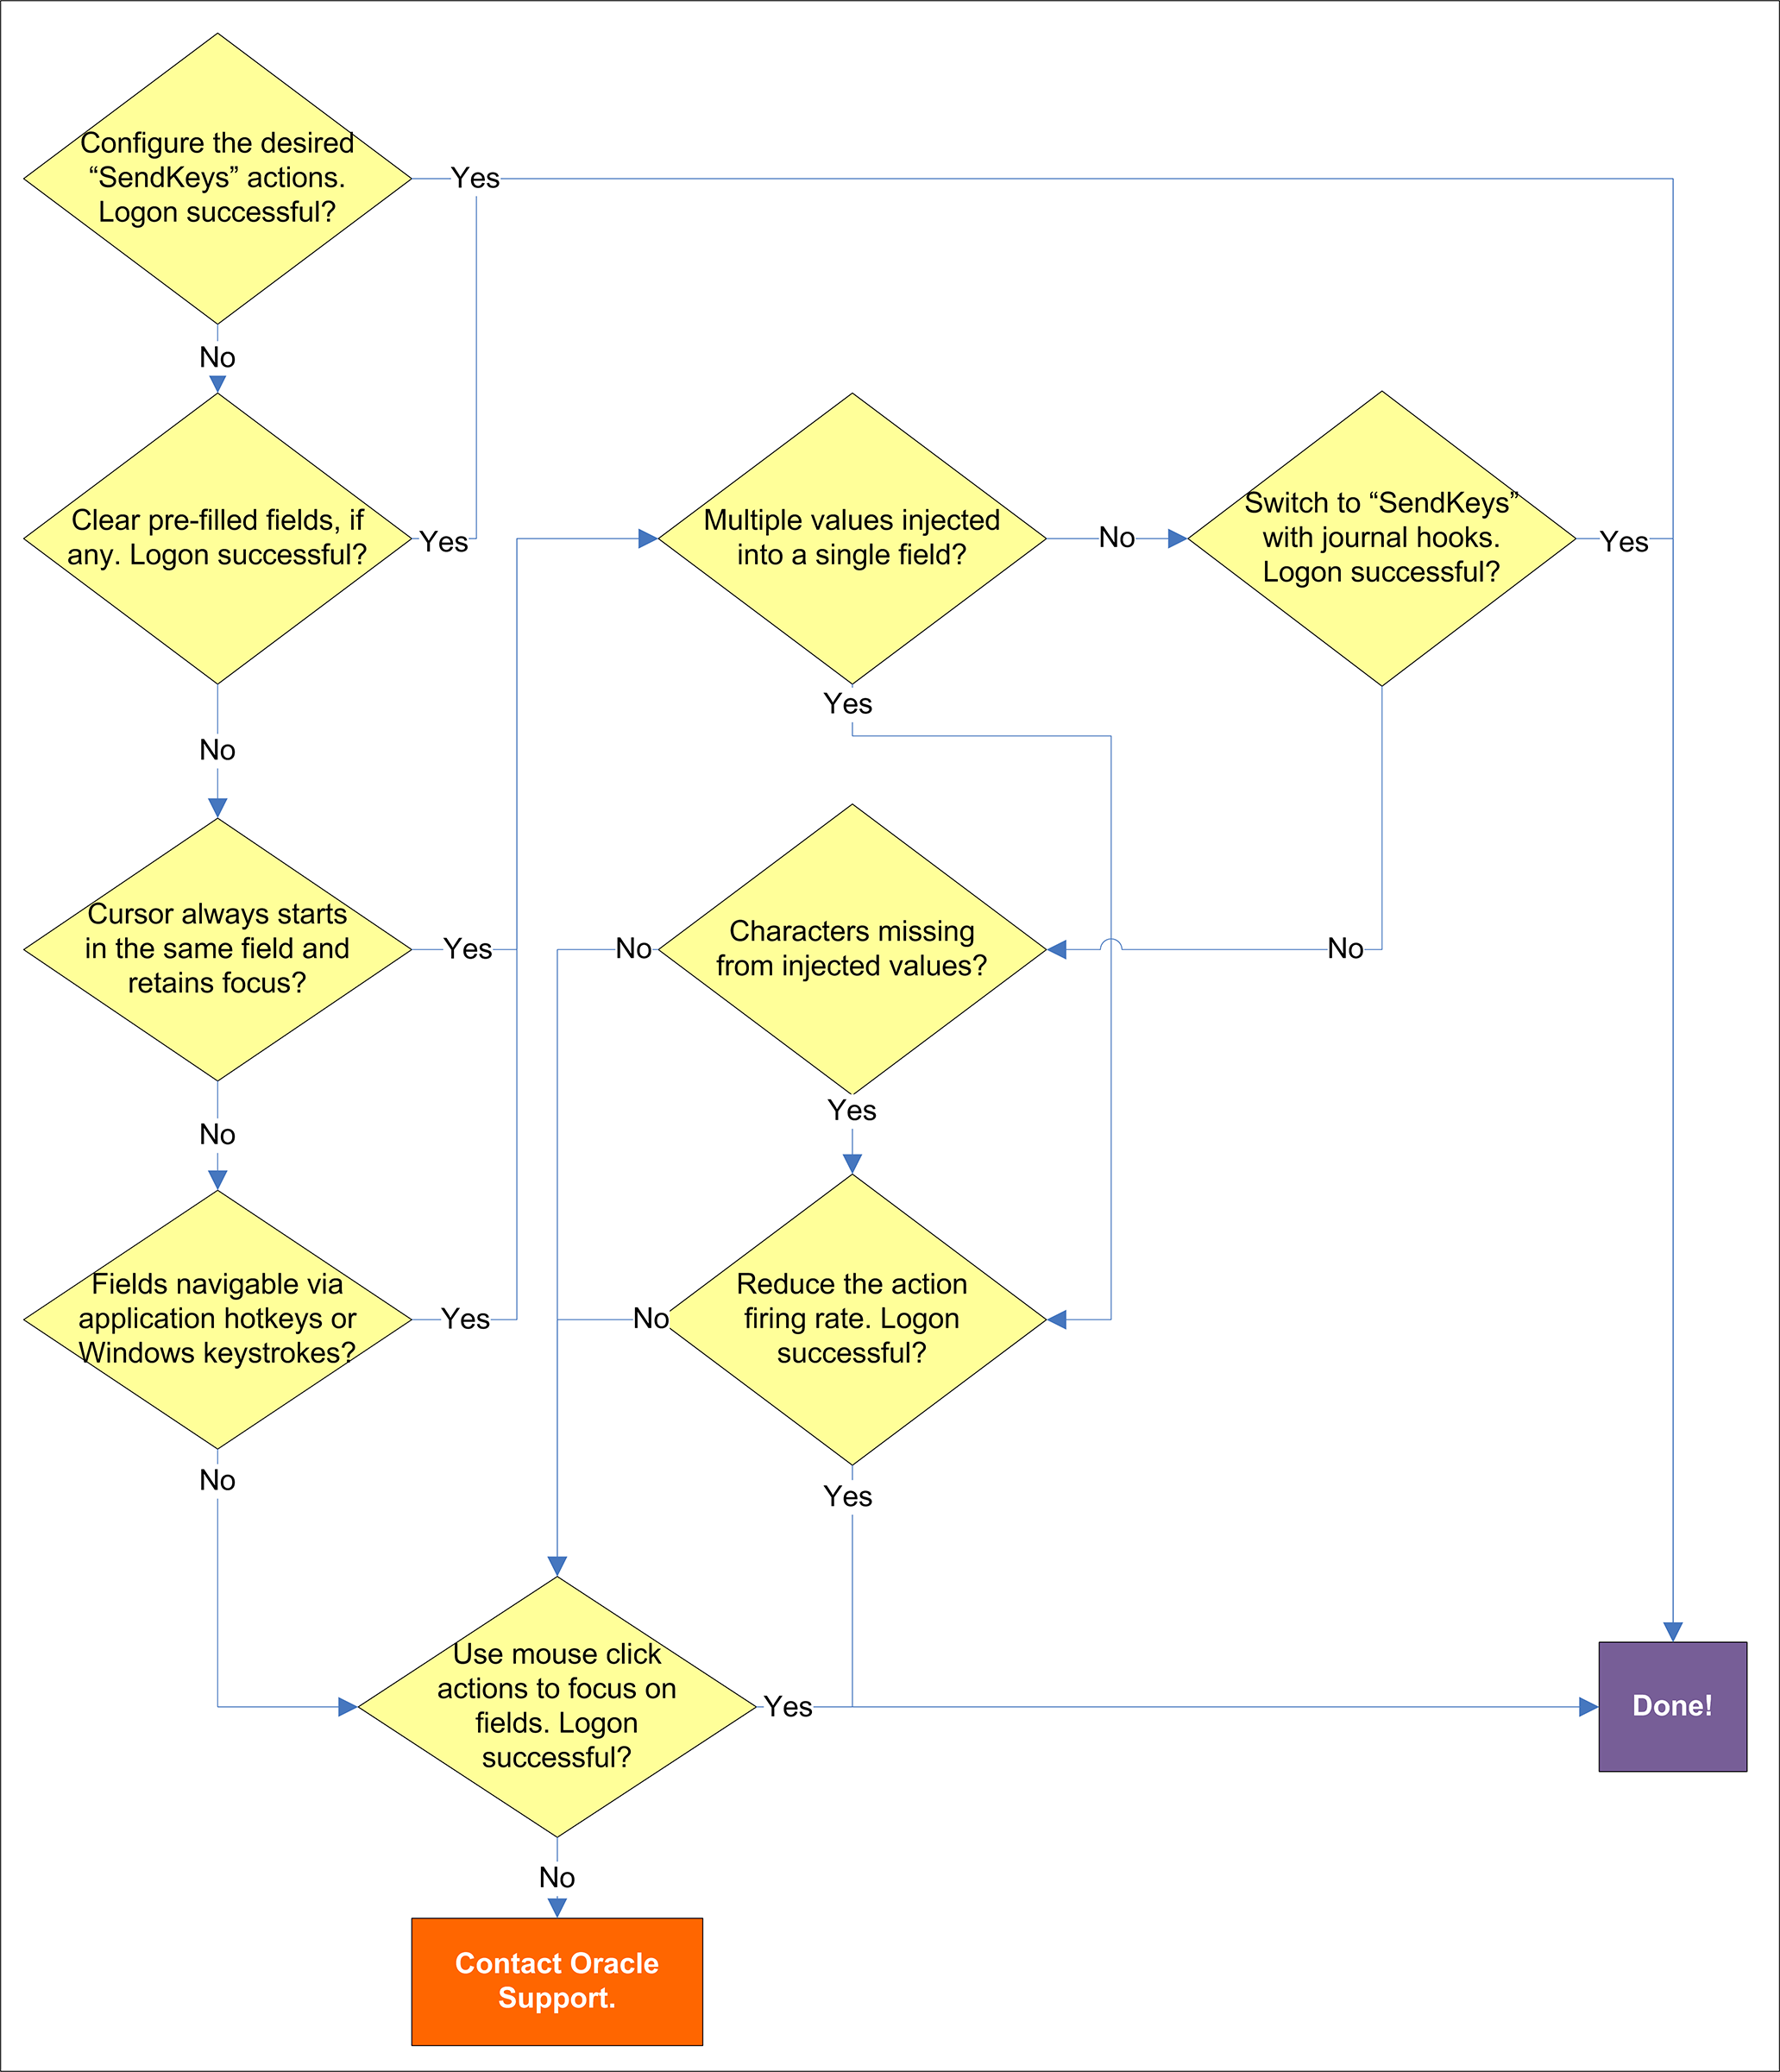
1.10.1 Pre-filled fields cause erroneous logon?
Some applications might pre-fill the logon fields when the logon form is displayed - for example, the user name field might be pre-filled with the name of the last successfully logged on user. You may have to send one or more Backspace or Delete key strokes to clear such a pre-filled field before injecting credentials into it.
1.10.2 Cursor always starts in the same field and retains focus?
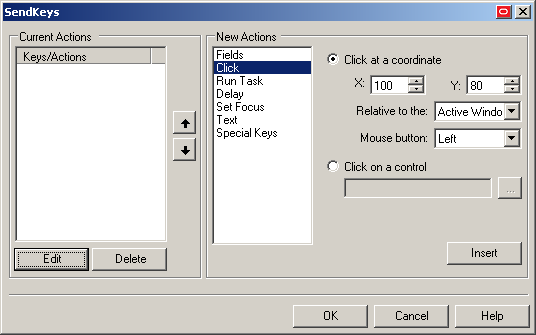
If the cursor does not always start in the same field and the field loses focus before the Agent populates it, see if the application permits you to navigate to the field through a specific hotkey combination (such as Alt+U) or by using standard Windows keys, such as Tab, arrows, and so on. If you cannot use keystrokes to navigate to the field, use a mouse click action whose coordinates point to within the target field to allow the Agent to "click" within the field, as shown in the example below.
1.10.3 Multiple values injected into a single field?
If the Agent is inserting multiple values (e.g., both the user name and the password) into a single field, it might be firing the "SendKeys" actions too quickly for the application to respond properly. In such cases, experiment with slowing down the action firing rate until credential injection is reliable. To do so, either insert a "Delay" action in between other actions, or set the SendKeys event interval global Agent setting under End-User Experience >Response to either Use for slow system or Use for very slow system.
1.10.4 Switching to "SendKeys" with journal hooks restores reliable injection?
If the Agent continues injecting multiple values into a single field after you have tried the suggestions in the previous step, switch the form interaction method to "SendKeys" with journal hooks. To do so, select the General tab in the application template, select the desired form, click Edit, select the Fields tab, and set the Transfer Method option to SendKeys using Journal Hook.
Note:
The "SendKeys" with journal hooks option causes the Agent to use an alternate API to send keystrokes and mouse clicks to the application; it is typically the most effective in Citrix environments.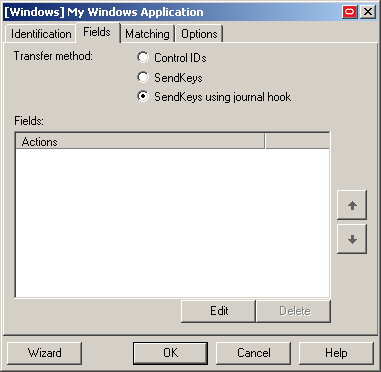
1.10.5 Characters missing from injected values?
If you find that individual characters are omitted from the injected field values, the Agent might be firing the "SendKeys" actions too quickly for the application to accept them properly. In such cases, experiment with slowing down the action firing rate until credential injection is reliable. To do so, either insert a "Delay" action in between other actions or set the SendKeys event interval global Agent setting under End-User Experience >Response to either Use for slow system or Use for very slow system.
1.10.6 Using mouse click actions to focus on fields results in successful logon?
If logon is still unsuccessful, consider using mouse click actions to focus on all fields and controls within the form. Be aware that because each mouse click action requires exact coordinates of the field or control you want to click, those coordinates must remain static in order for the mouse click to succeed. Thus, mouse click actions might not be reliable for windows whose contents shift when the window is resized or displayed in different resolutions.
If none of the above steps resolve your issue, contact Oracle Support for assistance.
1.11 Troubleshooting Matching
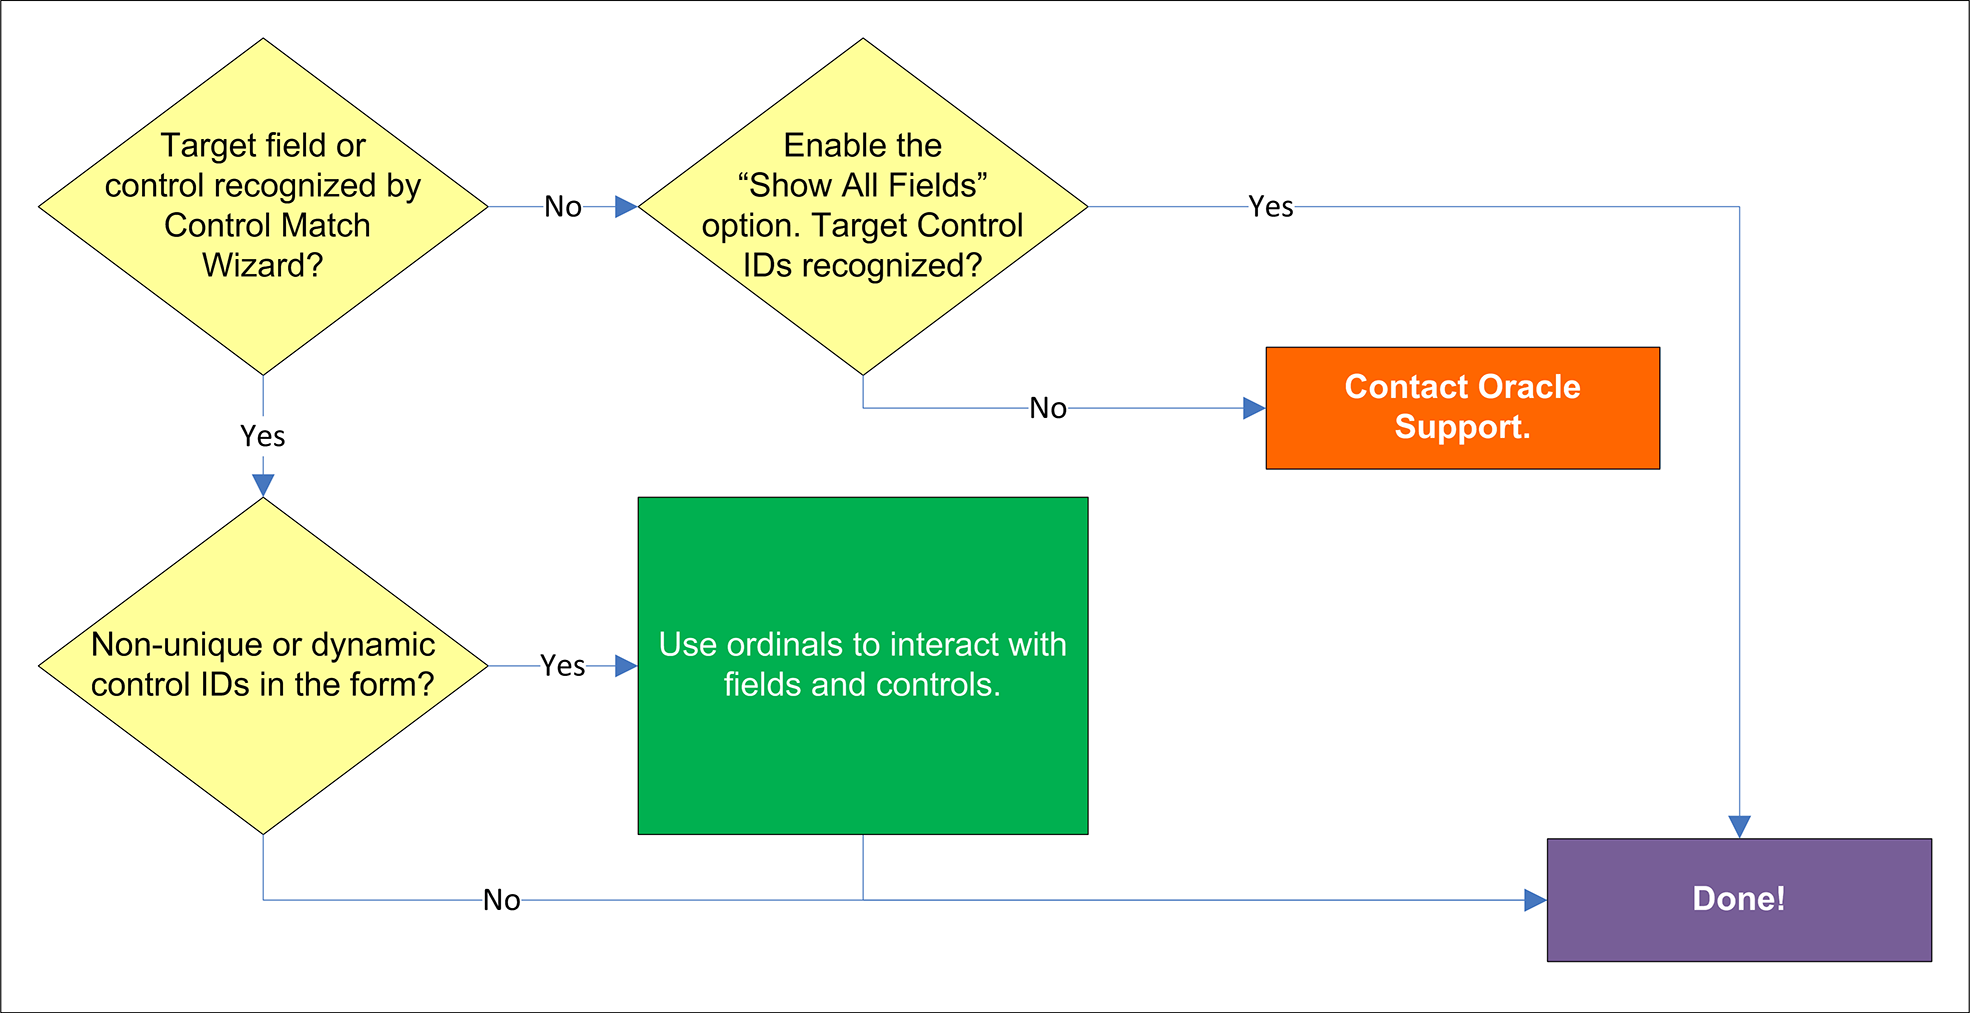
1.11.1 Target field or control recognized by Control Match Wizard?
If the field or control targeted for matching do not appear in the Control Match Wizard, even after enabling the Show all fields option, matching might not be possible. In such cases, please contact Oracle Support for assistance.
1.11.2 Non-unique or dynamic Control IDs in the form?
If one or more of the target Control IDs are non-unique or dynamic, use ordinals instead of Control IDs to uniquely identify fields and controls within the form. Ordinals are sequential ID numbers assigned by the Agent to each object in the window, from top to bottom, left to right, which allow the Agent to uniquely identify the detected fields and controls separately from Control IDs.
To switch a form from using Control IDs to using ordinals, select the form in the General tab in the template, click Edit, and click Wizard in the form properties dialog. Then, follow the steps inConfiguring a Form Using Control IDs to re-create the form definition but select the Use ordinals instead of control IDs check box when you arrive at the "Credential Fields" screen. The new configuration choices you make in the wizard will overwrite the existing form definition.
1.12 Troubleshooting a Logon Loop
Some applications display their logon form upon logout, which causes Logon Manager to recognize the logon form and automatically log you back on to the application. This creates an endless "logon loop" preventing you from logging out of the application. To prevent this loop from occurring, the administrator may choose to enable the logon grace period feature which forbids Logon Manager from logging on to an application within set time period since the last logon.
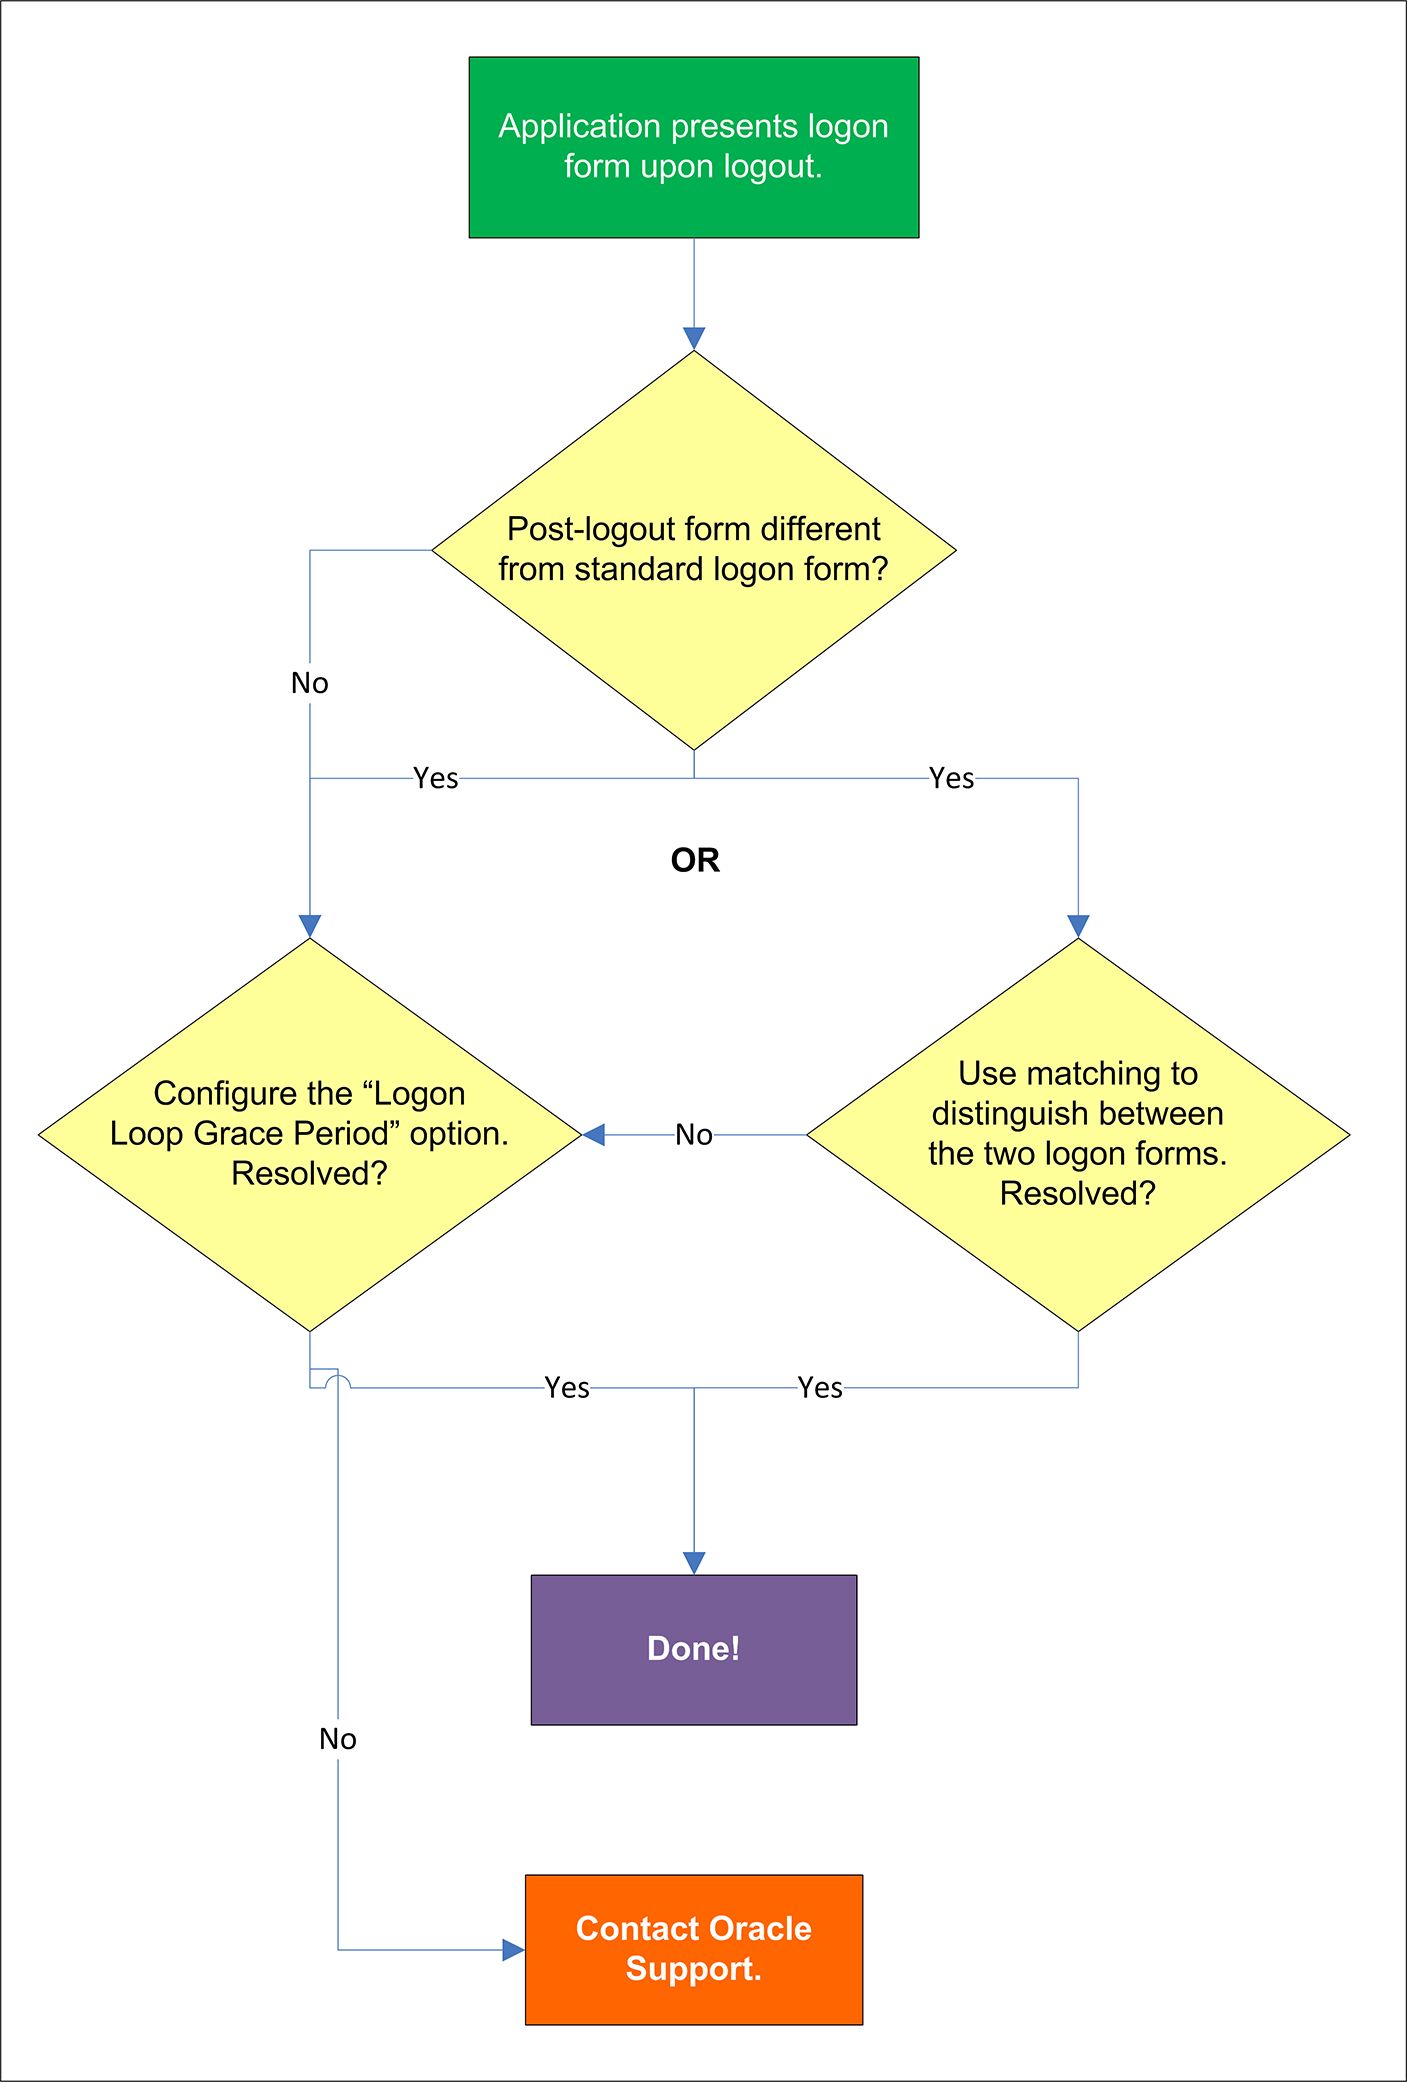
1.12.1 Post-logout form different from standard logon form?
Oracle recommends that you consider the "Logon Loop Grace Period" as well as matching if the logon form presented upon logout is sufficiently different from the application's standard logon form. (For more information on matching, see Using Matching to Improve Response Accuracy.) If the forms cannot be uniquely distinguished, use the "Logon Loop Grace Period" feature described below.
1.12.2 Configuring the "Logon Loop Grace Period" option resolves logon loop?
If the post-logout form cannot be uniquely distinguished from the standard logon form, configure a grace period that will prevent the Agent from automatically logging on to the same application if the specified grace period has not fully elapsed.
To configure the logon loop grace period timer, do the following:
-
In the Logon Manager Administrative Console, open the desired template and select the Miscellaneous tab.
-
In the Logon Loop Grace Period field, select the desired mode of operation from the drop-down list:
-
Prompt - if the Agent detects the application's logon form while the grace period is in effect, the Agent will prompt the user whether to complete the logon or ignore the application.
-
Silent - if the Agent detects the application's logon form while the grace period is in effect, the Agent will ignore the application and not log the user on.
-
None - deactivates the grace period timer. Agent will respond to the application every time it detects the application's logon form.
-
-
Do one of the following, depending on what you want the Agent to do while the grace period is in effect:
-
If you want the Agent to log the user on each time the launch of the application's executable is detected, select the Reset for each process check box.
-
If you would like the Agent to ignore the application until the grace period has expired, leave the Reset for each process check box blank.
-
-
Save your changes and commit them to your repository, if applicable.
Note:
If you have configured the logon grace period timer, and logon loop is still occurring for a specific form definition, make sure that the Adhere to logon loop grace period option in the form definition's Options tab is enabled.
If this does not resolve the logon loop for the application, contact Oracle Support for assistance.
1.13 Troubleshooting Java Application Issues
Use the steps below to diagnose and resolve issues specific to Java applications.
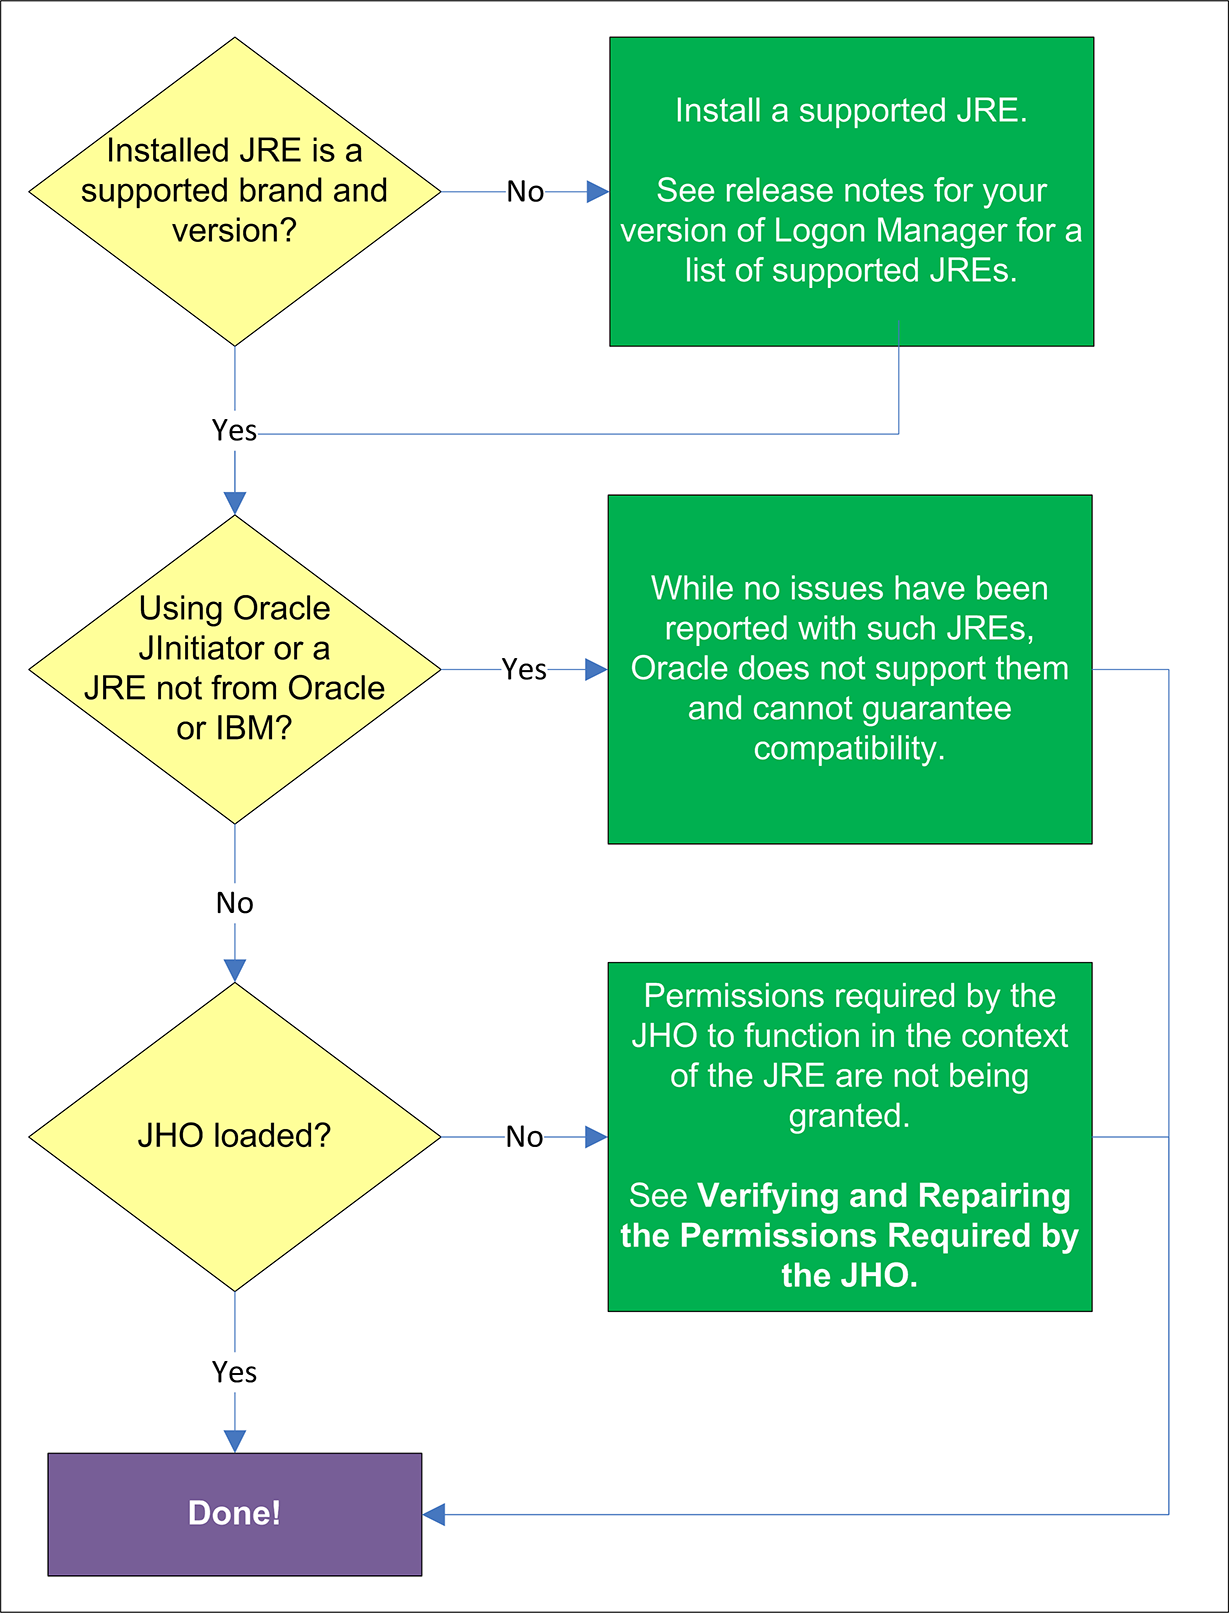
1.13.1 Installed JRE is a supported brand and version?
Refer to the release notes for your version of Logon Manager for a list of supported JREs. If the installed JRE is not supported, you must either upgrade Logon Manager to a release that supports your current JRE, or replace the current JRE with a version supported by your release of Logon Manager.
1.13.2 Using Oracle JInitiator or another JRE not made by Oracle or IBM?
While no issues have been reported when deploying Logon Manager with Oracle JInitiator or non-Oracle/non-IBM JREs, Oracle does not support nor warrant the proper functioning of Logon Manager with such JREs.
1.13.3 JHO loaded?
In certain situations, a configuration issue might prevent the JHO from loading when the Java application launches. To verify that the JHO is installed and running, use a process viewer tool, such as Microsoft Spy++ (included with Microsoft Visual Studio) or SysInternals Process Explorer to verify that the JVM executable has spawned the ssojho.dll child thread.
The example below shows the properties box of the Sun JVM executable javaw.exe in Process Explorer showing the ssojho.dll child thread running:

If the JHO is not loading for the target JRE, check that the permissions required by the JHO are being granted through the user's .java.policy file (located in their home directory) as described in the next section.
1.13.4 Verifying and Repairing the Permissions Required by the JHO
The JHO requires that a set of specific permissions is granted to it via the user's .java.policy file so that it can properly operate in the context of the target JRE. If these permissions are not in effect, Logon Manager will be unable to detect or respond to Java applications.
1.13.4.1 Verifying That the Required Permissions Are Being Granted
Every time Logon Manager starts, the permissions are copied from a template .java.policy file (located in %INSTALLDIR%\v-GO SSO\Helper\Java) to the user's .java.policy file located in the user's home directory. These permissions are then automatically granted to the JHO every time a Java application is launched.
If you suspect that the required permissions are not being granted to the JHO, check your JRE's log after starting Logon Manager for any missing permission exceptions referencing the JHO. If such exceptions are present, the required permissions are not being granted. This can be caused by one of the following:
-
The user's .java.policy file does not contain the permissions required by the JHO,
-
The target JRE's security settings (usually stored in the JRE's java.security file) do not reference the user's .java.policy file.
1.13.4.2 Restoring the Missing JHO Permissions
If the user's .java.policy file is missing the required JHO permissions, the file's ACL might be preventing Logon Manager from writing the permissions to it; in such case, check the file's ACL to make sure that write privileges are not being denied.
If the ACL is correct and the required permissions are not present in the user's .java.policy file, do one of the following:
-
If the user's .java.policy file contains other permissions or configuration information that you want to preserve, edit the file and manually add the missing JHO permissions.
-
If the user's .java.policy file does not contain other permissions or configuration information that you wish to preserve, simply delete it and restart Logon Manager; the file will be recreated and the required permissions inserted automatically.
Note:
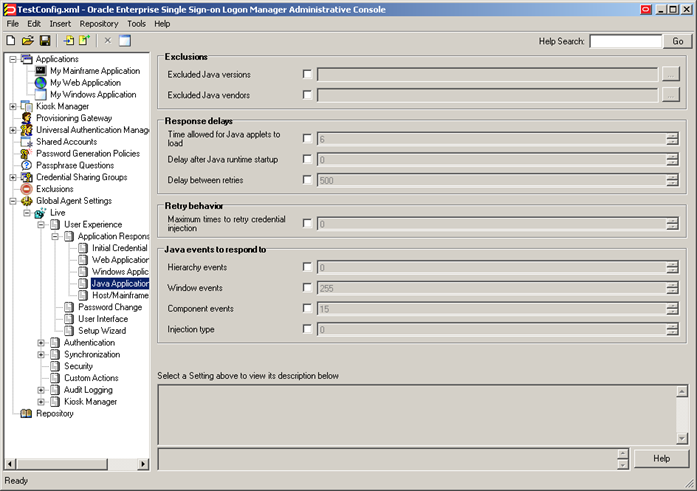
As JREs are updated by their vendors, it is possible that a future release introduces one or more new permissions that will be required by the JHO but which could not be accounted for at the time of Logon Manager's release. In such case, examine your JRE's error log for any missing permission exceptions after launching Logon Manager and a target Java application and add those permissions to Logon Manager's .java.policy template file so that they can be granted via the user's .java.policy file the next time Logon Manager starts.1.13.5 Configuring the Behavior of the Java Helper Object (JHO)
Logon Manager provides global Agent settings that allow you to control the following aspects of the JHO's behavior:
-
Exclude specific JRE versions
-
Exclude specific JRE vendors
-
Define a response delay to account for the loading of Java applets
-
Define a response delay to account for the initialization of the JRE
-
Define a delay between response retries
-
Define a maximum number of response retries
-
Define specific hierarchy, window, component and injection type events that the JHO will recognize or ignore
These settings are located in the tree in the Administrative Console at the following location:
Global Agent Settings > Live > User Experience > Application Response > Java Applications
To learn more about these settings and how to configure them, see the Console help. For even more granular control, Logon Manager also provides registry settings described in the next sections. Oracle recommends these settings be used only by experienced administrators.
1.13.5.1 Manually Restricting the JHO to Specific JREs
Aside from the Console settings described earlier, Logon Manager provides registry settings that allow you to create extremely granular inclusion and exclusion rules that Logon Manager will use to decide whether to load the JHO for the target application. You can specify, via regular expressions, the Java Virtual Machine (JVM) executables, JAR files, and command-line parameters that you want the JHO to consider.
When configuring these settings, keep the following in mind:
-
If the value for a given setting is omitted, the specified default is used; if a value is set, all non-matching values are ignored.
-
The JHO processes the inclusion rules first, followed by the exclusion rules.
-
The N suffix is a unique numerical identifier that bundles settings belonging to a specific application. The JHO will process the bundles sequentially in ascending order. The N suffix is a positive integer starting at 1.
-
You can determine the application's host JVM executable and launch command using the Trace Logging utility. The beginning of the Java trace log will indicate the host JVM and the launch command for the application.
The settings are located at the following path in the Windows Registry: HKEY_LOCAL_MACHINE\SOFTWARE\Passlogix\Extensions\AccessManager\JHO
The settings are divided into the following categories:
1.13.5.1.1 JHO Inclusion Rules
Use these settings to specify the host JVM executables, application JAR files, and command-line parameters that will cause the JHO to load for the target application. The values are case-insensitive regular expressions.
| Setting | Description |
| JhoIncludeHostNameN | Specifies the application's host JVM executable(s).
For example, if you want the JHO to load when the application is hosted by a JVM executable named java.exe or javaw.exe, set the value as follows: JhoIncludeHostName1=.*javaw?\.exe No-value default: All executables are accepted (i.e., JHO will load for any executable). |
| JhoIncludeHostCommandLineN | Specifies the command used to launch the application. The command string usually includes the full path and name of the JVM executable, the JAR file, as well as any required command-line parameters.
For example, if you want the JHO to only load when the application's JAR file is named Login.jar (while the rest of the command is allowed to vary), set the value as follows: JhoIncludeHostCommandLine1=.*Login\.jar.* No-value default: All command strings accepted (i.e., JHO will load for any command). |
1.13.5.1.2 JHO Exclusion Rules
Use these settings to specify the host JVM executables, application JAR files, and command-line parameters that will cause the JHO to ignore the target application. The values are case-insensitive regular expressions.
| Setting | Description |
| JhoExcludeHostNameN | Specifies the application's host JVM executable(s).
For example, if you want the JHO to ignore the application when the host JVM executable is named "java.exe" or "javaw.exe", set the value as follows: JhoExcludeHostName1=.*javaw?\.exe No-value default: Blank (i.e., nothing will cause the JHO to ignore the application) |
| JhoExcludeHostCommandLineN | Specifies the command used to launch the application. The command string usually includes the full path and name of the JVM executable, the JAR file, and any required command-line parameters.
For example, if you want the JHO to ignore the application when its JAR file is named "Login.jar" (but the rest of the command is non-consequential), set the value as follows: JhoExcludeHostCommandLine1=.*Login\.jar.* No-value default: Blank. (i.e., nothing will cause the JHO to ignore the application) |
1.13.5.1.3 Allowed Java Runtime Environment (JRE) Versions
These settings allow you to specify the desired JRE/JDK versions for which the JHO will load; all versions falling outside of the specified range will be ignored and the JHO will not load.
The values for both settings must follow the format x.y.z, where:
-
x is the major revision
-
y is the minor revision
-
z is denotes the release type (feature, maintenance, or update) and build ID of the installed JRE (for example, 1.6.0_07)
| Setting | Description |
| JhoMinimumJavaVersion | Specifies the lowest allowed JRE/JDK version.
Default value: 1.2 (the earliest JRE version supported by the JHO) |
| JhoMaximumJavaVersion | Specifies the highest allowed JRE/JDK version.
Default value: Blank (i.e., no upper JRE version limit is imposed) |
1.13.5.2 Manually Customizing the Event Response Behavior of the Java Helper Object (JHO)
Aside from the settings provided in the Console, Logon Manager provides registry settings that control the event response behavior of the JHO at an even more granular level. You can use these settings to troubleshoot and optimize Logon Manager performance when responding to Java applications by modifying the JHO's response to specific events when a Java application has been detected.
The settings are located within the following key in the Windows registry: HKEY_LOCAL_MACHINE\SOFTWARE\Passlogix\Extensions\AccessManager
1.13.5.2.1 Event Response Configuration Settings
| Setting | Description |
| JhoHierarchyEventProcessing | Determines which Java hierarchy events are recognized. Set the flag as follows:
HIERARCHY_EVENT_CHANGED = 0x1 The above value instructs the JHO to recognize all hierarchy events. |
| JhoEventWaitTimeout | Determines the event processing timeout for JHO controls (in milliseconds). The default value of 0 instructs the JHO to wait indefinitely. |
| JhoWindowEventProcessing | Determines which Java window events are recognized. This flag is a combination of the following values:
· WINDOW_EVENT_OPENED = 0x1 · WINDOW_EVENT_CLOSED = 0x2 · WINDOW_EVENT_ACTIVATED = 0x4 · WINDOW_EVENT_DEACTIVATED = 0x8 · WINDOW_EVENT_CLOSING = 0x10 · WINDOW_EVENT_ICONIFIED = 0x20 · WINDOW_EVENT_DEICONIFIED = 0x40 By default, all window events are recognized. |
| JhoComponentEventProcessing | Determines which Java component events are recognized. This flag is a combination of the following values:
· COMPONENT_EVENT_SHOWN = 0x1 · COMPONENT_EVENT_HIDDEN = 0x2 · COMPONENT_EVENT_ADDED = 0x4 · COMPONENT_EVENT_REMOVED = 0x8 By default, all component events are recognized. |
| JhoInjectType | Determines the injection type used by the JHO to submit data to the controls. This flag takes one of the following values:
· INJECT_TYPE_DEFAULT = 0 · INJECT_TYPE_METHOD = 1 · INJECT_TYPE_ACCESSIBLE = 2 · INJECT_TYPE_NONACCESSIBLE = 3 · INJECT_TYPE_ROBOT = 4 By default this flag is set to INJECT_TYPE_DEFAULT, in which case the JHO attempts injection using each of following methods, in the order shown, until injection is successful: · INJECT_TYPE_METHOD (if an appropriate set method had been found for the control) · INJECT_TYPE_ACCESSIBLE (if the control supports accessibility) · INJECT_TYPE_NONACCESSIBLE · INJECT_TYPE_ROBOT For combo and list boxes, the JHO always uses INJECT_TYPE_METHOD. |
1.13.5.2.2 Recommended JHO Event Response Configuration Defaults
We recommend the following default settings on new installations of Logon Manager:
-
JhoWindowEventProcessing=0x3
-
JhoComponentEventProcessing=0xB
-
JhoHierarchyEventProcessing=0x0
These values instruct the JHO to recognize the following events:
-
WINDOW_EVENT_OPENED (0x1)
-
COMPONENT_EVENT_SHOWN (0x1)
-
WINDOW_EVENT_CLOSED (0x2)
-
COMPONENT_EVENT_HIDDEN (0x2)
-
COMPONENT_EVENT_REMOVED (0x8)