8 Customizing OAAM Server Web Application Pages
The OAAM Server Web application provides an interface that can be easily tailored for your company look and feel to use with Oracle Adaptive Access Manager.
This chapter explains how to configure and deploy the OAAM Server Web application to support one or more Web application authentication and user registration flows. This chapter provides the following sections:
-
About Configuring and Customizing OAAM Server for Multiple Applications
-
About Managing the Appearance and Behavior of OAAM Using User-Defined Enumerations
Note:
Although you can still use the UIO Proxy, it is deprecated starting with 11.1.2.2 and will be desupported and no longer shipped in 12.1.4 and future releases. The recommendation is to use the native integration or Advanced Oracle Access Management Access Manager and Oracle Adaptive Access Manager integration using Trusted Authentication Protocol (TAP) instead of UIO Proxy. For information about native integration, see Chapter 2, "Natively Integrating Oracle Adaptive Access Manager," Chapter 3, "Integrating Native .NET Applications," and Chapter 4, "Natively Integrating Java Applications." For information about Access Manager and Oracle Adaptive Access Manager integration using TAP, see Integration Guide for Oracle Identity Management Suite.8.1 About Customizing the OAAM Server for Multiple Applications
Multitenancy refers to a principle in software architecture where a single instance of the software runs on a server, serving multiple client organizations. With a multitenant architecture, each client organization feels as if they are working with a separate customized application instance.
You can configure the OAAM Server to support one or more Web application authentication and user registration flows. The OAAM Server configuration is specific to the UIO Proxy deployment. The OAAM UIO Proxy offers multifactor authentication to Web applications without requiring any change to the application code.
The OAAM Server proxy intercepts the HTTP traffic between the client (browser) and the server (Web application) and performs appropriate actions, such as redirecting to OAAM Server, to provide multifactor authentication and authorization. OAAM Server in turn communicates with OAAM Admin to determines the risk and takes the appropriate actions, such as permitting the login, challenging the user, blocking the user, and other actions.
Figure 8-1 Universal Installation Deployment

Description of "Figure 8-1 Universal Installation Deployment"
The UIO Proxy can be placed in front of multiple applications and customized to work with each one as required.
8.2 About Configuring and Customizing OAAM Server for Multiple Applications
This section contains the following topics:
-
Determining the Application ID of Each Application to Secure
-
Assigning Default User Groups for Each Application to Secure
-
Configuring OAAM Server Properties Several Applications Have In Common
-
About Managing the Appearance and Behavior of OAAM Using User-Defined Enumerations
8.2.1 Determining the Application ID of Each Application to Secure
To ensure that a customer's data is unique from that of other customers, an Application ID for the client application is mapped to an Organization ID. An Organization ID identifies what tenant applications a user utilizes.
Determine how many applications are to be configured and assign each application an Application ID. This Application ID is the same one used to configure the Proxy (see Chapter 6, "Configuring the Oracle Adaptive Access Manager Proxy"). In many cases applications are referred to internally by some name or abbreviation, so an integrator configuring OAAM Server might want to use that name. For an example, if the client has two applications, one wholesale banking application and one retail banking application, the integrator might choose to use wholesale and retail as the Application IDs for the two applications.
This Application ID is the same one used to configure the Proxy (see Chapter 6, "Configuring the Oracle Adaptive Access Manager Proxy").
The Proxy will send the AppId to OAAM Server as needed through an HTTP header. This AppId is then used to determine which configuration is used when displaying pages to the client. OAAM Server is configured by a set of properties which will be discussed in more detail later.
Properties can contain an AppId to allow for multiple configurations for multi-tenant scenarios.
The following example shows how to use the AppId to define a property in the OAAM server:
bharosa.uio.appId1.default.user.group=app1Group
The bold appId1 is in the location in the property where you use the AppId to configure application specific values.
8.2.2 Assigning Default User Groups for Each Application to Secure
You can configure each application to have a unique default user group. This is the group that a user of that application will be associated with as their Organization ID when the user is first created in the Oracle Adaptive Access Manager database. The Organization ID is used when a user attempts to log in to the application and user data is loaded from the database.
An example of how Organization ID is used in a property definition is shown as follows:
bharosa.uio.appId1.default.user.group=app1Group
bharosa.uio.appId2.default.user.group=app2Group
In the example, two Organization IDs are defined to two different applications. The application with an AppId of appId 1 has been assigned the Organization ID of app1Group and the application with an AppId of appId2 has been assigned the Organization ID of app2Group.
8.2.3 Configuring OAAM Server Application Properties
An application in OAAM Server is made up of a grouping or set of properties. You can configure OAAM Server properties on a global or application specific level.
OAAM Server property names are prefixed with bharosa.uio. They are followed by the Application ID or default if the setting is global.
Property definitions that start with bharosa.uio.default apply to all Application IDs unless overridden by a more specific value.
In the following example, default is used instead of the appId to designate the property as a global default. The property is used across all applications of the OAAM Server installation unless a specific application has another location specified.
bharosa.uio.default.header = /globalcustomHeader.jsp
bharosa.uio.default.footer = /globalcustomFooter.jsp
The default properties for the path to the custom header and footer are:
bharosa.uio.default.header = path_to_custom_header.jsp
bharosa.uio.default.footer = path_to_custom_footer.jsp
An application-level property is one that only effects a single application when there are more than one application defined in the properties.
In Oracle Adaptive Access Manager and Access Manager integrations, the AppId is oam. This allows OAAM to display a different header and footer that keeps the same look and feel as Access Manager pages.
The properties for the path to the Access Management custom header and footer are:
bharosa.uio.oam.header = path_to_custom_header.jsp
bharosa.uio.oam.footer = path_to_custom_footer.jsp
These specific prefix bharosa.uio.oam value overrides the default settings defined as bharosa.uio.default.
In the following example, app1 uses an application-level defined header and footer file, but app2 uses an application-level defined footer but a global or default defined header file.
bharosa.uio.default.header = /globalcustomHeader.jsp
bharosa.uio.default.footer = /globalcustomFooter.jsp
bharosa.uio.app1.header = /app1customHeader.jsp
bharosa.uio.app1.footer = /app1customFooter.jsp
bharosa.uio.app2.footer = /app2customFooter.jsp
8.2.4 Configuring OAAM Server Properties Several Applications Have In Common
In addition to configuring properties for each application, you can configure a set of properties that several applications have in common. You can then extend that set to customize the parameters that differ between the set of applications.
If you were to configure three applications that all use a single footer, but each has a unique header, you can include the following properties:
bharosa.uio.myAppGroup.footer = /myAppGroup/customFooter.jsp

bharosa.uio.appId1.extends=myAppGroup
bharosa.uio.appId1.header=/client/app1/customHeader.jsp

bharosa.uio.appId2.extends=myAppGroup
bharosa.uio.appId2.header==/client/app2/customHeader.jsp

bharosa.uio.appId3.extends=myAppGroup
bharosa.uio.appId3.header==/client/app3/customHeader.jsp
8.3 About Managing the Appearance and Behavior of OAAM Using User-Defined Enumerations
You can manage the appearance and behavior of OAAM using user-defined enumerations. User-defined enumerations are a collection of properties that represent a list of items. Each element in the list may contain several different attributes. The definition of a user-defined enum begins with a property ending in the keyword ".enum" and has a value describing the use of the user-defined enum. Each element definition then starts with the same property name as the enum, and adds on an element name and has a value of a unique integer as an ID. The attributes of the element follow the same pattern, beginning with the property name of the element, followed by the attribute name, with the appropriate value for that attribute.
8.3.1 Enum Example
The following is an example of an enum defining credentials displayed on the login screen of an OAAM Server implementation:
bharosa.uio.default.credentials.enum = Enum for Login Credentials
bharosa.uio.default.credentials.enum.companyid=0
bharosa.uio.default.credentials.enum.companyid.name=CompanyID
bharosa.uio.default.credentials.enum.companyid.description=Company ID
bharosa.uio.default.credentials.enum.companyid.inputname=comapanyid
bharosa.uio.default.credentials.enum.companyid.maxlength=24
bharosa.uio.default.credentials.enum.companyid.order=0
bharosa.uio.default.credentials.enum.username=1
bharosa.uio.default.credentials.enum.username.name=Username
bharosa.uio.default.credentials.enum.username.description=Username
bharosa.uio.default.credentials.enum.username.inputname=userid
bharosa.uio.default.credentials.enum.username.maxlength=18
bharosa.uio.default.credentials.enum.username.order=1
This set of properties defines one user-defined enum that contains two elements, each of which with five attributes. The name and description attributes are required to define any user-defined enum, other attributes are defined and used as needed by each individual use of a user-defined enum.
8.3.2 Overriding Existing User-Defined Enums
Overriding existing user-defined enums has some special cases. You may override any existing enum element's attribute value of the default application ID just as you would any other property, but to change the value of an element's attribute in a single application using an appId, you must create the entire enum in that application using the appropriate appId.
For example, using the user defined enum defined in Section 8.3.1, "Enum Example," if you wanted to change Company ID to Profile ID for only one application (appId1), you would need to modify the enum:
bharosa.uio.appId1.credentials.enum = Enum for Login Credentials
bharosa.uio.appId1.credentials.enum.profileid=0
bharosa.uio.appId1.credentials.enum.profileid.name=ProfileID
bharosa.uio.appId1.credentials.enum.profileid.description=Profile ID
bharosa.uio.appId1.credentials.enum.profileid.inputname=profileid
bharosa.uio.appId1.credentials.enum.profileid.maxlength=20
bharosa.uio.appId1.credentials.enum.profileid.order=0
bharosa.uio.appId1.credentials.enum.username=1
bharosa.uio.appId1.credentials.enum.username.name=Username
bharosa.uio.appId1.credentials.enum.username.description=Username
bharosa.uio.appId1.credentials.enum.username.inputname=userid
bharosa.uio.appId1.credentials.enum.username.maxlength=18
bharosa.uio.appId1.credentials.enum.username.order=1
For instructions on customizing, extending, or overriding Oracle Adaptive Access Manager properties or enums, see Chapter 7, "Using the OAAM Extensions Shared Library to Customize OAAM."
8.3.3 Disabling Elements
To disable any already defined element in a user-defined enum, simply add an enabled attribute with a value of false. Using the appId1 credentials enum from Section 8.3.2, "Overriding Existing User-Defined Enums," you would add the following line to remove Profile ID from the elements used by the application:
bharosa.uio.appId1.credentials.enum.profileid.enabled=false
8.4 Customizing the OAAM Server Pages
This section describes how to customize the appearance of the OAAM server pages. Topics include:
8.4.1 Tips for Customizing the OAAM Web Application Pages
As you plan to customize the web user interface, keep the following points in mind:
-
When customizing, back up files so that they may be used when the software is upgraded.
-
When configuring the web application, use
oaam_custom.properties. The file should contain:-
Client-configured properties (any properties that have been customized for a specific deployment)
-
UIO Proxy system /device configurations. These properties deal with the structural changes in the overall application. It is where the header, footer, and CSS properties are located.
In the deployed application, the
oaam_custom.propertiesfile is located in theweb-inf/classesdirectory.Note:
In 11.1.2, theoaam_custom.propertiesfile replaces the bharosa_server.properties file from previous versions. -
-
OAAM Extension should contain a file called
client_resource_locale.properties. This filename is configured by the propertybharosa.config.resourcebundle.clientoverride. The default value isclient_resource. -
When adapting the OAAM deployment to a particular language, use
client_resource_locale.propertieswherelocaleis the locale string for which you want to use the custom values (en,es, and others). Theclient_resource_locale.propertiesfile is used to customize text on the pages when the application is translated into many languages. The file should contain-
Client-configured properties that are configurable for each locale being supported.
localeis the locale string for which you want to use the custom values (en,es, and others). -
UIO Proxy messaging and page content configuration. For example, page titles, links at the bottom of the pages, page messages, error message, and confirmation messages.
Note:
Theclient_resource_locale.propertiesfile is not used for header and footer files customization.The administrator creates the
client_resource_locale.propertiesfile to customize the application so that it contains locale-specific properties. -
For instructions on customizing, extending, or overriding Oracle Adaptive Access Manager properties, see Chapter 7, "Using the OAAM Extensions Shared Library to Customize OAAM."
8.4.2 Adding User-Defined Headers and Footers
You can create custom header and footer files for the applications being secured. The header and footer files are JSP files and can contain any HTML or JSP code required to replicate the look of the application being secured.
-
Create a work folder called
oaam_extensions. (The folder can be created anywhere if it is outside the installation folder.) -
Locate
oracle.oaam.extensions.warin the following directory:IAM_Home/oaam/oaam_extensions/generic -
Extract
oracle.oaam.extensions.warin theoaam_extensionsfolder. -
In the
oaam_extensionsfolder, create the following subfolders:/client/app1/ /client/app1/images/
-
Create a
customHeader.jspandcustomFooter.jspinside theclient/app1/folder.The header (
customHeader.jsp) and footer (customFooter.jsp) files should contain only content HTML, all page related tags (<html>,<head>,<body>, and so on) are already provided by OAAM Server.As a simple example, a header and footer are created that contain a single image each, to be used as the header and footer of an application called "appId1".
Copy the following code into
customHeader.jspfor the header./client/app1/customHeader.jsp <img src="client/app1/images/customHeader.jpg" alt="Welcome to App1"/>Copy the following code into customFooter.jsp for the footer.
/client/app1/customFooter.jsp
     <img src="client/app1/images/customFooter.jpg" alt="App1 Footer"/>
These files will be deployed in the
"/client/app1/"directory within the Web application. -
Add associated files to the
client/app1folder as needed.For example, the
customHeader.jpgandcustomFooter.jpgimage files referenced bycustomHeader.jspandcustomFooter.jsp./client/app1/images/customHeader.jpg /client/app1/images/customFooter.jpg
-
Open the
oaam_custom.propertiesfile in theWEB-INF/classes/bharosa_propertiesdirectory of theoracle.oaam.extensions.warfile. -
To associate these header and footer files with the application, add the following properties to
oaam_custom.propertiesand save it tooaam_extensions/WEB-INF/classes/bharosa_properties.bharosa.uio.appId1.header = /client/app1/customHeader.jsp bharosa.uio.appId1.footer = /client/app1/customFooter.jsp
-
Repackage
oracle.oaam.extensions.warfrom the parent folder ofoaam_extensionsusing the command:jar -cvfm oracle.oaam.extensions.war oaam_extensions/ META-INF\MANIFEST.MF -C oaam_extensions/ .
Note:
Note that there is a dot at the end of the command.This command recreates the WAR file with the
MANIFEST.MFfile. The new JSP files, referenced images, and added properties inoaam_custom.propertiesare included in the new WAR file. -
Shut down the OAAM Admin and OAAM Server managed servers.
-
Start the WebLogic Server where Oracle Adaptive Access Manager is deployed and log in to the WebLogic Administration Console.
-
Navigate to Domain Environment > Deployments and lock the console.
-
Click the Install button.
-
Browse to the location of the
oracle.oaam.extensions.warfile and select it by clicking the radio button next to the.warfile and clicking Next. -
Ensure Install this deployment as a library is selected and click Next.
-
Select OAAM Admin and OAAM Server servers as deployment targets.
-
Click Next again to accept the defaults in this next page and then click Finish.
-
Click the Save button and then Activate Changes.
-
Start the OAAM Admin and OAAM Server managed servers.
8.4.3 Customizing User Interface Styles
You can create a custom Cascading Style Sheet (CSS) to create a custom user interface. The CSS file provides control over backgrounds, font colors and sizes, and so on. The default CSS file, oaam_uio.css, is located in the css folder. You can override the styles in this CSS file using a custom CSS file. Use the file for an application or at a global level. For information on setting application properties, see Section 8.2.3, "Configuring OAAM Server Application Properties."
For example, to override the font-family of the default body style definition:
-
Create a work folder called
oaam_extensions.The folder can be created anywhere if it is outside the installation folder.
-
Locate
oracle.oaam.extensions.war, which is located in theIAM_Home/oaam/oaam_extensions/genericdirectory. -
Explode
oracle.oaam.extensions.warinto theoaam_extensionsfolder. -
Create the
client/app1/cssdirectory. -
Create an
app1.cssfile. -
Add the following code to the
app1.cssfile.body{ background-color:#ffffff; font-size:12px; color:#000000; font-family:arial,helvetica,sans-serif; margin:0px 0px 0px 0px } -
Change Helvetica to the primary font-family you want to use for your
appId1application. -
Add the file to the
/client/app1/cssdirectory. -
Open the
oaam_custom.propertiesfile in theWEB-INF/classes/bharosa_propertiesdirectory of theoracle.oaam.extensions.warfile. -
To use the newly created file, set the following property in
oaam_custom.properties:bharosa.uio.appId1.custom.css=/client/app1/css/app1.css
-
Repackage
oracle.oaam.extensions.warfrom the parent folder ofoaam_extensionsusing the command:jar -cvfm oracle.oaam.extensions.war oaam_extensions/META-INF/MANIFEST.MF -C oaam_extensions/ .
-
Shut down the OAAM Admin and OAAM Server managed servers.
-
Start the WebLogic Server where Oracle Adaptive Access Manager is deployed and log in to the Oracle WebLogic Administration Console.
-
Navigate to Domain Environment > Deployments and lock the console.
-
Click the Install button.
-
Browse to the location of the
oracle.oaam.extensions.warfile and select it by clicking the option next to the WAR file and clicking Next. -
Ensure Install this deployment as a library is selected and click Next.
-
Select OAAM Admin and OAAM Server servers as deployment targets.
-
Click Next again to accept the defaults in this next page and then click Finish.
-
Click the Save button and then Activate Changes.
-
Start the OAAM Admin and OAAM Server managed servers.
Any style defined in the oaam_uio.css in the OAAM Server ear file can be overridden in this manner if required.
8.4.4 Adding User-Defined Messages
You can customize content and messaging of the OAAM server pages by adding properties to the client_resource_locale.properties file.
Some customizable items, like page title and message, are applicable for each page. While other items, like login blocked message, are specific to a particular page.
To customize content and messaging:
-
Create a work folder called
oaam_extensions. (The folder can be created anywhere if it is outside the installation folder.) -
Locate
oracle.oaam.extensions.war, which is located in theIAM_Home/oaam/oaam_extensions/genericdirectory. -
Explode
oracle.oaam.extensions.warinto theoaam_extensionsfolder. -
Create a
client_resource_locale.propertiesfile inoaam_extensions\WEB-INF\classes. -
Add the customized messages to this file.
For example, to change the page title on the login page for the
appId1application, add the following line toclient_resource_locale.properties:bharosa.uio.appId1.signon.page.title=Welcome to App1, please sign in.
For example, to customize the error message displayed when a user has been blocked by security rules, add the following line to
client_resource_locale.properties:bharosa.uio.appId1.login.user.blocked = You are not authorized to login. Please contact customer service at 1-888-555-1234.
-
Repackage
oracle.oaam.extensions.warfrom the parent folder ofoaam_extensionsusing the command:jar -cvfm oracle.oaam.extensions.war oaam_extensions/META-INF/MANIFEST.MF -C oaam_extensions/ .
-
Shut down all managed servers.
-
Start the WebLogic Server where Oracle Adaptive Access Manager is deployed and log in to the Oracle WebLogic Administration Console.
-
Navigate to Domain Environment > Deployments and lock the console.
-
Click the Install button.
-
Browse to the location of the
oracle.oaam.extensions.warfile and select it by clicking the option next to the WAR file and clicking Next. -
Ensure Install this deployment as a library is selected and click Next.
-
Select OAAM Admin and OAAM Server servers as deployment targets.
-
Click Next again to accept the defaults in this next page and then click Finish.
-
Click the Save button and then Activate Changes.
-
Start the OAAM Admin and OAAM Server managed servers.
8.4.5 Customizing the Text in the OAAM Login, Password, and VAD Pages
You can override the page directions and the virtual authentication device text (if desired) in the resource bundles.
Add these customizations using OAAM Extensions Shared Library. For information on customizations, see Chapter 7, "Using the OAAM Extensions Shared Library to Customize OAAM."
Table 8-1 User Name Page Properties
| Property | Default Value | Description | Property Must Be In File |
|---|---|---|---|
|
bharosa.uio.default.signon.page.title |
Sign In: |
Title for default User name page |
oaam_custom.properties and client_resource_<locale>.properties |
|
bharosa.uio.default.signon.page.message |
Enter your user name. |
Message for User Name page |
oaam_custom.properties and client_resource_<locale>.properties |
|
bharosa.uio.default.username.label |
UserName |
Change the user name label on the OAAM Login page |
oaam_custom.properties and client_resource_<locale>.properties |
|
bharosa.uio.default.credentials.enum.username.name |
UserName |
Change the user name label on the OAAM Login page. |
oaam_custom.properties and client_resource_<locale>.properties |
Table 8-2 Password Page Properties
| Property | Default Value | Description | Property Must Be In File |
|---|---|---|---|
|
bharosa.uio.default.password.page.title |
Sign In: |
Title for default password page |
oaam_custom.properties and client_resource_<locale>.properties |
|
bharosa.uio.default.password.page.message |
Use this security device to enter your password. |
Message for Password page |
oaam_custom.properties and client_resource_<locale>.properties |
|
bharosa.uio.default.password.page.message |
Use this security device to enter your password. |
Message for Password page |
oaam_custom.properties and client_resource_<locale>.properties |
|
bharosa.uio.default.password.page.DeviceHTMLControl.message |
Enter your password. |
Device HTMO message for Password page |
oaam_custom.properties and client_resource_<locale>.properties |
|
bharosa.uio.default.password.page.DeviceKeyPadFull.message |
Please use this secure KeyPad to enter your password. |
KeyPad message for Password page |
oaam_custom.properties and client_resource_<locale>.properties |
|
bharosa.uio.default.password.page.DeviceKeyPadAlpha.message |
Please use this secure KeyPad to enter your password. |
alphanumeric KeyPad (numbers and letters only, no special characters) message for Password page |
oaam_custom.properties and client_resource_<locale>.properties |
|
bharosa.uio.default.password.page.DeviceTextPad.message |
Please use this secure TextPad to enter your password. |
TextPad message for Password page |
oaam_custom.properties and client_resource_<locale>.properties |
|
bharosa.uio.default.password.page.DevicePinPad.message |
Please use this secure PinPad to enter your PIN. |
PinPad message for Password page |
oaam_custom.properties and client_resource_<locale>.properties |
KeyPad Description and Directions
Table 8-3 KeyPad Description and Direction Properties
| Property | Default Value | Description | Property Must Be In File |
|---|---|---|---|
|
bharosa.authentipad.keypad.accessibility.directions |
KeyPad directions: Use the following links to enter your password. Your personalized caption text comes first, followed by control links, which are then followed by the key links. Once you have entered your password, use shift-tab to return to the enter link to submit your password. |
KeyPad directions |
oaam_custom.properties and client_resource_<locale>.properties |
|
bharosa.authentipad.keypad.security.image.alt |
Security Device Image |
KeyPad Authenticator background graphic |
oaam_custom.properties and client_resource_<locale>.properties |
|
bharosa.authentipad.keypad.datafield.label |
Password |
Password label. |
oaam_custom.properties and client_resource_<locale>.properties |
|
bharosa.authentipad.keypad.enterkey.label |
Enter |
Enter |
oaam_custom.properties and client_resource_<locale>.properties |
PinPad Description and Directions
Table 8-4 KeyPad Description and Direction Properties
| Property | Default Value | Description | Property Must Be In File |
|---|---|---|---|
|
bharosa.authentipad.pinpad.accessibility.directions |
PinPad directions: Use the following links to enter your numeric pin. Your personalized caption text comes first, followed by control links, which are then followed by the numeric links. Once you have entered your numeric pin, use shift-tab to return to the enter link to submit your pin. |
PinPad directions |
oaam_custom.properties and client_resource_<locale>.properties |
|
bharosa.authentipad.pinpad.security.image.alt |
Security Device Image |
PinPad Authenticator background graphic |
oaam_custom.properties and client_resource_<locale>.properties |
|
bharosa.authentipad.pinpad.datafield.label |
PIN |
PIN label. |
oaam_custom.properties and client_resource_<locale>.properties |
|
bharosa.authentipad.pinpad.enterkey.label |
Enter |
Enter |
oaam_custom.properties and client_resource_<locale>.properties |
TextPad Description and Directions
Table 8-5 TextPad Description and Direction Properties
| Property | Default Value | Description | Property Must Be In File |
|---|---|---|---|
|
bharosa.authentipad.textpad.accessibility.directions |
TextPad directions: Use the following items to validate your device. Your personalized caption text comes first, followed by a timestamp to ensure the device was generated for this session. Once you have entered your password in the previous password entry field, use tab to navigate to the enter link to submit your password. |
TextPad directions |
oaam_custom.properties and client_resource_<locale>.properties |
|
bharosa.authentipad.textpad.security.image.alt |
Security Device Image |
TextPad Authenticator background graphic |
oaam_custom.properties and client_resource_<locale>.properties |
|
bharosa.authentipad.textpad.datafield.label |
Password |
Password label. |
oaam_custom.properties and client_resource_<locale>.properties |
|
bharosa.authentipad.textpad.enterkey.label |
Enter |
Enter |
oaam_custom.properties and client_resource_<locale>.properties |
|
bharosa.authentipad.textpadreset.accessibility.directions |
TextPad directions: Use the following items to enter your new password. Your personalized caption text comes first, followed by a password input field and password confirmation field. Once you have entered your password, use tab to navigate to the enter link to submit your new password. |
TextPad reset directions |
oaam_custom.properties and client_resource_<locale>.properties |
|
bharosa.authentipad.textpadreset.security.image.alt |
Security Device Image |
TextPad authenticator reset background graphic |
oaam_custom.properties and client_resource_<locale>.properties |
|
bharosa.authentipad.textpadreset.datafield.label |
Password |
Password label. |
oaam_custom.properties and client_resource_<locale>.properties |
|
bharosa.authentipad.textpadreset.confirmfield.label |
Confirm Password |
Confirm Password label. |
|
|
bharosa.authentipad.textpadreset.enterkey.label |
Enter |
Enter |
oaam_custom.properties and client_resource_<locale>.properties |
CaptionPad Description and Directions
Table 8-6 CaptionPad Description and Direction Properties
| Property | Default Value | Description | Property Must Be In File |
|---|---|---|---|
|
bharosa.authentipad.captionpad.accessibility.directions |
CaptionPad directions: Use the following items to enter your new caption text. Control links come first, followed by a text input field. Once you have entered your caption, use tab to navigate to the enter link to submit your new caption. |
CaptionPad directions |
oaam_custom.properties and client_resource_<locale>.properties |
|
bharosa.authentipad.captionpad.security.image.alt |
Security Device Image |
CaptionPad Authenticator background graphic |
oaam_custom.properties and client_resource_<locale>.properties |
|
bharosa.authentipad.captionpad.datafield.label |
Security Phrase |
Security Phrase label. |
oaam_custom.properties and client_resource_<locale>.properties |
|
bharosa.authentipad.captionpad.enterkey.label=enter |
Enter |
Enter |
oaam_custom.properties and client_resource_<locale>.properties |
|
bharosa.authentipad.captionconfirmpad.accessibility.directions |
CaptionConfirmPad directions: Use the following items to review your caption text. To edit your caption text, tab to the Edit link and press Enter. |
CaptionPad confirm directions |
oaam_custom.properties and client_resource_<locale>.properties |
|
bharosa.authentipad.captionconfirmpad.security.image.alt |
Security Device Image |
CaptionPad authenticator confirm background graphic |
oaam_custom.properties and client_resource_<locale>.properties |
|
bharosa.authentipad.captionconfirmpad.datafield.label |
Security Phrase |
Security Phrase |
oaam_custom.properties and client_resource_<locale>.properties |
|
bharosa.authentipad.captionconfirmpad.enterkey.label |
Enter |
Enter |
oaam_custom.properties and client_resource_<locale>.properties |
QuestionPad Description and Directions
Table 8-7 KeyPad Description and Direction Properties
| Property | Default Value | Description | Property Must Be In File |
|---|---|---|---|
|
bharosa.authentipad.questionpad.accessibility.directions |
QuestionPad directions: Use the following items to enter your answer. Your personalized question comes first, followed by your personalized caption, which is then followed by your answer input field. Once you have entered your answer, use tab to navigate to the enter link to submit your answer. |
QuestionPad directions |
oaam_custom.properties and client_resource_<locale>.properties |
|
bharosa.authentipad.questionpad.security.image.alt |
Security Device Image |
QuestionPad Authenticator background graphic |
oaam_custom.properties and client_resource_<locale>.properties |
|
bharosa.authentipad.questionpad.datafield.label |
Answer |
Answer label. |
oaam_custom.properties and client_resource_<locale>.properties |
|
bharosa.authentipad.questionpad.enterkey.label |
Enter |
Enter |
oaam_custom.properties and client_resource_<locale>.properties |
8.4.6 Adding Forgot Username Link
OAAM has a placeholder for a link to Forgot Username. It can be configured to link to Oracle Identity Manager.
Note:
The Forgot Password feature requires Oracle Identity Manager integration. For more information on Access Manager, Oracle Adaptive Access Manager, and Oracle Identity Manager integration, see Integration Guide for Oracle Identity Management Suite.bharosa.uio.default.signon.links.enum.forgotusername=2 bharosa.uio.default.signon.links.enum.forgotusername.name=ForgotUsername bharosa.uio.default.signon.links.enum.forgotusername.description=Forgot your username? bharosa.uio.default.signon.links.enum.forgotusername.url=# bharosa.uio.default.signon.links.enum.forgotusername.personalization=false bharosa.uio.default.signon.links.enum.forgotusername.order=2 bharosa.uio.default.signon.links.enum.forgotusername.enabled=false
bharosa.uio.default.password.links.enum.forgotpassword=3
bharosa.uio.default.password.links.enum.forgotpassword.name=ForgotPassword
bharosa.uio.default.password.links.enum.forgotpassword.description=Forgot your password?
bharosa.uio.default.password.links.enum.forgotpassword.url=forgotPassword.do
bharosa.uio.default.password.links.enum.forgotpassword.personalization=false
bharosa.uio.default.password.links.enum.forgotpassword.order=3
bharosa.uio.default.password.links.enum.forgotpassword.enabled=true
8.4.7 Changing the Invalid Characters Check on the Login Page
To add characters to the invalid characters check on the Login page, add the following property to the client_resource.properties (or client_resource_en.properties) file.
bharosa.uio.default.signon.loginid.regexp=/[^\\s\\\\\\<\\>]/gi
Then add your characters to the property.
8.4.8 Configuring OAAM Server for Localization
This section contains the following topics:
8.4.8.1 Turning Off Localization
There is no flag to turn-off localization, but there is a property that captures the locales supported by the deployment. You can use the property to enable one locale.
You would change the locale.enum.XXX.adminSupported and locale.enum.XXX.enabled properties to false for each unwanted locale.
8.4.8.2 Overriding Localized Properties
Perform customizations to localized strings in the client_resource_locale.properties file:
-
Create
client_resource_locale.properties. -
Add property
bharosa.config.resourcebundle.clientoverridetoclient_resource_locale.properties. The default value of this property in OAAM Server isclient_resource.By default the file to add custom localized strings to is
client_resource_locale.properties.For example, for English, the file is
client_resource_en.propertiesand for Spanish the file isclient_resource_es.properties. -
Add customized properties to
client_resource_locale.properties. -
Create OAAM Extension WAR file containing
client_resource_locale.propertiesinside inoaam_extensions\WEB-INF\classesdirectory.
8.4.8.3 Configuring Language Defaults for Oracle Adaptive Access Manager
You can configure language defaults in the client_resource_locale.properties file using the bharosa.locale. enum property. For instructions on customizing Oracle Adaptive Access Manager, see Chapter 7, "Using the OAAM Extensions Shared Library to Customize OAAM."
An example of a bharosa.locale. enum is shown below:
bharosa.locale.enum.german=2
bharosa.locale.enum.german.name=German
bharosa.locale.enum.german.description=German
bharosa.locale.enum.german.language=de
bharosa.locale.enum.german.country=
bharosa.locale.enum.german.adminSupported=true
bharosa.locale.enum.german.enabled=true
To enable the default locale:
-
Add and set the
bharosa.local.enum.locale.enabled propertiesof the locales you want to support to true. -
Add and set the
bharosa.local.enum.locale.enabledproperties of the locales you do not want to support to false. -
Add and set the
bharosa.default.locale propertyto match thebharosa.locale.enum.localeproperty of your locale.
Note:
The only locales supported are the ones listed in the enums.8.4.8.3.1 Example 1
A German bank wants to set German as the default language and wants to support only German. Follow these steps to configure the client_resource_de.properties file:
-
If the locale enum does not exist, create it:
bharosa.locale.enum.german.enabled=true
-
If the locale enum already exists, set it to true.
-
If present, set other
bharosa.local.enum.locale.enabledproperties tofalse.bharosa.locale.enum.italian.enabled=false bharosa.locale.enum.french.enabled=false bharosa.locale.enum.portuguese_br.enabled=false bharosa.locale.enum.spanish.enabled=false bharosa.locale.enum.korean.enabled=false bharosa.locale.enum.chinese_cn.enabled=false bharosa.locale.enum.chinese_tw.enabled=false bharosa.locale.enum.japanese.enabled=false bharosa.locale.enum.arabic.enabled=false bharosa.locale.enum.czech.enabled=false bharosa.locale.enum.danish.enabled=false bharosa.locale.enum.dutch.enabled=false bharosa.locale.enum.finnish.enabled=false bharosa.locale.enum.greek.enabled=false bharosa.locale.enum.hebrew.enabled=false bharosa.locale.enum.hungarian.enabled=false bharosa.locale.enum.norwegian.enabled=false bharosa.locale.enum.polish.enabled=false bharosa.locale.enum.portuguese.enabled=false bharosa.locale.enum.romanian.enabled=false bharosa.locale.enum.russian.enabled=false bharosa.locale.enum.slovak.enabled=false bharosa.locale.enum.swedish.enabled=false bharosa.locale.enum.thai.enabled=false bharosa.locale.enum.turkish.enabled=false
-
Set
bharosa.default.locale propertyto match the value of the locale enum.Since
bharosa.locale.enum.german=2, setbharosa.default.localeproperty to 2.If the property does not exist, create it.
8.4.8.3.2 Example 2
A Brazilian bank wants to set Brazilian Portuguese as the default, but wants to display all the other languages that OAAM Server had been translated to. To configure the setting:
-
If the locale enum does not exist, create it:
bharosa.locale.enum.pt_br.enabled=true
-
If the locale enum already exists, set it to true.
-
Set all other
bharosa.local.enum.locale.enabledproperties to false. -
Set
bharosa.default.localeproperty to the value of the locale enum.If
bharosa.locale.enum.pt_br=9, setbharosa.default.locale propertyto9. -
Set
bharosa.locale.enum.locale.enabledproperty inclient_resource_locale.propertiesfor all the languages OAAM Server had been translated to and ensure they are set to true.bharosa.locale.enum.german.enabled=true bharosa.locale.enum.italian.enabled=true bharosa.locale.enum.french.enabled=true bharosa.locale.enum.portuguese_br.enabled=true bharosa.locale.enum.spanish.enabled=true bharosa.locale.enum.korean.enabled=true bharosa.locale.enum.chinese_cn.enabled=true bharosa.locale.enum.chinese_tw.enabled=true bharosa.locale.enum.japanese.enabled=true bharosa.locale.enum.arabic.enabled=true bharosa.locale.enum.czech.enabled=true bharosa.locale.enum.danish.enabled=true bharosa.locale.enum.dutch.enabled=true bharosa.locale.enum.finnish.enabled=true bharosa.locale.enum.greek.enabled=true bharosa.locale.enum.hebrew.enabled=true bharosa.locale.enum.hungarian.enabled=true bharosa.locale.enum.norwegian.enabled=true bharosa.locale.enum.polish.enabled=true bharosa.locale.enum.portuguese.enabled=true bharosa.locale.enum.romanian.enabled=true bharosa.locale.enum.russian.enabled=true bharosa.locale.enum.slovak.enabled=true bharosa.locale.enum.swedish.enabled=true bharosa.locale.enum.thai.enabled=true bharosa.locale.enum.turkish.enabled=true
-
Set
bharosa.default.locale propertyinclient_resource_locale.propertiesto9.
8.4.8.3.3 Example 3
A French bank wants clients to see French as a default, and wants to support only French, German, English, and Italian. The French locale enum is already present in the client_resource_fr.properties file.
bharosa.locale.enum.french=5
bharosa.locale.enum.french.name=French
bharosa.locale.enum.french.description=French
bharosa.locale.enum.french.language=fr
bharosa.locale.enum.french.country=
bharosa.locale.enum.french.adminSupported=true
bharosa.locale.enum.french.enabled=true
To configure the application:
-
In
client_resource_fr.propertiessetbharosa.locale.enum.locale.enabledtotruefor German, Italian, and English.bharosa.locale.enum.german.enabled=true bharosa.locale.enum.italian.enabled=true bharosa.locale.enum.english.enabled=true
-
Set all other
bharosa.local.enum.locale.enabledproperties tofalse. -
Set
bharosa.default.localeproperty to the value of the locale enum.Since
bharosa.locale.enum.french=5, setbharosa.default.localeproperty to5.
8.4.8.3.4 Example 4
A German bank wants to set English as the default language and wants to support all other languages. To do this, follow these steps for client_resource_de.properties:
-
If the locale enum does not exist, create it:
bharosa.locale.enum.english.enabled=true
-
If the locale enum already exists, set it to
true. -
If present, set other
bharosa.local.enum.locale.enabledproperties to true.bharosa.locale.enum.italian.enabled=true bharosa.locale.enum.german.enabled=true bharosa.locale.enum.french.enabled=true bharosa.locale.enum.portuguese_br.enabled=true bharosa.locale.enum.spanish.enabled=true bharosa.locale.enum.korean.enabled=true bharosa.locale.enum.chinese_cn.enabled=true bharosa.locale.enum.chinese_tw.enabled=true bharosa.locale.enum.japanese.enabled=true bharosa.locale.enum.arabic.enabled=true bharosa.locale.enum.czech.enabled=true bharosa.locale.enum.danish.enabled=true bharosa.locale.enum.dutch.enabled=true bharosa.locale.enum.finnish.enabled=true bharosa.locale.enum.greek.enabled=true bharosa.locale.enum.hebrew.enabled=true bharosa.locale.enum.hungarian.enabled=true bharosa.locale.enum.norwegian.enabled=true bharosa.locale.enum.polish.enabled=true bharosa.locale.enum.portuguese.enabled=true bharosa.locale.enum.romanian.enabled=true bharosa.locale.enum.russian.enabled=true bharosa.locale.enum.slovak.enabled=true bharosa.locale.enum.swedish.enabled=true bharosa.locale.enum.thai.enabled=true bharosa.locale.enum.turkish.enabled=true
-
Set
bharosa.default.locale propertyto match the value of the locale enum.Since
bharosa.locale.enum.english=0, setbharosa.default.localeproperty to 0.If the property does not exist, create it.
8.4.8.4 Customizing Abbreviations and Equivalences for Locales
Oracle Adaptive Access Manager supports the concept of "fuzzy logic." Fuzzy logic, in part, relies on preconfigured sets of word equivalents, commonly known as abbreviations.
In the English version of Oracle Adaptive Access Manager, there are several thousand English abbreviations (and equivalences).
In all other languages, it is necessary for the installer to enhance the brief abbreviation files provided. Without additions, the fuzzy logic will be not as effective.
Locale-specific abbreviation files are shipped with OAAM. These files are named bharosa_auth_abbreviation_config_locale.properties where locale is the locale string. For example, the Spanish version of the file is bharosa_auth_abbreviation_config_es.properties.
Changes cannot be made to this file. To customize abbreviations, a new file must be created with a new set of abbreviations. This file takes precedence over the original file and all abbreviations in the original file are ignored.
To localize for one locale (for example, for Japanese only), perform the following steps:
-
Create one file specific to the locale with the same prefix as the original locale-specific abbreviation file. For example,
Abbreviations_ja.propertiesfor Japanese. -
Add the file to
oaam_extensions/WEB-INF/classes. -
In the
client_resource_locale.propertiesfile, set the value of propertybharosa.authenticator.AbbreviationFileNameto that file's absolute path,WEB-INF/classes/Abbreviations_ja.propertiesin theoaam_extensionsfolder.
If you want customize for multiple locales, perform the following steps:
-
Create the files specific to those locales with the same prefix as the original locale-specific abbreviation file.
For example,
Abbreviations_es.properties for Spanish
Abbreviations_ja.properties for Japanese
-
Add the file to
oaam_extensions/WEB-INF/classes. -
In the
client_resource_locale.propertiesfile, set the value of propertybharosa.authenticator.AbbreviationFileNameto that file's absolute path,WEB-INF/classes/Abbreviations.propertiesin theoaam_extensionsfolder.The locale prefix is absent in the value of the property because the locale settings of the end user's browser determine the run-time locale.
8.5 Configuring a Single Login Page
If you want to have the username and password input on a single page, you can configure a single login page. This section contains the following topics:
-
Section 8.5.2, "Setting Properties to Enable the OAAM Single Login Page"
-
Section 8.5.3, "Configuring Single Login Page to Use the OAAM HTML Pad"
-
Section 8.5.4, "Customizing the OAAM Single Login Page Using the Shared Extensions Library"
Note:
In cases where the property you want does not exist in the appropriate file, you can add it.For instructions on deploying the OAAM Shared Extensions Library, see Chapter 7, "Using the OAAM Extensions Shared Library to Customize OAAM."
8.5.1 OAAM Single Login Page Flows
OAAM Single Login Page flows are presented in this section.
Single Login Page Login Flow (Access Manager and OAAM Integration)
Access Manager and OAAM integration in Advanced mode or Advanced mode using TAP is used in this flow. Access Manager and OAAM integration in Basic mode is not supported. Both Advanced modes include the OTP Anywhere and KBA Challenge frameworks. If integrated with OIM also, self-service management flows are supported available. For details on self-service management flow, see "Forgot Password Flow (Access Manager, OAAM, and OIM Integration)".
The single login page flow is as follows:
-
The user tries to access a resource protected by the OAAM authentication scheme.
-
Oracle Access Management WebGate (SSO Agent) intercepts the request and redirects the user to the OAAM Server.
-
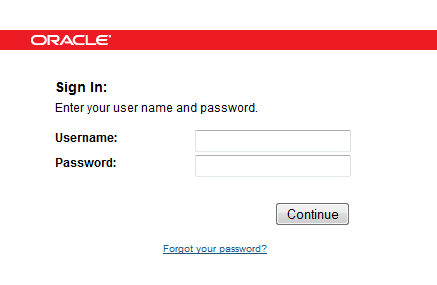
OAAM Server presents the user with a single login page with fields for Username and Password and a Forgot your password link, as shown in Figure 8-2.
-
The user submits credentials.
-
OAAM displays a jump page to capture digital and secure cookies and fingerprints the user device.
-
OAAM runs the device identification process to identify the user device.
-
OAAM evaluates the Preauthentication checkpoint to check if the user is a member of a blacklisted country, device, IP, ISP, or users group or if he is using WEBZIP. If he is in a blacklisted group or using WEBZIP, he is blocked and cannot proceed.
Note:
OAAM does not run the Authentipad checkpoint because no VADs are used for this flow. -
OAAM sends OAP API calls to Access Manager to validate credentials.
-
After validation on the Access Manager side, OAAM evaluates the Post-Authentication to determine if the action should be
Block,Challenge, orAllow.If the outcome of Post-Authentication is
Allowthen OAAM determines if the user has to be registered by evaluating the Registration checkpoint. Based on the types of registration it takes the user through the Registration Flow.If there is enough risk involved, the outcome of Post-Authentication may be
Challenge. OAAM evaluates the Challenge checkpoint to determine if the user should be blocked or challenged with one of the registered challenge mechanism by taking the user through the Challenge Flow.0 score is no risk
1-500 score is low risk
501-1000 score is high risk
-
OAAM interacts with the user during the appropriate flows and if the user is successful, one of the following scenarios occur:
-
If using the Access Manager and OAAM integration in Advanced mode, OAAM sets the OAM cookie, user is logged in, and a single sign-on session is created.
-
If using the Access Manager and OAAM integration in Advanced mode with TAP, Access Manager sets the OAM cookie, user is logged in, and a single sign-on session is created.
-
Forgot Password Flow (Access Manager, OAAM, and OIM Integration)
Note:
The Forgot Password feature requires Oracle Identity Manager integration. For more information on Access Manager, Oracle Adaptive Access Manager, and Oracle Identity Manager integration, see Integration Guide for Oracle Identity Management Suite.Access Manager, OAAM, and OIM integration includes OTP Anywhere, the Challenge framework, and additional self-service management flows (reset and change password) using OAAM with OIM APIs.
-
The user tries to access a resource protected by the OAAM authentication scheme.
-
Oracle Access Management WebGate (SSO Agent) intercepts the request and redirects the user to the OAAM Server.
-
OAAM Server presents the user with a single login page with fields for Username and Password and a Forgot your password link, as shown in Figure 8-4.
-
The user clicks the Forgot your password link.
-
The user is taken to the Forgot Password User Name page, as shown in Figure 8-5, where he enters his user name into the Username field.
Figure 8-5 Forgot Password User Name Page
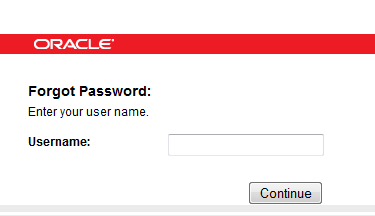
Description of "Figure 8-5 Forgot Password User Name Page"
-
The OAAM jump page captures the digital and secure cookies and fingerprints the user device.
-
OAAM runs the device identification process to identify the user device.
-
OAAM evaluates the Preauthentication checkpoint to check if the user is a member of a blacklisted country, device, IP, ISP, or users group or if he is using WEBZIP. If he is in a blacklisted group or using WEBZIP, he is blocked and cannot proceed.
Note:
OAAM does not run the Authentipad checkpoint because no VADs are used for this flow. -
The OAAM Server runs the Forgot Password checkpoint.
-
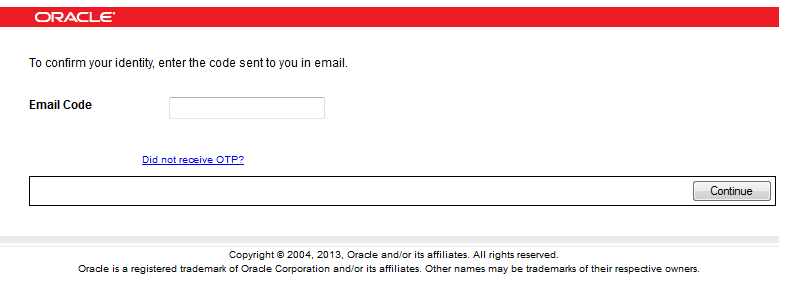
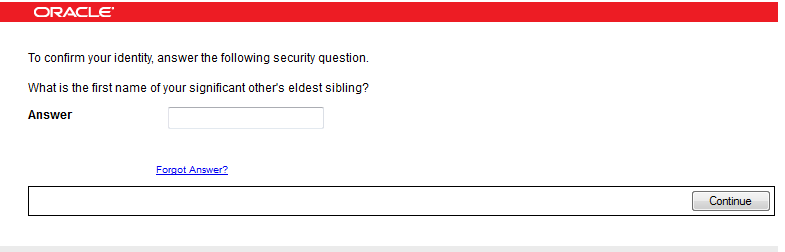
OAAM presents the user with a challenge page.
An example OTP challenge is shown below.
-
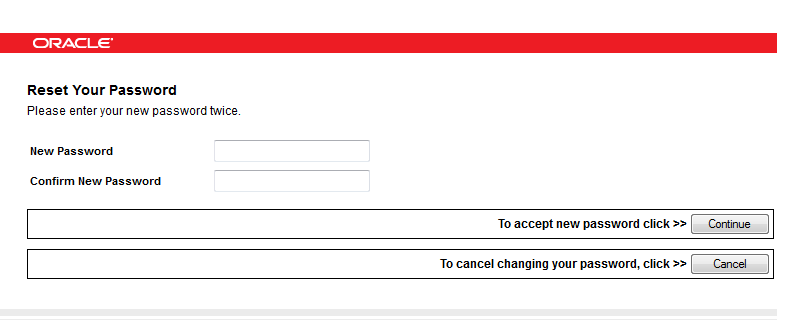
If the challenge is successful, he is redirected to the Password Reset page.
-
The user enters new password and confirms the new password by entering it again.
-
OAAM sends OAP API calls to Access Manager to validate credentials.
-
After authentication, OAAM evaluates Post-Authentication checkpoint policies. Based on the outcome of the policy OAAM might challenge or block the user or allow the user to register if he has not been registered.
If the outcome of Post-Authentication is
Allowthen OAAM determines if the user has to be registered by evaluating the Registration checkpoint. Based on the types of registration it takes the user through the Registration Flow.If there is enough risk involved, the outcome of Post-Authentication may be
Challenge. OAAM evaluates the Challenge checkpoint to determine if the user should be blocked or challenged with one of the registered challenge mechanism by taking the user through the Challenge Flow.0 score is no risk
1-500 score is low risk
501-1000 score is high risk
If the outcome of Post-Authentication is
Blockthen the user would be blocked and he will not be able to access the resource that he tried accessing. -
OAAM interacts with the user during the required flows and if the user is successful, one of the following scenarios occur:
-
If using the Access Manager and OAAM integration in Advanced mode, OAAM sets the OAM cookie, user is logged in, and a single sign-on session is created.
-
If using the Access Manager and OAAM integration in Advanced mode with TAP, Access Manager sets the OAM cookie, user is logged in, and a single sign-on session is created.
-
Single Login Page Challenge Flow
The challenge mechanism that is used and the order in which they are used depends on the deployment. For example, the OTP challenge can by configured to be first priority instead of KBA by changing trigger combination in the OAAM Challenge Policy.
-
If the user does not have a mechanism registered and the risk score is high enough for the user to be challenged, then the user might be blocked because it is not possible to take him through the challenge flow because of incomplete registration.
-
OAAM determine which authentication mechanism to use to challenge the user. The challenge is on an HTML page which does not require VADs. The user must enter the answer into the HTML input field. Figure 8-8 shows an example of a KBA challenge.
-
If able to answer the challenge, OAAM takes the user through the Registration Flow if the user needs registration.
-
If the challenge is unsuccessful, the user may be challenged again or he can be locked out because there are no more challenge mechanisms to challenge him with.
Single-Page Registration Flow (Access Manager and OAAM Integration)
Registration is required depending on security requirements, which specify whether the registration is mandatory or optional.
-
OAAM runs the Registration checkpoint to determine if the user needs to register his security profile. Based on the types of registration, it takes the user through the registration pages.
-
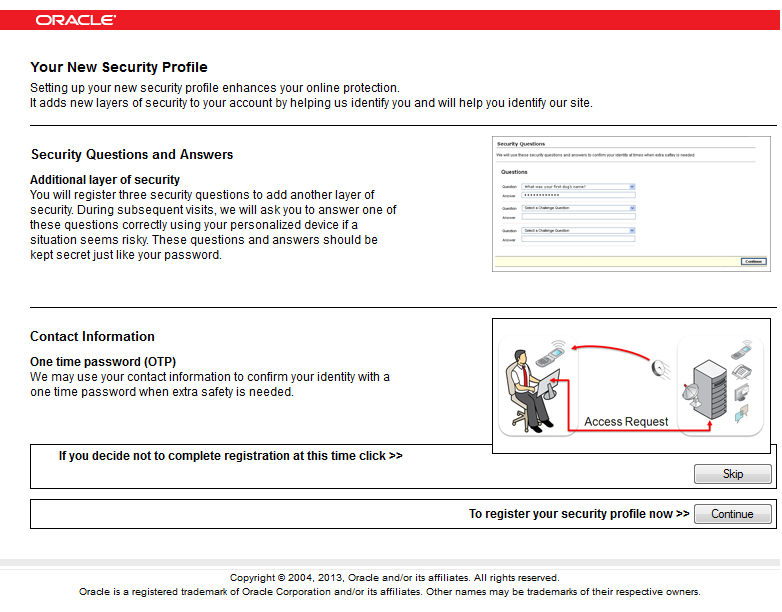
If the user is accessing the application for the first time, a Registration page is displayed after he enters valid credentials. Figure 8-9 shows the Registration page where the user can choose to register his security profile now or to register the security profile at a later time.
If he selects Continue, he is taken through the registration flow.
-
If the user does not have a complete profile registered, the user is taken to the registration pages where he provides the appropriate information in the HTML input fields. No VAD related information is shown.
-
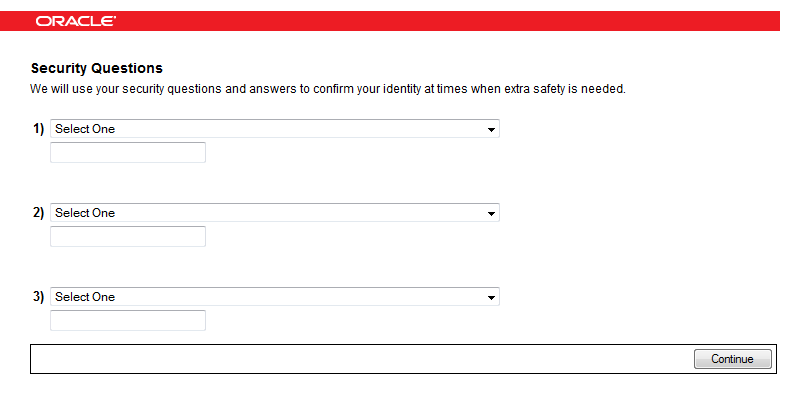
The user is taken to the Security Registration page where he selects challenge questions from the menus (dropdown lists) provided, and enters the answers to those questions in HTML input fields. No VAD related information is shown.
-
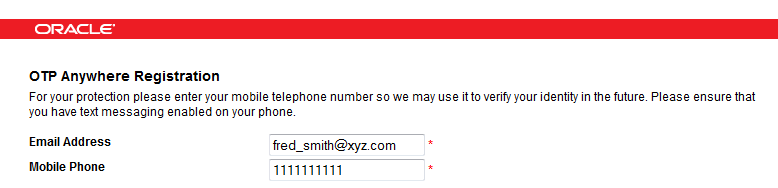
If the deployment supports OTP, the user is taken through the OTP Anywhere Registration. An example of an OTP registration page is shown below.
-
After successful registration, the user is successfully logged in.
Expired Password Flow (OAAM and OIM Integration)
-
The user tries to access a resource protected by the OAAM authentication scheme.
-
The user is redirected to OAAM Server application.
-
OAAM Server presents the user with a single login page. The user enters username and password, and OAAM retrieves the password syntax and lifecycle policies from Oracle Identity Manager. OAAM enforces these policies. It determines that the password expired.
-
The user is redirected to the Password Reset page.
-
The user enters new password and confirms the new password by entering it again.
-
The OAAM jump page captures the digital and secure cookies and fingerprints the user device.
-
OAAM runs the device identification process to identify the user device.
-
OAAM evaluates the Preauthentication checkpoint to check if the user is a member of a blacklisted country, device, IP, ISP, or users group or if he is using WEBZIP. If he is in a blacklisted group or using WEBZIP, he is blocked and cannot proceed.
Note:
OAAM does not run the Authentipad checkpoint because no VADs are used for this flow. -
After authentication, OAAM evaluates Post-Authentication checkpoint policies. Based on the outcome of the policy OAAM might challenge or block the user or allow the user to register if he has not been registered.
If the outcome of Post-Authentication is
Allowthen OAAM determines if the user has to be registered by evaluating the Registration checkpoint. Based on the types of registration it takes the user through the Registration Flow.If there is enough risk involved, the outcome of Post-Authentication may be
Challenge. OAAM evaluates the Challenge checkpoint to determine if the user should be blocked or challenged with one of the registered challenge mechanism by taking the user through the Challenge Flow.0 score is no risk
1-500 score is low risk
501-1000 score is high risk
If the outcome of Post-Authentication is
Blockthen the user would be blocked and he will not be able to access the resource that he tried accessing. -
OAAM interacts with the user during the required flows and if the user is successful, Access Manager sets the OAM cookie, user is logged in, and a single sign-on session is created.
Single-Page Login Flow for Self-Registration Flow (OAAM and OIM Integration)
The Single-Page Login can be used to initiate self-registration.
-
The user tries to access a resource protected by OAAM authentication scheme.
-
The user is redirected to OAAM Server application.
-
OAAM Server presents the user with a single login page with the Register link. This page does not display any text related to the VADs. The user clicks the Register link, which takes the user to a self-registration page provided by the application.
-
The user interacts with the application to self-register.
-
On completion, the user receives a confirmation message and a registration tracking request number.
Single-Page Login Flow for Track-Registration Flow (OAAM and OIM Integration)
The Single-Page Login can be used to access the interface for tracking the status of the self-registration.
-
The user is redirected to OAAM Server application.
-
OAAM Server presents the user with a single login page with the Track Registration link. This page does not display any text related to the VADs. The user clicks the Track Registration link, which takes the user to a page that tracks the status of the self-registration.
-
The user interacts with the application to track the self-registration.
-
On completion, the user receives the status of the tracked request.
8.5.2 Setting Properties to Enable the OAAM Single Login Page
To enable the single login page, set the following to true:
bharosa.uio.default.login.auth.enabled
bharosa.uio.default.singlelogin.enabled
The properties are modified in oaam_custom.properties and the changes deployed as part of the OAAM Shared Extensions Library.
8.5.3 Configuring Single Login Page to Use the OAAM HTML Pad
Ensure the following property is true so that HTML pages are used in Single Login Password flows:
bharosa.uio.default.singlelogin.forceHTMLDevice.enabled
By default this property is set to true.
Note:
This property only effects Single Login Page flows.If you want to control devices by rules in the single login page flow, you need to set the property to false and perform the following steps to configure the OAAM AuthenticationPad Policy to use the OAAM HTML Pad for Challenge SMS, Registered Image and Caption, Challenge Email, and Challenge Question rules.
Note:
If you set the property tofalse, the AuthentiPad checkpoint is run. If the property is set to true, the AuthentiPad checkpoint will not be run.-
Log in to the OAAM Administration Console as an administrator.
-
Double-click the Policies node. The Policies Search page is displayed.
-
In the Search filters section, select AuthentiPad for the Checkpoint and click Search.
-
In the Search Results table, click the OAAM AuthenticationPad Policy link to open the Policy Details page.
-
In the Policy Details page, click the Rules tab.
-
Click the Challenge Question link to open the Rules Details page.
-
In the Rules Details page, click the Results tab.
-
In the Actions Group list, select OAAM HTML Pad as the action you want triggered by this rule and click Apply to save the modified rule details.
A confirmation dialog is displayed.
-
Click OK to dismiss the confirmation dialog.
-
Repeat Steps 5 through 9 for Challenge SMS, Registered Image and Caption, and Challenge Email rules.
-
In the Policies Detail page, click the Trigger Combinations tab.
-
Change the Action Group for all the Trigger Combinations to OAAM HTML Pad and click Apply after making the edits.
A confirmation dialog is displayed.
-
Click OK to dismiss the confirmation dialog.
8.5.4 Customizing the OAAM Single Login Page Using the Shared Extensions Library
To add or modify the text and links to the Single Login Page, you must use the OAAM Shared Extensions Library:
-
Follow the instructions in Section 7.3, "Adding Customizations Using the OAAM Extensions Shared Library" to extract the Extensions Shared Library.
-
Add or modify the properties in
oaam_custom.propertiesandclient_resource_locale.propertiesand save the files in theoaam_extensions\WEB-INF\classes\bharosa_propertiesdirectory.Refer to Section 8.5.5 for information on specific properties and the files to which they need to be added.
-
Follow the instructions in Section 7.3.6, "Step 5 Repackage the OAAM Extensions Shared Library Into a New WAR File" to repackage the Extensions Shared Library,
oracle.oaam.extensions.war. -
Shut down all managed servers if they are running.
-
Start the WebLogic Administration Server.
-
Start the WebLogic Server where Oracle Adaptive Access Manager is deployed.
-
Follow the instructions in Section 7.3.11, "Step 10 Deploy the New OAAM Extensions Shared Library" to redeploy the OAAM Extensions Shared Library.
8.5.5 Properties for Customizing Messages, Links, and Credential Inputs on the Single Login Page
To add additional messages, links or fields or disable existing ones, configure the properties described in this section. Refer to the tables to see if the properties need to be added to both oaam_custom.properties and client_resource_locale.properties files as part of the OAAM Shared Extensions Library.
Single Sign In main page properties and buttons enums are shown.
Table 8-8 Single Login Page Properties and Buttons
| Property | Default Value | Description | Property Must Be In File |
|---|---|---|---|
|
bharosa.uio.default.singlelogin.page.title |
Sign In: |
Title for default Single Login page |
oaam_custom.properties and client_resource_<locale>.properties |
|
bharosa.uio.default.singlelogin.page.message |
Enter your user name and password. |
Single Login Message |
oaam_custom.properties and client_resource_<locale>.properties |
|
bharosa.uio.default.singlelogin.page.button |
Continue |
Name for Continue button on Single Login page. |
oaam_custom.properties and client_resource_<locale>.properties |
|
bharosa.uio.default.loginforgotpassword.page.button |
Continue |
Name for Continue button on Forgot Password page. |
oaam_custom.properties and client_resource_<locale>.properties |
The Single Login Page Welcome Message enum definitions are shown.
Table 8-9 Single Login Page Welcome Message
| Property | Default Value | Description | Property Must Be In File |
|---|---|---|---|
|
bharosa.uio.default.singlelogin.message.enum |
Enum for Single Login Page messages |
oaam_custom.properties |
|
|
bharosa.uio.default.singlelogin.message.enum.welcome |
1 |
Single Login Welcome Message enum value. |
oaam_custom.properties |
|
bharosa.uio.default.singlelogin.message.enum.welcome.name |
Welcome |
Single Login Welcome Message |
oaam_custom.properties and client_resource_<locale>.properties |
|
bharosa.uio.default.singlelogin.message.enum.welcome.description |
Welcome Message |
Description for Single Login Welcome Message |
oaam_custom.properties and client_resource_<locale>.properties |
|
bharosa.uio.default.singlelogin.message.enum.welcome.title |
Welcome |
Title for Single Login Welcome Message |
oaam_custom.properties and client_resource_<locale>.properties |
|
bharosa.uio.default.singlelogin.message.enum.welcome.msg |
Welcome to your secure online application. |
Message for Single Login Welcome Message |
oaam_custom.properties and client_resource_<locale>.properties |
|
bharosa.uio.default.singlelogin.message.enum.welcome.class |
css class |
oaam_custom.properties |
|
|
bharosa.uio.default.singlelogin.message.enum.welcome.order |
1 |
Order of the welcome message on the Single Login page |
oaam_custom.properties |
|
bharosa.uio.default.singlelogin.message.enum.welcome.enabled |
false |
Enabled flag for Single Login Welcome Message enum item |
oaam_custom.properties |
The Single Login Page enums for links are shown.
Table 8-10 Single Login Page Links
| Property | Default Value | Description | Property Must Be In File |
|---|---|---|---|
|
bharosa.uio.default.singlelogin.links.enum |
Enum for Single Login Page links |
oaam_custom.properties |
|
|
bharosa.uio.default.singlelogin.links.enum.forgotpassword |
1 |
Forgot password link enum value. |
oaam_custom.properties |
|
bharosa.uio.default.singlelogin.links.enum.forgotpassword.name |
ForgotPassword |
Name for the Forgot password link |
oaam_custom.properties |
|
bharosa.uio.default.singlelogin.links.enum.forgotpassword.description |
Forgot your password? |
Description for Forgot password link |
oaam_custom.properties and client_resource_<locale>.properties |
|
bharosa.uio.default.singlelogin.links.enum.forgotpassword.url |
forgotPassword.do |
URL for Forgot Password page. |
oaam_custom.properties |
|
bharosa.uio.default.singlelogin.links.enum.forgotpassword.personalization |
false |
Controls if the link will only be shown when the users has personalization (image registered). |
oaam_custom.properties |
|
bharosa.uio.default.singlelogin.links.enum.forgotpassword.order |
1 |
Order of the Forgot Password link on the Single Login page |
oaam_custom.properties |
|
bharosa.uio.default.singlelogin.links.enum.forgotpassword.enabled |
true |
Enabled flag for Forgot Password link enum item |
oaam_custom.properties |
|
bharosa.uio.default.singlelogin.links.enum.forgotusername |
2 |
Forgot user name link enum value. |
oaam_custom.properties |
|
bharosa.uio.default.singlelogin.links.enum.forgotusername.name |
ForgotUsername |
Name for the Forgot username link |
oaam_custom.properties and client_resource_<locale>.properties |
|
bharosa.uio.default.singlelogin.links.enum.forgotusername.description |
Forgot your username? |
Description for Forgot user name link |
oaam_custom.properties and client_resource_<locale>.properties |
|
bharosa.uio.default.singlelogin.links.enum.forgotusername.url |
# |
URL for Forgot User name page. |
oaam_custom.properties |
|
bharosa.uio.default.singlelogin.links.enum.forgotusername.personalization |
false |
Controls if the link will only be shown when the users has personalization (image registered). |
oaam_custom.properties |
|
bharosa.uio.default.singlelogin.links.enum.forgotusername.order |
2 |
Order of the Forgot User Name link on the Single Login page |
oaam_custom.properties |
|
bharosa.uio.default.singlelogin.links.enum.forgotusername.enabled |
false |
Enabled flag for Forgot User Name link enum item |
oaam_custom.properties |
|
bharosa.uio.default.singlelogin.links.enum.selfregistration |
3 |
Self Registration link enum value. |
oaam_custom.properties |
|
bharosa.uio.default.singlelogin.links.enum.selfregistration.name |
SelfRegistration |
Name for the Self Registration link |
oaam_custom.properties |
|
bharosa.uio.default.singlelogin.links.enum.selfregistration.description |
Register |
Description for Self Registration link |
oaam_custom.properties and client_resource_<locale>.properties |
|
bharosa.uio.default.singlelogin.links.enum.selfregistration.url |
# |
URL for Self Registration page. |
oaam_custom.properties |
|
bharosa.uio.default.singlelogin.links.enum.selfregistration.personalization |
false |
Controls if the link will only be shown when the users has personalization (image registered). |
oaam_custom.properties |
|
bharosa.uio.default.singlelogin.links.enum.selfregistration.order |
3 |
Order of the Self Registration link on the Single Login page |
oaam_custom.properties |
|
bharosa.uio.default.singlelogin.links.enum.selfregistration.enabled |
false |
Enabled flag for Self Registration link enum item |
oaam_custom.properties |
|
bharosa.uio.default.singlelogin.links.enum.trackregistration |
4 |
Track Registration link enum value. |
oaam_custom.properties |
|
bharosa.uio.default.singlelogin.links.enum.trackregistration.name |
TrackRegistration |
Name for the Track Registration link |
oaam_custom.properties |
|
bharosa.uio.default.singlelogin.links.enum.trackregistration.description |
Track Registration |
Description for Track Registration link |
oaam_custom.properties and client_resource_<locale>.properties |
|
bharosa.uio.default.singlelogin.links.enum.trackregistration.url |
# |
URL for Track Registration page. |
oaam_custom.properties |
|
bharosa.uio.default.singlelogin.links.enum.trackregistration.personalization |
false |
Controls if the link will only be shown when the users has personalization (image registered). |
oaam_custom.properties |
|
bharosa.uio.default.singlelogin.links.enum.trackregistration.order |
4 |
Order of the Track Registration link on the Single Login page |
oaam_custom.properties |
|
bharosa.uio.default.singlelogin.links.enum.trackregistration.enabled |
false |
Enabled flag for Track Registration link enum item |
oaam_custom.properties |
|
bharosa.uio.default.loginforgotpassword.links.enum |
Enum for username page of forgot password |
oaam_custom.properties |
|
|
bharosa.uio.default.loginforgotpassword.links.enum.cancel |
1 |
Cancel link enum value. |
oaam_custom.properties |
|
bharosa.uio.default.loginforgotpassword.links.enum.cancel.name |
Cancel |
Name for the Cancel link |
oaam_custom.properties |
|
bharosa.uio.default.loginforgotpassword.links.enum.cancel.description |
Cancel |
Description for Cancel link |
oaam_custom.properties and client_resource_<locale>.properties |
|
bharosa.uio.default.loginforgotpassword.links.enum.cancel.url |
login.do |
URL for Cancel page. |
oaam_custom.properties |
|
bharosa.uio.default.loginforgotpassword.links.enum.cancel.personalization |
false |
Controls if the link will only be shown when the users has personalization (image registered). |
oaam_custom.properties |
|
bharosa.uio.default.loginforgotpassword.links.enum.cancel.order |
3 |
Order of the Cancel link on the Single Login page |
oaam_custom.properties |
|
bharosa.uio.default.loginforgotpassword.links.enum.cancel.enabled |
false |
Enabled flag for Cancel link enum item |
oaam_custom.properties |
Table 8-11 provides information about the Single Login Page credential input enums.
Table 8-11 Single Login Page Credential Inputs
| Property | Default Value | Description | Property Must Be In file |
|---|---|---|---|
|
bharosa.uio.default.singlelogin.credentials.enum |
Enum for Login Credentials |
oaam_custom.properties |
|
|
bharosa.uio.default.singlelogin.credentials.enum.username |
0 |
Username field enum value |
oaam_custom.properties |
|
bharosa.uio.default.singlelogin.credentials.enum.username.name |
Username |
Name for Username field |
oaam_custom.properties and client_resource_<locale>.properties |
|
bharosa.uio.default.singlelogin.credentials.enum.username.description |
User's username |
Description for Username field |
oaam_custom.properties and client_resource_<locale>.properties |
|
bharosa.uio.default.singlelogin.credentials.enum.username.inputname |
userid |
HTML input name for Username field |
oaam_custom.properties |
|
bharosa.uio.default.singlelogin.credentials.enum.username.inputtype |
text |
HTML input type for Username field |
oaam_custom.properties |
|
bharosa.uio.default.singlelogin.credentials.enum.username.maxlength |
30 |
HTML input max length for Username field |
oaam_custom.properties |
|
bharosa.uio.default.singlelogin.credentials.enum.username.required |
true |
Required flag for Username field during login |
oaam_custom.properties |
|
bharosa.uio.default.singlelogin.credentials.enum.username.order |
1 |
Order on the page for Username field |
oaam_custom.properties |
|
harosa.uio.default.singlelogin.credentials.enum.password |
10 |
Password field enum value |
oaam_custom.properties |
|
bharosa.uio.default.singlelogin.credentials.enum.password.name |
Password |
Name for Password field |
oaam_custom.properties and client_resource_<locale>.properties |
|
bharosa.uio.default.singlelogin.credentials.enum.password.description |
Password |
Description for Password field |
oaam_custom.properties and client_resource_<locale>.properties |
|
bharosa.uio.default.singlelogin.credentials.enum.password.inputname |
pass |
HTML input name for Password field |
oaam_custom.properties |
|
bharosa.uio.default.singlelogin.credentials.enum.password.inputtype |
password |
HTML input type for Password field |
oaam_custom.properties |
|
bharosa.uio.default.singlelogin.credentials.enum.password.isPassword |
true |
oaam_custom.properties |
|
|
bharosa.uio.default.singlelogin.credentials.enum.password.maxlength |
30 |
HTML input max length for Password field |
oaam_custom.properties |
|
bharosa.uio.default.singlelogin.credentials.enum.password.required |
true |
Required flag for Password field during login |
oaam_custom.properties |
|
bharosa.uio.default.singlelogin.credentials.enum.password.order |
11 |
Order on the page for Password field |
oaam_custom.properties |
|
bharosa.uio.default.singlelogin.credentials.enum.password.enabled |
true |
Enabled flag for Password enum item |
oaam_custom.properties |
8.6 Questions/Answers About OAAM Server Customizations
A few troubleshooting tips for user interface customizations are as follows:
-
Question: I have added the following entries to
oaam_custom.propertiesin the OAAM extensions shared library:bharosa.uio.default.header = /customHeader.jsp bharosa.uio.default.footer = /customFooter.jsp
OAAM server is picking up the default header and footer and not the one I specified in the extensions library.
Answer: The custom header / footer files should have a unique name as OAAM Server pulls from the web application first. For example,
customHeader.jspandcustomFooter.jsp. -
Question: Why is the OAAM Server not picking up the
csschanges in OAAM extensions shared library?Answer: The property
bharosa.uio.default.custom.cssshould be set to a CSS file that is added to the extensions library. Thatcssfile can override any existing CSS definitions in the base application (defined byoaam_uio.css).For example, if you want to move the username and password text and OTP pads to the center of the screen, you must set
bharosa.uio.default.custom.css =CSS_file_name_and_pathand add the custom CSS file to the OAAM extensions shared library. -
Question: How do
struts_config_extension.xmlandtiles-def-extension.xmlwork in customizations?Answer: The OAAM extensions shared library has a
struts-config-extension.xmlandtiles-def-extension.xmlin theWEB-INFfolder. Any values added to these will augment or override the ones already defined bystruts-config.xmlandtiles-def.xmlin the application.For example, to use a customized JSP file (
customUserPreferences.jsp) for the base file (userPreferences.jsp), add the following totiles-def-extension.xml:<definition name="userPreferences" extends="bharosa.uio.baseLayout"> <put name="body" value="/customUserPreferences.jsp"/> </definition>
-
Question: How do I change the login page completely?
Answer: You must set
oaam.uio.login.page=custom_login_pageand add the file to the OAAM extensions shared library. You would need to update thestruts-config-extension.xmlcontained in the OAAM extensions shared library to override the "login" outcome. ReplaceoaamLoginPage.jspwith the custom filename.<action path="/entry" type="com.bharosa.uio.actions.EntryAction"> <forward name="login" path="/oaamLoginPage.jsp" /> </action>