2 Setting Up the OAAM Environment
This chapter presents details on setting up the Oracle Adaptive Access Manager environment for first time users. When you install Oracle Adaptive Access Manager, you install the binary files, such as executable files, JAR files, and libraries. Then, you use configuration tools to configure the software.
For information on how to upgrade an existing Oracle Adaptive Access Manager to Oracle Adaptive Access Manager 11g Release 2 (11.1.2), see Upgrade Guide for Oracle Identity and Access Management.
This chapter contains the following sections:
-
Setting the Time Zone Used for All Time Stamps in the OAAM Administration Console
-
Setting a Limit to the Number of Result Rows in the OAAM Administration Console (Optional)
2.1 About Setting Up the Base Environment
After completing the installation process, including post-installation steps, you must set up the Oracle Adaptive Access Manager base environment before you can use the graphical user interfaces or command-line tools to manage authentication mechanisms, risk based challenge methods, policy administration, and integration.
Information is also provided on securing OAAM web services.
Table 2-1 lists a summary of the high-level tasks for setting up the base Oracle Adaptive Access Manager environment.
Table 2-1 Setting Up the OAAM Base Environment
| No. | Task | Information |
|---|---|---|
|
1 |
Review prerequisites. |
For information, refer to Prerequisites for Setting Up the OAAM Base Environment. |
|
2 |
Set up the CLI environment. |
For information, refer to Setting Up the CLI Environment. |
|
3 |
Set up encryption and database credentials. |
For information, refer to Setting Up Encryption and Database Credentials. |
|
4 |
Create OAAM users. |
For information, refer to Creating OAAM Users. |
|
5 |
Import the OAAM snapshot. |
For information, refer to Importing the OAAM Snapshot. |
|
6 |
Import the IP location data. |
For information, refer to Importing IP Location Data. |
|
7 |
Set the time zone. |
For information, refer to Setting the Time Zone Used for All Time Stamps in the OAAM Administration Console. |
|
8 |
Set a limit to the number of result rows (Optional). |
For information, refer to Setting a Limit to the Number of Result Rows in the OAAM Administration Console (Optional). |
|
9 |
Enable OTP if used in your deployment. |
For information, refer to Enabling One-Time Password. |
|
10 |
Secure OAAM web services. |
For information, refer to Securing OAAM Web Service Access. |
2.2 Prerequisites for Setting Up the OAAM Base Environment
All tasks in this book presume that you have Oracle Adaptive Access Manager 11g installed with initial configuration completed as described in Installation Guide for Oracle Identity and Access Management.
Note:
The Oracle Database Enterprise Edition is the recommended database version for OAAM.2.3 Setting Up the CLI Environment
The Oracle Adaptive Access Manager Command-Line Interface (CLI) scripts enable users to perform various tasks instead of using the Oracle Adaptive Access Manager Administration Console.
Setting up the CLI environment involves the following tasks:
-
Set up the CLI work folder
-
Specifying properties for CLI script startup (optional).
-
Set up the Credential Store Framework (CSF) configuration
-
Set up the Oracle Adaptive Access Manager database credentials
2.3.1 Setting Up the CLI Work Folder
In this section, you will copy the CLI folder $IDM_ORACLE_HOME/oaam/cli to a working directory, for example, oaam_cli.
Note:
This task is required since it is not recommended to edit or change any files that are inside theIDM_ORACLE_HOME folder (the folder where you installed the Oracle Identity Management software).-
Create a working directory.
mkdir workcd workmkdir oaam_cli -
Copy the
oaam_clifolder to the working directory by executing the following command:
Execute the following command:
cp -r IDM_ORACLE_HOME/oaam/cli ~/work/oaam_cli
Execute the following command:
xcopy/s IDM_ORACLE_HOME\oaam\cli c:\work\oaam_cli
Select D=directory when it prompts so that entire folder can be copied.
2.3.2 Specifying Properties for CLI Script Startup (Optional)
The CLI scripts need the location of your middleware home and Oracle WebLogic installation on startup. Starting with 11.1.2.1.0, you have the option to specify these in oaam_cli.properties. Previously, you were required to either set environment variables containing this information or enter this information at the command line when prompted.
2.3.3 Setting Up the Credential Store Framework (CSF) Configuration
A credential store is a repository that can hold user name and password combinations, symmetric keys, tickets, or public key certificates. Oracle Platform Security Services includes the Credential Store Framework (CSF), a set of APIs that applications can use to create, read, update, and manage credentials securely. OAAM uses the CSF APIs to access credentials. Credentials are stored in the CSF of the Oracle WebLogic Server domain and managed using Oracle Fusion Middleware Enterprise Manager Control or Oracle WebLogic Scripting Tool (WLST).
Select one of the following mechanisms to access the OAAM encryption keys stored in the CSF:
-
CSF without Mbeans
-
CSF with MBeans
2.3.3.1 Configuring OAAM Database Details with CSF without MBeans
Important notes about this approach are listed as follows:
-
This method requires that you run the Oracle Adaptive Access Manager command-line utility scripts on the same computer as the WebLogic Server.
-
This method does not require you to specify the WebLogic Administrator and password.
-
This method is not recommended if Oracle Adaptive Access Manager is deployed in a clustered environment
To use this mechanism, navigate to the work folder where you copied the cli folder and open the file, conf/bharosa_properties/oaam_cli.properties in a text editor and then set the following properties:
Table 2-3 oaam_cli.properties Values for Using CSF Without Beans
| Property Name | Notes about Property Value |
|---|---|
|
|
|
|
|
Set the absolute file path of $DOMAIN_HOME/config/fmwconfig/jps-config-jse.xml |
|
|
Specify valid JDBC URL of the Oracle Adaptive Access Manager database. Make sure there are no typos. |
|
|
Leave this as blank if there are no additional TopLink properties. Otherwise specify the name of the properties file that has additional Toplink properties. Make sure the file is in the same folder as |
|
|
Change this value only if the Oracle Adaptive Access Manager schema is in non-oracle database. |
|
|
Do not change this value unless required. |
|
|
Do not change this value unless required. |
|
|
Do not change this value unless required. |
|
|
Do not change this value unless required. |
2.3.3.2 Configuring OAAM Database Details with CSF with MBeans
Important notes about this approach:
-
This method is recommended if Oracle Adaptive Access Manager is deployed in a clustered environment.
-
This method permits you to remotely connect to the Oracle Adaptive Access Manager WebLogic Server.
-
This method requires you to specify the Oracle Adaptive Access Manager WebLogic Administrator user and password.
To configure the Oracle Adaptive Access Manager Database details with CSF with MBeans, navigate to the work folder where you copied the cli folder and open the file conf/bharosa_properties/oaam_cli.properties in a text editor and then set the following properties:
Table 2-4 oaam_cli.properties Values for Using CSF With Beans
| Property Name | Notes about Property Value |
|---|---|
|
|
|
|
|
Hostname where WebLogic Administration Server runs |
|
|
Port number of WebLogic Administration Server. Usually it is |
|
|
Specify valid JDBC URL of the Oracle Adaptive Access Manager database. Make sure there are no typos. |
|
|
Leave this as blank if there are no additional Oracle Toplink properties. Otherwise specify the name of the properties file that has additional Oracle Toplink properties. Make sure the file is in the same folder as |
|
|
Change this value only if the Oracle Adaptive Access Manager schema is in non-oracle database |
|
|
Do not change this value unless required. |
|
|
Do not change this value unless required. |
|
|
Do not change this value unless required. |
|
|
Do not change this value unless required. |
2.3.4 Setting Up Oracle Adaptive Access Manager Database Credentials
Configuring database credentials in the Credential Store Framework involves the following steps:
-
Use Oracle Enterprise Manager Fusion Middleware Control to add database credentials (user name and password) in the Credential Store Framework in the domain where Oracle Adaptive Access Manager is installed. These credentials are used by the Oracle Adaptive Access Manager command-line utilities.
-
Configure the properties files that are used by the Oracle Adaptive Access Manager CLI utilities with details of the WebLogic administration server and Oracle Adaptive Access Manager database.
For information on the credential store, see Oracle Fusion Middleware Application Security Guide. Figure 2-1 shows the database credential setup.
For instructions on setting up database credentials in the CSF, see Section 2.4.6, "Setting Up Oracle Adaptive Access Manager Database Credentials in the Credential Store Framework."
Figure 2-1 Setting Up Database Credentials in the Credential Store
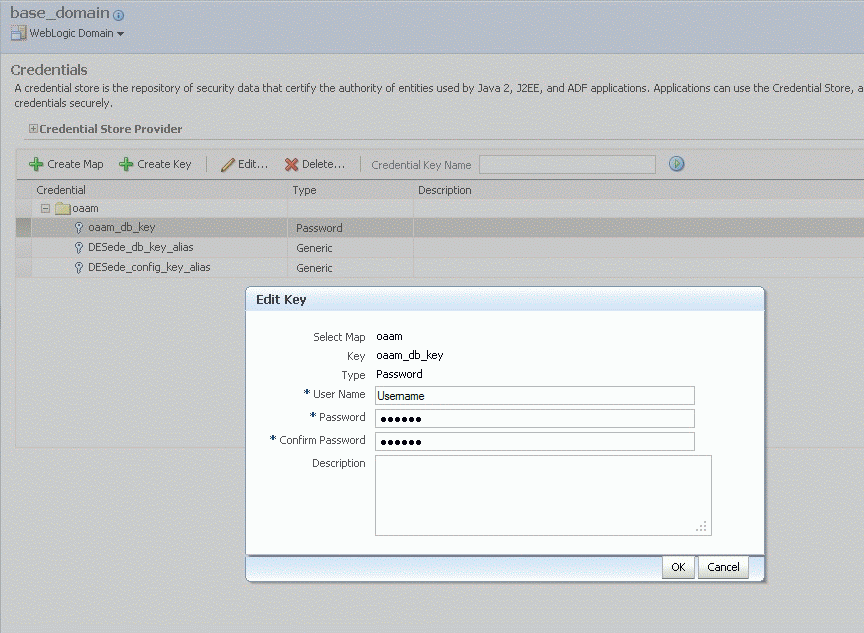
Description of "Figure 2-1 Setting Up Database Credentials in the Credential Store"
2.3.5 Using Persistence Instead of Setting Database Credentials in the Credential Store Framework
If you want to use persistence.xml instead of setting the Oracle Adaptive Access Manager database credentials in CSF, use the following steps. However this approach is not recommended nor supported.
-
Navigate to the work folder where you copied the
clifolder. Open the fileconf/bharosa_properties/oaam_cli.propertiesin a text editor and set the property value ofoaam.db.toplink.useCredentialsFromCSFtofalse. -
Update the Oracle Adaptive Access Manager database connection details in the
META-INF/persistence.xmlfile by editing the relevanteclipselink.jdbcproperties, as in the following examples:<property name="eclipselink.jdbc.driver" value="oracle.jdbc.driver.OracleDriver"/> <property name="eclipselink.jdbc.url" value="jdbc:oracle:thin:@dbhost.mydomain.example.com:1521/SERVICE_NAME"/> <property name="eclipselink.jdbc.user" value="OAAM_DB_USER"/> <property name="eclipselink.jdbc.password" value="DB_Password"/>
where
eclipselink.jdbc.driveris the fully qualified name of the driver classeclipselink.jdbc.urlis the driver-specific URLeclipselink.jdbc.useris the user name used by database connectioneclipselink.jdbc.passwordis the password for database connection validation
2.4 Setting Up Encryption and Database Credentials
Encryption keys are automatically generated if they do not exist when oaam_server and oaam_admin are started for the first time.
Oracle Adaptive Access Manager uses secret keys to encrypt data stored in the credential store framework. Encryption protects data within Oracle Adaptive Access Manager from unauthorized access. The process uses methods and a key or keys to encode plain text into a non-readable form. A key is required to decrypt the encrypted information and make it readable again. Authorized persons who own the key can decrypt information that is encrypted with the same key.
About Secret Keys in Setting Up Encrypted Data
Oracle Adaptive Access Manager requires that secret keys be set up to encrypt data stored in the credential store framework. These secret keys can be added to the WebLogic Server Credential Store Framework using Oracle Enterprise Manager Fusion Middleware Control.
The three keys that need to be created for OAAM to work are:
-
oaam_db_key -
DESede_db_key_alias -
DESede_config_key_alias
The oaam_db_key is used to access the database and must be added manually. For information on oaam_db_key, see Section 2.3.4, "Setting Up Oracle Adaptive Access Manager Database Credentials."
The DESede keys are used to encrypt data. As noted in the introduction to this section, if they do not exist, the OAAM servers will create them when it is first started. You can accept these DESede keys or create your own.
If you choose to use your own DESede keys you have two choices for creating and encoding them:
-
Provide your own secret key (a string of characters), encode it using
encodeKey.sh, and then store that value, or -
Use
generateEncodedKey.shto generate a key and encodes it in one step
Note that if you allow the server to generate the value or use generateEncodedKey.sh, you do not know the "secret phrase." You know only the encoded value. This value should be backed up. If you use your own secret key, you can regenerate the encoded value.
Setting Up Encryption for the Configuration and Database
Setting up encryption involves the following steps:
-
Ensure the secret keys (symmetric keys) for both the configuration value and database are available. If you do not have a secret key, generate an encoded symmetric key using the
genEncodedKeycommand. -
Encode the key using the
base64encodeoption of theencodeKeycommand. This step is not required if thegenEncodedKeycommand was used to generate the key. -
Use the Oracle Enterprise Manager Fusion Middleware Control to add the encoded secret key to an alias in the Credential Store Framework in the domain where Oracle Adaptive Access Manager is installed.
A credential store is a repository to store user name/password or generic credentials (a certificate). The value of using a credential store is that the application does not store passwords in clear text and does not have to invent its own solutions for protecting passwords, allowing administrators and developers alike to work with a consistent credential repository.
2.4.1 Prerequisites for Setting Up Encryption and Database Credentials
Prerequisites for setting up encryption and database credentials for Oracle Adaptive Access Manager are as follows:
-
If you do not have access to the Oracle Adaptive Access Manager installation folder, make sure Oracle Adaptive Access Manager 11g is configured with Oracle Enterprise Manager Fusion Middleware Control while creating the domain.
-
If you have access to the Oracle Adaptive Access Manager installation folder then make sure you have access to running the command-line scripts in the
MW_HOME\IDM_ORACLE_HOME\oaam\clifolder. -
Make sure the JDK is installed and check that the
javacommand is in the path by executing thejavacommand.
Note:
If you are upgrading from Oracle Adaptive Access Manager 10.1.4.5 to Oracle Adaptive Access Manager 11g, you can skip Section 2.4.2, "Setting Up the Encoded Secret Key for Encrypting Configuration Values,", Section 2.4.3, "Setting Up Encoded Secret Key for Encrypting Database Values,"and Section 2.4.4, "Generating an Encoded Secret Key," since the Upgrade Assistant automatically migrates the secret keys from Oracle Adaptive Access Manager 10.1.4.5 to the Credential Store Framework in Oracle Adaptive Access Manager 11g.2.4.2 Setting Up the Encoded Secret Key for Encrypting Configuration Values
To set up the encoded secret key for encrypting configuration values, proceed as follows:
-
Navigate to the Oracle Adaptive Access Manager command-line folder
MW_HOME\IDM_ORACLE_HOME\oaam\cli. -
Create a file
config_secret_key.fileand add the secret key to the file by entering:tobase64=secret-key
If you do not have any secret key and need instructions to generate an encoded secret key, see Section 2.4.4, "Generating an Encoded Secret Key."
This is your key to the encryption algorithm.
Note that
3DESaccepts any key, but it must be a minimum of 24 characters. -
Encode the key using the Base64 algorithm by executing the following command.
-
In UNIX
encodeKey.sh config_secret_key.file
-
In Windows
encodeKey.cmd config_secret_key.file
If the encoding command was successful, you see output similar to the following:
base64encode is done!
Base64 Encoded value =encoded_value
If the
KeyStorecommand was not successful, you might see the following error:Exception in thread "main" java.lang.NoClassDefFoundError: while resolving class: com.bharosa.vcrypt.common.util.KeyStoreUtil at java.lang.VMClassLoader.resolveClass(java.lang.Class) (/usr/lib/libgcj.so.5.0.0) at java.lang.Class.initializeClass() (/usr/lib/libgcj.so.5.0.0) at java.lang.Class.forName(java.lang.String, boolean, java.lang.ClassLoader) (/usr/lib/libgcj.so.5.0.0) at java.lang.Class.forName(java.lang.String) (/usr/lib/libgcj.so.5.0.0)
-
-
Note down the encoded value of the key printed on the screen. Make sure there are no spaces. You need this to add to the Credential Store Framework.
2.4.3 Setting Up Encoded Secret Key for Encrypting Database Values
To set up the secret key for encrypting database values, proceed as follows:
-
Navigate to the Oracle Adaptive Access Manager command-line folder
MW_HOME\IDM_ORACLE_HOME\oaam\cli. -
Create a
file db_secret_key.fileand add the secret key to the file by entering:tobase64=secret-key
Note:
- If you do not have any secret key and need instructions for generating an encoded secret key, see Section 2.4.4, "Generating an Encoded Secret Key."
-
This is your key to the encryption algorithm.
-
Note that
3DESaccepts any key, but it must be a minimum of 24 characters.
-
Encode the key using Base64 algorithm by executing the following command.
-
In UNIX
encodeKey.sh db_secret_key.file
-
In Windows
encodeKey.cmd db_secret_key.file
If the encoding command was successful, you see output similar to the following:
base64encode is done!
Base64 Encoded value = encoded_value
If the
KeyStorecommand was not successful, you might see the following error:Exception in thread "main" java.lang.NoClassDefFoundError: while resolving class: com.bharosa.vcrypt.common.util.KeyStoreUtil at java.lang.VMClassLoader.resolveClass(java.lang.Class) (/usr/lib/libgcj.so.5.0.0) at java.lang.Class.initializeClass() (/usr/lib/libgcj.so.5.0.0) at java.lang.Class.forName(java.lang.String, boolean, java.lang.ClassLoader) (/usr/lib/libgcj.so.5.0.0) at java.lang.Class.forName(java.lang.String) (/usr/lib/libgcj.so.5.0.0)
-
-
Note down the encoded value of the key printed on the screen. Make sure there are no spaces. You need this to add to the Credential Store Framework.
2.4.4 Generating an Encoded Secret Key
To generate an encoded secret key, proceed as follows:
-
Execute the following command:
-
In UNIX
genEncodedKey.sh sample.db_3des_input.properties
-
In Windows
genEncodedKey.cmd sample.db_3des_input.properties
-
-
If the command is successful you see output similar to the following:
Generated key = encoded_key
Note:
Encoding the generated key is not necessary since it is already encoded.2.4.5 Adding the Encoded Symmetric Key to the Credential Store Framework
OAAM Servers automatically generate the secret key if you start them after domain creation. You can choose to use those auto-generated secret keys if you do not want to use different secret keys.
To add a symmetric key to the Credential Store Framework, proceed as follows:
-
Log in to Oracle Enterprise Manager Fusion Middleware Control at http://
weblogic_admin_server:port/em using the Web browser and use the WebLogic Administrator credentials to log in. -
Expand the WebLogic Domain icon in the Navigation tree in the left panel.
-
Select OAAM domain and right-click and select the menu option Security, and then the option Credentials in the submenu.
-
Check to see whether there is a map with the name oaam. If not, click the Create Map option and enter the Map Name as
oaam. Click OK to save the map. -
Click oaam to select the map and then click Create Key.
-
In the pop up screen make sure Select Map is oaam.
-
Enter the following values:
-
Key Name:
DESede_db_key_aliasif the key is database-related orDESede_config_key_aliasif it is configuration/application related. Make sure there are no typos or spaces. -
Type:
Generic. -
Credential Value: encoded value of the symmetric key
-
-
Enter a description in the Description field.
-
Click OK to save the secret key to the Credential Store Framework.
-
Make sure you back up the alias and the secret key.
The backup is required if you must re-create the domain and point the domain to the existing Oracle Adaptive Access Manager database.
Note:
If you lose the secret key, all the existing data in the Oracle Adaptive Access Manager database becomes unusable since many important administrative operations involve encrypted data.
2.4.6 Setting Up Oracle Adaptive Access Manager Database Credentials in the Credential Store Framework
To set up the Oracle Adaptive Access Manager database credentials in the Credential Store Framework, proceed as follows:
-
Log in to Oracle Enterprise Manager Fusion Middleware Control at http://
weblogic_admin_server:port/em using the Web browser and use the WebLogic Administrator credentials to log in. -
Expand the WebLogic Domain icon in the Navigation tree in the left panel.
-
Select the OAAM domain and right-click and select the menu option Security and then the option Credentials in the submenu.
-
Check to see whether there is a map with the name oaam. If not click the Create Map option and enter the Map Name as
oaam. Click OK to save the map. -
Click oaam to select the map and then click Create Key.
-
In the pop up screen make sure Select Map is oaam.
-
Enter the following values:
-
Key:
oaam_db_key. Make sure there are no typos and spaces. -
Type:
Password -
UserName: database user name of OAAM
-
Password: database password of OAAM
-
-
Enter the description.
-
Click OK to save the secret key to the Credential Store Framework.
2.4.7 Backing Up Database Credentials and Encoded Secret Keys for Encrypting the Database and Configuration Values
You must back up the encoded secret keys used. You may need these keys, if you must re-create the Oracle Adaptive Access Manager 11g domain. Make sure you note the encoded secret key and the alias name.
-
Log in to Oracle Enterprise Manager Fusion Middleware Control.
-
Expand the WebLogic Domain on the left panel, and select OAAM domain.
-
From the OAAM Domain, select Security, and then Credentials.
-
Expand oaam and select the symmetric key related entries associated with the Type Generic.
-
Click Edit.
-
Navigate to the Credentials section then copy the symmetric key related entries and note the key name.
-
Repeat these steps to back up database and configuration keys.
Note:
If you delete and re-create the Oracle Adaptive Access Manager 11g domain, make sure you use the backed-up secret keys when setting the encryption keys so that the existing data in the Oracle Adaptive Access Manager database can be decrypted properly.2.4.8 Changing the Encryption Algorithm
All encrypted fields are encrypted with DESede (also known as Triple DES) by default. For example, this algorithm is used to store users answer to challenge questions in OAAM 11g. If you want to, you can change the encryption algorithm by changing the property bharosa.cipher.encryption.algorithm.system.default.
Changing the encryption algorithm is a decision that must be made in the beginning when setting up the environment. Changing it after the fact will not change the underlying data and the existing data becomes unusable.
Standard supported encryption algorithms
The supported standard encryption algorithms are:
-
AES
-
DES
-
DESede (Triple DES)
DESede is the default
To switch to a different encryption
Set the property bharosa.cipher.encryption.algorithm.system.default to one of the following:
-
DES
-
AES
To use a new encryption algorithm follow these steps:
-
Write a java a class that implements the interface
com.bharosa.common.util.Password. -
Implement the methods
encrypt()anddecrypt(). -
Add an element to the
bharosa.cipher.encryption.algorithm.enumenum with the following attributes tooaam_custom.propertiesfile:-
name: Name of the algorithm
-
description: Description of the algorithm
-
classname: Fully qualified Class name of the java class developed in Step 1
-
keyRetrieval.className: Set this to
com.bharosa.common.util.cipher.CSFKeyRetrieval -
prefix.system: Prefix that will be used while encrypting (Optional)
-
alias: Alias of the encryption algorithm
For example:
bharosa.cipher.encryption.algorithm.enum.AES_aa=99
bharosa.cipher.encryption.algorithm.enum.AES_aa.name= <Name of the algorithm>
bharosa.cipher.encryption.algorithm.enum.AES_aa.description= <Description of the algorithm>
bharosa.cipher.encryption.algorithm.enum.AES_aa.classnameProperty=<Fully qualified Class name of the java class developed in Step 1>
bharosa.cipher.encryption.algorithm.enum.AES_aa.keyRetrieval.classname=com.bharosa.common.util.cipher.CSFKeyRetrieval
bharosa.cipher.encryption.algorithm.enum.AES_aa.alias=<Alias of the encryption algorithm>
-
-
Set the property
bharosa.cipher.encryption.algorithm.system.defaultto the newly added element name. -
Compile and build the JAR file and related property files.
-
Package them as an OAAM extensions WAR file.
-
Deploy the OAAM extensions WAR file and target it to both oaam_admin and oaam_server.
For information on the using the OAAM Extensions Shared Library, see "Using the OAAM Extensions Shared Library to Customize OAAM" in Developer's Guide for Oracle Adaptive Access Manager.
2.5 Creating OAAM Users
This section contains the following topics:
2.5.1 Creating OAAM Administrative Roles and User in an External LDAP Store
When using an external LDAP store, you must add a number of OAAM roles and groups to the store.
You can use the IdM configuration tool (idmConfigTool) to:
-
Create Oracle Adaptive Access Manager Administration User
-
Create Oracle Adaptive Access Manager Groups
-
Add the Oracle Adaptive Access Manager Administration User as a member of Oracle Adaptive Access Manager Groups
For information on creating a property file and running the tool to load OAAM users and groups into LDAP, see "Using the idmConfigTool Command" in Integration Guide for Oracle Identity Management Suite.
2.5.2 Creating OAAM Users in an Embedded LDAP Store
The Oracle Adaptive Access Manager users can access functionality based on the roles they are assigned. These administrator roles have specific permissions assigned to them based on their responsibilities.
To create an OAAM user, proceed as follows:
-
Log in to the Oracle WebLogic Administration Console for your WebLogic administration domain.
-
In the left panel, select Security Realms.
-
On the Summary of Security Realms page select the name of the realm (for example,
myrealm). -
On the Settings for Realm Name page select Users and Groups, and then Users.
-
Click New and provide the required information to create a user, such as
user1, in the security realm. -
Click the newly created user,
user1. -
Click the Groups tab.
-
Assign any of the groups with the
OAAMprefix to the user,user1. -
Click Save.
2.6 Importing the OAAM Snapshot
A full snapshot of policies, dependent components and configurations is shipped with Oracle Adaptive Access Manager. The oaam_base_snapshot.zip file is located in the MW_HOME/IDM_ORACLE_HOME/oaam/init directory.
Note:
If you use Mozilla Firefox with the WinXP 32-bit operating system, you may see aFailed to load snapshot file error when you attempt to load the OAAM system snapshot into the OAAM environment.
Use another operating system and/or web browser when loading the OAAM system snapshot.
Perform the following steps to import the OAAM snapshot:
-
Log in to the Oracle Adaptive Access Manager Administration Console (OAAM Admin) using the following URL:
http://host:port/oaam_admin
-
Load the snapshot file into the system by following these instructions:
-
Open System Snapshot under Environment in the Navigation tree.
-
Click the Load from File button.
A Load and Restore Snapshot dialog appears.
-
Deselect Back up current system now and click Continue.
A dialog appears with the message that you have not chosen to back up the current system, and do you want to continue?
-
When the dialog appears with the message that you have not chosen to back up the current system, and do you want to continue, click Continue.
The Load and Restore Snapshot page appears for you to choose a snapshot to load.
-
Browse for
oaam_base_snapshot.zipand click the Load button to load the snapshot into the system database. -
Click OK and then Restore.
-
The snapshot contains the following items that must be imported into OAAM:
-
Challenge questions for English (United States)
During registration, which could be enrollment, opening a new account, or another events such as a reset, the user selects questions from a list of questions and enters answers to them. These questions, called challenge questions, are used to authenticate users.
Questions for the languages you want to support must be in the system before users can be asked to register. These questions may also be required to log in to OAAM Server.
-
Entity definitions
The actors that are tracked during authentication are called authentication entities and include user, city, device, and so on. These base entities are required to enable conditions that are used for patterns.
-
Standard patterns
Patterns are used by Oracle Adaptive Access Manager to either define one bucket or dynamically create buckets. Oracle Adaptive Access Manager collects data and populates these buckets with members based on pattern parameters, and rules perform risk evaluations on dynamically changing membership and distributions of the buckets.
-
Standard configurable actions
Configurable actions are actions that are triggered based on the result action or risk scoring or both after a checkpoint execution. The configurable actions are built using action templates.
Note:
If you are upgrading from Oracle Adaptive Access Manager 10.1.4.5 to Oracle Adaptive Access Manager 11g, you see that the names and descriptions of the standard action templates are slightly different, since the action templates in Oracle Adaptive Access Manager 11g are globalized and hence the difference. -
Standard policies
Policies are designed to help evaluate and handle business activities or potentially risky activities that are encountered in day-to-day operation.
-
Any groups
Collections of items used in rules, user groups, and action and alert groups are shipped with OAAM.
If you must customize any properties, you should import the snapshot into your new test system, make the changes, export the snapshot, and import it into your new system. Alternatively you can import the snapshot on the new system and make the property changes directly, thereby eliminating the test system completely.
Note:
For customers who are upgrading from 11.1.1.3.0 to 11.1.2: Do not import the snapshot. This procedure is only for first time initial setup. Importing a snapshot overwrites the existing environment and replaces it with a new one. For upgrades, import separate zip files for the entities, definitions, or policies.For upgrading policies, components, and configurations, perform a backup, and then import the separate file. The following are available:
-
Base policies are shipped in the
oaam_policies.zipfile, which is located in theMW_HOME/IDM_ORACLE_HOME/oaam/initdirectory. For information on importing policies, see Section 11.11.2, "Importing Policies." -
Base-authentication required entities are shipped in the
Auth_EntityDefinition.zipfile, which is located in theMW_HOME/IDM_ORACLE_HOME/oaam/initdirectory. For information on importing entities, see Section 19.3.8.2, "Importing Entities." -
Default patterns are shipped in the
OOB_Patterns.zipfile, which is located in theMW_HOME/IDM_ORACLE_HOME/oaam/initdirectory. For information on importing patterns, see Section 15.10.1, "Importing Patterns." -
Default questions are shipped in
oaam_kba_questions_locale.zipfiles, which are located in theMW_HOME/IDM_ORACLE_HOME/oaam/init/kba_questionsdirectory. The locale identifier locale specifies the language version. For information on importing challenge questions, Section 7.4.5, "Importing Challenge Questions."
2.7 Importing IP Location Data
IP location data is used by risk policies to determine the risk of fraud associated with a given IP address (location).
To be able to determine location of the login or transaction, this data must be uploaded to an OAAM database. For information on loading the data into the OAAM database, see Section 27.2, "Importing IP Location Data."
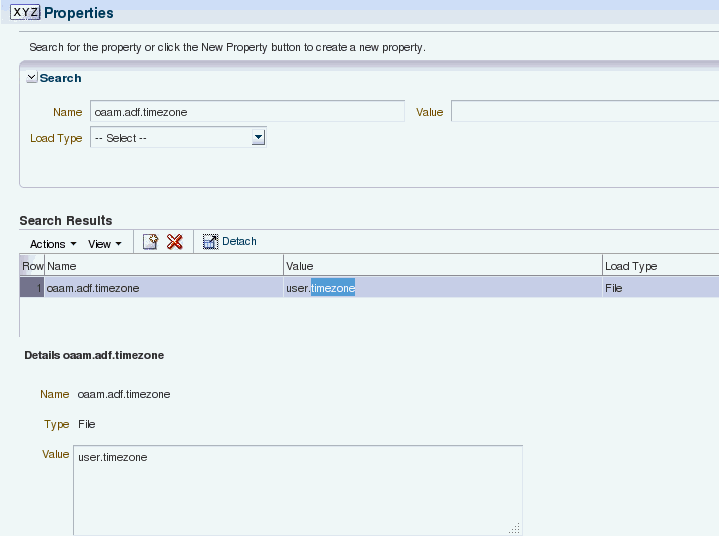
2.8 Setting the Time Zone Used for All Time Stamps in the OAAM Administration Console
A time zone identifies an area that always shares the same local time.
Time zones are used throughout Oracle Adaptive Access Manager for a variety of purposes. A time stamp can indicate when an alert was generated, the process start and end dates of a job, search pages, and so on. Users often are most comfortable working in their local time zones. As the administrator, you can configure the preferred time zones for the OAAM Administration Console.
The property is a system wide time zone setting and not a per-user one. All users must be in the single time zone.
Note that time zone and the browser locale formatting are independent of each other. For example, if you set your browser to en-gb, but set your oaam.adf.time zone to America/Los_Angeles, the time stamps are formatted as per British locale formatting but the time zone is still Pacific Time.
Use the Property Editor to set oaam.adf.timezone to the desired time zone.
For example,
oaam.adf.timezone = Atlantic/Reykjavik
Figure 2-2 shows the Properties page and the property to update for the timezone.
For instructions on using the Properties Editor, see Chapter 26, "Using the OAAM Properties Editor."
Time zones are listed in Section C.31, "Time Zone Properties."
2.9 Setting a Limit to the Number of Result Rows in the OAAM Administration Console (Optional)
The oracle.oaam.db.query.maxrows property allows you to set a limit to the number of result rows. The default value for this parameter is 0. This value should never be set to be smaller than 100 or smaller than the number of members in your largest group with a full cache policy.
2.10 Enabling One-Time Password
OTP Anywhere is a secondary risk-based challenge solution consisting of a server generated one-time password (OTP) delivered to an end user via a configured out of band channel. Supported OTP delivery channels include short message service (SMS), e-mail, and instant messaging.
For information on enabling OTP, see Section 8, "Setting Up OTP Anywhere."
2.11 Securing OAAM Web Service Access
Out-of-the-box, OAAM publishes Web services at the URL: /oaam_server/services.
Authentication checks whether the user credentials that were passed are correct. Starting with OAAM 11g Release 2 (11.1.2.0.0), the default mechanism to secure OAAM Web Services is by using Oracle Web Services Manager (OWSM) policies. To manage SOAP authentication (HTTP Basic authentication with user name and password request), you must configure Oracle Web Services Manager (OWSM) policies.
Authorization checks whether a user is allowed to access the requested resource based on the user's membership in a configured group of users in the WebLogic embedded user store. Authorization is managed through Oracle Enterprise Manager Fusion Middleware Control.
The requirements for accessing the OAAM web service are the following:
-
Configuration of the SOAP web access requires the OAAM Extensions Shared Library for Native Integration using SOAP.
For information on the using the OAAM Extensions Shared Library, see "Using the OAAM Extensions Shared Library to Customize OAAM" in Developer's Guide for Oracle Adaptive Access Manager.
-
The configurable properties must be specified in
oaam_custom.propertiesand this file should be in the Java Classpath of the client application.
An overview of tasks you need to perform to secure OAAM Web Services is provided below.
Table 2-5 Securing OAAM Web Access
| No. | Task | Information |
|---|---|---|
|
1 |
Enable web services authentication. Set up the Oracle Web Services Manager (OWSM) Policy to set HTTP Basic Authentication on |
OAAM Web Services can be protected by Oracle Web Services Manager (OWSM) using the policy For information, see "Enabling Web Services Authentication" in Developer's Guide for Oracle Adaptive Access Manager. |
|
2 |
Create a user with valid user name and password and associate the user to a group that will be configured to be able to access OAAM web services. |
SOAP authentication is implemented using a user name and password. Web Services/SOAP clients need to send the user name and password for successful communication with OAAM web services. The user name and password must be associated with a user that is accessible to the application server. In order for that user to have permissions to perform operations on web services, the user must be in a group that is associated with an authorization policy. For information, see "Creating User and Group" in Developer's Guide for Oracle Adaptive Access Manager. |
|
3 |
Configure web services authorization. |
Using the Oracle Web Services Manager (OWSM) policy For information, see "Configuring Web Services Authorization" in Developer's Guide for Oracle Adaptive Access Manager. |
|
4 |
Set up security for web services. |
Web Services/SOAP clients need to send the user name and password for successful communication with OAAM web services. The password needs to be stored in a KeyStore for security. Note: This step is not required if SOAP Authentication is disabled on the OAAM server. For information, see "Setting Up Client Side Keystore to Secure the SOAP User Password" in Developer's Guide for Oracle Adaptive Access Manager. |
|
5 |
Configure other SOAP properties. |
For information, see "Setting SOAP Related Properties in oaam_custom.properties" in Developer's Guide for Oracle Adaptive Access Manager. |