2 Developing Provisioning Processes
This chapter describes process management with the Design Console. It contains the following topics:
2.1 Process Definition Form
A process is the mechanism for representing a logical workflow for provisioning in Oracle Identity Manager. Process definitions consist of tasks. Process tasks represent the steps that you must complete to fulfill the purpose of a process. For example, in a provisioning process, tasks are used to enable a user or organization to access the target resource.
The Process Definition form shown in Figure 2-1 is in the Process Management folder. You use this form to create and manage the provisioning processes that you associate with your resource objects.
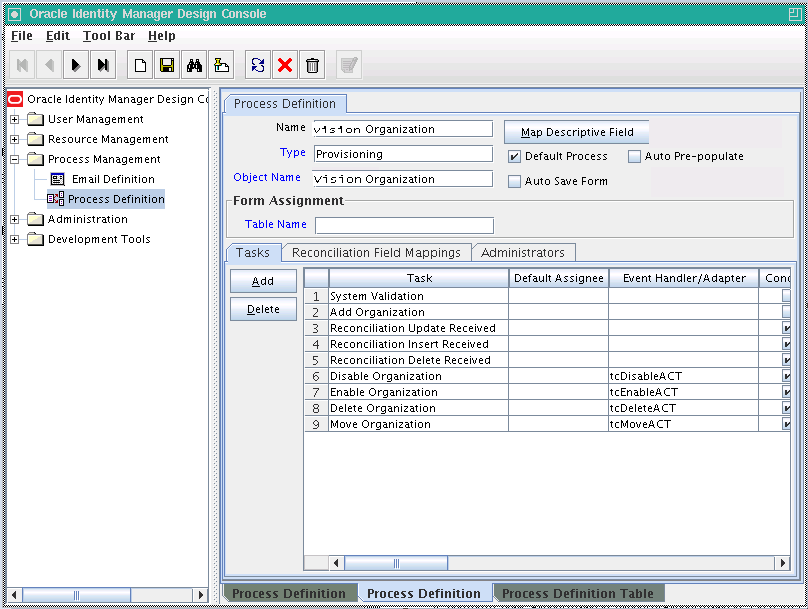
In Figure 2-1, the Xellerate Organization provisioning process is created and assigned to the resource object of the same name.
Note:
Not all the form columns are captured in Figure 2-1; additional field columns extend on the right of the Tasks table.Table 2-1 describes the fields of the Process Definition form.
Table 2-1 Fields of the Process Definition Form
| Field Name | Description |
|---|---|
|
Name |
The name of the process. |
|
Type |
The classification type of the process definition. |
|
Object Name |
The name of the resource object to which the process will be assigned. |
|
Map Descriptive Field |
Click this button to select a field that will be used as an identifier of the process definition after an instance is assigned to a resource object. |
|
Render Workflow |
Click this button to start a Web browser and display the current workflow definition by using the Workflow Renderer tool. |
|
Default Process |
This check box determines if the current process is the default provisioning process for the resource object with which it is associated. Select the check box to set the process as the default provisioning process for the resource object to which it is assigned. If you deselect the check box, the process will not be the default. It will only be invoked if a process selection rule causes it to be chosen. |
|
Auto Pre-Populate |
This check box designates whether the fields of a custom form are populated by Oracle Identity Manager or a user. Two types of forms are affected:
If the Auto Pre-Populate check box is selected, when the associated custom form is displayed, the fields that have prepopulate adapters attached to them will be populated by Oracle Identity Manager. When this check box is deselected, a user must populate these fields by clicking the Pre-Populate button on the toolbar or by manually entering the data. Note: This setting does not control the triggering of the prepopulate adapter. It only determines if the contents resulting from the execution of the adapter are displayed in the associated form field(s) because of Oracle Identity Manager or a user. For more information about prepopulate adapters, see "Working with Prepopulate Adapters". Note: This check box is only relevant if you have created a process form that is to be associated with the process and prepopulate adapters are used with that form. |
|
Table Name |
The name of the table that represents the form that is associated with the process definition. |
2.1.1 Creating a Process Definition
To create a process definition:
-
Open the Process Definition form.
-
In the Name field, type the name of the process definition.
-
Double-click the Type lookup field.
From the Lookup dialog box that is displayed, select the classification type (Approval) of the process definition.
-
Double-click the Object Name lookup field.
From the Lookup dialog box that is displayed, select the resource object that will be associated with the process definition.
-
Optional. Select the Default Process check box to make this the default provisioning process for the resource object to which it is assigned.
If you do not want the current process definition to be the default, go to Step 6.
-
Optional. Select the Auto Save Form check box to suppress the display of the provisioning process' custom form and automatically save the data in it.
This setting is only applicable to provisioning processes.
To display provisioning process' custom form and solicit users for information, deselect this check box.
Note:
If you select the Auto Save Form check box, ensure that all fields of the associated "custom" process form have adapters associated with them. However, a process form can have default data or object to the process data flow mapping or organization defaults.For more information about adapters and their relationship with fields of custom forms, see Chapter 3, "Using the Adapter Factory".
-
If a custom form is to be associated with the process definition, this form contains fields that have prepopulate adapters attached to them, and you want these fields to be populated automatically by Oracle Identity Manager, select the Auto Pre-Populate check box.
If the fields of this form are to be populated manually (by an user clicking the Pre-Populate button on the Toolbar), deselect the Auto Pre-Populate check box.
Note:
If the process definition has no custom form associated with it, or this form's fields have no pre-populate adapters attached to them, deselect the Auto Pre-Populate check box. For more information about prepopulate adapters, see "Working with Prepopulate Adapters". -
Double-click the Table Name lookup field.
From the Lookup window that is displayed, select the table that represents the form associated with the process definition.
-
Click Save.
The process definition is created and the Map Descriptive Field button is enabled. If you click this button, the Map Descriptive Field dialog box is displayed.
From this window, you can select the field (for example, the Organization Name field) that will be used as an identifier of the process definition when an instance of the process is assigned to a resource object. This field and its value will be displayed in the reconciliation Manger form.
Note:
If a process has a custom process form attached to it, the fields on that form will also be displayed in this window and be available for selection.
2.1.2 Tabs on the Process Definition Form
After you start the Process Definition form and create a process definition, the tabs of this form become functional.
The Process Definition form contains the following tabs:
Each of these tabs is described in the following sections.
2.1.2.1 Tasks Tab
You use this tab to:
-
Create and modify the process tasks that comprise the current process definition
-
Remove a process task from the process definition (when it is no longer valid)
Figure 2-2 displays the Tasks tab of the Process Definition form.
Figure 2-2 Tasks Tab of the Process Definition Form
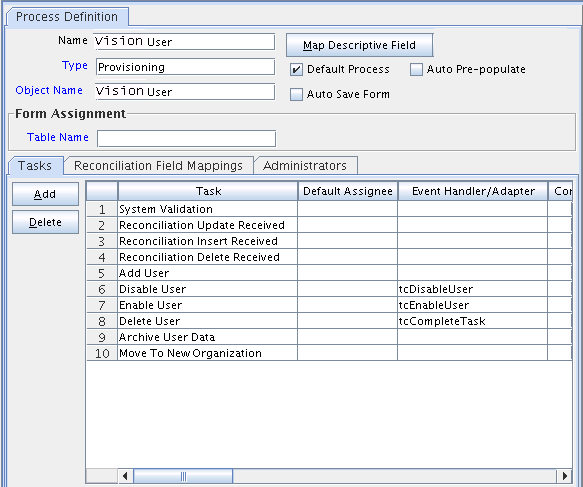
Description of ''Figure 2-2 Tasks Tab of the Process Definition Form''
See Also:
See "Modifying Process Tasks" for information about editing process tasks2.1.2.1.1 Adding a Process Task
Process tasks represent the steps that you must complete in a process.
To add a process task:
-
Click Add.
The Creating New Task dialog box is displayed.
-
In the Task Name field, enter the name of the process task.
-
From the Toolbar of the Creating New Task window, click Save. Then, click Close.
The process task is added to the process definition.
2.1.2.1.2 Editing a Process Task
For instructions about how to edit and set process tasks, see "Modifying Process Tasks".
2.1.2.2 Reconciliation Field Mappings Tab
You use the Reconciliation Field Mappings tab shown in Figure 2-3 to define a relationship between data elements in a target system or trusted source and fields in Oracle Identity Manager.
Figure 2-3 Reconciliation Field Mappings Tab of the Process Definition Form
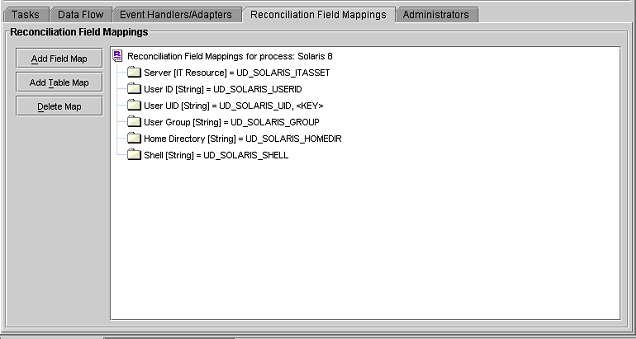
Description of ''Figure 2-3 Reconciliation Field Mappings Tab of the Process Definition Form ''
Only fields that you define in the Reconciliation Fields tab of the associated resource are available for mapping. Using a reconciliation event, these mappings determine which fields in Oracle Identity Manager to populate with information from the target system. For target resources (not trusted sources), you can use this tab to indicate which fields are key fields. Key fields determine the values that must be same on the process form and the reconciliation event to generate a match on the Processes Matched Tree tab of the Reconciliation Manager form.
For each mapping, the following information is displayed:
-
Name of the field, as defined on the Reconciliation Fields tab of the associated resource, on the target system or trusted source that is to be reconciled with data in Oracle Identity Manager.
-
Data type associated with the field, as defined on the Reconciliation Fields tab of the associated resource.
Possible values are Multi-Valued, String, Number, Date, and IT resource.
Note:
The IT Resource must be marked as a key field. -
For trusted sources: For user discovery, mapping of the data in the trusted source field to the name of a field on the users form, or for organization discovery, mapping of the data in the trusted source field to the name of a field on the Oracle Identity Manager Organizations form.
If you are performing user and organization discovery with a trusted source, organization discovery must be conducted first.
-
For target resources: The name of the field on the resource's custom (provisioning) process form to which the data in the target resources field is to be mapped.
-
For target resources: Indicator designating if the field is a key field in the reconciliation for this target resource.
For provisioning processes to match a reconciliation event data, the key field values in their process forms must be the same as those in the reconciliation event.
Note:
Oracle recommends configuring both the entitlement attribute and the key attribute for the child data in reconciliation field mappings to enable effective duplicate entitlement or child data validation. See "Duplicate Validation for Entitlements or Child Data" in the Oracle Fusion Middleware Administrator's Guide for Oracle Identity Manager for information about duplicate validation for entitlements or child data.2.1.2.2.1 User Account Status Reconciliation
To configure user account status reconciliation, you must do the following:
-
For trusted sources: You must create a reconciliation field, for example,
Status, in the corresponding trusted resource object, which denotes the status of the user in the target. The value of this field must be eitherActiveorDisabled. This reconciliation field must be mapped to the user attributestatusin the corresponding process definition. -
For target resources: You must create a reconciliation field, for example,
Status, in the corresponding resource object, which denotes the status of the resource in the target. This reconciliation field must be mapped to the process attributeOIM_OBJECT_STATUSin the corresponding process definition. The following statuses are supported for target resource reconciliation:-
Revoked
-
Provisioned
-
Ready
-
Provide Information
-
Enabled
-
None
-
Waiting
-
Provisioning
-
Disabled
-
2.1.2.2.2 Mapping a Target Resource Field to Oracle Identity Manager
You can map the fields on a target resource or trusted source, as defined on the Reconciliation Fields tab of the associated resource definition, to applicable fields in Oracle Identity Manager. These mappings determine the fields that must be updated in Oracle Identity Manager in a reconciliation event. These mappings occur when you click one of the following on the Reconciliation Manager form:
-
The Create User or Create Organization button
-
The Link button on the Matched Users or Matched Organizations tab
-
The Establish Link button on the Processes Matched Tree tab
For user discovery on a trusted source, you define the fields to be mapped from the User resource to fields in the User provisioning process. The fields (that is, the user attributes) to which you will map your trusted source fields are derived from the Users form.
For organization discovery on a trusted source, you define fields to be mapped from the Oracle Identity Manager Organization resource to fields in the Oracle Identity Manager Organization provisioning process. The fields (that is, the organization attributes) to which you will map your trusted source fields are derived from the Organizations form.
After you have accessed the provisioning process definition for the associated resource and selected the Reconciliation Field Mappings tab, use one of the two procedures described in the following sections.
To map a single value field:
-
Click Add Field Map.
The Add Reconciliation Field Mappings dialog box is displayed.
-
Select the field on the target system that you want to map from the menu in the Field Name field.
Oracle Identity Manager will automatically supply the field type based on what was entered for this field on the associated Resource Object form.
-
For trusted sources:
Select a value from the User Attribute menu and click OK. Go to Step 4.
For target resources:
Double-click Process Data Field. Select the correct mapping from the Lookup dialog box and click OK.
-
If you are defining mapping for a trusted source, go to step 5.
Set the Key Field for Reconciliation Matching check box for target resources only. If this check box is selected, Oracle Identity Manager evaluates if the value of this field on the provisioning process form matches the value of the field in the reconciliation event. All matched processes are displayed on the Processes Matched Tree tab of the Reconciliation Manager form. If this check box is deselected, Oracle Identity Manager does not require the value of this field to match the process form and reconciliation event for process matching.
Note:
To set a field as a key field, it must be set as required on the Object Reconciliation tab of the applicable resource. -
Click Save.
The mapping for the selected fields is applied the next time a reconciliation event is received from the target resource or trusted source.
Mapping a Multi-Value Field (For Target Resources Only)
To map a multi-value field:
-
Click Add Table Map.
The Add Reconciliation Table Mappings dialog box is displayed.
-
Select the multi-value field on the target system that you want to map from the menu in the Field Name field.
Oracle Identity Manager will automatically supply the field type based on what was entered for this field on the associated Resource Object form.
-
Select the child table you defined on the target resource's process form from the Table Name menu.
-
Double-click Process Data Field, and select the correct mapping from the Lookup dialog box, and click OK.
-
Save and close the Add Reconciliation Table Mappings dialog box.
-
Right-click the multi-value field you just mapped, and select Define a property field map from the menu that is displayed.
-
Select the component (child) field you want to map.
Oracle Identity Manager will automatically supply the field type based on what was entered for this field on the associated Resource Object form.
-
Double-click the Process Data Field field.
Select the correct mapping from the Lookup dialog box and click OK.
-
Set the Key Field for Reconciliation Matching check box.
If this check box is selected, Oracle Identity Manager compares the field value on the provisioning process child form with the field value in the reconciliation event. All matching processes are displayed on the Processes Matched Tree tab of the Reconciliation Manager form. If you deselect this check box, the value of this field does not have to match on the process form and reconciliation event for process matching. Ensure that at least one component (child) field of each multi-valued field is set as a key field. This improves the quality of the matches generated on the Process Matched Tree tab.
Note:
Key fields must be set as required on the Object Reconciliation tab of the applicable resource. -
Repeat Steps 6 through 9 for each component (child) field defined on the multi-value field.
-
Click Save.
The mapping for the selected fields will be applied the next time a reconciliation event is received from the target resource.
2.1.2.2.3 Deleting a Mapping
This procedure is used to delete a mapping that has been established between a field in Oracle Identity Manager and a field on the target system or trusted source as defined on the Reconciliation Fields tab of the associated resource definition.
To delete a mapping:
-
Go to the provisioning process definition for the associated resource.
-
Select the Reconciliation Field Mappings tab.
-
Select the field mapping you want to delete.
-
Click Delete Map.
The mapping for the selected field is deleted.
2.1.3 Modifying Process Tasks
To modify a process task for a process definition, double-click its row heading. The Editing Task window is displayed, containing additional information about the process task.
The Editing Task window contains the following tabs:
Note:
You must not modify the Xellerate Users process definition.2.1.3.1 General Tab
You use this tab to set high-level information for the task that you want to modify. For this example, the Create User task is used to create a user in the Solaris environment.
Table 2-2 describes the fields of the General tab.
Table 2-2 Fields of the General Tab
| Field Name | Description |
|---|---|
|
Task Name |
The name of the process task. |
|
Task Description |
Explanatory information about the process task. |
|
Duration |
The expected completion time of the current process task in days, hours, and minutes. |
|
Conditional |
This check box determines if a condition is met to add the current process task to the process. Select this check box to prevent the process task from being added to the process unless a condition has been met. Clear this check box to not require the condition to be met for the process task to be added to the process. |
|
Required for Completion |
This check box determines if the current process task must be completed for the process to be completed. Select this check box to require the process task to have a status of Completed before the process can be completed. Deselect this check box to ensure that the status of the process task does not affect the completion status of the process. |
|
Constant Duration |
Not applicable |
|
Task Effect |
From this box, select the process action you want to associate with the task, for example, disable or enable. A process can enable or disable a user's access to a resource. When the disable action is chosen, all tasks associated with the disable action are inserted. Note: If you do not want the process task to be associated with a particular process action, select No Effect from the box. |
|
Disable Manual Insert |
This check box determines if a user can manually add the current process task to the process. Select this check box to prevent the process task from being added to the process manually. Deselect this check box to enable a user to add the process task to the process. |
|
Allow Cancellation while Pending |
This check box determines if the process task can be canceled if its status is Pending. Select this check box to allow the process task to be canceled if it has a Pending status. Deselecting this check box to prevent the process task from being canceled if its status is Pending. |
|
Allow Multiple Instances |
This check box determines if the process task can be inserted into the current process more than once. Select this check box to enable multiple instances of the process task to be added to the process. Deselect this check box to enable the process task to be added to the current process only once. |
|
Retry Period in Minutes |
If a process task is rejected, this field determines the interval before Oracle Identity Manager inserts a new instance of that task with the status of Pending. When the value of the Retry Period in Minutes field is 30, it means that if the Create User process task is rejected, then in 30 minutes Oracle Identity Manager adds a new instance of this task and assigns it a status of Pending. Note: If you specify a value for this field, then you must ensure the following:
|
|
Retry Count |
Determines how many times Oracle Identity Manager retries a rejected task. When the value of the Retry Count field is 5, it means that if the Create User process task is rejected, then Oracle Identity Manager adds a new instance of this task, and assigns it a status of Pending. When this process task is rejected for the fifth time, Oracle Identity Manager no longer inserts a new instance of it. |
|
Child Table/ Trigger Type |
These boxes specify the action that Oracle Identity Manager performs in the child table of a custom form that is associated with the current process, as indicated by the Table Name field of the Process Definition form. From the Child Table box, select the child table of the custom form where Oracle Identity Manager will perform an action. From the Trigger Type box, specify the action that Oracle Identity Manager is to perform in the child table. These actions include:
Note: If the custom process form does not have any child tables associated with it, the Child Table box will be empty. In addition, the Trigger Type box will be grayed out. |
|
Off-line |
This flag is applicable only for user attribute propagation tasks. If the flag is set for a user attribute propagation task, the task insertion is asynchronous. |
2.1.3.1.1 Modifying a Process Task's General Information
To modify the general information for a process task:
-
Double-click the row heading of the task you want to modify.
The Editing Task dialog box is displayed.
-
Click the General tab.
-
In the Description field, enter explanatory information about the process task.
-
Optional. In the Duration area, enter the expected completion time of the process task (in days, hours, and minutes).
-
If you want a condition to be met for the process task to be added to the Process Instance, select the Conditional check box. Otherwise, go to Step 6.
Note:
If you select the Conditional check box, you must specify the condition to be met for the task to be added to the process. -
When you want the completion status of the process to depend on the completion status of the process task, select the Required for Completion check box.
By doing so, the process cannot be completed if the process task does not have a status of Completed.
If you do not want the status of the process task to affect the completion status of the process, go to Step 7.
-
To prevent a user from manually adding the process task into a currently running instance of the process, select the Disable Manual Insert check box. Otherwise, go to Step 8.
-
To enable a user to cancel the process task if its status is Pending, select the Allow Cancellation while Pending check box. Otherwise, go to Step 9.
-
To allow this task to be inserted multiple times in a single process instance, select the Allow Multiple Instances check box. Otherwise, go to Step 10.
-
Click the Task Effect box.
From the custom menu that is displayed, select one of the following:
-
Enable Process or Access to Application. If a resource is reactivated by using the enable function, all tasks with this effect are inserted into the process. If you select this option, you must also select the Allow Multiple Instances check box.
-
Disable Process or Access to Application. If a resource is deactivated by using the disable function, all tasks with this effect are inserted into the process. If you select this option, you must also select the Allow Multiple Instances check box.
-
Revoke Process or Access to Application. When the resource is revoked, the revoke workflow is executed without canceling the existing tasks in the provisioning process.
-
No Effect. This is the default process action associated with all tasks. If this option is selected, the task is only inserted during normal provisioning unless it is conditional.
-
-
Optional. If the process task is Rejected, you might want Oracle Identity Manager to insert a new instance of this process task (with a status of Pending).
For this to occur, enter a value in the Retry Period in Minutes field. This designates the time in minutes that Oracle Identity Manager waits before adding this process task instance.
In the Retry Count field, enter the number of times Oracle Identity Manager will retry a rejected task. For example, suppose 3 is displayed in the Retry Count field. If the task is rejected, Oracle Identity Manager adds a new instance of this task, and assigns it a status of Pending. After this process task is rejected for the fourth time, Oracle Identity Manager no longer inserts a new instance of the process task.
Note:
If either Retry Period or Retry Count is selected, you must specify parameters for the other option because they are both related. -
From the Child Table box, select the child table of the custom form where Oracle Identity Manager will perform an action.
From the Trigger Type box, specify the action that Oracle Identity Manager will perform in the child table. These actions include the following:
-
Insert: Adds a new value to the designated column of the child table
-
Update: Modifies an existing value from the corresponding column of the child table
-
Delete: Removes a value from the designated column of the child table
Note:
If the custom process form does not have any child tables associated with it, the Child Table box will be empty. In addition, the Trigger Type box will be grayed out. -
-
Click Save.
The modifications to the process task's top-level information reflects the changes you made in the General tab.
2.1.3.1.2 Triggering Process Tasks for Events Defined in Lookup.USR_PROCESS_TRIGGERS Fields
When a user attribute is defined in Lookup.USR_PROCESS_TRIGGERS, for each modification of the attribute, the corresponding process task is triggered for each provisioned resource. This is same for the First Name, Last Name, Display Name (USR_DISPLAY_NAME) user attributes and custom user attributes. However, for the Lookup.USR_PROCESS_TRIGGERS fields USR_STATUS, USR_LOCKED, USR_LOCKED_ON, and USR_MANUALLY_LOCKED, the attached process task is not triggered.
The following sections describe how to trigger the process tasks for the Lookup.USR_PROCESS_TRIGGERS fields:
It is not possible to run a task via Lookup.USR_PROCESS_TRIGGERS for the USR_STATUS attribute because this attribute is processed separately by Oracle Identity Manager. This attribute is changed by enabling, disabling, or deleting a user. These operations have a special effect on the provisioned resources because the corresponding process tasks are started via the Task Effect setting, as described in Table 2-2, "Fields of the General Tab". For these three operations, the Lookup.USR_PROCESS_TRIGGERS is not used. Therefore, when the status changes, perform the following to run the process task:
For transition from Disabled to Enabled status:
-
In the Process Definition form, create a process task named
Enable User. -
Open the Editing Task window, and click the General tab.
-
From the Task Effect list, select Enables Process or Access to Application.
-
Select Conditional and specify the condition to be met for the task to be added to the process.
For transition from Enabled to Disabled status:
-
In the Process Definition form, create a process task named
Disable User. -
Open the Editing Task window, and click the General tab.
-
From the Task Effect list, select Enables Process or Access to Application.
-
Select Conditional and specify the condition to be met for the task to be added to the process.
For transition from Enabled/Disabled/Provisioned to Revoked status:
-
In the Process Definition form, create a process task named
Delete User. -
Then set this task as an Undo task for the Create User task, which is the task that creates the user and is typically unconditional.
-
Select Conditional and specify the condition to be met for the task to be added to the process.
Note:
when the Oracle Identity Manager user is deleted, for each completed task in each resource, Oracle Identity Manager tries to run the Undo tasks.
For the USR_LOCKED, USR_LOCKED_ON, USR_MANUALLY_LOCKED Attributes
The lock and unlock operations, are handled in Oracle Identity Manager as separate orchestrations. The orchestration is on:
entity-type="User" operation="LOCK"
Or:
entity-type="User" operation="UNLOCK"
The event handler that does the evaluation for Lookup.USR_PROCESS_TRIGGERS is:
oracle.iam.transUI.impl.handlers.TriggerUserProcesses
This is triggered only in the following user orchestrations:
-
MODIFY: For generic fields
-
CHANGE_PASSWORD, RESET_PASSWORD: For USR_PASSWORD propagation
-
ENABLE, DISABLE, DELETE: For handling the execution of process tasks
For lock/unlock operations, the TriggerUserProcesses event handler is not triggered. Therefore, for the attributes modified through lock/unlock operations, the Lookup.USR_PROCESS_TRIGGERS is not checked.
If you want to run custom code for these operations when these fields are changed, then you can create event handlers and register them on the orchestrations mentioned in this section.
2.1.3.2 Integration Tab
By using the Integration tab, you can:
-
Automate a process task by attaching an event handler or task adapter to it.
-
Map the variables of the task adapter, so Oracle Identity Manager can pass the appropriate information when the adapter is triggered. This occurs when the process task's status is Pending.
-
Break the link between the adapter handler and the process task, once the adapter or event handler is no longer applicable with the process task.
For example, suppose that the adpSOLARISCREATEUSER adapter is attached to the Create User process task. This adapter has nine adapter variables, all of which are mapped correctly as indicated by the Y that precedes each variable name.
Note:
-
Event handlers are preceded with tc (Thor class), such as
tcCheckAppInstalled. These are event handlers that Oracle provides. Customer-created event handlers cannot have a tc prefix in their name. Adapters are preceded with adp, for example,adpSOLARISCREATEUSER. -
From the Design Console, you cannot create or modify DOB event handlers. You can only view the existing event handlers.
See Also:
Chapter 3, "Using the Adapter Factory" and Chapter 18, "Developing Event Handlers" for more information about adapters and event handlers2.1.3.2.1 Assigning an Adapter or Event Handler to a Process Task
The following procedure describes how to assign an adapter or event handler to a process task.
Important:
If you assign an adapter to the process task, the adapter will not work until you map the adapter variables correctly. See "Mapping Adapter Variables" for details.To assign an adapter or event handler to a process task:
-
Double-click the row heading of the process task to which you want to assign an event handler or adapter.
The Editing Task window is displayed.
-
Click the Integration tab.
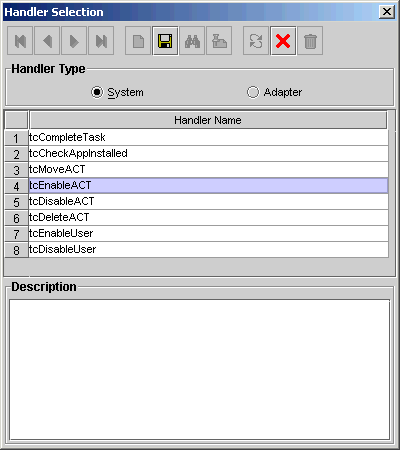
-
Click Add.
The Handler Selection dialog box is displayed, as shown in Figure 2-4.
-
To assign an event handler to the process task, select the System option.
To add an adapter to the process task, select the Adapter option. A list of event handlers or adapters, which you can assign to the process task, is displayed in the Handler Name region.
-
Select the event handler or adapter that you want to assign to the process task.
-
From the Handler Selection window's Toolbar, click Save.
A confirmation dialog box is displayed.
-
Click OK.
The event handler or adapter is assigned to the process task.
2.1.3.2.2 Mapping Adapter Variables
See Also:
"Adapter Mapping Information" for more information about the items to select in this procedureNote:
To trigger a task associated with a change to a parent form field, the name of the task must befield Updated, where field is the name of the parent form field. If the task is not named according to this convention, it is not triggered during a field update.To map an adapter variable:
-
Select the adapter variable that you want to map.
-
Click Map.
The Data Mapping for Variable window is displayed.
-
Complete the Map To, Qualifier, IT Asset Type, IT Asset Property, Literal Value, and Old Value fields.
Note:
IT Asset Type and IT Asset Property are displayed only when It Resources is selected from the Map To operations. The Literal Value field is displayed only when Literal is selected from Map To. Old Value check box is enabled only when Organization Definition or User Definition is selected from Map To. -
From the Data Mapping for Variable window's Toolbar, click Save.
-
Click Close.
The mapping status for the adapter variable changes from
NtoY. This indicates that the adapter variable has been mapped.
2.1.3.3 Task Dependency Tab
You use the Task Dependency tab to determine the logical flow of process tasks in a process. Through this tab, you can:
-
Assign preceding tasks to a process task.
These tasks must have a status of Completed before Oracle Identity Manager or a user can trigger the current process task.
-
Assign dependent tasks to a process task.
Oracle Identity Manager or a user can trigger these tasks only after the current process task has a status of Completed.
-
Break the link between a preceding task and the current task so that the preceding task's completion status no longer has any effect on the current task being triggered.
-
Break the link between the current task and a dependent task so that the current task's completion status no longer has any bearing on triggering the dependent tasks.
For example, the Create User process task does not have any preceding tasks. Oracle Identity Manager triggers this task whenever the task is inserted into a process (for example, when an associated resource is requested). The Create User process task has seven dependent tasks. Before completion of this process task, each dependent task will have a status of Waiting. Once this task achieves a status of Completed, each of these process tasks are assigned a status of Pending, and Oracle Identity Manager can trigger them.
2.1.3.3.1 Assigning a Preceding Task to a Process Task
To assign a preceding task to a process task:
-
Double-click the row heading of the process task to which you want to assign a preceding task.
The Editing Task window is displayed.
-
Click the Task Dependency tab.
-
From the Preceding Tasks region, click Assign.
The Assignment window is displayed.
-
From this window, select the preceding task, and assign it to the process task.
-
Click OK.
The preceding task is assigned to the process task.
2.1.3.3.2 Removing a Preceding Task from a Process Task
To remove a preceding task from a process task:
-
Select the preceding task that you want to delete.
-
From the Preceding Tasks region, click Delete.
The preceding task is removed from the process task.
2.1.3.3.3 Assigning a Dependent Task to a Process Task
To assign a dependent task to a process task:
-
Double-click the row heading of the process task to which you want to assign a dependent task.
The Editing Task window is displayed.
-
Click the Task Dependency tab.
-
From the Dependent Tasks region, click Assign.
The Assignment window is displayed.
-
From this window, select the dependent task, and assign it to the process task.
-
Click OK.
The dependent task is assigned to the process task.
2.1.3.4 Responses Tab
You use the Responses tab to do the following:
-
Define the response codes that can be received in conjunction with the execution of a particular process tasks. You can use response codes to represent specific conditions on the target system.
-
Define the conditional tasks that are started if a response code is received during execution of this process task. These tasks are called generated tasks.
-
Remove a response from a process task.
-
Remove a generated task from a process task.
For example, when a Create User process task is completed, the SUCCESS response is activated. This response displays a dialog box with the message "The user was created successfully." In addition, Oracle Identity Manager triggers the Enable User process task.
Note:
By default, the UNKNOWN response is defined for each process task that is rejected. This way, even when the system administrator does not add any responses to a process task, if this task is rejected, the user will be notified in the form of an error message in a dialog box.2.1.3.4.1 Adding a Response to a Process Task
To add a response to a process task:
-
Double-click the row heading of the process task to which you want to add a response.
The Editing Task window is displayed.
-
Click the Responses tab.
-
In the Responses region, click Add.
A blank row is displayed in the Responses region.
-
Enter information in the Response field.
This field contains the response code value. This field is case-sensitive.
-
Enter information in the Description field. This field contains explanatory information about the response.
If the process task triggers the response, this information is displayed in the task information dialog box.
-
Double-click the Status lookup field.
From the Lookup window that is displayed, select a task status level. If the response code is received, it will cause the task to be set to this status.
-
Click Save.
The response you added would now reflect the settings you have entered.
2.1.3.4.2 Removing a Response from a Process Task
To remove a response from a process task:
-
Select the response that you want to delete.
-
From the Responses region, click Delete.
The response is removed from the process task.
Note:
You will not be able to delete a response from a process task that is invoked for any provisioning instance, even if the response is existing or is newly added. However, if the process task is not invoked for any provisioning instance, you will be able to delete the response.
2.1.3.4.3 Assigning a Generated Task to a Process Task
To assign a generated task to a process task:
-
Double-click the row heading of the process task to which you want to assign a generated task.
The Editing Task window is displayed.
-
Click the Responses tab.
-
Select the response code for which you want to assign generated tasks.
-
From the Tasks to Generate region, click Assign.
The Assignment window is displayed.
-
From this window, select the generated task, and assign it to the process task response.
-
Click OK.
The generated task is assigned to the process task.
2.1.3.5 Task to Object Status Mapping Tab
A resource object contains data that is used to provision resources to users and applications.
In addition, a resource object is provided with predefined provisioning statuses, which represent the various statuses of the resource object throughout its life cycle as it is being provisioned to the target user or organization.
Note:
Provisioning statuses are defined in the Status Definition tab of the Resource Objects form.The provisioning status of a resource object is determined by the status of its associated provisioning processes, and the tasks that comprise these processes. For this reason, you must provide a link between the status of a process task and the provisioning status of the resource object to which it is assigned.
The Task to Object Status Mapping tab is used to create this link. Also, when this connection is no longer required, or you want to associate a process task status with a different provisioning status for the resource object, you must break the link that currently exists.
For this example, there are five mappings among process task statuses and provisioning statuses of a resource object. When the Create User process task achieves a status of Completed, the associated resource object will be assigned a provisioning status of Provisioned. However, if this task is canceled, the provisioning status for the resource object will be Revoked. None indicates that this status has no effect on the provisioning status of the resource object.
The following sections describe how to map a process task status to a provisioning status and unmap a process task status from a provisioning status.
2.1.3.5.1 Mapping a Process Task Status to a Provisioning Status
To map an process task status to a provisioning status:
-
Double-click the row heading of the process task, which has a status that you want to map to the provisioning status of a resource object.
The Editing Task window is displayed.
-
Click the Task to Object Status Mapping tab.
-
Select the desired process task status.
-
Double-click the Object Status lookup field.
From the Lookup window that is displayed, select the provisioning status of the resource object to which you want to map the process task status.
-
Click OK.
The provisioning status you selected is displayed in the Task to Object Status Mapping tab.
-
Click Save.
The process task status is mapped to the provisioning status.
2.1.3.5.2 Unmapping a Process Task Status From a Provisioning Status
To unmap an process task status from a provisioning status:
-
Select the desired process task status.
-
Double-click the Object Status lookup field.
From the Lookup window that is displayed, select None. None indicates that this status has no effect on the provisioning status of the resource object.
-
Click OK.
The provisioning status of None is displayed in the Task to Object Status Mapping tab.
-
Click Save.
The process task status is no longer mapped to the provisioning status of the resource object.