8 Managing Policies and Assertion Templates
This chapter includes the following sections:
8.1 Overview of Policy and Assertion Template Management
The following sections provide an overview of policy and assertion template management.
8.1.1 Building Policies Using Policy Assertions
A policy is expressed as one or more policy assertions representing an application URLs capabilities or requirements. A policy assertion is the smallest unit of a policy that performs a specific action for the request and response operations. For example, a policy assertion may stipulate that a request to an application URL be encrypted. Likewise, a policy assertion can define the maximum message size that an application URL can accept.
8.1.2 Predefined Policies and Assertion Templates
There is a set of predefined policies and assertion templates that are automatically available. The predefined policies are based on common best practice policy patterns used in customer deployments.
You can immediately begin attaching these predefined policies to the URLs in the MSAS applications. You can edit and configure the predefined policies or create a new policy by making a copy of one of the predefined policies.
Predefined policies are constructed using assertions based on predefined assertion templates. You can create new assertion templates, as required.
For more information about the predefined policies and assertion templates, see:
-
"Predefined Policies" in Policy and Assertion Template Reference for Oracle Mobile Security Access Server
-
"Predefined Assertion Templates" in Policy and Assertion Template Reference for Oracle Mobile Security Access Server
8.2 Managing Policies
You manage policies from the Access Policies page. From this page you can:
-
Search for specific policies or types of policies
-
View policies
-
Create, edit, and delete policies
-
Import or export policies to or from the repository
-
Add assertions or OR groups to a policy
-
Version a policy
The following sections describe how to manage policies.
8.2.1 Viewing Access Policies
You view policies from the Access Policies page by performing the following steps:
-
From the Oracle Access Management home page, click the Mobile Security tab from the list of tabs at the top of the page.
-
From the Mobile Security Launch Pad, click Access Policies in the Mobile Security Access Server section.
The Access Policies page opens in a new tab.
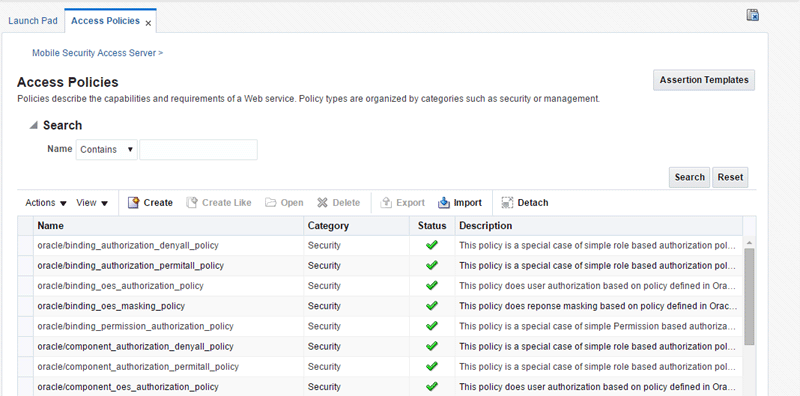
8.2.2 Searching for Policies
In the Access Policies page, you can reduce the number of policies that are returned by specifying the appropriate search criteria. To do so:
-
In the Search pane, specify the criteria to use in the search.
In the Name field, enter a policy name or part of a policy name and select the operator to use to refine the search. Available operators are Starts with, Ends with, Equals, and Contains. For example, to search for message protection policies only, select the Contains operator, and enter
messagein the Name field.You can use percent
%as a wildcard, any place in the name. Asterisk*is not recognized as a wildcard and is treated as plain text. Searches are case-insensitive. -
Click Search.
The Policies table is refreshed to include only those policies that match the specified search criteria.
8.2.3 Viewing the Details of a Policy
Use the following procedure to view the details of a policy.
-
From the Oracle Access Management home page, click the Mobile Security tab from the list of tabs at the top of the page.
-
From the Mobile Security Launch Pad, click Access Policies in the Mobile Security Access Server section.
The Access Policies page opens in a new tab. Optionally, refine the list of policies displayed using Search, as described in "Searching for Policies".
-
Select the policy to be viewed from the list of policies and click Open. Alternatively, select Actions and then Open.
Figure 8-2 displays the Policy Details page for the
oracle/wss10_saml_token_with_message_protection_service_policy.Figure 8-2 Policy Details Page with the General Tab Selected
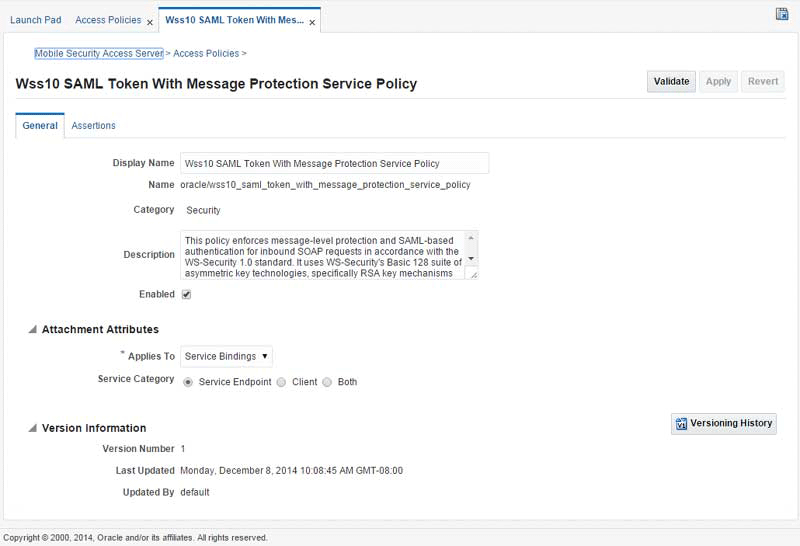
Description of "Figure 8-2 Policy Details Page with the General Tab Selected"
The Policy Details page contains two tabs:
-
The General tab (shown in Figure 8-2) displays information such as the policy name and display name, policy category, description, and whether the policy is enabled. The Attachment Attributes section provides details about the type of endpoints to which the policy can be attached, and the service category (service endpoint, client, or both). The Version Information section lists the version number of the policy, when it was last updated, and by whom. You can navigate to the Policy Version history page. For more information about policy versions, see "Versioning Policies".
-
The Assertions tab includes a table that lists all of the assertions contained in the policy. Select the assertion name in the table to view the assertion details. The content displayed varies depending on the assertion selected. Figure 8-3 displays the Assertions tab for the Wss10 SAML Token With Message Protection Service Policy.
Figure 8-3 Policy Details Page with the Assertion Tab Selected
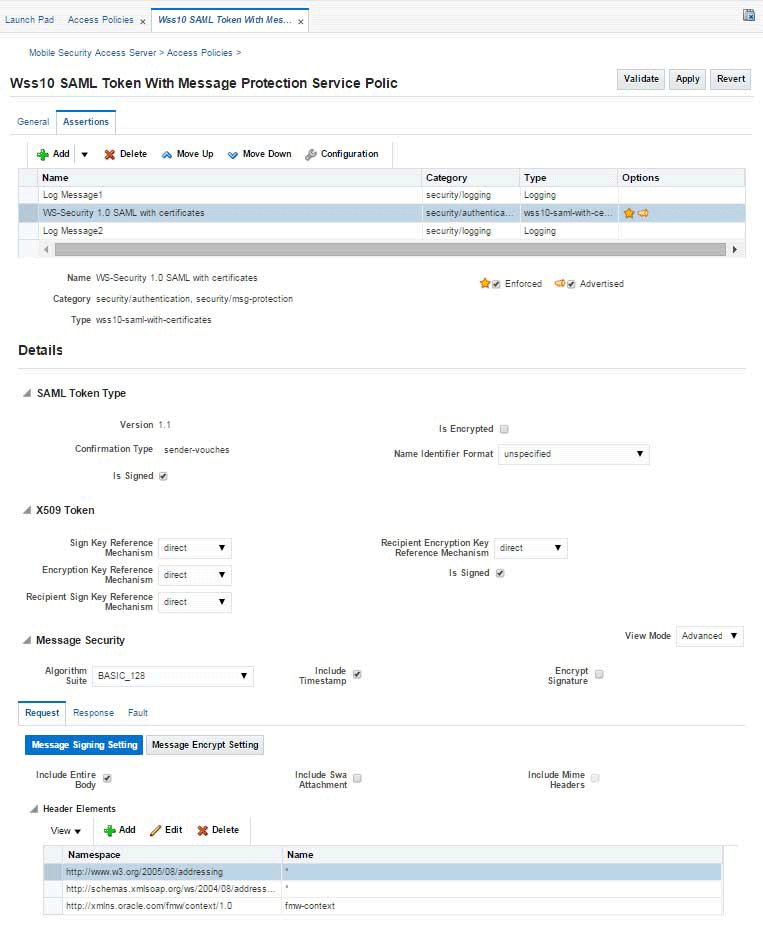
Description of "Figure 8-3 Policy Details Page with the Assertion Tab Selected"
-
8.2.4 Creating and Editing a Policy
The following sections describe how to create and edit policies:
8.2.4.1 Creating a New Policy
Use the following procedure to create a new policy using one or more assertion templates:
-
From the Oracle Access Management home page, click the Mobile Security tab from the list of tabs at the top of the page.
-
From the Mobile Security Launch Pad, click Access Policies in the Mobile Security Access Server section.
The Access Policies page opens in a new tab.
-
Click Create. Alternatively, select Actions and then Create.
The page, temporarily titled Untitled, includes two tabs: General and Assertions. The General tab is displayed by default.
-
On the General tab, optionally specify a unique name in the Display Name field to be used in the console to reference the policy.
The page title is updated to reflect the display name you specify. If you do not specify a display name, the policy name is used to reference the policy.
-
Enter a policy name in the Name field.
The policy name must include the directory in which the policy is located. For example, all predefined policies provided by Oracle are contained in the
oracle/directory, such asoracle/wss_http_token_service_policy.Notes:
Oracle recommends that you follow the policy naming conventions described in "Recommended Naming Conventions for Policies".You cannot edit the name of a policy once the policy is created. To change the policy name, you will need to clone the policy and assign it a different name.
-
By default, the Category field is set to Security.
Note:
You can create new policies in the Security category only. -
Optionally, enter a brief description for the policy in the Description field.
-
Select the Enabled option to enable the policy, if desired. Note that a policy that is not enabled is not enforced at run time.
-
In the Attachment Attributes section of the page, specify the type of policy enforcement points to which the policy can be attached. From the Applies To menu, choose one of the following options:
-
All—Specifies that the policy can be attached to any type of policy enforcement point, including service endpoints and client endpoints.
-
Service Bindings—Specifies that the policy can be attached to service and client endpoints. When you choose this option, in the Service Category field select whether the policy can be attached to service endpoints, service clients, or both.
-
-
Select the Assertions tab, and click Add to add assertions to your policy. For more information, see "Adding Assertions to a Policy"
-
Optionally, add an OR group to the policy. Select the Add menu then select OR Group. Then, select the Add menu then select Assertion to OR Group to add the desired assertions to the OR group.
An OR group enables you to define multiple security subcategory options, only one of which can be executed. For example, a subset can contain both a SAML Token and a Username Token security/authentication subcategory assertion, so an application can use either one or the other, but not both. For more information, see "Adding an OR Group to a Policy".
-
Configure the assertions as required by modifying the settings and configuration properties.
To edit the configuration properties, click Configuration. The list of configuration properties defined for the assertion are displayed. Edit the configuration properties as described in "Editing the Configuration Properties" and click OK.
For details about the settings and configuration properties for each assertion template, see "Assertion Template Settings and Configuration Properties" in Policy and Assertion Template Reference for Oracle Mobile Security Access Server.
-
When you have finished adding assertions to the policy, select the assertions in the table and use the Move Up and Move Down buttons to set the order in the policy. Assertions are invoked in the order in which they appear in the list.
-
Click Validate to validate the policy.
If the policy is invalid, it is disabled as a precaution. After you correct the validation issues, you will have to enable the policy. For more information on policy validation, see "Validating Policies".
-
Click Apply to apply your changes, or Revert to revert your changes.
8.2.4.2 Cloning a Policy
You can create a new policy by cloning an existing policy.
To clone a policy:
-
From the Oracle Access Management home page, click the Mobile Security tab from the list of tabs at the top of the page.
-
From the Mobile Security Launch Pad, click Access Policies in the Mobile Security Access Server section.
The Access Policies page opens in a new tab.
-
Optionally, refine the list of policies displayed using Search, as described in "Searching for Policies".
-
Select the policy to be cloned from the list of policies and click Create Like. Alternatively, select Actions and then Create Like.
It is recommended that you change the name of this new policy to be more meaningful in your environment.Notes:
Oracle recommends that you follow the policy naming conventions described in "Recommended Naming Conventions for Policies".You cannot edit the name of a policy once the policy is created. To change the policy name, you will need to clone the policy and assign it a different name.
-
Modify the policy as required, including the assertions.
For details about adding assertions to the policy, see "Adding Assertions to a Policy". For details about adding an OR group to the policy, see "Adding an OR Group to a Policy".
-
Click Validate to validate the policy.
If the policy is invalid, it is disabled as a precaution. After you correct the validation issues, you will have to enable the policy. For more information on policy validation, see "Validating Policies".
-
Click Apply to apply your changes, or Revert to revert your changes.
8.2.4.3 Editing a Policy
Note:
Oracle recommends that you do not edit the predefined policies so that you will always have a known set of valid policies.If you wish to edit a predefined policy, Oracle recommends that you clone the policy and then edit it.
You can edit a policy as described in this section. The changes that you make to the policy take effect at the next polling interval for policy changes.
Each time you save a change to your policy, a new version is created, and the older versions are retained. For more information about policy versioning, see "Versioning Policies".
To edit a policy:
-
From the Oracle Access Management home page, click the Mobile Security tab from the list of tabs at the top of the page.
-
From the Mobile Security Launch Pad, click Access Policies in the Mobile Security Access Server section.
The Access Policies page opens in a new tab.
-
Optionally, refine the list of policies displayed using Search, as described in "Searching for Policies".
-
Select the policy to be edited from the list of policies and click Open. Alternatively, select Actions and then Open.
The Policy Details page is displayed. For more information about the Policy Details page, see "Viewing the Details of a Policy".
-
Select the General tab and edit the following information:
-
Display name and description, if desired. You cannot edit the policy name. To change the name of a policy, you will need to clone it and assign it a different name.
-
Remaining fields on the tab as required, including enabling or disabling the policy or modifying the type of policy enforcement points to which the policy can be attached.
-
-
Select the Assertions tab and perform one or more of the following tasks:
-
Modify the assertion settings and configuration properties as required. To modify the assertion settings, select the assertion in the table and edit the settings as required in the Details section of the page. To edit the configuration properties, click Configuration and edit the properties as required in the Configuration table. To enable the assertion, select the Enforced option.
Note:
The Advertised option is reserved for future use. -
Add assertions or OR groups as required, as described in "Adding Assertions to a Policy" and "Adding an OR Group to a Policy", respectively.
-
Delete assertions or OR groups as required. To do so, select the assertion or OR group in the table and click Delete.
For details about the assertions in each predefined policy, see "Predefined Policies" in Policy and Assertion Template Reference for Oracle Mobile Security Access Server.
-
-
Click Validate to validate the policy.
If the policy is invalid, it is disabled as a precaution. After you correct the validation issues, you will have to enable the policy. For more information on policy validation, see "Validating Policies".
-
Click Apply to apply your changes, or Revert to revert your changes.
8.2.5 Exporting and Importing Policies
Import and export policies using the procedures described in the following sections.
8.2.5.1 Exporting a Policy
You may want to export a policy to copy it from a development environment to a production environment, or to simply view the policy in another tool or application. You can export policies that you have created as described in "Creating and Editing a Policy". Once the policy is exported, you can import it to another repository, attach it, make changes to it, and so forth.
Use the following procedure to export a policy from the repository:
-
From the Oracle Access Management home page, click the Mobile Security tab from the list of tabs at the top of the page.
-
From the Mobile Security Launch Pad, click Access Policies in the Mobile Security Access Server section.
The Access Policies page opens in a new tab.
-
Select the policy or policies to be exported from the list of policies and click Export.
The policies are added to a zip archive file named
policyexport.zipby default, and downloaded to your local directory.If you perform multiple export operations, subsequent files are named uniquely. For example, as
policyexport(n).zip, wherenstarts with 1 and is incremented by 1 for each additional export.The directory structure for each policy is maintained in the archive file using the following structure:
META-INF/policies/policyname
8.2.5.2 Importing a Policy
Import one or more policies into the repository using the following procedure. Once the policies are imported, you can attach them and make changes to them.
Notes:
The policy name you import must not already exist in the repository.Be aware that "policy name" and "file name" are different. The policy name is specified by the name attribute of the policy content; the file name is the name of the policy file. You might find it convenient for the two names to match, but it is not required.
You cannot prefix the name of a policy with oracle_. Otherwise, you will receive exceptions when you try to use the policy.
To import one or more policies:
-
From the Oracle Access Management home page, click the Mobile Security tab from the list of tabs at the top of the page.
-
From the Mobile Security Launch Pad, click Access Policies in the Mobile Security Access Server section.
The Access Policies page opens in a new tab.
-
Click Import.
You are prompted to provide the name of a zip archive file containing the policies to be imported.
Note:
The policies to be imported must use the following directory structure in the zip archive:META-INF/policies/policynameWithin this directory structure,
policynameincludes the directory in which the policy is located. -
In the Import window, click Choose File and navigate to the directory where the policies archive file is located, then select the zip archive file to be imported.
-
Click Import.
If an error is encountered with one of the policies, the import process stops. For example, if there are five policies to be imported and an error is encountered in the third one, the first two will be imported but the remaining policies will not.
An information window is displayed listing the policies that were imported. Click OK to close the window.
The imported policies are added to the list of policies in the Access Policies page.
8.2.6 Adding Assertions to a Policy
You can add assertions to a policy during policy creation or editing.
The policy can contain any number of assertions belonging to the Security category; however, the combination of assertions must be valid. For more information on valid assertions, see "Validating Policies".
To add an assertion to a policy:
-
Navigate to the Policy Details page for the policy to which you want to add assertions, as described in "Viewing the Details of a Policy".
-
Select the Assertions tab.
-
Click Add or select Assertion from the Add menu.
The Add Assertion page is displayed. The assertions available for that policy are displayed in the Search Results table, organized by Template Name. Optionally, use the View menu to display the Display Name column, or to change the order of the columns.
-
Select an assertion from the table, or provide search parameters in the Name and Category fields and click Search. The results that match the search criteria are displayed in the Search Results table. In the Search Results table, select the assertion or assertions to be added to the policy and click Add Selected. To add all the listed assertions to the policy, click Add All.
The selected assertions are displayed in the Selected Assertion Templates table. The assertions are displayed using the Template Name. Optionally, use the View menu to display the Template Display Name column, or to change the order of the columns.
-
In the Selected Assertion Templates table, optionally edit the names for the added assertions in the Assertion Name field.
-
Review the selections in the Selected Assertion Templates table. To remove one or more assertions from this table, click Remove Selected or Remove All. When you have confirmed the assertion selection, click Add Assertion.
The added assertions are listed in a table in the Assertion tab.
For details about the assertion templates, see "Predefined Assertion Templates" in Policy and Assertion Template Reference for Oracle Mobile Security Access Server.
-
To configure the assertion, select the assertion and edit the settings as required in the Details section of the page.
-
To enable or advertise the assertion, select the Enforced option.
Note:
The Advertised option is reserved for future use. -
To edit the configuration properties, click Configuration.
The list of configuration properties defined for the assertion are displayed.
-
Edit the Configuration properties and click OK.
For details about the configuration properties for each assertion template, see "Assertion Template Settings and Configuration Properties" in Policy and Assertion Template Reference for Oracle Mobile Security Access Server.
Note that you can edit only the Value, and Description fields. The Name, Type, and Default Value property settings defined in the assertion template cannot be changed, and are displayed as read only. For details about these properties, see "Editing the Configuration Properties".
-
When you have finished adding assertions to the policy, select the assertions in the table and use Move Up and Move Down buttons to set the order in the policy. Assertions are invoked in the order in which they appear in the list.
-
Click Apply to apply your changes, or Revert to revert your changes.
8.2.7 Adding an OR Group to a Policy
You can create an OR group, consisting of one or more assertions, enabling a single policy to accept multiple types of security tokens. A client can enforce any one of the policies that are defined in the OR group. For more information, see "Defining Multiple Policy Alternatives (OR Groups)".
You can add only one OR group to a policy. Once you have added an OR Group, the OR Group option is greyed out.
To add an OR group to a policy:
-
Navigate to the Policy Details page for the policy to which you want to add the OR group.
-
Select the Assertions tab.
-
Select OR Group from the Add menu.
An
OR Grouprow is added to the assertions table. -
Select Assertion to OR Group from the Add menu. Notice that the OR Group is now greyed out on the menu, so you cannot add any additional OR groups.
Note:
If you click Add or select Assertion from the Add menu, the assertion will be added outside the OR group.The Add Assertion search page is displayed.
-
Select one or more assertions from the Search Results table, or provide search parameters in the Name and Category fields and click Search. The results that match the search criteria are displayed in the Search Results table.
For details about the assertion templates, see "Predefined Assertion Templates" in Policy and Assertion Template Reference for Oracle Mobile Security Access Server.
-
In the Search Results table, select the assertion or assertions to be added to the OR Group and click Add Selected. The selected assertions are displayed in the Selected Assertion Templates table.
-
In the Selected Assertion Templates table, optionally provide display names for the added assertions in the Assertion Name field.
-
Review the selections in the Selected Assertion Template table. To remove one or more assertions from this table, click Remove Selected or Remove All. When you have confirmed the assertion selection, click Add Assertion.
The added assertions are listed under the OR Group in the list of assertions in the Assertion tab.
-
To add additional assertions to the OR group, repeat steps 4 through 8.
-
Configure the assertions as required by modifying the settings and configuration properties.
-
To edit the assertion settings, select the assertion and edit the settings in the Details section of the page.
-
To edit the configuration properties, click Configuration.
The list of configuration properties defined for the assertion are displayed.
Edit the configuration properties as described in "Editing the Configuration Properties" and click OK.
-
To enable or advertise the assertion, select the Enforced option.
Note:
The Advertised option is reserved for future use.
For details about the configuration properties for each assertion template, see "Assertion Template Settings and Configuration Properties" in Policy and Assertion Template Reference for Oracle Mobile Security Access Server.
-
-
When you have finished adding assertions to the OR group, select the assertions and use Move Up and Move Down to order them as needed. Assertions are considered for invocation in the order that they appear on the list.
-
To delete an assertion from the OR group, select the assertion and click Delete. To delete the entire OR group, select the OR group and click Delete.
-
Click Apply to apply your changes, or Revert to revert your changes.
8.2.8 Versioning Policies
Whenever a change to a policy is saved, a new version of the policy is automatically created and the version number is incremented. The Policy Manager maintains the history of these changes, enabling you to go back to an earlier version.
For example, you might find it useful to create two different versions of a policy and alternate between them. For example, you might have an occasional need to use a policy such as oracle/binding_authorization_denyall_policy policy with selected roles to temporarily lock down access to a service.
By using the versioning feature, you can reuse multiple versions of a policy without having to recreate them every time you need them.
You can also delete any version of the policy, except the active policy, from the Policy Version history table by selecting the policy and clicking Delete.
You cannot edit the policy from the Policy Version history page. You must edit a policy from the Policy Details page.
The following sections describe versioning in more detail:
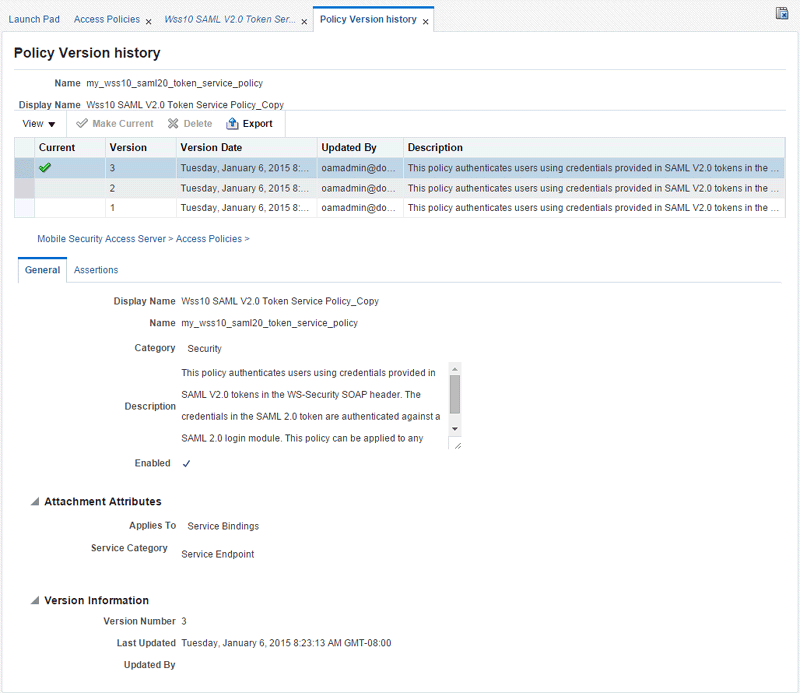
8.2.8.1 Viewing the Version History of a Policy
You can view the version history for a policy from the Policy Version history page, which you can access from the Policy Details page.
To view the version history for a policy:
-
Navigate to the Policy Details page for the policy as described in "Viewing the Details of a Policy".
-
Select the General tab for the policy, if it is not already selected.
-
In the Version Information section of the page, click Versioning History.
The Policy Version history for the page is displayed, as shown in Figure 8-4. The policy versions appear in order in the version history table at the top of the page. The currently active policy has the highest version number, and is the only policy that can be attached to a policy enforcement point. However, you can make an earlier version of a policy the active version.
8.2.8.2 Changing the Current Version of a Policy
Use the following procedure to change the current version of the policy:
-
Navigate to the Policy Details page for the policy as described in "Viewing the Details of a Policy".
-
Select the General tab for the policy, if it is not already selected.
-
In the Version Information section of the policy detail page, click Versioning History to display the Policy Version history page.
-
In the policy version table, select the version to be made current and click Make Current.
The selected policy version becomes the current active policy and the current version number is incremented by 1. The earlier version of the policy is retained.
8.2.8.3 Deleting Versions of a Policy
Use the following procedure to delete earlier versions of a policy. You can delete all versions except the active policy version. To delete all versions of the policy, including the active version, see "Deleting a Policy".
-
Navigate to the Policy Details page for the policy as described in "Viewing the Details of a Policy".
-
Select the General tab for the policy, if it is not already selected.
-
In the Version Information section of the policy detail page, click Versioning History to display the Policy Version history page.
-
In the policy version table, select the version or versions to be deleted and click Delete.
-
In the Confirm Policy Version Deletion box, click OK.
The selected policy version(s) is deleted from the repository and the Policy History table.
8.2.8.4 Exporting a Version of a Policy
Use the following procedure to export a version of the policy:
-
Navigate to the Policy Details page for the policy as described in "Viewing the Details of a Policy".
-
Select the General tab for the policy, if it is not already selected.
-
In the Version Information section of the policy detail page, click Versioning History to display the Policy Version history page.
-
In the policy version table, select the version to be exported and click Export.
The policy is added to a zip archive file named
policyexport.zipby default, and downloaded to your local directory.The directory structure for each policy is maintained in the archive file using the following structure:
META-INF/policies/policyname
8.2.9 Deleting a Policy
Before you delete a policy, Oracle recommends that you verify that the policy is not attached to any URLs. If you try to delete a policy that is attached to a URL, you will receive a warning. You will not be prevented from deleting an attached policy. However, the service request will fail the next time the URL to which the policy is attached is invoked.
When you delete a policy, the active policy and all previous versions of the policy are deleted. To retain the active policy version and delete only the previous versions of the policy, see "Deleting Versions of a Policy".
To delete a policy:
-
From the Oracle Access Management home page, click the Mobile Security tab from the list of tabs at the top of the page.
-
From the Mobile Security Launch Pad, click Access Policies in the Mobile Security Access Server section.
The Access Policies page opens in a new tab.
-
Optionally, refine the list of policies displayed using Search, as described in "Searching for Policies".
-
From the Access Policies page, select the policy to be deleted from the list of policies and click Delete. Alternatively, select Actions and then Delete.
-
A dialog box appears asking you to confirm the deletion. Click Delete.
8.3 Validating Policies
There are restrictions on the type and number of policy assertions that are permitted in a policy. A policy can contain only assertions that belong to a single category. Therefore, you cannot combine a security assertion with an management assertion in the same policy. The policy type is determined by the category of the assertion. Therefore, a policy containing a security assertion is a security policy. Security assertions are further categorized into subcategories: authentication, message protection (msg-protection), and authorization.
There are restrictions on the number and type of assertions you can have in a policy. The restrictions are as follows:
-
A security policy can contain multiple security assertions; however, there can be only one assertion from the following subcategories in a policy: encryption, signing, and authentication.
-
Some assertions contain both authentication and message protection. For example, if you view the
oracle/wss11_username_token_with_message_protection_service_policy, you will see that the second assertion falls into two categories: security/authentication and security/msg-protection, as shown in Figure 8-5.Figure 8-5 Security Assertion with Two Subcategories
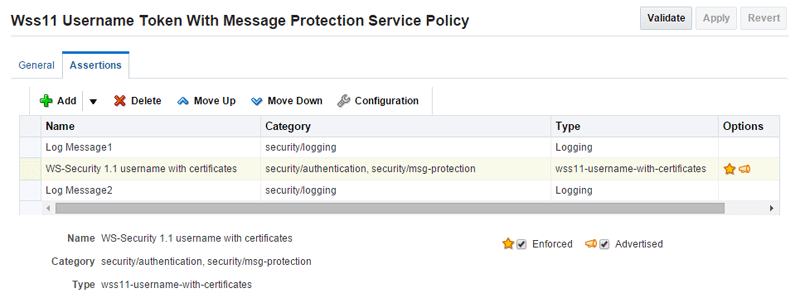
Description of "Figure 8-5 Security Assertion with Two Subcategories"
Oracle recommends that you create one policy for authentication and message protection, and a second policy for authorization. If you create a policy that contains both an authentication and an authorization assertion, then the authentication assertion must precede the authorization assertion.
When you create a new policy or edit a policy, the validation process checks to see that your policies meet these requirements. If the validation fails during policy creation, the policy is created but is marked as disabled.
To validate a policy:
-
Navigate to the Policy Details page for the policy as described in "Viewing the Details of a Policy".
-
On the Policy Details page of the policy being viewed or edited, click Validate.
If the validation is successful, the
Policy is Validmessage appears.If the validation is not successful, the resulting error message describes the problem. Make the necessary corrections, then revalidate the policy.
-
Once the policy validates successfully, click Apply to save the policy, if it is not already saved.
8.4 Managing Policy Assertion Templates
You manage policies from the Access Policies page. From this page you can:
-
Search for specific assertion templates
-
View assertion templates
-
Create, edit, and delete assertion templates
-
Edit configuration properties for an assertion template
-
Import and export assertion templates
The following sections describe how to manage assertion templates.
8.4.1 Viewing Assertion Templates
You view assertion templates from the Assertion Templates page by performing the following steps:
-
From the Oracle Access Management home page, click the Mobile Security tab from the list of tabs at the top of the page.
-
From the Mobile Security Launch Pad, click Access Policies in the Mobile Security Access Server section.
The Access Policies page opens in a new tab.
-
Click Assertion Templates.
The Assertion Templates page opens in a new tab.

8.4.2 Searching for an Assertion Template
In the Assertion Templates page, you can reduce the number of assertion templates that are returned by specifying the appropriate search criteria. To do so:
-
From the Oracle Access Management home page, click the Mobile Security tab from the list of tabs at the top of the page.
-
From the Mobile Security Launch Pad, click Access Policies in the Mobile Security Access Server section.
The Access Policies page opens in a new tab.
-
Click Assertion Templates.
The Assertion Templates page opens in a new tab.
-
In the Search pane, specify the criteria to use in the search.
In the Assertion Name field, enter an assertion template name or part of a name and select the operator to use to refine the search. Available operators are Starts with, Ends with, Equals, and Contains. For example, to search for message protection assertion templates only, select the Contains operator, and enter
messagein the Assertion Name field.You can use percent
%as a wildcard, any place in the name. Asterisk*is not recognized as a wildcard and is treated as plain text. Searches are case-insensitive. -
Click Search.
The Assertion Templates table is refreshed to include only those assertion templates that match the specified search criteria.
8.4.3 Viewing the Details of an Assertion Template
Use the following procedure to view the details of an assertion template.
To view the assertion template details:
-
From the Oracle Access Management home page, click the Mobile Security tab from the list of tabs at the top of the page.
-
From the Mobile Security Launch Pad, click Access Policies in the Mobile Security Access Server section.
The Access Policies page opens in a new tab.
-
Click Assertion Templates.
The Assertion Templates page opens in a new tab.
-
Optionally, refine the list of assertion templates displayed using Search, as described in "Searching for an Assertion Template".
-
Select the assertion template to be viewed from the list of assertion templates and click Open. Alternatively, select Actions and then Open.
Figure 8-7 displays the Assertion Template Details page for the Wss10 SAML V2.0 Token with Message Protection service Assertion Template.
Figure 8-7 Assertion Template Details Page
Description of "Figure 8-7 Assertion Template Details Page"
-
Review the details of the assertion template.
General information about the assertion template is provided at the top of the page. Click Configuration to view the configuration properties for the template. The Settings section of the page displays the settings specific to that template. For details about the settings and configuration properties for each of the predefined assertion templates, see "Predefined Assertion Templates" in Policy and Assertion Template Reference for Oracle Mobile Security Access Server.
8.4.4 Cloning an Assertion Template
You can create a new assertion template using an existing template as the base. Select the assertion template that most closely matches the desired behavior, make a copy of it using the Create Like feature, then make any changes required to get the new behavior.
To clone a policy:
-
From the Oracle Access Management home page, click the Mobile Security tab from the list of tabs at the top of the page.
-
From the Mobile Security Launch Pad, click Access Policies in the Mobile Security Access Server section.
The Access Policies page opens in a new tab.
-
Click Assertion Templates.
The Assertion Templates page opens in a new tab.
-
Optionally, refine the list of assertion templates displayed using Search, as described in "Searching for an Assertion Template".
-
Select the assertion template to be cloned from the list of assertion templates and click Create Like. Alternatively, select Actions and then Create Like.
The Assertion Template Details page is displayed.
-
Edit the name and display name for the assertion template and, optionally, enter a brief description.
The word Copy is appended to the name and display name of the cloned assertion template and, by default, this is the name assigned to the new assertion template.
It is recommended that you change the name of this new assertion template to be more meaningful in your environment. For more information, see "Recommended Naming Conventions for Assertion Templates".
Notes:
You cannot edit the name of an assertion template after it is created. To change the assertion template name, you will need to clone the assertion template and assign it a different name. -
Modify the assertion template settings and configuration properties as required. For details about the settings and configuration properties in each of the predefined assertion templates, see "Predefined Assertion Templates" in Policy and Assertion Template Reference for Oracle Mobile Security Access Server. For details about modifying the configuration properties, see "Editing the Configuration Properties".
-
Click Apply to save the new assertion template.
8.4.5 Editing an Assertion Template
Note:
Oracle recommends that you do not edit the predefined assertion templates so that you will always have a known set of valid templates.If you wish to edit a predefined assertion template, Oracle recommends that you clone the assertion template and then edit it.
You can edit an assertion template as described in the following procedure.
-
From the Oracle Access Management home page, click the Mobile Security tab from the list of tabs at the top of the page.
-
From the Mobile Security Launch Pad, click Access Policies in the Mobile Security Access Server section.
The Access Policies page opens in a new tab.
-
Click Assertion Templates.
The Assertion Templates page opens in a new tab.
-
Optionally, refine the list of assertion templates displayed using Search, as described in "Searching for an Assertion Template".
-
Select the assertion template to be edited from the list of assertion templates and click Open. Alternatively, select Actions and then Open.
-
Edit the display name and description, if desired. You cannot edit the assertion template name. To change the name of an assertion template you will need to clone it and assign it a different name.
-
Edit the settings as required.
For details about the settings and configuration properties for each of the predefined assertion templates, see "Predefined Assertion Templates" in Policy and Assertion Template Reference for Oracle Mobile Security Access Server.
-
Click Configuration to edit the configuration properties.
To delete a property, select the property in the table and click Delete.
-
Click OK to accept the configuration property changes.
-
Click Apply to apply your changes, or Revert to revert your changes.
8.4.6 Editing the Configuration Properties
If you have cloned one of the predefined assertion templates, you can modify the configuration properties to match your environment. For example, properties that are configurable in assertion templates include csf-key, saml.issuer.name, keystore.recipient.alias, and role, among others.
When you clone an assertion template, or edit a cloned assertion template, you can configure the following settings for each property:
-
Description—Description of the property.
-
Value—Current value.
-
Default—Default value. This value is used if the Value field is not set.
-
Type—Can be one of the following:
-
Constant—Property cannot be overridden.
-
Required—Property is required and can be overridden.
-
Optional—Property is optional and can be overridden.
-
To configure the properties:
-
In the assertion template being cloned or edited, click Configuration.
The Configuration window displays the list of properties for the template.
-
Select the property from the list and modify the fields as required. Note that the Name of an existing property cannot be changed.
-
Add or delete configuration properties as required.
To add a configuration property, click Add. In the blank row that appears, provide a name for the property. The remaining fields are optional. However, if you select Type required, then you must provide a value for the property.
To delete a configuration property, select the property in the table and click Delete.
-
When you have finished changing the configuration properties, click OK.
-
Click Apply to apply your changes, or Revert to revert your changes.
Note:
When you add an assertion to a policy, as described in "Adding Assertions to a Policy", you can modify the Value, Default, and Description configuration properties to match your environment. The Name and Type configuration properties defined in the assertion template cannot be changed, and are not editable fields in the table.
8.4.7 Configuring Assertions
You can modify the configuration properties to match your environment. For example, properties that are configurable in assertion templates include csf-key, saml.issuer.name, keystore.recipient.alias, and role, among others.
When you clone or edit an assertion template, you can configure the following settings for each property:
-
Value—Current value.
-
Default—Default value. This value is used if the Value field is not set.
-
Type—Can be one of the following:
-
constant—Property cannot be overridden.
-
required—Property is required and can be overridden.
-
optional—Property is optional and can be overridden.
-
-
Description—Description of the property.
To configure the properties:
-
In the assertion template being cloned or edited, click Configuration.
The Configuration window displays the list of properties for the template.
-
Select the property from the list and modify the fields as required. Note that the Name of an existing property cannot be changed.
-
Add or delete configuration properties as required.
To add a configuration property, click Add. In the blank row that appears, provide a name for the property. The remaining fields are optional. However, if you select Type required, then you must provide a value for the property.
To delete a configuration property, select the property in the table and click Delete.
-
When you have finished changing the configuration properties, click OK.
-
Click Apply to save the changes in the assertion template.
Note:
When you add an assertion to a policy, as described in "Adding Assertions to a Policy", you can modify the Value, Default, and Description configuration properties to match your environment. The Name and Type configuration properties defined in the assertion template cannot be changed, and are not editable fields in the table.
8.4.8 Exporting and Importing an Assertion Templates
Export and import an assertion template, as described in the following sections:
8.4.8.1 Exporting an Assertion Template
To export one or more assertion templates:
-
From the Oracle Access Management home page, click the Mobile Security tab from the list of tabs at the top of the page.
-
From the Mobile Security Launch Pad, click Access Policies in the Mobile Security Access Server section.
The Access Policies page opens in a new tab.
-
Click Assertion Templates.
The Assertion Templates page opens in a new tab.
-
Select the assertion templates that you would like to export in the Assertion Templates table.
-
Click Export.
The assertion templates are added to a zip archive file named
assertiontemplatesexport.zipby default, and downloaded to your local directory.If you perform multiple export operations, subsequent files are named uniquely. For example, as
assertiontemplatesexport(n).zip, wherenstarts with 1 and is incremented by 1 for each additional export.
8.4.8.2 Importing an Assertion Template
Import an assertion template into the repository using the following procedure. Once the assertion template is imported, you can edit it, add it to a policy, and so on.
Notes:
The assertion template you import must not already exist in the repository. Otherwise, you will get an error and the import operation will fail.To import an assertion template:
-
From the Oracle Access Management home page, click the Mobile Security tab from the list of tabs at the top of the page.
-
From the Mobile Security Launch Pad, click Access Policies in the Mobile Security Access Server section.
The Access Policies page opens in a new tab.
-
Click Assertion Templates.
The Assertion Templates page opens in a new tab.
-
Click Import.
You are prompted to provide the name of a zip archive file containing the assertion templates to be imported.
-
In the Import window, click Choose File and navigate to the directory where the assertion template archive file is located, then select the zip archive file to be imported.
-
Click Import.
An information window is displayed listing the policies that were imported. Click OK to close the window.
The imported policies are added to the list of policies in the Access Policies page.
8.4.9 Deleting an Assertion Template
Follow the steps in this section to delete an assertion template that you created or imported. The predefined assertion templates delivered with OWSM are read-only and cannot be deleted.
-
From the Oracle Access Management home page, click the Mobile Security tab from the list of tabs at the top of the page.
-
From the Mobile Security Launch Pad, click Access Policies in the Mobile Security Access Server section.
The Access Policies page opens in a new tab.
-
Click Assertion Templates.
The Assertion Templates page opens in a new tab.
-
Optionally, refine the list of assertion templates displayed using Search, as described in "Searching for an Assertion Template".
-
Select the assertion template to be deleted from the list of assertion templates and click Delete.
You are prompted to confirm that you want to delete the assertion template.
-
Confirm your selection and click Delete.
The selected assertion template is deleted from the list of assertion templates on the Assertion Templates page.
8.5 Enabling or Disabling Policies and Assertions
The following sections describe the different methods for enabling or disabling policies, or assertions within a policy:
8.5.1 Enabling or Disabling a Policy for all Policy Enforcement Points
When you create a policy, it is enabled by default unless it has validation errors. A policy can be globally enabled or disabled from the Policy Details page. You can enable or disable the policy from one central location, and it will be enabled or disabled for any policy enforcement point to which it is attached.
When you disable a policy from the Policy Details page, the policy continues to be attached to the policy enforcement points, but the policy is not enforced. You may want to temporarily disable a policy if you discover that there is a problem with the policy that is causing all requests to a service to fail. Once the problem is corrected, you can globally enable the policy.
To enable or disable a policy for all policy enforcement points:
-
From the Oracle Access Management home page, click the Mobile Security tab from the list of tabs at the top of the page.
-
From the Mobile Security Launch Pad, click Access Policies in the Mobile Security Access Server section.
The Access Policies page opens in a new tab.
-
Optionally, refine the list of policies displayed using Search, as described in "Searching for Policies".
-
Select the policy to be edited from the list of policies and click Open. Alternatively, select Actions and then Open.
The Policy Details page is displayed. For more information, see "Viewing the Details of a Policy".
-
Select the General tab if it is not already selected.
-
Select or deselect the Enabled box to enable or disable the policy, respectively.
-
Click Save.
8.5.2 Enabling or Disabling Assertions Within a Policy
Rather than enable or disable an entire policy as described in "Enabling or Disabling a Policy for all Policy Enforcement Points", you may wish to enable or disable one or more of the assertions that are contained within a policy. This provides a more fine-grained level of control over the assertions that are executed.
To enable or disable one or more assertions within a policy:
-
From the Oracle Access Management home page, click the Mobile Security tab from the list of tabs at the top of the page.
-
From the Mobile Security Launch Pad, click Access Policies in the Mobile Security Access Server section.
The Access Policies page opens in a new tab.
-
Optionally, refine the list of policies displayed using Search, as described in "Searching for Policies".
-
Select the policy to be edited from the list of policies and click Open. Alternatively, select Actions and then Open.
The Policy Details page is displayed. For more information, see "Viewing the Details of a Policy".
-
Select the Assertions tab.
-
Select the assertion in the table and select or deselect the Enforced box to enable or disable the assertion within the policy, respectively.
-
Click Apply.
8.6 Defining Multiple Policy Alternatives (OR Groups)
To define multiple alternatives for policy enforcement, you can define a set of assertions, called an OR group, within a service policy. At run time, based on the assertions defined in the OR group on the service side, a client has the flexibility to choose which one of the assertions to enforce.
For example, if a service-side policy defines an OR group that consists of the following assertions:
-
wss11-saml-with-certificates -
wss11-username-with-certificates
At run-time, the client can choose to enforce either the wss11-saml-with certificates assertion OR wss11-username-with-certificates assertion.
There is no limit to the number of assertions that can be included in an OR group. Each assertion must be valid for the policy and should support the policy requirements.
When defining the OR group, carefully consider the order in which the assertions are added and the settings that are configured. For example, consider the following scenario:
-
On the client side, you have attached the
wss11_username_token_with_message_protection_client_policypolicy withInclude Timestampenabled. -
On the service side, you have attached a custom OR group policy with two
wss11_username_token_with_message_protection_service_templateassertions defined, the first withInclude Timestampdisabled and the second withInclude Timestampenabled.
In this scenario, the first assertion will get executed and the response will be sent with no timestamp. As a result, processing on the client side will fail because it is expecting a timestamp. This type of situation can occur whenever a client policy assertion expects a greater number of security requirements than the executed service policy assertion.
The following predefined client policies contain OR groups:
-
oracle/multi_token_client_policy—For more information, see "oracle/multi_token_client_policy" in Policy and Assertion Template Reference for Oracle Mobile Security Access Server. -
oracle/multi_token_over_ssl_client_policy—For more information, see "oracle/multi_token_over_ssl_client_policy" in Policy and Assertion Template Reference for Oracle Mobile Security Access Server.
8.7 Recommended Naming Conventions for Policies
The valid characters for policy names are:
-
Uppercase and lowercase letters
-
Numerals
-
Underscore (_)
-
Hyphen (-)
Note:
The first character in the name cannot be a hyphen.Oracle recommends that you encode as much information as possible into the full policy name and display name so that you can tell, at a glance, what the policy does. For example, the full name for one of the predefined security policies is oracle/wss10_username_token_with_message_protection_service_policy and the display name is Wss11 Username Token With Message Protection Service Policy. Figure 8-8 identifies the different parts of this predefined policy name.
Figure 8-8 Identifying the Different Parts of a Policy Name
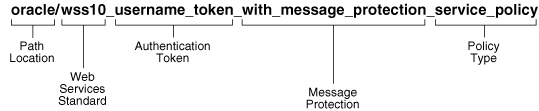
Description of "Figure 8-8 Identifying the Different Parts of a Policy Name"
The following convention is used to name the predefined policies. The parts of the policy name are separated with an underscore character (_).
-
Path Location – All policies are identified by the directory in which the policy is located. All predefined policies are in the
oracledirectory. Oracle recommends that you keep any policies that you create in a directory that is separate from theoracledirectory in which the predefined policies are located. -
Web services Standard – If the policy uses a WS-Security standard, it is identified with wss10 (WS-Security 1.0) or wss11 (WS-Security 1.1). Or it could just be set to indicate that it is independent of WS-Security 1.0 or 1.1.
-
Authentication token – If the policy authenticates users, then the type of token is specified. The predefined options include:
-
http_token – HTTP token
-
jwt_token - JWT token
-
kerberos_token – Kerberos token
-
saml_token – SAML token
-
saml_hok_token - SAML holder of key token
-
saml20_token - SAML 2.0 token
-
saml20_token_bearer - SAML Bearer 2.0 token
-
username_token – Username and password token
-
x509_token – X.509 certificate token
You can also define custom authentication tokens.
-
-
Transport security – If the policy requires that the message be sent over a secure transport layer, then the token name is followed by over_ssl, for example,
oracle/http_oauth2_mobile_client_over_ssl_policy. -
Message protection – If the policy also provides message confidentiality and message integrity, then this is indicated using the phrase with_message_protection as in Figure 8-8.
-
Policy Type – Indicates the type of policy or assertion template— client or service. Use the term policy to indicate that it is a policy, or template to indicate that it is an assertion template. For example, there are predefined policy and template assertions that are distinguished, as follows:
wss10_message_protection_service_policywss10_message_protection_service_template
Whatever conventions you adopt, Oracle recommends you take some time to consider how to name your policies. This will make it easier for you to keep track of your policies as your enterprise grows and you create new policies.
It is recommended that you keep any policies you create in a directory that is separate from the oracle directory where the predefined policies are located. You can organize your policies at the root level, in a directory other than oracle, or in subdirectories. For example, all of the following are valid:
-
wss10_message_protection_service_policy -
oracle/hq/wss10_message_protection_service_policy -
hq/wss10_message_protection_service_policy
Note:
Use of the prefix "oracle_" in the policy name (for example, oracle_wss_http_token_service_policy) is not recommended as a best practice.8.8 Recommended Naming Conventions for Assertion Templates
The same naming conventions used to name predefined policies are used to name the assertion templates. The predefined assertion templates begin with the directory name oracle/ and are identified with the suffix _template at the end; for example, oracle/wss10_message_protection_service_template.
It is recommended that you follow the recommended naming conventions, and keep any assertion templates that you create in a directory that is separate from the oracle directory where the predefined assertion templates are located. You can organize your assertion templates at the root level, in a directory other than oracle, or in subdirectories.
For more information about the naming conventions for predefined policies, see "Recommended Naming Conventions for Policies".