
|
|
|
Articles Setup
Select Configuration > Cashiering > Codes > Articles to configure the transaction code Articles feature. (This feature is available when the CASHIERING > ARTICLES application function is set to Y.)
One transaction code can sometimes serve as an umbrella for multiple individual items, or articles, that can be posted using that code. At times it may be desirable to be able to break out these separate articles for billing and revenue-tracking purposes. For example, a single "minibar food" transaction code might cover potato chips, crackers, peanuts, pretzels, and so forth. Using articles, you can specify an individual article number that identifies each of these food items, even though they are all grouped under the same transaction code. Moreover, you can specify a default price for each article, just as you can for transaction codes. Then, instead of posting a lump sum to the minibar food transaction code, you have the option of posting each individual article and its quantity and price. Using our example, rather than posting 7.75 to minibar food, you can post 5.00 for two bags of peanuts and 2.75 for potato chips. Two separate charges to the minibar food transaction code will appear on the guest's bill (one for 5.00 and one for 2.75). The breakdown of charges by article will also be available for revenue tracking. See Articles Revenue for details.
The Articles screen is the starting point for setting up articles.
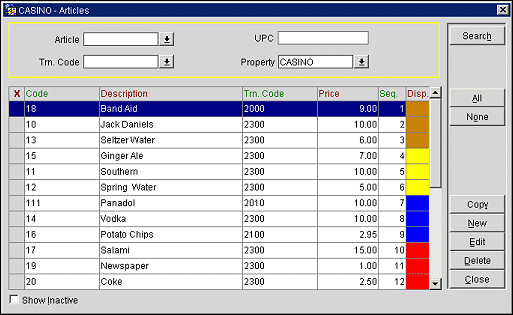
The following search criteria are available to help you locate articles.
Article. Select the down arrow to choose the article to locate.
UPC. (Available when the CASHIERING > POST IT application parameter is set to Y.) Enter the UPC or place the cursor in the field and then scan the article. UPC information can be modified only by the user who has permission to access the Article configuration. Article configuration cannot be deleted once it has been posted, but it can be inactivated.
Trn. Code. Select the down arrow to choose the transaction code to locate.
Property. (Available when the OPP MHOT Multi-property PMS add-on license is active.) Select the down arrow to choose the property to display articles.
Show Inactive. Select this check box to display only inactive article codes.
The Articles screen shows the following information:
X. An X in this column indicates that the article record has been selected for the Copy or Delete actions. To mark a record, click in the X column. Click on the X to un-select the record. Select the All button to mark all records. Select the None button to un-select all records.
Code. Article code.
Description. Text description of the article.
Trn. Code. Transaction code to which the article belongs.
Price. Default price for the article.
Seq. Number that determines the order in which article codes will display when listed. Article codes that do not have a sequence number assigned are listed numerical order by code number following those codes that have a sequence number.
Disp. Post It article button display color. Available when the CASHIERING > POST IT application parameter is set to Y. See Post It Article Setup, below.
You may copy article configurations to one or more other properties in your multi-property cluster if the OPP_MHOT PMS Multi-property PMS license code is active. The target properties must have the CASHIERING > ARTICLES application function set to Y, and the transaction codes to which articles are being copied at the target properties must match the transaction codes at the source property.
Select the articles to copy by placing an X in the X column on the Articles screen. When you select the Copy button, the Property multi-select LOV appears. Choose the properties to copy the selected article configurations to.
Note: The Post It check box and Display Color will copy to the other property only if Post It is active in the target property.
To add a new article, select the New button. To edit an existing article, highlight your choice on the Articles screen and select the Edit button. The Articles - New screen or Articles - Edit screen appears. Provide the following information and select the Save button.
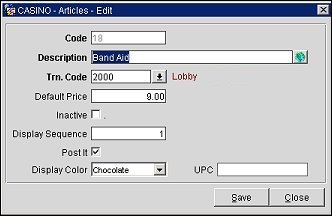
Code. Enter a numeric code for the article. Codes must be at least 2 characters in length (e.g., 01, 83, 320). Codes must be unique. The code may not be changed once the article configuration has been saved.
Description. Enter a text description of the article. Select the globe icon to add translation.
Trn. Code. Select the down arrow to display a list of transaction codes. From the list choose the transaction code to which the article belongs.
Note: The transaction codes available for selection include only those transaction codes that are set up as Revenue Group transaction codes (i.e., the Revenue Group check box is selected on the Transaction Code screen). The list does not include transaction codes for generates and payments.
When you have made your choice the description of the transaction code appears next to the field. (If you entered a transaction code in the Trn. Code search field on the Articles screen, the same transaction code will auto-fill this field when creating a new article code. You may select a different transaction code if you wish.)
Default Price. When a posting is made using this article, the amount specified in this field automatically appears in the Posting screen Amount column.
Inactive. Select this check box to make the article code inactive. Articles may not be deleted once a charge has been posted against them; however, making the article inactive removes it from further use.
Display Sequence. Enter a number that determines the position of the article code in lists. If no sequence number is assigned to an article, it is displayed in alphabetical order by Description following those article codes that have a sequence number.
Post It. Available when the CASHIERING > POST IT application parameter is set to Y. Select this check box to include this article in the article posting buttons on the Post It screen. See Post It Article Setup, below.
Display Color. This field appears when the Post It check box is marked. Select the down arrow to choose a color for the article button for this item on the Post It screen. See Post It Article Setup, below.
UPC. (Available when the CASHIERING > POST IT application parameter is set to Y.) This field displays when the Post It check box is marked. This value must be unique for each article and can be from 1 to 13 digits; a prompt will display if it is not numeric or unique. The UPC can be entered manually or by placing the cursor in the UPC field and then scanning the article. Existing UPC information will be overwritten.
The Post It feature is available when the CASHIERING > POST IT application parameter is set to Y. Articles that are configured for Post It appear on the Post It screen to provide a convenient interface for posting charges.
Articles can be configured to appear on the Post It screen. The article appears on the Post It screen only when a default price is configured for it.
To make an article available on the Post It screen, select the Post It check box on the Articles - New or Articles - Edit screen. When you do so, the Display Color field becomes available. Select the down arrow to choose the background color for the article button that will represent this item. (If no color is selected, light blue is the default.) The article Description will appear as a label on the button.
Buttons are arranged on the Post It screen from left to right and top to bottom according to the Display Sequence number assigned to the article, lowest number to highest number.
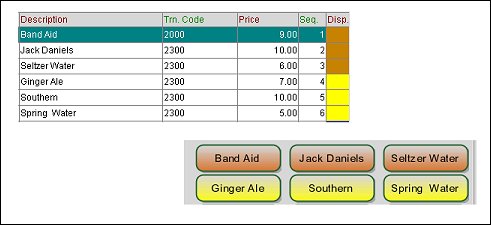
If two (or more) articles have the same sequence number, they are arranged in alphabetic order (by Description).
All articles without a display sequence number are arranged in alphabetic order (by Description) following all articles that have a display sequence number.
Show Me
See Also