
|
|
|
Billing Reports
Requirements/prerequisites
The following requirements must be met to have access to the Billing Reports feature:
From within an OPMS/OCIS interfaced environment, the Billing Reports screen gives PMS users access to OCIS billing reports. Use this screen to define parameters for reports, preview reports and submit reports via fax, email, XML file or print. From OPMS, select Miscellaneous>Memberships>Billing Reports to open the Billing Reports screen and choose from the following reports:
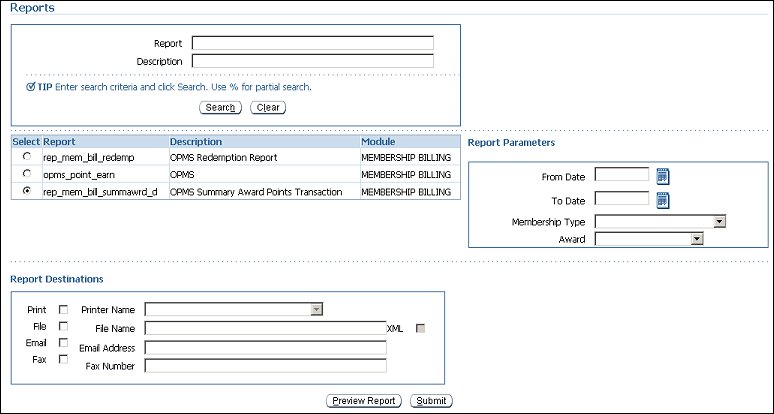
Use this area to search for a report. Define your search criteria and select the Search button. Results are displayed in the reports grid below.
Report. Enter the name or partial name of the report.
Description. Enter a full or partial description of the report.
Search. Select to display search results.
Clear. Select to clear search results from the reports grid.
Select the report you want to preview or submit. A description is displayed for each report as well as its module. Only one report can be selected.
In this area, define your report parameters, such as date, revenue group and membership type.
From Date. Select the calendar tool and choose a "from" date.
To Date. Select the calendar tool and choose a "to" date.
Membership Type. Select the down arrow and choose a membership type from the list. This filters your report by a specific membership type.
Award. (Displays when either the OPMS Redemption or OPMS Summary Award Points Transaction report is selected.) Select the down arrow and choose an award group from the list. This filters your report by a specific award.
Revenue Group. (Displays when the OPMS Point Earning report is selected.) Select the down arrow and choose a revenue group from the list. This filters your report by a specific revenue group.
Note: For now, users can only print and preview OCIS reports. The file, email and fax functionalities may be available in future releases.
Select a desired output destination for your report.
Print. Select to print the report. In the field to the right, select the down arrow and choose a printer from the list. This field becomes active when the Print check box is selected.
File. Select to save the report to either a local or network location. Enter the name for the file in the field to the right. Select the XML check box to save it as an XML file.
Email. Select to send the report to an email address. Enter an email address in the field to the right.
Fax. Select to fax the report. Enter a fax number in the field to the right.
Preview Report. Select to preview your report.
Submit. Select to submit your report to the output destination you selected in the Report Destinations area.
See Also