
|
|
|
Block Access Exclusion Configuration
This functionality is available when the OPR<version number>ORS license code is active. Use the Block Access Exclusion - Configuration screen to exclude the block from a particular central reservation office (CRO). When a block access exclusion is configured for a business block, specific CROs will not be able to edit the block, i.e., add a new reservation or modify an existing reservation in the block; cancel a reservation in the block; or both.
To open the Block Access Exclusion - Configuration screen, select the Access Exclusion button on either the Business Block or the Quick Business Block screen.
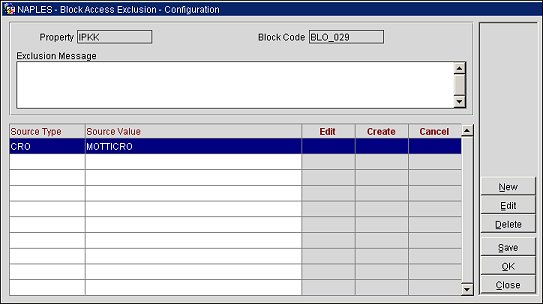
Resort. (Read only) The name of the resort or property.
Block Code. (Read only) The block code from the Business Block screen.
Source Type. The OPERA system type, such as a CRO.
Source Value. The name of the CRO.
Create. The date the block was created.
Cancel. The date the block was canceled, if applicable.
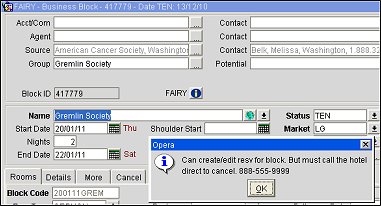
Exclusion Message. The message displayed for the block access exclusion. This is the message that displays to CROs that have been blocked from canceling or editing the business block. The message will display when the blocked CRO tries to access the business block. See image below for message example.
New. Select to open the Rate Access Exclusion Configuration - New screen and add a new block access exclusion.
Edit. Select to open the Rate Access Exclusion Configuration - Edit screen and make changes to an existing block access exclusion.
Delete. Select to delete a block access exclusion highlighted in the display grid.
Save. Select this button to save your changes.
OK. Select this button to save your changes and close the screen.
Select New to open the Rate Access Exclusion Configuration - New screen and add a new block access exclusion configuration or select Edit to make changes to an existing one.
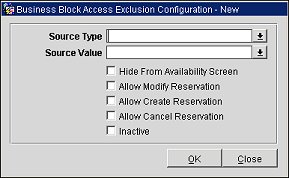
Source Type. Select the type of OPERA system, such as a central reservation office (CRO).
Source Value. Select the down arrow and choose an OPERA system from the list of values. If CRO is selected as the Source Type, a list of CROs will be displayed.
Hide from Availability Screen. Select this check box to hide the excluded business block from the ORS Sales - Availability screen. The block can still be viewed on other screens.
Allow Modify Reservation. Select this check box to allow a reservation in the block to be modified by the CRO.
Note: When the Reservations>Functions>Reservation Access Control application setting is set to N, the Allow Modify Reservation and Allow Create Reservation check boxes will be combined into one check box: Allow Create/Modify Reservation.
Allow Create Reservation. Select this check box to allow a reservation to be added to the block by the CRO.
Note: When the Reservations>Functions>Reservation Access Control application setting is set to N, the Allow Modify Reservation and Allow Create Reservation check boxes will be combined into one check box: Allow Create/Modify Reservation.
Allow Cancel Reservation. Select this check box to allow a reservation in the block to be canceled by the CRO.
OK. Select to add a new block access exclusion configuration or to save changes to an existing one.
Inactive. Select to make the block access exclusion inactive in the system. Although it will be inactive, you can keep the configuration to use at a later date. You can clear the check box to reactivate the configuration.
See Also