
|
|
|
Customizable Reports
Note: Refer to the complete Help that is part of the Oracle Reports Builder software. This can be found when the Oracle Reports Builder is active and selecting the Help > Help Contents or F1 in the Reports Builder software.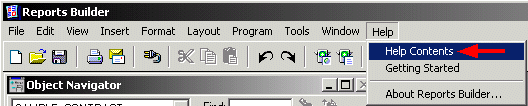
OPERA configuration allows an unlimited number of user-defined report formats to cover items such as guest folios, confirmation letters, registration cards, messages and accounting statements. While the content of these forms are defined using "merge codes," Oracle Developer 2000 Report Builder provides the formatting functionality. Definitions for each report are unique to that report and include such general items as the page size, margins and orientation, placement of page headers and footers, fonts, and number of copies. You have a lot of flexibility in how you set up these customizable reports. You can start new reports and design as you work or make use of OPERA's sample report templates to create customizable reports for your property.
Note: Another available option for customizing reports in OPERA is the OPERA XML Publisher, which combines the functionality of oracle reports with the flexibility of Microsoft Word. Throughout this help topic you will notice certain options that pertain specifically to customizing reports with the OPERA XML Publisher/Stationery Editor. While these options will be defined here, refer to the Stationery Editor help topic for more detailed explanations of these features.
The path where customizable reports are to be stored is determined by the CUSTOMIZABLE_REPORTS variable in the default_xxx.env file on the application server. In the original installation, the folder has been created and the path has been correctly filled out. The path resides at \micros\opera\production\customizable reports.
Note: Multi-byte, or special characters, can and will be displayed on customizable reports.
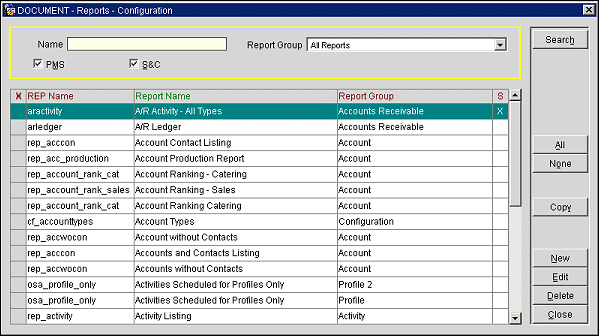
Following is a list of the sample reports that are provided by OPERA. When creating your property's reports it is recommended that you use the sample report as a starting point. When creating your reports it is imperative that the report belong to the report group noted, so OPERA can find the report when triggered to print. The following list contains the only customizable reports that are allowed within OPERA.
The Report Groups listed will not be seen from the front end of the application Miscellaneous > Reports, but you will be able to access these report groups from the Configuration > Setup > Report Setup menu.
Click on the sample report to view all of the merge codes that are available for that sample report.
Name |
Report Name |
Alert |
|
1 Column Banquet Event Order |
|
2 Column Banquet Event Order |
|
2 Column Banquet Event Order FB |
|
Configuration Application User Setup - Detail |
|
Commission Check Format |
|
Combined Contract |
|
BI Publisher Contract Merge |
|
Credit Card Receipt |
|
Deposit Receipt |
|
Event List |
|
Event List Detailed |
|
Event Overview |
|
Event Short List |
|
OPERA Express Banquet Event Order |
|
Expense Folio |
|
Currency Exchange Receipt |
|
|
|
Group Room Reservation Sheet |
|
Group Folio |
|
Confirmation Letter |
|
Itinerary Confirmation |
|
Kiosk Confirmation |
|
Labels |
|
Messages |
|
Owner Checks |
|
Owner Statement |
|
Owner Summary |
|
OWS User ID Password Reminder |
|
Paidout Receipt |
|
Payment Receipt |
|
Payment Tax Receipt |
|
Registration Card
|
|
Registration Card Monarch |
|
Accounts Receivable Reminders (Note: This report is only available when the CASHIERING > ACCOUNTS RECEIVABLES application function is set to Y.) |
|
Accounts Receivable Folio (Note: This report is only available when the CASHIERING > ACCOUNTS RECEIVABLES application function is set to Y.) |
|
Lead Proposal Report |
|
Accounts Receivable Statement (Note: This report is only available when the CASHIERING > ACCOUNTS RECEIVABLES application function is set to Y.) |
|
Workorders |
|
Voucher form. Available when the RESERVATIONS > VOUCHERS application function is set to Y. |
The above samples will be located in the \micros\opera\production\customizable reports folder. As noted above, there is one sample folio, which can be used for the Accounts Receivable Folio, Passerby Folio, and the Guest Folio.
Notes:
In schemas that include a Korea (KR) property, the available merge codes for Passport Number, ID Number and Date of Birth are described in the attached spreadsheets.
In ASP mode, to view a report in the Customizable_Reports folder, you must type the name of the report.
Once you have completed the customization, the .RDF files will be compiled, and the matching .REP files will be created and stored in the \micros\opera\production\runtimes folder. For example, you will have a BELLHOTEL FOLIO.RDF file in the \micros\opera\production\customizable reports folder and a BELLHOTEL FOLIO.REP file in the \micros\opera\production\runtimes folder. If you are working in a multi-property environment it is recommended that the resort ID is included in your report naming convention in order to be consistent and straightforward.
.RDF – This file allows the customization to take place. To customize a report the .RDF file will need to be opened with Oracle Report Builder.
.REP – OPERA searches for this file to print the report. OPERA points to the \micros\opera\production\runtimes folder for the specified file.
![]()
Customization of reports can only take place on the application server or on the user workstation with a remote connection to the application server.
On folios, properties can write their own functions that look at the print rate flag and prints the rates based on the Print Rate option that is set up in Rate Configuration (see Rate Configuration for details). The Print Rate option does not only affect folios, but also confirmations, registration cards, etc.
To begin, select Configuration > Setup > Report Setup > Reports.
The following steps will be using the example of customizing a new Folio for your property.
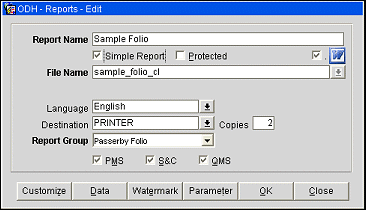
Provide the following information, then select OK to save your changes.
Report Name. Enter the name of your folio. This can be any name you want and does not have to match with the RDF/REP Name you will enter below.
Simple Report. Select the check box if the report is a Simple Report. (See Simple Report Writer for details)
Protected. Select this field to determine whether or not this report will be available to users who have the permissions to print protected reports.
Active. When selected, the customizable report will be displayed in the front end side of OPERA.
MS Word Icon. Select this option to use the Oracle BI Publisher to customize your reports. See Stationery Editor for more details.
Language. Select the down arrow to choose the language of the report. This is especially important as folios will look at the language of the profile and print the corresponding folio with that same language code. Different folios can be set up for different languages and have the text of the folios in the specified language.
File Name. Enter the name of your folio. This is the name of the .REP/.RDF file that you are creating. This can be the same as the Report Name above. You do not need to type in the file extension of .REP or .RDF in this field. Make sure that there are no spaces in the name.
Form to Run. For standard customized reports, this is normally left blank. From the drop down menu, select the form (FMX) to display when the selection criteria is to be picked before running the report. Confirmation, Folios, Registration Cards, AR Reminders, AR Statements and Messages will never have a form to run.
Copies. Select the default number of copies to make of this specific report when ran. Without the correct user permission, this field will be grayed out and can't be modified.
Destination. Select Printer, Fax, or Email for the output destination.
Report Group. Select from the drop down list, the report group to assign the customized report to.
Application. Select all of the applications to display the customized report in.
Customize. Select the Customize button to open the file you wish to customize in the appropriate utility, either Oracle Reports Builder or the OPERA XML Publisher. See Stationery Editor for more details on customizing reports using the OPERA XML Publisher.
Watermark. Select this button to configure the folio copy legend watermark for the current report. Available for reports belonging to the Folios, Accounts Receivable Folios, Post It Folios and Passerby Folios report groups when the CASHIERING > FOLIO COPY LEGEND application setting is set to W. See Watermark Configuration for details.
Data. This button will only display when the Microsoft Word Icon check box is selected. The Data button is used to verify the data source for your OPERA XML Publisher report. When this option is selected, the Data Source selection screen displays and the name of the data source file is automatically defaulted. See Stationery Editor for more details.
Parameter. Once a report has been saved, you may select the Parameter button to define parameters for the report. The Parameters screen appears. This screen is for use when you are creating actual reports (not customized folios) and will allow the user to enter filters that the report would use. Example: End Date, Start Date, Property, etc.
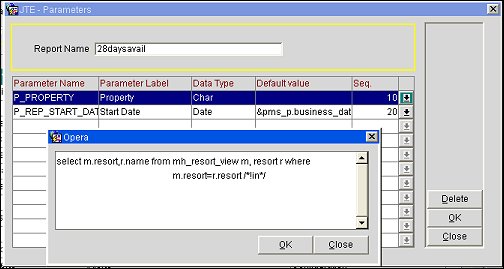
To add a parameter, provide the following information and select OK to save your changes:
Parameter Name. Name of the parameter. (Type directly in the grid.)
Parameter Label. The name that will identify the parameter field on the report form. (Type directly in the grid.)
Data Type. Select the down arrow and choose the data type for the parameter.
Default Value. Enter a default value for the parameter, if appropriate. (Type directly in the grid.)
Seq. Enter a sequence number that will determine where the parameter appears in listings. (Type directly in the grid.)
To add a SQL statement to be executed in order to generate the parameter value, select the down arrow to the right of the grid. In the text box, enter the SQL statement. Select the OK button to save the statement and return to the Parameters screen.
Select OK or Close to return to the Create New Report screen.
If this is the first customized report then the following dialog box will be displayed. This dialog box is letting you know that it cannot find the .RDF in the path that has been specified by the GENERAL > CUSTOMIZABLE REPORTS application setting. This setting gives the path where the customized reports (RDFs) are being stored on the application server.

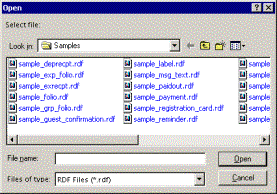
When selecting Yes OPERA prompts with an open file box. This defaults to the same path as designated in the Customizable Reports path. Highlight the file that you want to use as the template, and select Open.
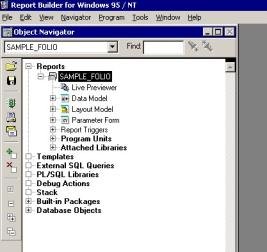
Starting the Oracle Report Builder program places you directly in the Object Navigator. This is the main starting point for creating your report. There are two main areas that you use to customize your report.
The name SAMPLE FOLIO in the example below displays the actual name of the .REP file that you created. If the name is not appearing correctly, with the name highlighted, press F4 or right mouse click and select the Property Palette. The field name is the name of your report and can be changed here.
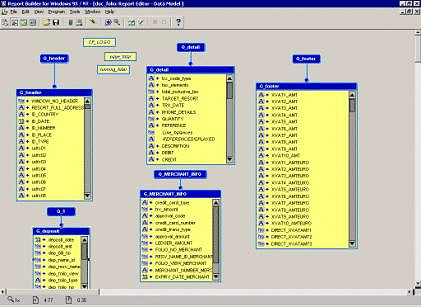
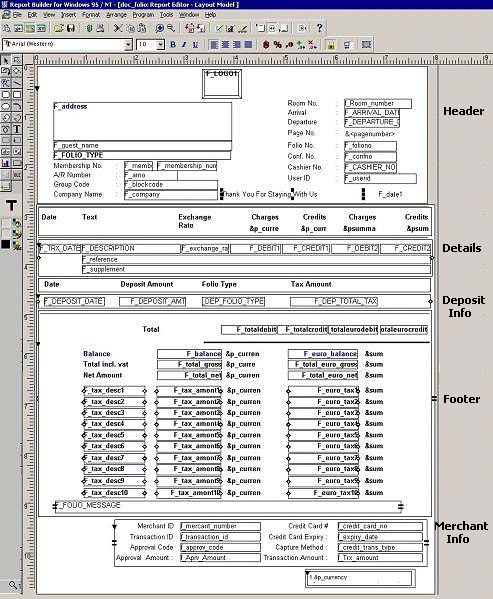
Double click on the logo to the left of the Data Model. The Data Model is normally separated into sections depending on the type of sample that you are using. For our example a folio is separated into five sections: Detail, Footer, Merchant Info, and Deposit Info (Q 1).
A data source can either be a table or a view from the database. A view can be defined as a combination of several tables that appear as a single table for ease of reference.
To view the definition of a query statement, double click on the query object, as in the Q_header for example.
![]()
After double clicking, the SQL Query Statement window is displayed.
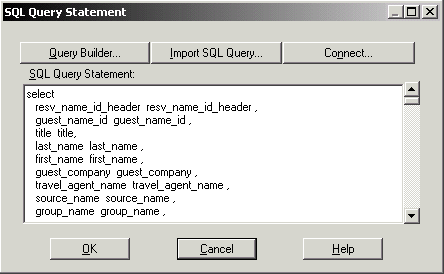
What is displayed is all of the fields that are selected to appear in the Header of the customizable report. These fields are also displayed in the G_header list that is displayed on the Data Model screen, connected to the Q_header with a connector (line).
Double click on the logo to the left of the Layout Model. This will open a screen showing the report appearance based on your configuration. This display is not the actual report that will print, but shows the layout codes for the report. If you are using the sample folio report, your layout model would display as shown here.
To the left of the form is your Tool Palette which you can use to add new fields using existing merge codes, create text, or other functions.
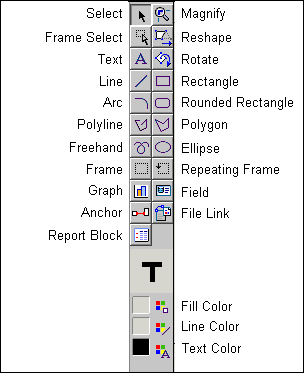
Anchor |
Enables you to anchor two objects together. To draw an anchor, click an edge of the child object, click at other positions in the editor (optionally), and double-click an edge of the parent object. Using the constrain key (usually the Shift key) while placing the anchor on the child object causes it to be constrained to the nearest 25 percent increment. |
Arc |
Enables you to draw an arc boilerplate object. To draw an arc, click- and-drag diagonally to define the object, then release. To draw the arc of a circle, use the constrain key (usually the Shift key). You can set special Graphics Options for an arc object using the Format menu. |
Ellipsis |
Enables you to draw an elliptic boilerplate object. To draw an ellipse, click-and-drag diagonally to define the object, then release. To draw a perfect circle, use the constrain key (usually the Shift key). |
Fill Color |
Displays all of the available colors, No Fill, and Patterns. Choosing any of the colors or No Fill sets the fill color for the selected objects and all subsequently created objects. Selecting Patterns displays a pattern palette. Choosing any pattern sets the fill pattern for the selected objects and all subsequently created objects. At the bottom of the Pattern palette are foreground and background color palettes. Choosing foreground and background colors sets the colors for the patterns. |
Field |
Creates a field. To draw a field, click-and-drag diagonally to define the object, then release. To draw a perfect square, use the constrain key (usually the Shift key). |
File Link |
Creates a boilerplate object that is read in from a file. The boilerplate may be text, drawings, or images and is represented as a rectangle in the editor. To draw a File Link object, click-and-drag diagonally to define the object, then release. To draw a perfect square, use the constrain key (usually the Shift key). |
Frame |
Creates a frame. To draw a frame, click-and-drag diagonally to define the object, then release. To draw a perfect square, use the constrain key (usually the Shift key). |
Freehand |
Draws a free-form boilerplate object. To draw a freehand object, click- and-drag to define the object, then release |
Frame Select |
Selects a frame or repeating frame and all of the objects within it. Any object that is indirectly or directly anchored to an object within the frame or repeating frame is also selected. Any object that is anchored to the frame or repeating frame or an object outside of the frame or repeating frame is not selected. |
Graph |
Enables you to create a graph in your report. To create a graph, click in the painting region to display the Graph Wizard. |
Line Color |
Displays all of the available colors, No Line, and Patterns. Choosing any of the colors or No Line sets the line color for the selected objects and all subsequently created objects. Selecting Patterns displays a pattern palette. Choosing any pattern sets the line pattern for the selected objects and all subsequently created objects. At the bottom of the Pattern palette are foreground and background color palettes. Click these to display the available colors. Choosing foreground and background colors sets the colors for the patterns. |
Line |
Draws a line boilerplate object. To draw a line, click where you want one endpoint, drag to the other endpoint, and release. To draw perfectly horizontal, vertical, or 45 degree lines, use the constrain key (usually the Shift key). You can set additional options for lines by choosing Line Width, Bevel, Dash, or Arrow from the Format menu. |
Magnify |
Magnifies an area around the point on which you click by a factor of two (i.e., the objects become twice as big as they were). By pressing the constrain key (usually the Shift key) while using the Magnify tool, you magnify by a factor of one-half (i.e., the objects become half as big as they were). This tool is useful when you want to focus on one part of a large layout. |
Polygon |
Draws a polygon boilerplate object. To draw a polygon, click at the desired location of the first vertex, then click at the next vertex, etc. To finish drawing the polygon, double-click at the final vertex, and a line is drawn connecting the first and last vertices. To draw a perfectly horizontal, vertical, or 45 degree segment, use the constrain key (usually the Shift key). Constraining one vertex does not affect subsequent vertices. |
Polyline |
Creates a polyline boilerplate object. To draw a polyline, click at the desired location of the first vertex, then click at the next vertex, etc. To finish drawing the polyline, double-click at the final vertex. Unless you manually connect the first and last vertices, they are not connected (as with the polygon object). To draw a perfectly horizontal, vertical, or 45 degree segment, use the constrain key (usually the Shift key). Constraining one vertex does not affect subsequent vertices. |
Rectangle |
Draws a rectangular boilerplate object. To draw a rectangle, click-and- drag diagonally to define the object, then release. To draw a perfect square, use the constrain key (usually the Shift key). |
Repeating Frame |
Creates a repeating frame. To draw a repeating frame, click-and-drag diagonally to define the object, then release. To draw a perfect square, use the constrain key (usually the Shift key). |
Report Block |
Enables you to define a default layout for a portion of your report, without overwriting the entire layout model. To create an additional default layout, click in the painting region to display the Report Block Wizard. |
Reshape |
Changes the shape of selected objects. To reshape objects, click-and- drag on their control points. The control points you see when reshaping differ from those you seen when selecting an object. arcs - Changes the sweep angle to something other than 90 degrees (the default when creating an arc). polygons - Moves any vertex to a new position. |
Rotate |
Rotates selected boilerplate text and graphic objects. To rotate an object, click-and-drag one of its control points. The selected object will rotate in the direction you drag. These additional rules apply when using the Rotate tool: Rotated text is not supported on all operating systems. For example, rotated text will not appear rotated in character mode. To rotate a field, reference the field (e.g., &ename) in a boilerplate text object. You can only rotate boilerplate text that you typed or imported in the editor. You cannot rotate boilerplate text created with the File Link tool. For rotated text, the Horizontal Elasticity property refers to the direction in which you read the text. For example, if you rotate your text 90 degrees and give it a Fixed Horizontal Elasticity, it means that the text will occupy a fixed vertical space. If you set Horizontal and Vertical Elasticity to Variable or Expand and the rotation angle of the text is not a multiple of 90 degrees, the object's width will actually be treated as contracting (for Variable) or fixed (for Expand). |
Rounded Rectangle |
Draws a rounded, rectangular boilerplate object. To draw a rounded rectangle, click-and-drag diagonally to define the object, then release. To create a square with rounded corners, use the constrain key (usually the Shift key). You can set special Graphics Options for a rounded rectangle object using the Format menu. |
Select |
Selects one or more objects for an operation. When an object is selected, its control points become visible. By shift-clicking, you can select multiple objects or groups. When you select an object in the Report Editor, it is also selected in the Object Navigator |
Text Color |
Displays all of the available colors. Choosing any of the colors sets the text color for the selected objects and all subsequently created objects, until you change it. |
Text |
Creates and edits a boilerplate text object. You can create a boilerplate text object with the Text tool in one of two ways: Click where you want the text to start and begin typing. Text will word wrap only when you type a return to start a new line. Click-and-drag to create a bounding box for the text. Text entered in the box will word wrap to fit within the horizontal boundaries of the box. The box will grow vertically, if necessary, to accommodate the text you type. To edit existing boilerplate text, click the boilerplate text object and start typing/editing. When you are typing or editing text, you are in text mode. To get out of text mode, click outside of the boilerplate text object. While in text mode, you can perform actions on text such as cut, copy, and paste, or use the Stylebar to change fonts and alignment. Note: If you change the font or size of the boilerplate text, the bounding box automatically grows or shrinks with the text |
This sample folio report is separated into five sections - Header, Details, Deposit Info, Footer and Merchant Info.
Words displayed in the layout model that are not enclosed in a box are text items. A text item is a constant, that is, an element that remains unchanged regardless of the guest information. Using either F4 or a right mouse click and selecting Property Palette will allow you to see a field's item type. The two main types of fields are
Field. This field type uses a merge code.
Text. This field type inserts free form text onto the report.
To delete a field or text item, select the item with your cursor. This inserts sizing handles - square handles that appear at each corner and along the sides of the rectangle and surround a selected object. When satisfied that this is the item to be deleted, press Delete on the keyboard.
It is possible to move a field or text item around in the layout model. Select the item with your cursor and either drag the item or use your keyboard arrows to move the item around. Remember that if you move a text item, chances are there is a field item that attaches to it, and this should probably be moved as well.
To add a merge code into your report, select the Field icon from the Tool Palette on the left side (See Tool Palette image above). With your cursor draw a box within the layout where you would like the field added. Either select the Property Palette option from your right click, or select F4.
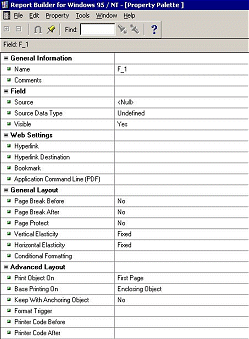
To find information pertaining to each of the above fields in the Property Palette, just select the field and select F1 and the help topic for that field in the Reports Builder will display and give all critical information for that field.
To add a text item into your report, select the Text icon from the Tool Palette on the left side (See Tool Palette image above). With your cursor, draw a box within the layout where you would like the text item added. Once the box is drawn you can type directly within the box. You will not need to perform any functions from within the Property Palette.
Drawing lines, filling in a box with a color, or changing the color of a merge code or text item when printed. Changing a color will only be needed if you are using color printers to print out your folios, registration cards, statements, etc.. When selecting a field or an item, you can use the Drawing Palette to change the field or text item.
Margins. Selecting the different margins will allow you to work within that margin. The Header, Footer, Details, Merchant Info, and Deposit areas are all within the main section, which is the middle icon shown below.
![]()
If you are using Packages and you want to print the net amount for all charges, you can use the following formula in Report Builder:
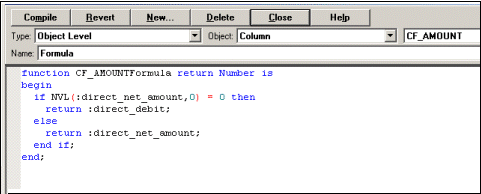
Tip: All folio variables starting with the word "Direct" come without any formatting (i.e., numbers as numbers, dates as dates, etc.). If you need to manipulate data (add two values, format a date, etc.) use these variables.
When you are ready to compile, select [Ctrl+Shft+K].
Now the compiled report must be converted to a REP file and stored in the Runtimes directory. To create the REP file, select Tools > File Conversion. The Report Builder Convert screen appears.
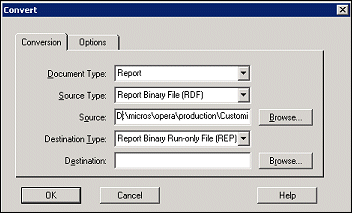
Select the Browse button to find the report RDF file you want to convert. With the file path for the RDF file shown in the Source field, select the OK button. The REP file will be created and stored by default in the Micros\OPERA\Customizable Reports folder.
To make the report available to users, move it to the Runtimes directory.
See Also