
|
|
|
Export Column Details
The Export Column Details screen allows users to define and configure the export columns. Two types of columns can be defined. The first is the View Column, which is defined in the view and can be picked up from existing columns. The other one is the Formula Column which can consist of any valid PL/SQL formula. The formula can also call the following view columns which are hard coded pseudo columns:
Through the use of formulas, export views, and existing UDF components advanced users can customize and extend information needed within the export files. This flexibility provides you with the framework to create custom user exports and functionality using OPERA's flexible tools.
To get profile information in the export file, a formula column can be setup in the export, using the below function which would return the requested information from the requested profile. This function is as follows:
EXP CREATE DATA.GET PROF INFO(in name id, in column name, in resort default pms p.resort)
Where:
For example, if you are using the EXP RESERVATIONS or EXP GENERAL RESERVATIONS VIEW view, the following formula column could be inserted to retrieve the UDFCxx from the NAME table.
Use the formula EXP CREATE DATA.GET PROF INFO(GUEST NAME ID, 'UDFCxx’).
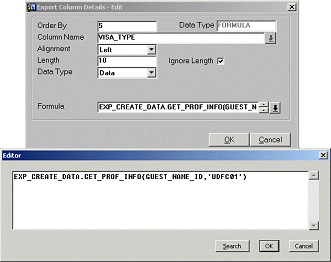
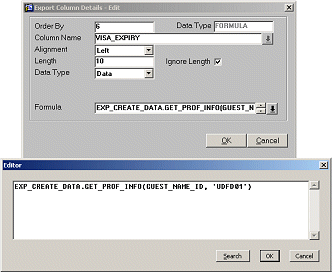
If you want to include a VISA Type and a VISA Expiry in your export file, you could use the UDF’s on your Profile screen. Using the EXP CREATE DATA.GET PROF INFO(GUEST NAME ID, 'UDFCxx’) formula, you can set up your export, and these values would be included in this export as shown here:
Visa Type |
UDFCxx |
LOV |
16 types - A, B, C, D, F, G, J, L, M, Q, T, U, W, X, Y, Z |
Visa Expiry |
UDFDxx |
DATE |
|
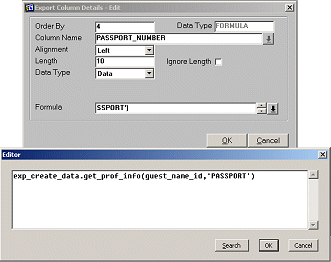
Passport Number |
|
EDIT |
|
Therefore you will need to make these formula columns for each of the requested information records from the profile. Any column from the PROFILE 1w view can be used. This view has all the Profile information.
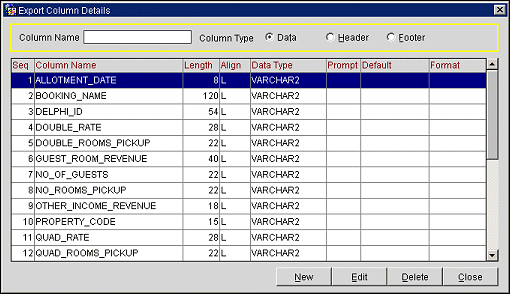
To access the Export Column Details screen, follow these steps:
Column Name. Enter the column name.
Column Type. Select one of the following radio buttons.
Seq. Enter a number to indicate the sequence in the file where this record falls.
Column Name. Select the column name from the list of values provided.
Length. Enter a number to indicate the length of the field; for instance a character field may be 50 characters long.
Align. Select the alignment for the column (left or right).
Data Type. Indicates whether the column is a Data (character, date, formula, number), Header or Footer. Header columns will always appear as the first row of the export. Footer columns will be always appearing as the last row in the export.
Prompt. This column can be used as a filter for the export, if it is selected. If ARRIVAL DATE is one of the columns in a reservation export and this column has the Show Prompt option selected while the export is being generated, you are prompted to enter a particular date. The export filters out any arrival date that does not match this particular date, and the export is completed only for the condition where ARRIVAL DATE is equal to the date you entered.
Default. The value that should appear by default when the prompt is displayed on the Export generation screen.
Format. The format (MMDDYY, DDMMYY) for the data. All valid SQL formats are accepted.
New. Creates a new column for the export.
Edit. Edit the highlighted column.
Delete. Deletes the highlighted column.
Close. Closes out of the Export Column Details functionality.
Select the Column Type to display in the grid. You can display the records in the header file, the footer file, or the data file. The grid displays the sequence, column name, record length, alignment, data type, prompt, default and format. To move a record up or down within the file, highlight the record, then select the Edit button to manually change the sequence number of the record. To add a record to the generated export file, select the New button. For additional information, refer to New/Edit Export Column Details, below.
Note: If you are changing the sequence of a record to a sequence that is already in use, you must also change that record's sequence. For instance, if I were to change record number five - DOUBLE_ROOMS_PICKUP to sequence number four, I would then also have to change record number four DOUBLE_RATE to an available sequence number.
If there are no existing columns in the view, you are prompted to create one. Respond Yes or No to create a formula column to add a record to the existing export file.
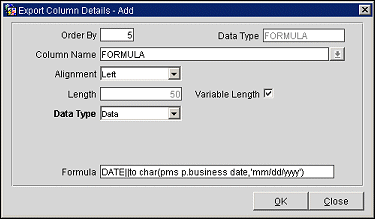
Order By. Enter a number to indicate the sequence in the file where this record falls.
Data Type. Enter the type of column, such as DATE, VARCHAR2 (Variable Character), or FORMULA.
Column Name. Select the column name from the list of values provided.
Alignment. Select the alignment for the column (left or right).
Length. Enter a number to indicate the length of the field; for instance a character field may be 50 characters long.
Variable Length. Select to have the field length varies depending on what data is stored in it.
Data Type. Select the placement of the record you are adding. This determines if you are adding the record into the Header record, the Data record, or the Footer record.
Default Value. Manually enter the value that is automatically inserted in the column.
Show Prompt. Select the check box to have a prompt appear for the column before continuing with the export.
Formula. Valid SQL formula which would be exported. Examples of a valid formula are:
The Export Select Columns screen appears when adding new columns from existing columns in the view, and displays all of the columns that are available for the view selected. Only one view may be selected for revenue export type, but the generic revenue views will contain most of the columns names needed for the revenue exports.
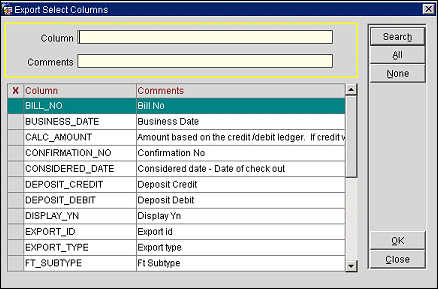
Clicking on a column name places an X in the X column, which indicates that the column will appear in the export.
Double-clicking on a column will open the Export Column Details screen. This screen will show only the columns selected to appear in this export.
All. Places an 'X' next to all columns so that all columns will appear in the export.
None. This button will remove the check from all of the columns so that none of the columns appear in the export.
OK. This button will close the screen and save all current settings.
Close. This button will close the screen and leave any settings as they were before the screen was opened.
See Also