
|
|
|
IFC Control Setup (Interface Control Setup)
Select System Configuration>Setup>Property Interfaces>Interface Control Setup to display the Interface Control Status screen. This screen shows a list of the interfaces that have been configured for the property, and the status of each.
To make changes to an interface setup, highlight your choice and select the Edit button. To add a new interface to the property, select the New button. The Interface Setup screen appears. The information that is required on this screen varies with the Interface Type being configured.
When setting up the credit card EFT interface, observe the following:
Room Extension functionality allows the user to assign to the respective reservations room extensions which can be used to control both the barring and unbarring of interfaces as well as the mapping of charges.
In the OPERA environment, two and three bedroom suites are configured as a single inventory unit, with multiple guests in the same room being handled as sharers. This functionality is required to accommodate the situation where a 2 bedroom suite is booked for 2 guests, each requiring their own charges for facilities such as telephone, pay TV etc. However, the room reflects as only one room in the inventory.
When three or more guests are accommodated as sharers in the two room suite, charges are routed to the primary sharing guest with the respective extension. In reality it is not possible to identify which guest used the telephone in the two bed single extension room. It is also possible to have multiple guests in the same room assigned to the same extension number.
The following diagram gives an example of a Suite room in inventory. Room 123 is configured in the system as an inventory room. Each room has a bed, and there is only one entrance which gives access to both rooms inside Room 123. At any given points of time, the two sharers in the room will need to know each other as each room is not secured by a lock. An example of this situation, is a company conference etc. where two sharers from the same company will be sharing the suite.
Command field position 1 = 1 (Checkin/Checkout Flag activated)
Command field Position 1 = 2 (Supports 'Room Move commands).
Room Num = Line Num
XLAT ID |
ROOM NUM |
LINE NUM |
TYPE MASK STAT |
A |
|7201 |
|7201 |R |
|5555000000000000 |0000000000 |
A |
|7202 |
|7202 |R |
|5555000000000000 |0000000000 |
A |
|7203 |
|7203 |R |
|5555000000000000 |0000000000 |
A |
|7204 |
|7204 |R |
|5555000000000000 |0000000000 |
The following two guests are sharing the same room – Room 123. Since the Mandatory flag is activated, the user is forced to enter the Extension number upon Check-in.
John Smith has Extension 7201 and Robert Jones has Extension 7202. The agent enters a check-in for each room. Check-in John Smith- Room – 123 Extension – 7201. Check- in Robert Jones – Room – 123 Extension – 7202.
When creating a Room Move, the guest in Room 123 with Extension 7201,7202 displays MOVED, and the guest is now in Room 124 with Extension 7203,7204.
The following 'LON' messages are sent.
LINE |
CMD |
7203 |
LON |
7201 |
LOF |
7204 |
LON |
7202 |
LOF |
Extension 7203 is used for an International call. The interface sends a charge $11.29 to extension 7203. The FO ACT Processor translates the Extension Number associated with the charge and posts it to the respective guest folio as shown below:
Room : 124
Guest : Robert Jones
When the checkout operation is performed in OPERA for the room, the Extension numbers are 'Barred'/'Checked out' as shown below:
LINE |
CMD |
7203 |
LOF |
7204 |
LOF |
If a user tries to re-instate a guest in OPERA after checkout the following message appears: Do you want to send the check-in to the interface Yes/No? If the user answers Yes, the extensions that were previously assigned to the guest Robert Jones – 7203 and 7204 are re-activated/unbarred as shown below.
LINE |
CMD |
7203 |
LON |
7204 |
LON |
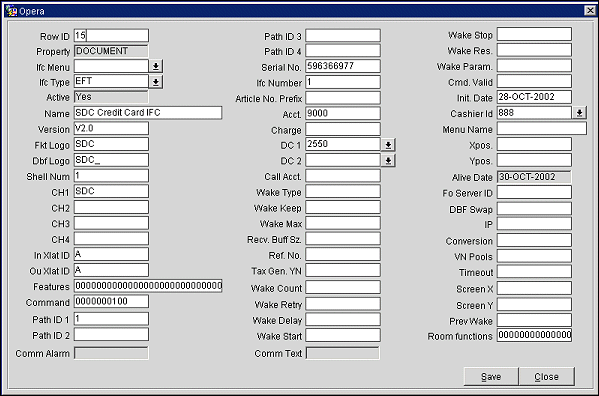
The following features are available on the IFC Control Setup screen. Information requirements vary for each interface.
Row ID. View the row ID.
IFC Menu. View the interface menu.
IFC Type. View the interface type.
Active. View the active code.
Name. View the interface name.
Version. View the interface version.
Fkt Logo. View the Fkt logo.
Dbf Logo. View the Dbf logo.
Shell Num. View the shell number.
CH 1. View the channel 1 value.
CH 2. View the channel 2 value.
CH 3. View the channel 3 value.
CH 4. View the channel 4 value.
In Xlat ID. View the in xlat ID.
Ou Xlat ID. View the Ou xlat ID.
Features. View the features values.
Command. View the command value.
Path ID 1. View the path 1 ID.
Path ID 2. View the path 2 ID.
Path ID 3. View the path 3 ID.
Path ID 4. View the path 4 ID.
Serial Num. View the serial number.
IFC Number. View the interface number.
Article No. Prefix. View the article number prefix.
Acct. View the account number.
Charge. View the charge value.
DC 1. View the DC 1 value.
DC 2. View the DC 2 value
Call Acct. View the call account number.
Wake Type. View the wake type value.
Wake Keep. View the wake keep value.
Wake Max. View the wake max. value.
Recv. Buf. Siz. View the recv. buffer size.
Ref. Nums. View the reference numbers.
Wake Count. View the wake count value.
Wake Retry. View the wake retry value.
Wake Delay. View the wake delay value.
Wake Start. View the wake start value.
Wake Stop. View the wake stop value.
Wake Res. View the wake res. value.
Wake Param. View the wake
Cmd. Valid. View the cmd. valid value
Init. Date. View the init. date.
Cashier NR. View the cashier NR.
Menu Name. View the menu name
Xpos. View the Xpos value.
Ypos. View the Ypos value.
Alive Date. View the alive date.
Comm. Alarm. View the comm. alarm.
Comm. Text. View the comm. text
Fo Server Job. View the Front Office server job.
Delete. Select this button to delete the highlighted interface control record.
New. Select this button to add a new interface control record
Edit. Select this button to view or edit the highlighted interface control record.
Close. Select this button to close the current screen.