|
|
|
LDAP Integration
At times, particularly in large chains, many users will need access to OPERA even though they do not work in the same hotel. For example, if certain employees need access to the OPERA PMS at each of a chain's 125 hotels, this would mean that a user account needs to be set up for these employees in each of the 125 hotels. It would also be required to maintain these accounts and inactivate accounts when users leave the company. LDAP Integration offers a solution for setting up access to many users. With LDAP, user accounts are maintained in one place only, using the IT infrastructure in Microsoft Active Directory (Lightweight Directory Access Protocol or LDAP). This integration enables efficient maintenance of user accounts from one central location and enables login to OPERA without having to manually configure individual accounts in OPERA.
Note: LDAP users will be hidden within OPERA to users who are not a member of the OPERA Supervisor group and will not have Edit User screens (EMPLOYEE screen). All activities performed by LDAP users in OPERA will be recorded in the User Activity Log with the LDAP user's Username.
Note: The OPERA LDAP Integration feature uses an Oracle Wallet password to secure communications between LDAP and the Oracle database. This password is automatically set when OPERA is installed or upgraded and is stored in encrypted form in the OPERA database. If your database administrator wishes to change the Oracle Wallet password for any reason, you will need to also change the General>Default Wallet Password application setting to match the new Oracle Wallet password or the OPERA LDAP feature will become inoperable. The General>Default Wallet Password application setting display is masked for security.
Integrating OPERA with LDAP requires configuration in OPERA and setup in Active Directory.
To prepare for LDAP integration, trusted external LDAP directories must be set up in OPERA. One LDAP configuration must be set up for each Active Directory that will be used to access OPERA. To begin, select Configuration>Setup>LDAP Configuration. The LDAP Systems screen appears.
To create a new LDAP system configuration, select the New button. To edit an existing system, highlight your choice and select Edit.
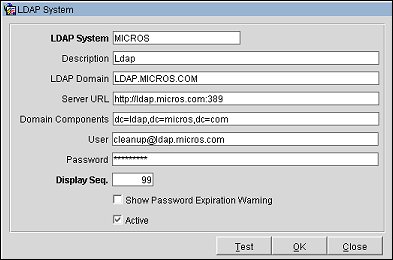
Provide the following information and select the OK button.
LDAP System. Enter a new or change an existing LDAP system name to connect to the domain. The system uses what is entered here for connecting to the domain when users log on (i.e. jjones@ldap.micros.com), unless the LDAP Domain field (see below) has a name entered. The LDAP System name can be a name longer than 40 characters or shorter and does not need to be the fully qualified domain name. For example, the fully qualified domain name of LDAP.MICROS.COM can be shortened to another name (i.e. MDB). When changed, users who already were configured with the previous LDAP System name, i.e. LDAP.MICROS.COM, will automatically have their logon name changed to the newly shortened name (i.e. jjones@micros).
Note: When changing the LDAP System name, the Application Server needs to be restarted to populate the correct values on the Default Domain in the OPERA Login page.
- When the LDAP System name is updated, the user name is also updated in Miscellaneous>Reports Scheduler.
Description. Enter a description for the LDAP system.
LDAP Domain. If this field is empty, the name entered in the LDAP System field will be used for logon and connection to the domain. If this field has a name entered (either a full qualified domain name or a short version), it will overwrite the LDAP System name and be used for connection to the domain.
Server URL. Enter the SSO URL for the LDAP Host (e.g., https://ldap.micros.com:636). Authentication of users against external LDAP can use secure communications (SSL). Https:// in the External SSO URL is recognized for SSL communications. (You may also provide this information using the LDAP Test screen described below. If you enter this information on the LDAP Test screen, it will automatically be copied to this field when you select OK from the LDAP Test screen.)
To provide failover to a backup server in case one server does not respond, you may enter additional server URLs in this field, separated by commas. Active Directory will loop through the list of servers until one responds.
Domain Components. Enter a comma separated list of the domain components for the LDAP SSO URL (e.g., dc=ldap, dc=micros, dc=com). (You may also set this information up using the LDAP Test screen described below. If you enter this information on the LDAP Test screen, it will automatically be copied to this field when you select OK from the LDAP Test screen.)
User. Low level LDAP user (LDAP user with minimal privileges) to be used for login to Active Directory by the LDAP Cleanup Utility.
Note: The LDAP System code and the domain portion of the user name must match. The following warning appears if there is a mismatch: "LDAP System <system_code> and user domain <user_domain> must match. Please change the LDAP System to <user_domain>."
Password. Password to be used by the LDAP user.
Display Seq. Enter a number that determines the position of this LDAP system in LOV lists.
Show Password Expiration Warning. Select this check box to display the warning: "Active Directory password will expire in X days. Please change your password in Active Directory" to the user at OPERA login; "X" is the number of days that remain until the user's password expires. This message will appear at login starting 5 days prior to the password expiration date and will reappear at login until the password is changed or the password expires.
Active. Select the Active check box to activate the LDAP system.
To test the connection to the LDAP server, select the Test button. The LDAP Test screen appears.
Provide the following information.
Server URL. Enter the SSO URL for the LDAP Host (e.g., https://ldap.micros.com:636). Authentication of users against external LDAP can use secure communications (SSL). Https:// in the External SSO URL is recognized for SSL communications.
Domain Components. Enter a comma separated list of the domain components for the External SSO URL (e.g., dc=ldap, dc=micros, dc=com).
User and Password. Enter a username and password of any user having access to the Active Directory.
When you select the Test button the results of the connection attempt are displayed in the Log/Response grid. Once the connection test is successful, you may select the OK button to copy the Server URL and Domain Components information back to the LDAP Systems screen to complete the LDAP System setup.
Select the Export button to export the test results as a text file (named ldap.txt) that is stored in your OPERA export directory (e.g., micros\opera\export\schema_name\property\).
Next, set up the user groups and their associated permissions to be granted to users who access OPERA via LDAP integration. (See User Groups for details on using this feature.) Here are some hints for efficiently creating user groups and assigning permissions for multiple properties.
Select Setup>User Configuration>User Groups to access the User Groups screen. Select the New button to create a user group to which LDAP users will be attached. Remember that the Group Name assigned here must match the name of the Role created in Microsoft Active Directory. (You may create as many LDAP user groups as you will need.)
Note: When working in multi-property OPERA environments (e.g., in ASP hosted environments, when the OPP_MHOT Multi-property PMS add on license is active, or when the OPR_<version_number> ORS license code is active), user group names may be duplicated in different chains.
There are 3 levels of user groups that can be configured in LDAP:
Note: Property access user groups are only required when users will be working in an environment where multiple properties share the same database schema and the users will be allowed to log into and work in multiple properties. Property access user groups control the properties that the logged in user may access, while the permission user groups control what rights are granted to the logged in user at each property.
Permission user groups must have names that match the names of the Roles created in Active Directory (e.g., FRONTDESK, NightAudit, Cashiering, etc.); these user group names are the same at each property in the chain and are set up using the Permission button on the User Groups configuration screen. Permissions are granted for each permission user group per property.
Create the permission user groups (having the same names as the Roles set up in LDAP Active Directory) as you normally would. Use the Permission button on the User Groups screen to select permissions for each permission user group.
Modules. This field is available on the User Group - New and User Group - Edit screen when an active LDAP System is configured for the property (Configuration>Setup>LDAP Configuration). Select the Modules down arrow to choose the OPERA applications to which the logged in users belonging to this user group will have access. If a logged in user belongs to more than one user group, he will have access to the applications associated with all groups to which he belongs. (This feature provides application access similar to the way selecting the application check boxes on the User screen provides application access for standard OPERA users.)
Login Screen. This field is available on the User Group - New and User Group - Edit screen when an active LDAP System is configured for the property (Configuration>Setup>LDAP Configuration). Select the down arrow to choose the default login screen for users in this user group. (This feature provides a default login screen similar to the way selecting the Login Screen on the User screen does for standard OPERA users.)
Note: If the user belongs to multiple user groups and two or more of those user groups have different login screens assigned, OPERA will display the login screen having the alphabetically first form name.
When you are done, select OK to return to the User Groups screen.
Property access user groups determine which property or clusters of properties the user may access. Property access user groups are set up using the Prop. Perm. button on the User Groups configuration screen. Property access user groups can be uniquely named per property or cluster of properties (e.g., HOTEL1, HOTEL2.... or CLUSTER1, CLUSTER2....) and identify the property or properties that members of that group may access.
As an example, any LDAP user who belongs to the CLUSTER1 property access user group and also belongs to the FRONTDESK permissions user group, has the permissions configured for the FRONTDESK user group at any CLUSTER1 property that he logs into. For example, assume that the FRONTDESK Role is set up in Active Directory. A FRONTDESK permissions user group is set up for the Bellaire Hotel. In addition, the CLUSTER1 property access user group contains the Bellaire Hotel (as well as other properties in the cluster). If user PATR@LDAP.MICROS.COM belongs to the CLUSTER1 and FRONTDESK user groups, upon login at the Bellaire, she is granted the permissions assigned to the FRONTDESK user group. If she later logs into another property in the CLUSTER1 user group, she will have the FRONTDESK permissions that are set for the new property. See LDAP Cluster Configuration for a diagram of these user group relationships.
Create your property access user groups as you would normally create a new user group. From the User Groups screen, highlight the new property access user group and select the Property Access button to select the property(ies) to which users in that group will have access. The Property Access screen appears.
You do not need to specify Modules for the access user groups. Module access will be pulled from the logged in user's permissions user group. When you are done, select OK to return to the User Groups screen.
Access and Permissions can be assigned to users for one or several chains. The following names for User Groups, Properties, Chains, and Users are only for demonstration purposes. Use your own required names when setting up Chain Access User Groups.
To provide access to users for more than one chain:
To provide access for just one chain, using the same above example:
![]()
The User Groups screen has two additional buttons when the OPR<version _number> ORS license code is active: CRO Acc. and Prop Acc.
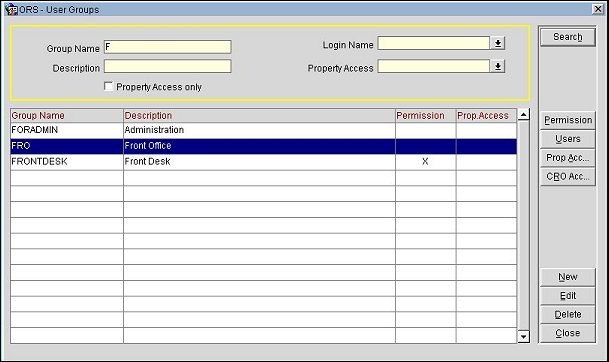
CRO Acc. Select this button to go to the CRO Access screen where you may choose the CROs that will be accessible to users belonging to the highlighted user group. Available when the OPR_<version_number> ORS license code is active and when LDAP login is configured.
Prop. Acc. Select this button to go to the Property Access screen where you may choose the properties that will be accessible to users belonging to the highlighted user group. Available when the OPR_<version_number> ORS license code is active and when LDAP login is configured.
![]()
Next, select the Permission button on the User Groups screen. The User Group Permissions screen appears. Select the permission groups and/or permissions you want to grant to the functional user group.
Select the Group Grant button to display the Copy Permissions screen.
Provide the following information and select the OK button.
Permissions. A view only list of the selected permissions.
To Group. Select the down arrow to choose the user groups to grant the highlighted permissions to.
To Property. Select the down arrow to choose the properties to copy the selected user groups along with their permissions to.
(Alternatively, the Copy feature on the User Group Permissions screen may be used to assign permissions to user groups at the different properties.)
Note: LDAP users will only be visible in the Employee form (Setup >User Configuration >Users) when logging in with the native OPERA Supervisor username. Individual permissions for an LDAP user can only be assigned by the native OPERA Supervisor. Changing the user permission groups on an LDAP user in OPERA will have no impact as LDAP supersedes OPERA and LDAP will resynchronize the permission groups with Active Directory Roles again on the next login.
From the Active Directory, you can:
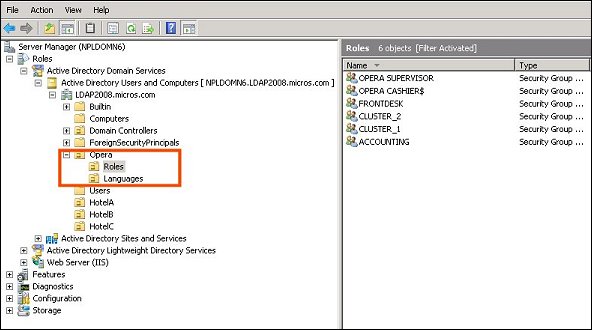
On the LDAP Host, configure an Organizational Unit (OU) called OPERA. Under the OPERA OU, configure an OU called ROLES (i.e., OPERA\ROLES).
Next, configure user groups within the ROLES OU whose names match the user groups configured in OPERA (e.g., Accounting, FrontDesk, NightAudit, etc.). The Roles-User Groups match is not case sensitive.
Note: A "real-world" Active Directory configuration will likely have subdirectories for each hotel (HotelA, HotelB, HotelC in the screenshot below) where LDAP users at that hotel would be configured. Notice, however, that the OPERA Active Directory structure is at the root level and not at the level of the hotels.
Attach the user groups to the users in LDAP.
Tip: For users that are connecting to OPERA through a website link, the OPERA Login Splash screen will be bypassed and the user will be logged into OPERA with the correct permissions granted for that user.
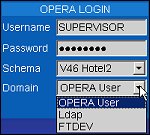
Username. LDAP users may login to OPERA using a valid LDAP login format (e.g., <username>@<domain_name>. The OPERA Sign-on screen recognizes LDAP users in the Username field when one of the following characters is detected: \ (back slash), / (forward slash) , @ (at sign). Depending on the SSL configuration of the LDAP Host, there could be multiple Username formats; for example:
LDAP users may also login using their regular OPERA login username and password. If they have been assigned to multiple domains they may select the desired domain from the Domain LOV. See the Domain description below.
Password. Passwords are case sensitive.
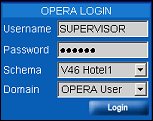
Schema. When the user is assigned multiple schemas, the Schema LOV can be selected for the desired schema.
Domain. This field is always visible, but is relevant for users who access OPERA using a Domain Account through Lightweight Directory Access Protocol (LDAP).
The domain used in the Domain field to log into OPERA (either OPERA User or domain name) for this session will be stored as a Cookie and appear as the default domain for next log in.
When an LDAP login is entered, it is authenticated against the LDAP Host; authentication of users against LDAP can use secure communications (SSL).
Upon successful login, OPERA presents the Property selection screen.
When users successfully log in, they will have access to the OPERA applications and permissions granted to the user group(s) to which they belong.
See Login Screen for more information on logging in to OPERA.
The OPERA LDAP Cleanup utility, scheduled to run using the OPERA Scheduler, automatically checks for inactive LDAP users and inactivates them in OPERA. All actions taken by this process are logged in the OPERA User Activity Log.
Note: OPERA cashier IDs belonging to inactivated LDAP users are not recycled for reuse by other OPERA users.
It is possible to automatically assign cashier IDs to OPERA users who have an LDAP login. This allows you to sidestep the need to manually open the User screen for each of these users in order to set up a cashier ID.
Note: Automatic assignment of cashier IDs is preferable to manually assigning cashier IDs to LDAP users.
The following steps outline the process.
1. Configure an LDAP Cashier Template. See Cashier Setup for details.
2. Set up the OPERA Cashier$ user group within the ROLES OU in the LDAP directory. It is not necessary to set up a corresponding OPERA user group.
Note: Be sure the OPERA user group(s) assigned to the user have appropriate Cashiering permissions.
3. Assign LDAP users to the OPERA Cashier$ user group if they are to have a cashier ID automatically assigned to them.
4. The first time the user who belongs to the OPERA Cashier$ LDAP user group logs in to OPERA with an LDAP username, a cashier ID will be automatically and transparently assigned to the user. The user will be assigned the cashiering attributes, including Starting Amount and Max Uses, specified on the LDAP Cashier Template. The LDAP username will be used for the Name on the LDAP Cashier Template.
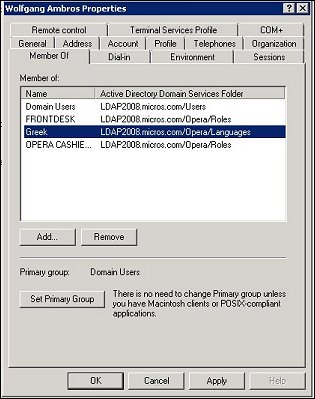
The S&C Owner code can be manually assigned to an OPERA user by entering the code in the Owner field on the Edit User screen. The Owner code can be automatically assigned and populated to the Edit User screen for LDAP users.
To do so, define the owner code in the user's Active Directory account properties using the Telephones tab Notes area.
|
|
The code must start in the first position on the first line of the Notes area and it must use the format:
S&C_Owner=<owner_code>
where <owner_code> is a unique code (typically the sales manager's initials) for that owner. For example: S&C_Owner=JOHND.
Uniqueness of the code is checked at the time the user next logs in to OPERA as an LDAP user and before the code is entered into the user's OPERA record. If the code is not unique, the user will be notified by a broadcast message ("Owner code already exists. Please contact your Administrator to adjust the owner code.") and the Owner field on the Edit User screen will remain blank. If the user already has an owner code assigned, the owner code will be superseded by the code from LDAP.
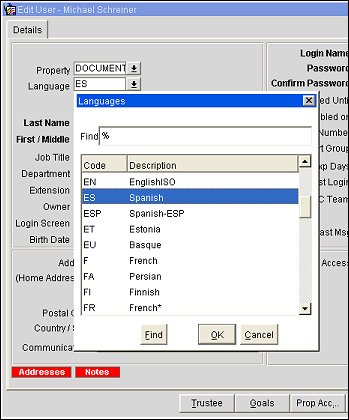
For OPERA users who have an LDAP login, it is possible to automatically apply the user's language code, as set on the Edit Users screen Language field in OPERA, to be the user's default language on the OPERA sign-on screen. This allows the user to sidestep the need to manually set the language at login if the language differs from the language set in the General>Base Language application setting.
In LDAP, configure a new OU (organizational unit) under OPERA called Languages.
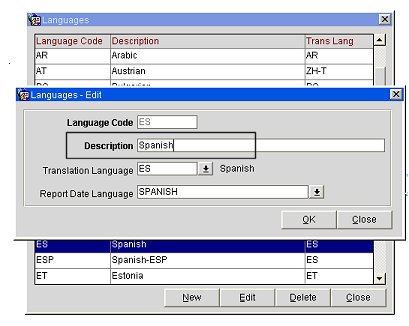
Next, configure user groups within the Languages OU where the group name matches the language Description set up for the language in OPERA (Configuration>Profile>Geographical Data>Languages).
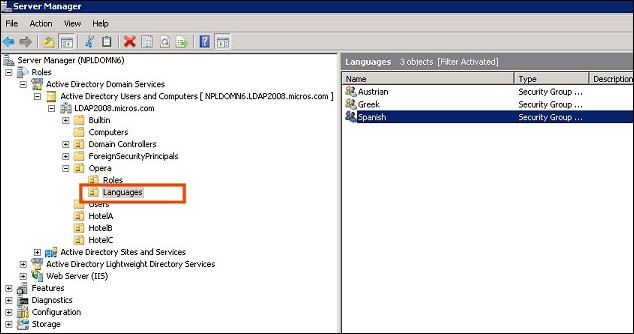
Finally, make LDAP users members of the Languages user groups.
Note: Configuring the Languages OU in LDAP is not mandatory and if it does not exist, or if one of the language groups configured under the Languages OU does not match the OPERA user's language code, the LDAP user's login language defaults to the language set by the property's General>Base Language application setting.
Note: OPERA does not validate email, phone and address information received from LDAP. This feature assumes that the appropriate address types already exist in the OPERA property.
The following LDAP address and telephone information, if available in LDAP, is automatically copied to LDAP users' OPERA profiles the first time they log in to OPERA. Thereafter, the information is updated in OPERA, if necessary, each time the LDAP user logs in to OPERA.
Telephone. This telephone number is copied to the LDAP user's OPERA profile BUSINESS phone number (Role=PHONE/Type = BUSINESS).
Email. This email address is copied to the LDAP user's OPERA profile EMAIL address (Role= EMAIL/Type = EMAIL).

Home. This telephone number is copied to the LDAP user's OPERA profile HOME phone number (Role=PHONE/Type = HOME).
Mobile. This telephone number is copied to the LDAP user's OPERA profile MOBILE phone number (Role=PHONE/Type = MOBILE).
Fax. This telephone number is copied to the LDAP user's OPERA profile FAX phone number (Role=PHONE/Type = FAX).
Notes. This area can be used to define the S&C owner code and the Employee ID.
Employee ID. Adding and changing an Employee ID in Active Directory provides additional security and limits accessibility to changing the Employee ID from within OPERA by anyone with the Supervisor permission. When the Employee ID is changed in the Active Directory, the user with this ID logs into OPERA and the number is synchronized and placed in the appropriate OPERA tables. To define the Employee ID for the user, enter up to 20 characters as a maximum for the employee number:
Street. This address information is copied to the LDAP user's OPERA profile BUSINESS address, Address1.
P.O. Box. This address information is copied to the LDAP user's OPERA profile BUSINESS address, Address2.
City. This address information is copied to the LDAP user's OPERA profile BUSINESS address, City.
State/Province. This address information is copied to the LDAP user's OPERA profile BUSINESS address, State/Province.
ZIP/Postal Code. This address information is copied to the LDAP user's OPERA profile BUSINESS address, ZIP/Postal Code.
Country/Region. This address information is copied to the LDAP user's OPERA profile BUSINESS address, Country.
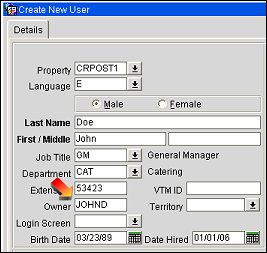
For users who access OPERA via LDAP integration, the Title and Department fields on the user's LDAP Properties Organization tab can be automatically copied to the OPERA Edit User screen Job Title and Department information when the user logs in. Thereafter, the information is updated in OPERA, if necessary, each time the LDAP user logs in to OPERA.
In order to use this feature, exactly matching (including upper and lower case) Department descriptions and Job Title descriptions must already be configured in OPERA prior to the LDAP user logging into OPERA. (Job Titles and Departments are configured in OPERA at Configuration>Setup>User Configuration>Departments and Configuration>Setup>User Configuration>Job Titles.)
For example, assume John Doe has the Title Catering Manager in LDAP.
And the Catering Manager Job title is configured in OPERA.
When John Doe logs into OPERA, his LDAP Title will be automatically copied to his OPERA Job Title.