
|
|
|
Log Book
The Log Book function is available when the General>Log Book application function is set to Y.
Select Miscellaneous>Log Book to access the log book. You may also access the log book from the Track It Dashboard screen.
The log book is an internal logging record that can have various uses depending on business processes set up by the property. For example, the log book can be used to record "FYI" details and advisories for pass-along between shifts. It might also be used to record reminders for a particular future date, to create To Do items, or to make a record of some unusual circumstance.
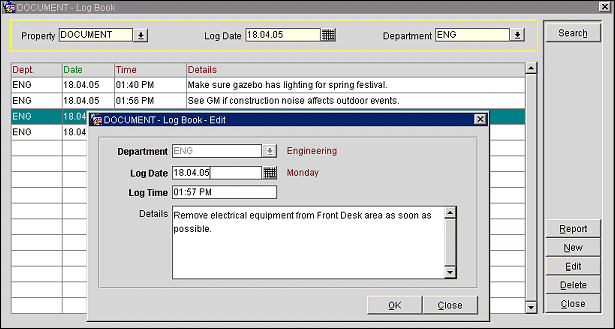
The following information is available on the Log Book screen:
Property. Available when the OPP_MHOT Multi-property add-on license is active. Select the down arrow to choose the property to display log book entries. The default is your logged in property.
Log Date. Enter the date to see log book entries. The default is today's date.
Note: The previous month's log book entries are purged from OPERA on the last day of each month. For example, if today is July 31st, the entries for June 1st through June 30th would be deleted.
Department. Select the down arrow to choose the department to display log book entries. The default is all departments.
Note: When the log book is accessed from the Track It Dashboard, only those departments designated on the Track It Defaults Setup screen are available for viewing/selection.
Dept. Department associated with the log book entry.
Date. Log date assigned to the entry.
Time. Time associated with the log book entry.
Details. Text of the log book entry. If the entire text is not visible, double click to display the Log Book - Edit screen.
To add a new log book entry, select the New button. To edit an existing entry, highlight your choice and select the Edit button. The Log Book - New or Log Book - Edit screen appears. Provide the following information and select the OK button
Department. Select the down arrow to choose the department associated with the log book entry. Once the entry is saved, this field may not be edited. The department name appears to the right of the field.
Note: When the log book is accessed from the Track It Dashboard, only those departments designated on the Track It Defaults Setup screen are available for viewing/selection.
Log Date. Enter the date to which this entry applies. Today's date is the default date. The day of the week for the date shown appears to the right of the field. The date cannot be earlier than today's date.
Log Time. Enter the time to which this entry applies. The current time when the entry is created is the default time. The time cannot be earlier than the current time.
Details. Enter the text of the log book entry.
Select the Report button to prepare a copy of the log book entries that are currently displayed in the Log Book screen grid. From the Log Book Report options you may choose one of the following:
Preview. Preview the report in PDF format (you may also save the PDF).
Print. Print the current log book display on the local printer.
File. Create an RTF file that can be opened in most word processors for editing.
See Also