
|
|
|
OPERA SQL
When the user permission UTILITIES>OPERA SQL is active, the OPERA SQL utility real-time diagnostic and resolution tool for Oracle databases is available only to Oracle database administrators for researching and resolving database errors and performance issues. Access the OPERA SQL tool by selecting Utilities>Tools>OPERA SQL.
The OPERA SQL utility has two modes: Query Mode and Explain Plan Mode.
For security purposes and to be PCI compliant, each successful SQL statement the user runs through OPERA SQL is recorded and saved for a limited time in the User Activity Log. The User Log will contain the user ID, workstation, date and time, the statement text, and type of statement, i.e. DML, DDL, DCL, TCL, Query and so on. If a statement is not successful due to syntax errors or other issues, the statement will not be logged. Users who view the User Activity Log for statements run from the OPERA SQL utility must be granted the permission GENERAL>SHOW SYSTEM LOG.
Note: When the General>Mask Credit Card Number application parameter is set to Y or N, regardless of whether you have Reservations>Credit Card Information Edit permission, credit card numbers will be masked with X's (except for the last 4 digits); expiration dates will be masked with X's (expired dates are shown as EXP).
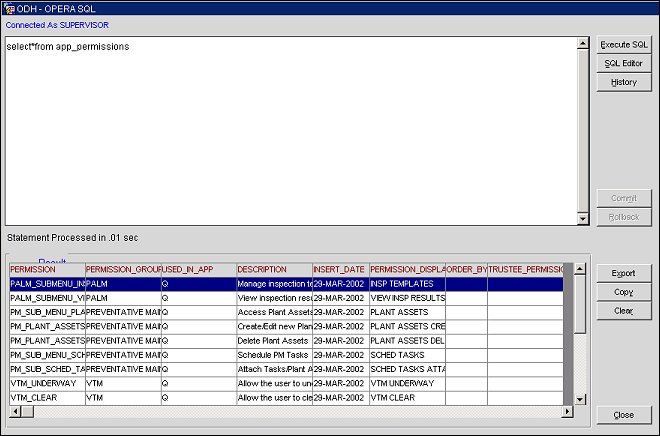
At the Query Mode screen, you can enter SQL Command Strings and view results. For more detailed information on other available functionality in this mode, see Button Functions.
SQL Command String Window (Upper window). Enter the SQL Command String in this area. Then, select Execute SQL. The results appear in the Result grid.
Result (Lower grid). View the outcome of a particular SQL action, operation, or command.
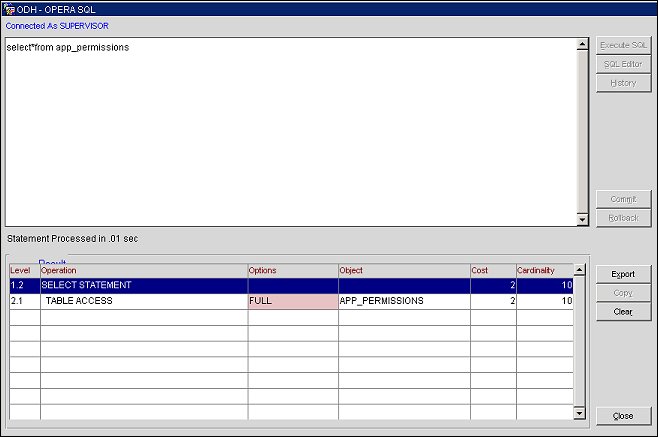
The Explain Plan mode screen can be accessed after a query has been made in Query Mode and at least one row appears in the Results grid. To view the Explain Plan for the query, place your mouse pointer in the area above the Execute SQL button and select Alt + Click. The Result Grid will display the Explain Plan.
The only button functions available in the Explain Plan mode are Clear, Export, and Close.
Execute SQL. (Only available in Query Mode.) Begin and carry through to completion the SQL command string.
SQL Editor. (Only available in Query Mode.) SQL Editor is an explorer and code editor combined for the OPERA SQL Server databases. With the SQL Editor, database administrators can find code, change it and create a release script for it, all from the same application.
History. (Only available in Query Mode.) Displays the OPERA SQL History screen where previously executed SQL Command Statements display (those executed since v5.0.04.01 implementation only). See OPERA SQL History below. The History button is available for users granted the permission GENERAL>SHOW SYSTEM LOG. Selecting this button displays similar information as that in the User Activity Log screen (Miscellaneous>User Activity Log). Having the SQL Command Statements display here makes the OPERA SQL tool more convenient for support purposes.
Commit. (Only available in Query Mode.) Commits the current transaction. All changes made by the transaction become visible to others and are guaranteed to be durable if a crash occurs.
Rollback. (Only available in Query Mode.) Rolls back the current transaction and causes all the updates made by the transaction to be discarded.
Export. (Available in Query and Explain Plan Modes.) Select to export the results to a user-defined location (the default is D:\MICROS\OPERA\Export\ <schema_name>\<resort>\operasql) as a text. Once the file is exported to the defined location, it can then be viewed, emailed, etc.
Copy. (Only available in Query Mode.) Select this button to copy and paste the entire query results into the desired format.
Clear. (Available in Query and Explain Plan Modes.) In Query Mode, select this button to remove the existing SQL Command String and Results. In Explain Plan Mode, select this button to return to the Query Mode.
Close. (Available in Query and Explain Plan Modes.) Close the SQL Editor.
This screen appears when the History button is selected. When the OPERA SQL History functionality is first implemented in your environment the screen does not display any data, but previous history can be seen at the User Activity Log (Miscellaneous>User Activity Log). Once SQL Command Statements have been successfully executed, the OPERA SQL History screen will display history based on the search criteria.
The SQL History main screen contains three sections:
SQL Types. When the SQL History main screen first opens, all SQL Types check boxes are selected for search criteria. If you want to limit the SQL Types, select the desired check box. If no check boxes are selected, the SELECT check box is automatically activated. Double-Clicking the SQL Types label will toggle the options between SELECT only and all SQL Types selected. The SQL Types check boxes include:
Show All Users - (Available only when the user has the permission UTILITIES>OPERA SQL HISTORY SHOW ALL USERS) When selected, successful/executed SQL History from all users matching the search criteria will be displayed. When not selected, only the current user's SQL History will be displayed.
From Date/To Date.
SQL Statement. Enter the desired SQL statement for which you want to display history.
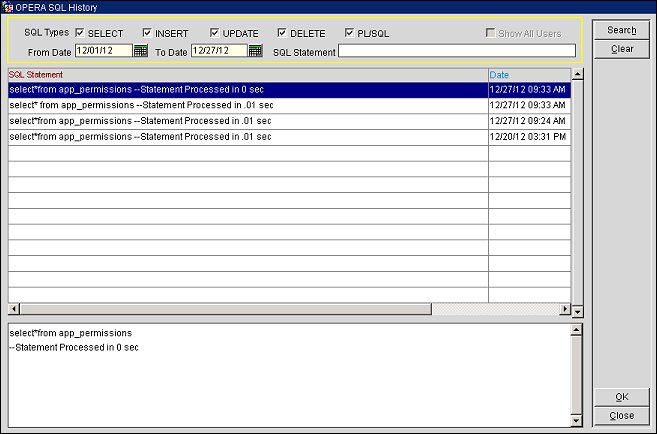
The upper SQL Statement grid displays the queried history entries. The default sort order will place the most recent SQL History Statements at the top of the grid. The following columns are displayed in the grid. Use the scrollbar below the grid to view columns that are not currently visible.
Grid entries shaded in Gray indicate history where the user could not be determined when the SQL Statement was originally executed. These entries will be available to all users regardless of the SQL Types "Show All Users" check box selection. When the “Show All Users” option is selected, entries that were created by another user will be shaded in yellow.
There are two methods to paste a History entry to the SQL Statement in the OPERA SQL screen for editing and execution.
This area displays the entire SQL Statement for the highlighted SQL Statement in the upper grid. Use the scroll bar on the bottom to view more text. This area can be used to copy and paste text into the “SQL Statement” field or to any other application that supports pasting text. While this area is editable, changes made will not be saved. Your changes will be pasted into the “SQL Statement” in the OPERA SQL window when *OK+ is selected. Simply double-clicking a grid entry will not paste changes to the “SQL Statement” text.
The SQL Statement area is currently limited to 32,000 characters. Because of this, the following dialog will be displayed when the SQL Statement being pasted would exceed the 32,000 character limit:
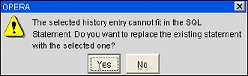
Yes. Select Yes to delete the current SQL Statement in the OPERA SQL screen. Instead, the selected SQL Statement from OPERA SQL History will be pasted into the OPERA SQL screen.
No. Selecting No will cancel the paste operation and return to the OPERA SQL History screen.
Search. Queries the OPERA SQL history based on the currently selected filter.
Clear. Clears the search criteria and re-selects all “SQL Types.”
OK. Pastes the Full SQL Statement of the currently selected grid entry into the SQL Statement in the OPERA SQL screen. The OPERA SQL History screen closes and the OPERA SQL screen displays.
Close. Closes the OPERA SQL History screen with no action taken.
See Also