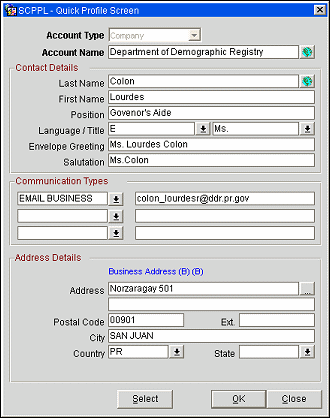
Create a Quick Profile
The Quick Profile screen is available from the Quick Profile Search screen when you select the New button. Use the Quick Profile screen to create new profiles when you are performing an Inquiry or setting up a Quick Business Block.
Note: When Name, Last Name, First Name, and City Search filters are entered in the Quick Profile Search screens, these fields carry over to the new Quick Profile screen.

Account Type. Select the Account Type. Because only a Company or Travel Agent profile can be attached to a Potential record, these are the only options in the Account Type LOV when the Quick Profile screen is called from the Company ellipsis on the Potential screen.
When the application function Source is set to N, Source will NOT be an option in the Quick Profile screen Account Type LOV when called from the Company ellipsis of a Business Block, Quick Business Block or the Activity screen(s).
Account Name. Enter the Account name. When the application parameter General> Alternate Name is set to Y, the globe icon displays next to the Account Name field. Select this icon to open the Alternate Name screen where an Alternate Account Name and Alternate Language can be populated. When the application parameter General>Auto Alternate Name Translate is set to Y, the Alternate Account Name field is displayed in the Quick Profile Screen and the globe icon calls a screen to enter the non-translated Account Name.
Last Name. The surname or last name of contact / individual. When the application parameter General> Alternate Name is set to Y, the globe icon displays next to the Last Name field. Select this icon to open the Alternate Name screen where the following fields can be populated: Alternate Last Name, Alternate First Name, Alternate Language/Title, Alternate Salutation & Alternate Envelope Greeting. When the application parameter General>Auto Alternate Name Translate is set to Y, the Alternate Last Name, Alternate First Name, Alternate Title, Alternate Salutation and Alternate Envelope Greeting fields are displayed in the Quick Profile Screen and the globe icon calls a screen to enter the non-translated values.
First Name. The first name of the contact / individual.
Position. The position or job title of the contact.
Language. Select the down arrow and choose the guest's preferred correspondence language. A default correspondence language was established for your property during set up.
Title. Select the down arrow and choose a courtesy greeting (Mr., Mrs., Ms., Dr., Herr, Mm., etc.) from the Titles list of values. The greetings are sorted based on the language selected. When you select a title, the default salutation and or Envelope Greeting for that title will be populated if they have been configured in Title configuration.
Envelope Greeting. The way you address the contact on a mailing label or the outside of an envelope. If a default for this field has been configured in Title configuration, it will default when the appropriate Title is selected.
Note: In S&C, when the application parameter Profiles>Override Envelope Greeting is active, this field can updated by changing the Title and/or Name fields. It is not possible to manually update the Envelope Greeting field. When inactive, changes made to the Title and/or Name fields do not update the Envelope Greeting field but it is possible to manually update the field.
Salutation. The form of address used for this contact at the beginning of a letter. If a default for this field has been configured in Title configuration, it will default when the appropriate Title is selected.
Note: In S&C, when the application parameter Profiles>Override Salutation is active, this field can only be updated by changing the Title and/or Name fields. It is not possible to manually update the Salutation field. When inactive, changes made to the Title and/or Name fields do not update the Salutation field but it is possible to manually update the field.
Communication Types. Select up to 3 communications categories and provide associated addresses or numbers for this Account (e.g., Web Page Address, Main Telephone Number etc.) and Contact (e.g., Home Phone, Email Address). The values entered here will be populated on both the Account and Contact.
Address Type. The selected Address Type will be displayed in blue above the Address line. The default address type for this screen is based on the application setting Profiles>Company Address Type or Profiles>Individual Address Type, depending on whether you are creating an Account or a Contact. (The system determines whether you are creating an Account or Contact based on from which side of the Quick Profile Search screen the New button was selected.)
Address. When the ellipsis is selected, four lines are provided to type each address type. The address details will be populated on both the Account and Contact.
Postal Code. Postal code or Zip code.
Extension. Postal code or Zip code extension.
City. City portion of the address.
Country. Select the country for this address.
State. The state for the address. If the Zip code and Country are provided, the state will default based on the Cities and Postal Codes configuration.
Cleansed. This check box is available in PMS and ORS/OCIS if an external address cleansing interface is licensed (e.g., the OPP_ADDO Address Doctor Interface) and the Profile>Address Cleansing application parameter is set to Y (otherwise the check box is disabled). Address verification is performed when the Cleansed check box on the Profile screen (or the Addresses screen) is un-selected. Enter your address information and select the OK or Save button to initiate address cleansing. Address validation may be applied to the profile address information when the profile is created or when the address is edited. This check box is automatically selected after the address has been validated. To re-validate an address change, edit the appropriate address elements and un-check the Cleansed check box. The address will be re-validated when you select the Save or OK button. See Address Doctor Setup and Address Cleansing Result for details.
See Also