
|
|
|
Room Plan (Ctrl+F3)
The Room Plan screen provides a view of the occupancy and the availability of rooms over a period of time. In addition, the Room Plan offers you direct access to many of the most-used screens in OPERA, and a shortcut to a variety of options such as moving guests to other rooms without having to access the Reservation menu, checking in guests, and creating shares.
To access the Room Plan screen, select Miscellaneous > Show Quick Keys and choose the Room Plan icon, or press Ctrl+F3 from any area in the OPERA application. You can also select Reservations > Room Plan to display the Room Plan screen.
Enter your search options and select the Search button.
Note: When one or more room types have been selected in the Room Type field, and one or more features have been selected in the Features field, the search will identify room numbers belonging to any of the specified room types which have all the specified room features. If no room types are defined, the query will identify room numbers with the selected feature(s), regardless of room type.
Date. Enter the date (past, current, future) from which you'd like to display reservations in the room plan. The current system date is the default start date for the display. To change the start date, type a new date or use the calendar tool.
Property. Available when the OPP MHT2 OPERA Property Management Multi-Property (Cross Reservation) add-on license code is active. Displays the logged in property. Select the down arrow to choose another property.
Room Types. Select the down arrow to choose one or more room types to display the room plan (See Room Types for details).
Room Classes. Available if the General > Room Class application function is set to Y. Select the down arrow to choose the room classes to display the room plan. This list includes All Room Classes, including Pseudo Room Classes.
Rooms. Enter a room number or a list of room numbers, separated by commas or spaces, to display the room plan. Or, select the down arrow to display a multi-select list of values showing a list of rooms along with their room type and description. Only the specific room number(s) included in the search are returned.
Note: If the Reservation > Room Display Order application setting is set to Least Used Ascending or Least Used Descending, and pseudo rooms are included in the search, pseudo rooms will appear after all other room types in their defined display sequence.
Floor. To search by a specific floor or floors, select the down arrow to choose one or more floors. Selecting a floor in this field will return all of the guests that are staying on that particular floor for their reservation. If the FRONT DESK > FULL DESCRIPTION application parameter is active, hovering over this field displays the full description of the code values.
Features. Select the down arrow to choose one or more room feature codes for the rooms you wish to display on the room plan. Room feature codes specify the room attributes that distinguish each room, excluding the attributes for smoking and floor, as these attributes may be specified in their own fields. When more than one feature is selected, then this will be treated as an "AND" type search. For example, if Bath Tub and Hair Dryer are selected, then this will search for rooms that have both the Bath Tub and Hair Dryer as features of the room. If the FRONT DESK > FULL DESCRIPTION application parameter is active, hovering over this field displays the full description of the code values.
Smoking. If your property has smoking and non-smoking rooms, you can specify the appropriate code here. Select the down arrow to choose a smoking preference code for the rooms you wish to display on the room plan. If the FRONT DESK > FULL DESCRIPTION application parameter is active, hovering over this field displays the full description of the code values.
Assigned Rooms. Select this check box to display rooms that are assigned to guests. This check box is selected by default.
Unassigned Rooms. Select this check box to display rooms that are not assigned to guests. This check box will be selected by default if the Room Plan is called from the Detailed Availability screen with the Available radio button option selected.
Note: Unassigned rooms do not include rooms that are due out. Select the Due Out check box (an Advanced search option) to display rooms that are due out.
Partially Assigned Rooms. (Available when the General > Component Rooms application function is set to Y.) Select this check box to display component rooms that have not been assigned to guests but which have at least one of their individual room elements assigned to a guest. This check box is selected by default when coming from the Detailed Availability screen with the Occupied radio button option selected. This check box is helpful when viewing component rooms to determine how best the room assignments can be utilized for maximum revenue opportunities.
Owner Only Rooms. Available when the OPV_<version number> OPERA Vacation Ownership System license code is active, select this check box to display owner only rooms.
Vertical Zoom. Select this check box to display an expanded number or rooms (vertical display).
Horizontal Zoom. Select this check box to display an expanded range of dates (horizontal display).
Component Rooms. (Available when the General > Component Rooms application function is set to Y.) Select this check box to display component-room room numbers followed by an indented breakout of the individual room numbers in the component room. The Room and Room Type fields have a yellow background when the room is an element of a component room.
![]()
Note: The component room's room number itself may be an element of higher level component room, in which case its Room and Room Type will also have a yellow background.
Rental Units. Available when the OPV_<version number> OPERA Vacation Ownership System license code is active, select this check box to display rental units.
Select the Advanced button to display additional search options.
Room Status. Opens the List of Room Statuses screen to filter the displayed rooms by the desired status (Clean, Dirty, Inspected, Out of Service, Out of Order, or Pickup).
Due Out. Select this check box to display due out rooms. When this check box is not selected, due out rooms are included in the display along with rooms that meet your other filter criteria. When the Unassigned Rooms check box is also selected, unassigned rooms and due out rooms are shown on the grid.
Room Conditions. Available when the Rooms Management > Room Conditions application function is set to Y. Select this check box to list only rooms having a room condition assigned (including those with a room condition that is flagged "Do Not Display in Room Assignment"). When this check box is not selected, rooms having a room condition assigned are included in the display along with rooms that meet your other filter criteria.
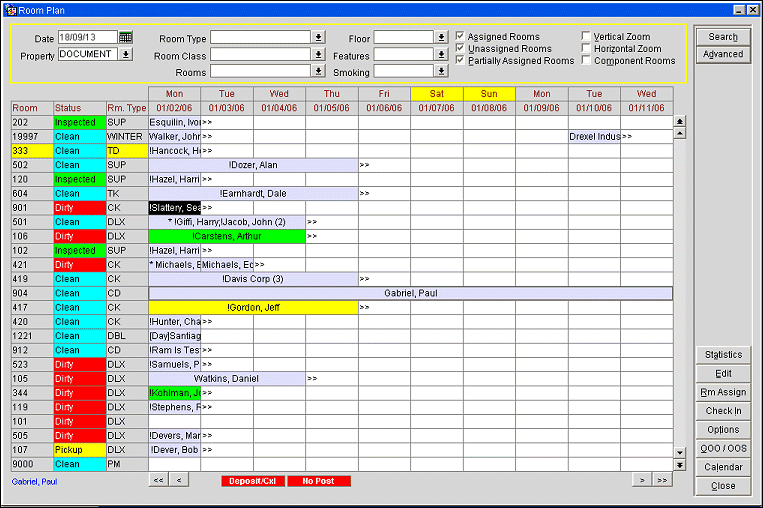
The Room Plan provides you with a view of the occupancy and the availability of rooms over a period of time. You can move the display up and down by using the Page Up and Page Down keys and the slide bar at the right of the grid. The <, <<, >, and >> buttons under the grid scroll the display left and right.
When you select a cell that is associated with a reservation, lamps appear in the lower part of the screen as appropriate for that reservation.
Each cell of the grid represents a day/room combination. One or more cells may be labeled showing the name of the guest holding a reservation for that room on that (or those) dates. If the reservation is for more than one guest, the number of guests is shown in parentheses following the name. Out of Order and Out of Service rooms are labeled with the OOO/OOS reason. Rooms that have a room condition code assigned to them (e.g., if the room is set aside for show or designated for some other property-specific purpose) are labeled with the room condition code and have a dotted background. Other grid symbols are described in Screen Symbol Explanations, below.
Reservation blocks may be color coded using a scheme set up by the property to signify reservation characteristics, market code, or VIP level, depending on the Reservations > Reservation Color Definition application setting. (Color code setup is described in Reservations Color Codes, VIP Levels, and Market Codes.
Note: When a guest is checking out on a given date and no other guest is blocked for that same room arriving on the same date, the Departure Date cell is displayed in the color based on the guest's assigned color, but only when the applicable grid box is displayed on the far left column of the grid.
For Example
Guest Elisa Dozer is Departing on 04/07
Viewing the reservation with the departure date for the reservation as the 2nd column in the grid. The departure date cell only contains >> to indicate that this is the departure date, but no color is populated.![]()
Viewing the reservation with the departure date for the reservation as the 1st column in the grid. The departure date cell displays the >> to indicate this is the departure date, but also displayed the color attached to the reservation.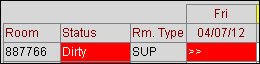
Columns of information include the following:
Room. Room number. Click on a room number to display a picture of the room along with room details. (See Room Picture and Description, below). Click on the column heading to reorder the display in numerical order.
On certain screens that display room numbers for selection when you are assigning a room (e.g., the Room Plan screen, Room Assignment screen and the Available Room Search screen), the default room display sequence is user definable through the Reservations>Room Display Order application setting:
In addition, when the Room Display Order is Back to Back Ascending or Back to Back Descending, the following rules determine the listing sequence:
These rules ensure that the sequence displays the rooms least likely to result in an occupancy gap first. If a gap cannot be avoided, then rooms with the longest gap are shown next because longer gaps can be filled by a greater combination of reservations.
When the OPV_<version number> OPERA Vacation Ownership license is active, the Reservations>Room Order Preference for Units application setting works in conjunction with the Reservations>Room Display Order application setting to determine if Units (room types with rotation) should display before or after non-unit rooms. If Rooms With Points First is selected for the Reservations>Room Order Preference for Units application setting, OPERA will first display the room types with Rotation Points first and these will be followed by those rooms without Rotation Points defined in the order set in the Reservations>Room Display Order application setting. If Rooms With Points Last is selected for the Reservations>Room Order Preference for Units application setting, OPERA will first display rooms without Rotation Points in the order set in the Room Display Order application setting followed then by those room types with Rotation Points.
O/R. Available when the OPV_<version number> OPERA Vacation Ownership System license code is active, this column displays "O" if this is an owner-only room, or an "R" is this room is part of the rental program.
Room Status. Housekeeping room status for the room. Click on the column heading to reorder the display alphabetically by room status.
Room Type. Room type. Click on a room type to display a full description of the room type and a picture of the room type. (See Room Picture and Description, below). Click on the column heading to reorder the display alphabetically by room type.
Note: If the Room and Room Type fields have a yellow background, the room is an element of a component room. Component room functionality is available when the General > Component Rooms application function is set to Y.
Date. Date and day of the week. Double click on a date to see the Property Calendar screen with that date highlighted.
Click in the Room Number or Room Type column to display a separate window that includes a picture and a description of the room or room type. The descriptive information on these screens is pulled from the Room Type screen and the Room Edit screen, respectively. If the FRONT DESK > FULL DESCRIPTION application parameter is active, the full description of the Room Feature and Smoking preference display at the bottom of the screen. See Image Maintenance screen for information on configuring room and room type images.
Note: A double click on the image will open the image full-size in a browser window.
Select the Statistics button to display an occupancy statistics grid in the lower part of the screen.

This grid shows the following information for each date.
Total Rooms Reserved. Number of rooms reserved.
Occupancy %. Occupancy rate: Number of Rooms Reserved divided by (Total Number of Physical Rooms minus OOS and OOO rooms) x 100.
Arrival Rooms. Number of rooms reserved for guests arriving on this date.
Stayovers. Number of rooms assigned to guests who will be in-house tonight. Includes Arrival Rooms for this date unless the reservation is Day Use.
Departure Rooms. Number of rooms assigned to guests whose departure date is this date.
Click in any Arrival Rooms, Stayovers, or Departure Rooms number (non-zero) cell to display the Reservation Search screen showing the reservations on which the number is based. From the Reservation Search screen you may edit reservations.
Note: The Reservation Search screen lists reservations for guests who do not have an assigned room and whose reservations are therefore not displayed on the Room Plan query, as well as reservations for guests who have an assigned room and whose reservations are displayed on the Room Plan query.
The Search area and all Search Criteria are inactive due to the fact that only reservations for that day need to be seen to coincide with the functionality at hand.
Button options provide convenient access the many commonly-used OPERA features.
Note: Availability of an option button depends on the contents of the cell where the cursor is positioned. For example, only cells that are associated with a reservation offer the Edit button and the Options button (Reservation Options); only blank cells offer the New button; only blank cells for the current date offer the Walk In button; and so on. But if you are only granted the Room Plan View user permission, then none of these options, including the drag and drop functionality will not be available. You have to be granted the Room Plan New/Edit in order to use the buttons and drag & drop functionality.
New. Takes you directly to a new Reservations screen. The room number and the arrival and departure dates for new reservation are auto-populated in the Reservation screen. When the Reservations > Profile Search Prior to New Reservation application parameter is active, then you will automatically be taken to the Profile Search screen to select a profile before making a reservation.
OK. OK is available when you begin a reservation from the Profile Search screen using the Resv button. Select the dates you want for the reservation, then select the OK button. Once you have completed a new reservation starting from the guest's Profile, and you return to the Room Plan screen, this button allows you to start another new reservation (for example, if you highlight the grid entry for the reservation you just completed, you can easily add a sharing reservation; or, if you select an empty grid block, you can create an entirely new reservation).
Edit. Takes you directly to the Reservations screen so you can view and/or edit the highlighted reservation.
Rm Assign. Available only if there are non-blocked reservations for the room type/date selected. Takes you directly to the Room Assignment screen and carries Arrival Date, Room Type, and Number of available nights over for the room number. The room number for this record can be auto-populated when assigned to a reservation via this option.
OOO/OOS. Takes you directly to the Out of Order/Service screen where you can set the OOO/OOS status for a selected room or rooms. The room number selected from the Room Plan screen automatically populates into the Room List field of the Out of Order/Service - New screen when this button is selected. The Out of Order feature is available when the Rooms Management > Out of Order application function is set to Y. The Out of Service feature is available when the Rooms Management > Out of Service application function is set to Y.
Note: The OOO/OOS button will only be available if a user has the required Rooms Management OOO or OOS permissions granted.
Walk-In. Available for the current date only. Navigates directly to a Reservations screen. The room number for this record is automatically loaded into the form. Use the Check In option to go directly to checking in the guest. When the Reservation > Reservation Flow application setting is set to Room Plan/Grid, walk-in reservations are prompted to be checked in and the Checked In Successfully prompt is displayed.
Note: When the application setting Reservations > Reservation Flow = Room Plan/Grid, the Walk In button on the Room Plan screen, depending on how the Room Plan screen is accessed, behaves the following ways:
CTRL + F3: When the current date is selected on the Room Plan grid, the Walk In button is active. Select the Walk In button to proceed with the reservation. When a future date is selected, the Walk In button toggles to a Check In button that is not active.
Reservations > New Reservation: When the current date is selected on the Room Plan grid, the Walk In button is not displayed. Select OK to proceed with the reservation.
Front Desk > Arrivals > Walk In: When the current date is selected on the Room Plan grid, the Walk In button is not displayed. Select OK to proceed with the Walk In reservation.
Calendar. Takes you directly to the Property Calendar screen, from which new reservations may be created.
Check In. Available for Due In guests only. Takes you directly to the Payment Method screen where method of payment can be entered. If a room condition exists for the room that the guest is being checked in to, then a message prompt is displayed that states "This room has a condition of <room condition>. Do you wish to continue?" Select Yes to continue with the check-in or select No to choose another room for the guest.
Note: When a user assigns a room through the Payment Method screen, and selects a room type that differs from the original room type of the reservation, this prompt will display “Room Type changed to XXX. Do you want to continue?" When selecting YES, the room type change will be treated as a free upgrade and the user will not be prompted with “Room Type has been changed to XXX. Do you want to change RTC to CLK?”. The RTC and Room Rate on the reservation will be saved with the original values.
Options. Display the Reservation Options menu for this reservation.
Note: When the General > Enhanced Options Management application parameter is set to Y, you have another way of quickly accessing options without selecting the Options button to open the Options menu itself. You can press Ctrl+T to display the blue Option field.
![]()
To view all the available options in alphabetical order, scroll through the options list by selecting the Up and Down arrow keys. Press Enter to select the displayed option and open the corresponding option screen. Or, instead of scrolling through the options list, type the first three letters of the desired option. The corresponding options screen appears. (For example, type c-a-n for Cancel.)
You may also enter the first letter of the desired option and all options beginning with that letter will appear in alphabetical order as you scroll. To scroll, use the arrow keys or repeatedly press the beginning letter key. For example, if you typed a-a-a-a you might scroll through the options of Accompanying, Add on, Agent/Company, Alerts. Press Enter to open the desired option.
Note: You may or may not be able to use the drag & drop functionality as this depends on which user permissions have been granted to you.
Reservations displayed in the grid body of the Room Plan screen support click and drag functionality. Here are some of the most-used drag and drop activities:
Room Move. Select the left mouse button on the block representing the guest's reservation. Holding down the mouse button, drag it to a vacant block representing another room and release the mouse button. OPERA will use the same availability checks and updates that also apply for guest transactions on the In House Search and Reservations screens. You will not be able to move a guest to an out-of-order room.
If the reservation was checked in, OPERA will ask whether the room status of the original guest room should be changed to dirty (DI). If your property works with the Inspected room status (when the Rooms Management > Use Inspected Status application function is set to Y), you will have the following possibilities:
If the status of the room from which you are moving the guest is Inspected (IS), the following options will be available:
If the status of the room from which you are moving the guest is Clean (CL), the following options will be available:
Invoices of checked in guests will be transferred to the new room automatically.
Note: If a room condition has been applied to the target room, you are prompted with a message: "This room has a condition of <condition description>. Do you wish to continue?" Select Yes to complete the move or select No to cancel the move.
Change of Room Type to Charge. When the Reservation > Room Type to Charge application parameter is set to Y, OPERA implements the addition of the RTC field on the Reservation screen. By using this field it is possible to have the reservation be inventoried on one room type, but charged as if it was another room type (the room type specified in the RTC field). When you drag a guest's reservation to a room which has a different room type, a prompt appears: "Room type has been changed to <new_room_type>. Do you want to change RTC to <new_room_type>?" Respond Yes to continue with the move and change the RTC to the new room type (Yes is the default). Respond No to continue with the move without changing the RTC from what appears on the Reservation screen. This feature is available only if the RTC on the Reservation screen matches the room type shown on the reservation prior to the move.
Moving an Arrival to a Room with a Scheduled Departure. OPERA allows you to move a reservation arriving on a given date to a room assigned to another reservation that is scheduled to depart on that same date. This does not affect the max occupancy set for the room because departures are not included in the calculation for the max occupancy.
Room Moves and Virtual Number Assignment. This functionality only applies if the property works with virtual number pools and the OPP VNS Virtual Numbers license code is active. When you move guests with virtual numbers to another room, using Front Desk > In House Guests > Options > Room Move or with Ctrl+F3, the system moved the virtual number from the phone pool to the target room.
Room Moves to a Vacant Room. If you move a guest to a vacant unshared room, OPERA will carry out the standard move functions such as changing the room status, updating availability etc., and then display the virtual number activity. If the target room is set up the same way, the system will move all numbers across, irrespective of whether or not the pool is room or guest-based. You can always see from the display what has happened. If the target room is set up differently, for instance not activated for the pager pool, then the action description for the source room will state that the virtual number was Unassigned and the action for the target room will read Room cannot have VN. When sharers are involved, the action depends on whether the pool is guest-based or room- based. For guest-based pools, virtual numbers will always follow the guest and be moved to the new room accordingly (always assuming the room is set up accordingly). When moving a sharer with room-based pool numbers, the virtual number will stay with the room. Accordingly, the action for the source room will read Stays in room. OPERA will either automatically assign a new virtual number for the target room, prompt the user to enter a number or continue without assigning a number, depending on the assignment rule of the pool.
Create a Share Reservation. When you drag one guest into a room which is already taken by another guest, you are creating a share reservation. OPERA will carry out a Combine Share operation and update the availability accordingly. When you drag a reservation to an occupied room, OPERA first prompts "Would you like to change the room for <name>?" If you reply Yes, the following message appears: "Room <nnn> is already occupied by <name> whose arrival date is <date> and departure date is <date>. A share will be created." Select Yes to create the share. The Share Confirmation screen appears, allowing you to confirm all share details. Select OK to close the Share Confirmation screen and return to the Room Plan. This popup message can be hidden so that it is not displayed at all (See Pop Up Blockers for details). If the message is selected to be hidden, the user only receives the "Room XXX is already booked by XXX whose arrival date is XXX and departure date is XXX" message and is not prompted to create a share.
Move Sharing Reservations / Break a Share. When you click on a share reservation (the * before the guest's name tells you that the reservation is sharing), the Share Guests screen appears.
This screen shows the names of all the guests who are part of this share, along with their arrival and departure dates. If you do not wish to move all sharers, unmark the X by the names of the guests which are not to be moved. (By default all sharers names are selected.) Then click OK. Continue dragging and the sharers you selected will be moved to the new room. The message "Do you want to change the room number from <nnn> to <nnn> for <names>?" appears. Reply Yes to complete the move.
Virtual Number Handling in Room Moves. Virtual number handling in room moves is straightforward with guest-based number pools. Virtual numbers will simply move along with the guest, always assuming the target room is set up the same way. However for room-based virtual pools the situation is different. If the target room has an assigned room-based virtual number, then the virtual number of the target room will also be applied to the guest moving into the room. The virtual number display will show Unassigned for the source room and Existing VN for the target room. If the moving guest had no previous virtual number assignment, then the screen will read No VN assigned for the source room and Existing VN for the target room.
If the target room has no assigned room-based virtual number and the moving guest also has no assignment, the standard assignment rules as configured for each pool will apply. The source room will display No VN assigned and OPERA will either automatically assign a new virtual number to the target room, prompt the user to enter a number or continue without assigning a number depending on the assignment rules. If a guest with a permanent number was checked into a room not set up for the respective virtual number pool, OPERA will attempt to re-assign this number with the room move. When conducting a room move from a pseudo room to an actual guest room OPERA will proceed in exactly the same manner as described in the situations above. Moving between pseudo rooms (except for PI or PY room types) will not bring up any dialogue boxes as these rooms cannot have virtual numbers.
Room Numbers Flagged as Do Not Move. A room may be flagged on the Reservation as DNM (Do No Move). When a room is flagged DNM the room that is assigned to the reservation may not be changed. (In addition, you may not change the room type, as this would unassign the room.) The Do Not Move functionality is in-effect until the guest checks in. Once the guest has checked in, the Do Not Move is cancelled and room moves may be performed for the guest as usual. If a guest has the Do Not Move option applied to the room number assigned to his reservation, a blue DNM indicator lamp appears when the reservation is highlighted. This guest's room number cannot be changed unless the DNM option is unselected on the Reservation screen. The drag and drop feature cannot be used to change the room for guests whose room number is flagged as Do Not Move. The Do Not Move option is available when the Reservations > Do Not Move Room application function is set to Y.
Reservation Date Changes. To change the stay dates for a reservation that has not yet checked in, select the left mouse button on the block representing the guest's reservation. Holding down the mouse button, drag it to a vacant block representing a future date (and different room, if desired) and release the mouse button. OPERA will use the same availability checks and updates that also apply for guest transactions on the Reservations screen. You will not be able to move a guest to an out-of-order room.
You may also select the left or right edge of a block to extend or shorten stay dates. You may not change the arrival date for already checked in reservations; you may not change the arrival date to a date earlier than the current business date. A prompt asks you to confirm the date change: "Do you want to change the arrival date/departure date from <date> to <date? for <guest name>?" If fixed charges apply to the reservation, a prompt asks you to "Please verify reservation's fixed charges."
When updating the dates of a reservation that has a specific Routing Instruction attached with a specific Begin and End date for the reservation, the "Reservation Dates have been changed, please verify existing Routing Instructions." message prompt is displayed for verification.
Note: When extending the departure date for a reservation that belongs to an elastic business block and the new departure date falls outside of the block dates, a prompt asks you if you want to extend the block dates to accommodate the reservation. Answer Yes to extend the block dates; answer No to leave the block dates and the reservation stay dates unchanged.
Note: When the Reservations > Refresh Rates for Extension Dates Only application parameter is set to Y, if a reservation is extended (new arrival date or new departure date), then the rates will be refreshed for only the additional dates that the reservation was extended by. See Refresh Rates for Extension Dates for details.
Room Moves to a Discrepant Room. When the Rooms Management > Discrepant Rooms application function is set to Y and the current reservation is assigned to or moved to a room with a discrepancy, which is when the Housekeeping status of the room differs from the Front Office status of the room, a message prompt is displayed. The messages states "Room XXX is <discrepant reason> discrepant? Do you want to continue?" Answer Yes to move the reservation and select No to choose another room.
Following is a list of the coding used on the Room Plan:
>> |
The guest identified in the gray cell to the left is expected to check out on this day. If the cell containing the guest's name is off the display to the left and the cell with the >> symbol is visible in the display, you may place your cursor over the cell to pop-up a hint showing the departing guest's name. |
[DAY] |
This is a day-use reservation. |
! |
This guest is in-house. |
* |
This guest is a member of a share. Click to see Sharing Guests screen. |
(n) |
Number in parentheses following guest name indicates the number of adults on the reservation if more than 1. |
Colored cell background |
Room has OOO or OOS condition code assigned. Depending on the setting for the Reservations > Reservation Color Definition application setting, displays the user defined color associated with the Reservation, Market Code, or VIP Level of a reservation. |
Dotted cell background |
Room has a room condition code assigned. |
Yellow Day column header background |
Weekend days. Any days defined as weekend days in the General > Weekend Days application settings. |
Yellow Room, Room Type background |
The room is an element of a component room. |
See Also