
|
|
|
Screen Painter Overview
OPERA's Screen painter functionality allows a property to customize certain screens throughout the system. Fields can be added, modified, or deleted and can be arranged in any order that better advantages the property. Also, when one screen is updated, this change can be updated to other screens with the click of a button.
Note: Screen Painter can also be accessed in ASP mode (for example, when OPERA is running in a hosted environment). See Screen Painter in ASP Mode for details.
Note: Screen painting can also be applied and copied to chains. See Applying Screen Painter to Chains.
Among many other things that can be accomplished by the screen painter, one of the advanced features is that it can apply auto conditions that allow for client specific "intelligence" to be added to OPERA through PL/SQL programming. All additions, modifications, or deletions in Screen Painter are recorded in the User Activity Log as Configuration>Activity Type CF_SCREEN_PAINTER.
Select Configuration>Setup>Screen Design>Screen Painter.
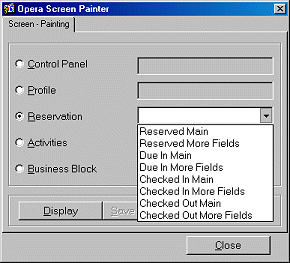
Select one of the radio buttons (Control Panel, Profile, Reservation, Activities, Business Block) to access the screen (form) to be painted. Some screens, such as the Reservation screen, will also have a form mode to select before the form is open.
Note: The specific screens and tabs available to Screen Painter are as follows: Control Panel (GNCTRL00); the Profile screen (PROFILE, CON_MAIN, and ACC_MAIN) main forms and More Fields tabs; the Reservation screen (RSEDIT) main form and More Fields tab; and, if the OPS/OPC <version number> Sales & Catering add-on license is active, the Activity and Business Block screens (ACT_MAIN and BOOKING).
Note: The following user definable LOV fields (character and numeric) are available for screen painting on the Reservation screen main and More Fields tabs: UDFC01 through UDFC40, and UDFN01 through UDFN40.
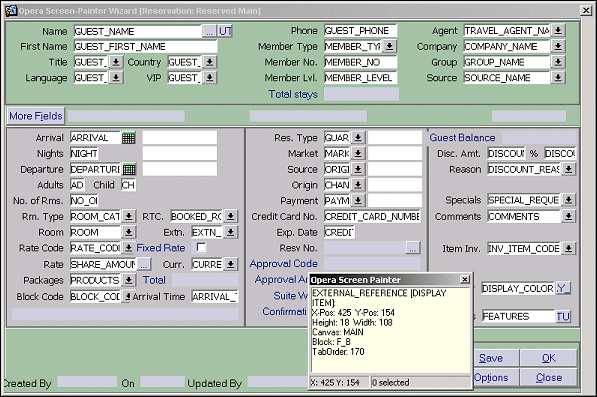
Once a specific form and mode is selected, the Screen Painting wizard program (ScreenWiz) will display a visual representation of the form, fields, prompts and other controls.
To delete a field, select it by clicking once with left mouse and press the Delete key.
Alternatively, a field can be modified and the visible check box unchecked to hide the field.
When clicking with the right mouse on a field, the field properties form will be displayed.
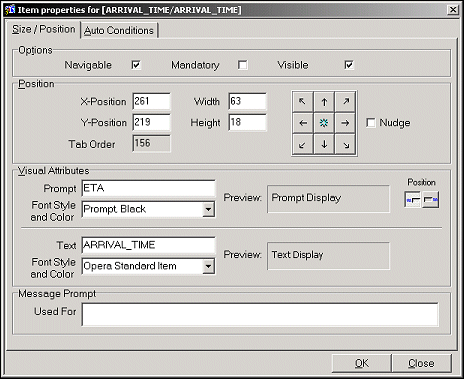
Navigable. If selected, this check box indicates the field is included in the tab order and is editable/updateable.
Mandatory. If selected, this check box indicates the field is mandatory. A value must exist to save the record.
Visible. If selected, this check box indicates the field is visible to the user. If unselected, this field is hidden.
Visual Attributes. The visual attributes for the Prompt and Text Display fields. They can be further defined with the font style and color List of Values. When changing the properties, the preview pane will show the resulting changes. Position allows for left or right alignment of the contents displayed in the text box.
Preview/Used For. Usually the same value as Prompt. The prompt text will be displayed during a pop up message if the field is mandatory and left empty rather than displaying the column name from the table.
Clicking with the right mouse on a blank area of the form will display the context menu.
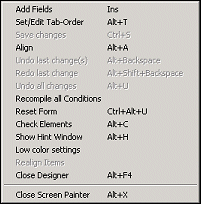
Add Field. Select from a field list that may be painted on this form. This includes all UDFs.
Set/Edit Tab Order. All fields are displayed that have been marked as navigable. The fields can be dragged into the required order or select more than one tab and move them all at once, hold down the Shift key while selecting all the tabs that need to be moved. When moving the tabs above or below what is displayed, the screen will automatically scroll.
Save Changes. Save all changes since the last save.
Align. Multiple fields can be selected by holding the Ctrl key. Selecting the align option displays a pad of 8 options to align the objects. Align Right Edges, Align Left Edges, Align Horizontally, Space Evenly, Horizontally.
Undo Last Change. Removes last edit.
Redo Last Change. Reinserts the last remove.
Undo All Changes. Returns the screen to layout since last save took place.
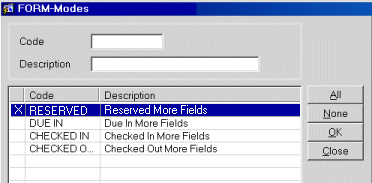
Reset Form. Be very careful with this option. Returns form to the default condition. This will remove all screen painting that has taken place on this form and reset to default. If the form consists of multiple modes (e.g., the Reservation screen), a multi-select list allows you to choose those modes of the form that should be reset.
To add a field, press the INS key or select from the Context Menu.
Note: When a new field is screen painted onto a screen, the tabbing order should be corrected within screen painter immediately following the addition as needed.
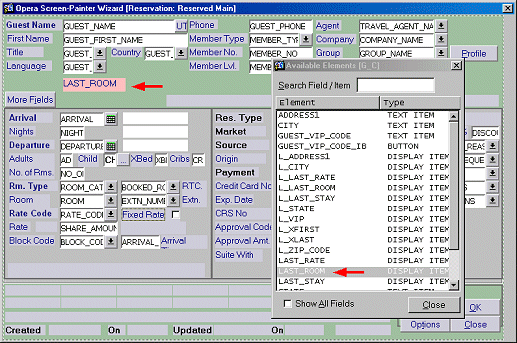
The required field can then be dragged from the list on the area of the required form. Select a field with the left mouse button and drag on the area of the form.
The properties of the field can then be modified by clicking the field with the right mouse button.
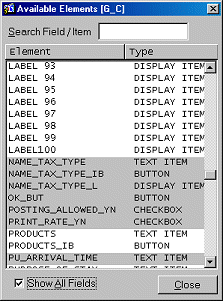
If checked, the Show All Fields check box on the Available Elements list will display the fields/elements that have already been painted on the form. These are shaded in grey within the list.
To create each group for the List of Values, select Configuration>Screen Design>List of Values Maintenance>List of Values Group Maintenance.
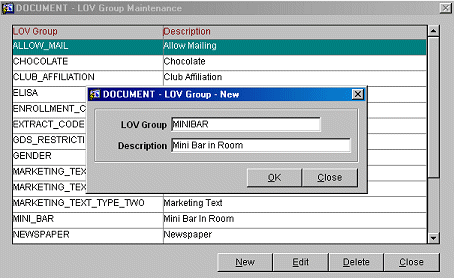
Create a New List of Values group code for the list you will be creating.
To create each code for the List of Values, select Configuration>Screen Design>List of Values Maintenance>List of Values Value Maintenance.

Create new entries for each of the values required for the List of Values. Select New to add new record.
Use codes of 1 or 2 characters where possible.
The next step is to create the query to retrieve the List of Values list when the user selects the control on the screen. Select Configuration>Setup>Data Definition.
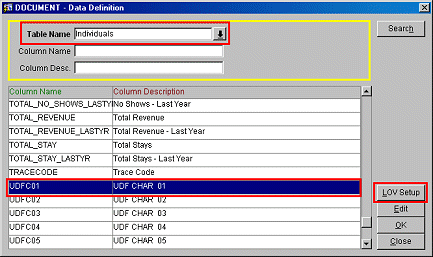
Select the table name and the corresponding field that you want to create a List of Values for.
Highlight the required field and select LOV Setup.
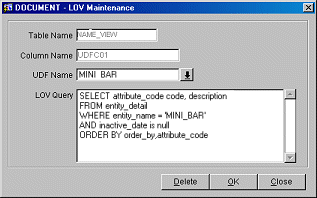
Select the UDF Name created from the available list. The required SQL will be generated by OPERA.
Select the OK button to save the changes and continue.
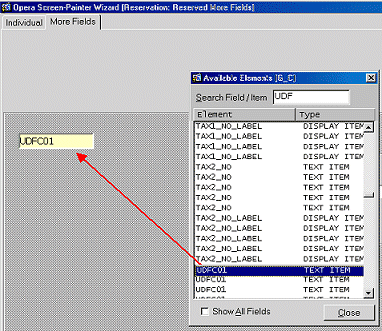
The final step is to paint the field and prompt (label) onto the required form within the Screen Painting Wizard. Select Configuration>Setup>Screen Design.
Select the required screen and mode.

Drag the appropriate UDF field onto the canvas with the mouse.
Right click in the new field to display the Item Properties screen.
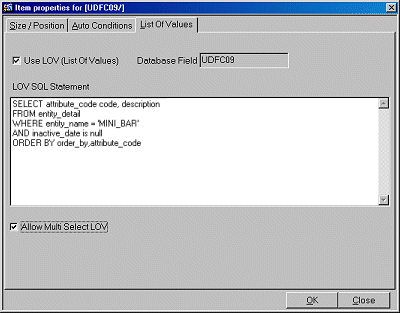
Select the Size/Position tab. Enter the name of the LOV in the Prompt field to label the list of values.
Select the List of Values tab and check the Use LOV checkbox. The required select statement will be entered automatically in the LOV SQL Statement text area. (See Manually Entering the LOV SQL Select Statement below if you are adding an LOV for a UDF that you have not previously configured in LOV Maintenance.)
Check the Allow Multi Select LOV check box to create a multi-pick List of Values.
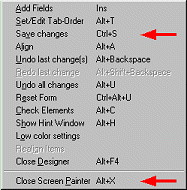
Right click on blank area of canvas and Save changes or press Ctrl+S to save changes to the screen.
Right click on a blank area of the canvas and exit Screen Painter, or press Ctrl+X to exit Screen Painter.
Access the screen and confirm that the changes are correct.
When saving changes, ScreenWiz will prompt you to select which modes these changes are to be saved to. You can select one or more screens to apply the changes by checking the left column (X) and selecting OK.
In most cases, you will create the LOV for any UDF you are planning to add to an OPERA screen before entering Screen Painter by using LOV Maintenance, as described above. If however, you add a UDF to the canvas which does not have an LOV configured for it, the Item Properties screen LOV SQL Statement text area will be blank and you will need to manually enter the appropriate SQL statements for the LOV you are adding. If you take this approach, it is assumed that you are familiar with SQL.
Keep the following in mind:
The SQL should select two columns. The first one will be the actual value that will be populated in the UDF field. The second column will be the description of that code which is used for display in the LOV.
Example of valid SQL
SELECT ATTRIBUTE_CODE, DESCRIPTION FROM ENTITY_DETAILWHERE ENTITY_NAME = 'UDFC07'ORDER BY ORDER_BY
Examples of invalid SQL
(1) Selects only one column
SELECT ATTRIBUTE_CODEFROM ENTITY_DETAILWHERE ENTITY_NAME = 'UDFC07'ORDER BY ORDER_BY
(2) Uses its own alias names
SELECT ATTRIBUTE_CODE char1, DESCRIPTION char2FROM ENTITY_DETAILWHERE ENTITY_NAME = 'UDFC07'ORDER BY ORDER_BY
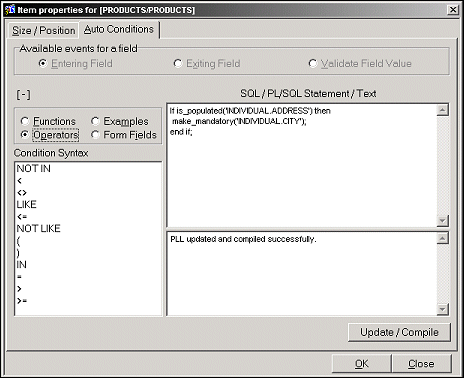
Auto conditions allow for client specific 'intelligence' to be added to OPERA through PL/SQL programming. PL/SQL programming allows for specific screen painting function to be referenced for the three event type fields that will occur of Entering, Exiting, and Validating.
Note: An Auto Condition on a Date Field cannot be set for Entering or Exiting the field - it must be set based on Validate Field Value. Generally, when using conditions to update other fields the Validate Field Value should be used.
Note: Auto Conditions can be defined for each field when screen painting profile address (PR_ADDRESS).
Entering Field. Auto-condition is activated when a user navigates to the field. This information is stored in the DYNAMIC_FIELDS table in the PRE_TEXT_ITEM_TRIG column.
Exiting Field. Auto-condition is activated when the a user navigates out of this field. This information is stored in the DYNAMIC_FIELDS table in the PRE_TEXT_ITEM_TRIG column.
Validate Field Value. Auto-condition is activated when the user has finished typing text into the field. This trigger is then used to check what information was entered against a pre-defined format. This information is stored in the DYNAMIC_FIELDS table in the PRE_TEXT_ITEM_TRIG column.
Both, the fields and labels, can be manipulated using the auto condition functionality.
GET_VALUE() |
GET_VALUE is used to get the value of another field on the form, so that it can be used for formatting or conditional manipulation. This function is used in conjunction with other functions, the most common being the SET_VALUE function. Syntax for the GET_VALUE function is as follows: get_value('<item_name>') <item_name> would then be a form field reference such as f_b.city. The available form fields can be listed via the radio button selection. Example. When a field is populated on the individual profile screen (in this case, the VIP Code), a check box (in this case Active) is automatically selected: IF GET_VALUE('INDIVIDUAL.VIP_CODE') = '3'THEN SET_VALUE('INDIVIDUAL.F_ACTIVE_YN,'Y'); ELSE SET_VALUE('INDIVIDUAL.F_ACTIVE_YN','N'); END IF; |
SET_VALUE() |
SET_VALUE is used to set the value of the field. Syntax for the SET_VALUE function is as follows: set_value('<item_name>','<value>'); <item_name> would then be a form field reference such as f_b.city. The available form fields can be listed via the radio button selection. Field defaults may be used to set a value for all new records created. This function is commonly used when a value is only set conditionally, based on the content/value of another field. So, it is often used in conjunction with the get_value() function. Example. Set the guest arrival times to the pickup time entered in the transport field. |
POP_MESSAGE() |
POP_MESSAGE is used to display a pop-up prompt message to the user. The syntax for the POP_MESSAGE function is as follows: pop_message('<text you want to display>'); Example. Pop up a message to appear within the reservation form to remind the user to offer a upsell for $50 per night during check-in. This message prompt should display as the user exits the departure date field. |
IS_POPULATED() |
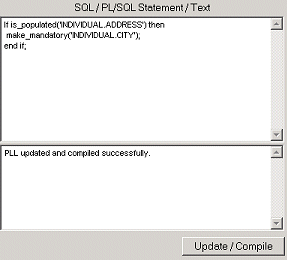
IS_POPULATED is used to check if there is a value in the field specified. This function returns a Boolean value of True or False. The syntax for the IS_POPULATED function is as follows: is_populated('<item_name>'); <item_name> would then be a form field reference such as f_b.city. The available form fields can be listed via the radio button selection. A common use for this function would be in conjunction with the PL/SQL IF-THEN-ELSE function. Example. If the address line 1 field is populated, then make the city field mandatory. |
IF-THEN-ELSE |
IF-THEN-ELSE is used to branch outcomes based on specific criteria. The syntax for the IF-THEN-ELSE function is as follows: if <condition1><operator><comparison_value> then <action>; A common use for this function is in conjunction with the functions listed above (and others available) to perform tests and specify specific outcomes for each test. Example. If the country code equals AU, then make the state code mandatory. |
CHANGE_THE_LOOK() |
CHANGE_THE_LOOK is used to change the color of the label/field. The syntax for the CHANGE_THE_LOOK function is as follows: change_the_look('<item_name>','lookname'); LOOKNAME=BLUE, YELLOW, BLACK, RED, GREEN Example. Change the look of UDFC15 to Blue. |
HIDE_ITEM() |
HIDE_ITEM is used to remove the display of a field or label. The syntax for this function is as follows: hide_item('<item_name'); <item name> would then be a form field reference such as f_b.city. The available form fields can be listed via the radio button selection. |
SHOW_ITEM() |
SHOW_ITEM is used to activate display of a field or label. The syntax for this function is as follows: show_item('<item_name>'); <item name> would then be a form field reference such as f_b.city. The available form fields can be listed via the radio button selection. |
MAKE_MANDATORY() |
MAKE_MANDATORY is used to force a value to be required for the field. The syntax for this function is as follows: make_mandatory('<item_name>'); <item name> would then be a form field reference such as f_b.city. The available form fields can be listed via the radio button selection. Example. If the rate code is wholesale, make the voucher field mandatory. |
SET_ITEM_PROPERTY() |
SET_ITEM_PROPERTY is used to format the value within the field. The syntax for this function is as follows: Example. Set the value in the passport field to uppercase. |
REFRESHSCREEN |
Repaints the screen and refreshes the field/label values. The syntax for this function is as follows: refreshscreen |
Condition Syntax |
Description |
NOT IN |
Negated List Match |
< |
Less Than |
<> |
Not Equal To |
LIKE |
Wildcard match using % for variable data like "%COR%" |
<= |
Less Than or Equal To |
NOT LIKE |
Negated Wildcard Match |
( |
Open Bracket |
) |
Close Bracket |
IN |
List match from values separated by commas in (LCORP1, NCORP1, NCORP2, NCORP3) |
= |
Equal To |
> |
Greater Than |
>= |
Greater Than or Equal To |
Button canvasses are not screen paintable. However, you may add auto conditions to validate the Save, OK, and Close buttons. To set conditions, right-click on the button. The Item Properties screen appears with the Auto Conditions tab displayed.
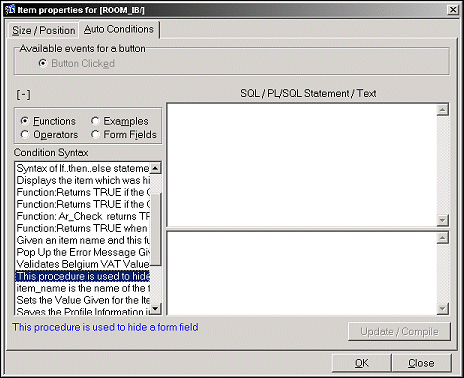
The Button Clicked radio button is selected and may not be unselected. In the text entry area, dd or update the SQL statements required to add validation when the button is selected.
When a code is added to an auto condition, it must be compiled by selecting the Update/Compile button. This checks that the syntax is correct and updates the code within the PLL/PLX runtime file for the form.
If multiple application servers exist, ensure that the resulting PLL/PLX files are copied to all of the correct application servers.
Copy the files into the \Runtimes folder for all of the application servers. These files must also be retained/restored in the event of an application server rebuild/reinstall. This is commonly performed for version upgrades to OPERA and Oracle iAS.
If the value of the rate code field starts with ‘WHL’, then make the UDFC15 field (voucher number) mandatory. |
If get_value(‘F_B.RATE_CODE’) like ‘WHL%’ then |
If the country code is equal to <list> and the state code is empty, then pop up a message to the user to select a valid state code. |
if get_value('acc_main.country_code') |
Format the passport field in |
set_item_property('Individual.Passport',CASE_RESTRICTION,UPPERCASE); |
If the pickup arrival time is recorded and the guest arrival time is empty, then set the value of the arrival time to the value of the pickup arrival time field. |
if get_value('F_B.PU_ARRIVAL_TIME') is not null and |
If address 1 is populated, then make city mandatory. |
If is_populated(' INDIVIDUAL.ADDRESS') then |
IF the membership type attached to the profile is ‘KPC’, then make the field UDFC32 null. |
DECLARE If name_in ('individual.MEMBERSHIP_TYPE') = 'KPC' then |
Pop up a message if a field equals a certain value. |
if Get_Value('INDIVIDUAL.UDFC32') not in ('Y',' ') and |
Pop up a message if the entered data is not in a particular set of values. |
if get_value('UDFN11') not in ('1','2','7','9') then |
If there is more than one owner attached to an account, show the ‘Owner’ field in yellow. |
Declare Cursor c1(in_name_id number) is account_view where name_id = in_name_id; Begin vOwners := 0; If vOwners >1 then |
Populate UDFs on a reservation from UDFs on the individual profile. |
declare cursor getProfileData(in_id number) is vudfc28 varchar2(200); begin vid := get_value('f_b.guest_name_id'); if get_value('f_b.udfc28') is null then if get_value('f_b.udfc27') is null then if get_value('f_b.udfc18') is null then if get_value('f_b.udfc17') is null then end; |
Copy the country code to the nationality field on the individual profile. |
if Get_Value('INDIVIDUAL.NATIONALITY_CODE') is null then |
On click of save button. Check the ‘save in history’ box based on whether an address is entered or not. |
if (Get_Value('INDIVIDUAL.ADDRESS') is not null |
Copy a UDF field from the reservation to a UDF in the individual profile. |
declare cursor getProfileData(in_id number) is vudfc27 varchar2(200); vid number; begin vid := get_value('f_b.guest_name_id'); update name set udfc29=vudfc27 where name_id=vid and udfc29 is null ; end; |
Update the VIP field based on the previous number of visits. |
DECLARE BEGIN if get_value( 'F_B.GUEST_VIP_CODE') is NULL and totstays > 4 then END; |
If room type does not equal the room type charged (comp upgrade), set the color of the RTC field to blue. |
if get_value('F_B.BOOKED_ROOM_CATEGORY_LABEL') <> change_the_look('F_B.BOOKED_ROOM_CATEGORY_LABEL','CYAN'); end if; |
Copy the value in the ID Number field into the Passport field. |
copy( name_in('individual.id_number'), 'individual.passport' ); |
See Also