
|
|
|
Activities Dashboard - Profiles and Itineraries
Profiles and itineraries (reservations and scheduled activities) can be created through the Activities Dashboard. In order to create an itinerary for a guest, a profile must be searched for and selected or a new profile must be created for the guest. Once the profile is selected, either a new or existing profile, a reservation can be made for the guest and activities scheduled.
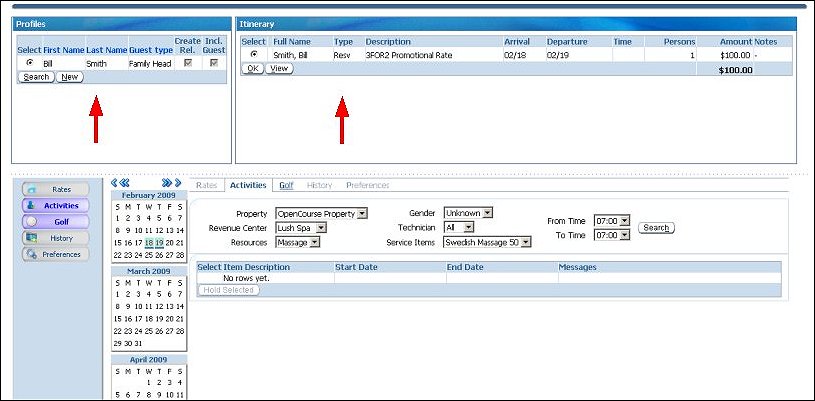
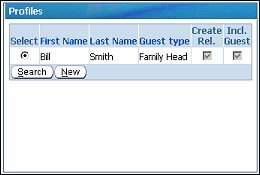
When you open the Activities Dashboard to create a new reservation and schedule activities, the Profiles area is where you will begin your work by either searching for an existing profile or creating a new profile and booking the reservation under the profile name. After a reservation is made, the Profiles grid will display the profile under which the reservation was made as well as any additional profiles that were attached to the reservation.
The first profile that is selected from the Profile Search screen will be the profile under which the reservation is made, and this profile will be displayed in the Profiles area as the "Family Head." Additional profiles can be created and attached to the reservation. These additional profiles will be displayed in the Profiles area as "Family Members."
The profiles grid features the following columns:
Select. Select the radio button in this column to work with a profile for purposes of scheduling activities for it. Once a reservation has been booked and a profile is selected in the Profiles grid, you can select either the Activities, Dining or Golf tab to schedule an activity for the selected profile.
First Name. Displays the first name of the profile. This column can be sorted by selecting its heading.
Last Name. Displays the last name of the profile. This column can be sorted by selecting its heading.
Guest type. Displays the guest type for the profile, which can be either "Family Head" or "Family Members." The Family Head guest type represents the profile under which the reservation was made. This column can be sorted by selecting its heading.
Create Rel. (selected by default) Select to create a relationship for the profile to the Family Head. This will create a "Family Member" to "Family Head" type relationship. If unselected, a relationship will not be created between the profiles; however, if a previous relationship exists, it will not be removed by unselecting this check box.
Note: Since the Family Head is the profile under which the reservation is made, this check box is not available for selection for the Family Head.
Incl. Guest. (selected by default) Select to include the profile as an accompanying guest on the reservation. When unselected, the profile will be removed from the reservation.
Note: Since the Family Head is the profile under which the reservation is made, this check box is not available for selection for the Family Head.
From the Profiles area, select the New button to open the New Profile screen and create a new profile. If a reservation has not yet been booked, once the new profile is created, it will be added to the Profiles area of the Dashboard as the "Family Head." However, if the reservation has already been booked under a Family Head, the new profile will be added to the Profiles area as a "Family Member."
Note: If a reservation has not yet been booked, the new profile that is created here will be the profile under which the reservation is made. This will be displayed in the Profiles grid as "Family Head." Any additional profile that is created will be displayed in the Profiles grid as a "Family Member."
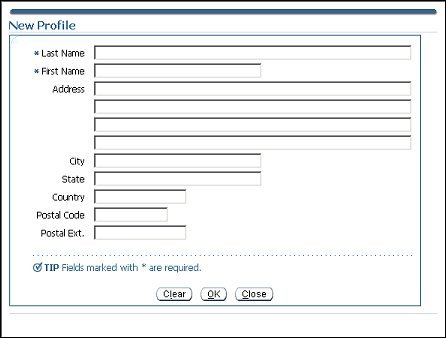
The New Profile screen features the following fields:
Last Name. (required) Enter the last name of the new profile.
First Name. (required) Enter the first name of the new profile.
Address. Enter the address of the new profile.
City. Enter the city of the new profile.
State. Enter the state of the new profile.
Country. Enter the country of the new profile.
Postal Code. Enter the postal code of the new profile.
Postal Ext. Enter the postal extension of the new profile.
Clear. Select to clear all fields.
OK. Select to save the new profile and add it to the Profiles grid.
In addition to creating new profiles, you can search for existing profiles. To search for an existing profile, select the Search button to open the Profile Search screen. If the reservation has not yet been booked, any profile that is selected from the Profile Search screen will be loaded into the Profiles grid and displayed as the "Family Head." This profile will be the profile under which the reservation is made. If a reservation has already been booked and a profile is selected from the Profile Search screen, this profile will be added to the Profiles grid and displayed as a "Family Member." This is the case with any additional profiles that are selected.
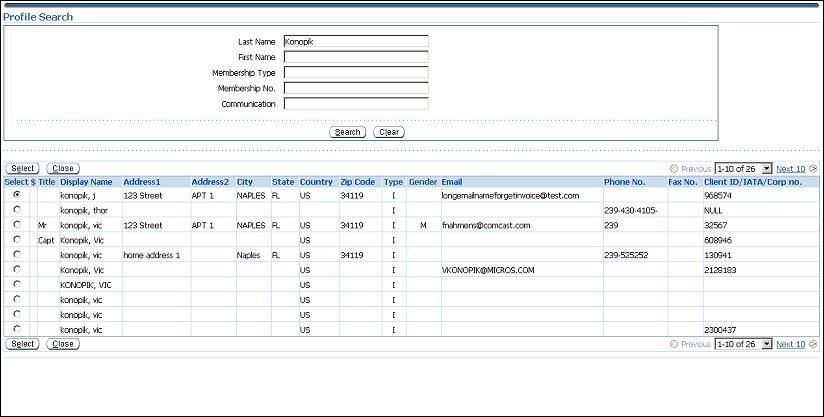
Enter the search criteria that you want to filer by and select the Search button to display results.
Last Name. Enter the last name of the profile you want to search.
First Name. Enter the first name of the profile you want to search.
Membership Type. If the profile that you are searching for has a membership type, enter the membership type.
Membership No. If the profile that you are searching for has a membership number, enter the membership number.
Communication. Enter a method of communication in this field to filter results by a method of communication, such as a phone number or email address.
Search. Select to begin search and display results in the search results grid.
Clear. Select to clear all search criteria fields.
To move to the next group of 10 records or to view all records, select the down arrow and choose an option from the Previous drop-down list located both directly above and below the search results grid. You can also select the Next 10 link next to this field to go to the next 10 records or the Previous link to go to the previous 10 records.
Select. Select the radio button in this column next to the profile you want to attach to the reservation. Select the Select button to attach the profile to the reservation.
Title. The title for the profile, such as Sir, Mr., Ms., etc., is displayed in this column.
Display Name. The display name for the profile is shown in this column. This column can be sorted by selecting its heading.
Address 1. Address 1 for the profile is displayed in this column. This column can be sorted by selecting its heading.
Address 2. Address 2 for the profile is displayed in this column. This column can be sorted by selecting its heading.
City. The city for the profile is displayed in this column. This column can be sorted by selecting its heading.
State. The state for the profile is displayed in this column. This column can be sorted by selecting its heading.
Country. The country for the profile is displayed in this column. This column can be sorted by selecting its heading.
Zip Code. The zip code for the profile is displayed in this column. This column can be sorted by selecting its heading.
Type. The type for the profile is displayed in this column. This column can be sorted by selecting its heading.
Gender. The gender for the profile is displayed in this column. This column can be sorted by selecting its heading.
Email. The email for the profile is displayed in this column. This column can be sorted by selecting its heading.
Phone No. The phone number for the profile. This column can be sorted by selecting its heading.
Fax No. The fax number for the profile. This column can be sorted by selecting its heading.
Client ID/IATA/Corp. no. The client ID, IATA or corporation number for the profile.
Select. Select to attach a profile to the reservation that has the radio button next to it selected. If a reservation has not yet been booked, select to book a reservation under the selected profile. This column can be sorted by selecting its heading.
Close. Select to close the Profile Search screen.
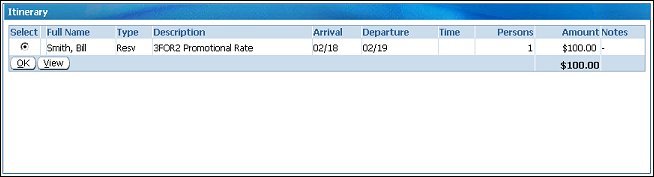
The Itinerary area of the Activities Scheduler features a grid displaying the reservation and all of the scheduled activities for the reservation. After a reservation is made, it will be displayed in the Itinerary grid under the Family Head profile. Any activities that are scheduled for profiles will also be displayed in the Itinerary grid. Each individual profile's scheduled activities will be displayed.
The Itinerary grid features the following columns:
Select. Select the radio button next to the reservation or activity in order to confirm the reservation. You will go to the Reservation screen where the rest of the reservation can be completed.
Full Name. The full name of the profile under which the reservation or activity is booked will display in this column.
Type. The type of activity will display in this column, such as dinning, gulf, massage, or Resv if it is the reservation.
Description. A brief description of the activity will display in this column. If it is the reservation, the rate code for the reservation will display.
Arrival. The arrival time for the reservation or start time for the activity will display in this column.
Departure. The departure time for the reservation or the end time for the activity will display in this column.
Time. The begin and end times for the activity.
Persons. The number of persons for the reservation or activity will display in this column.
Amount. The amount for the reservation or activity will display in this column. The total amount for the reservation and all activities will display under this column at the bottom of the grid.
Notes. Any notes attached to the reservation or activity will display in this column.
OK. Select to confirm the scheduled activity or to finish booking the reservation.
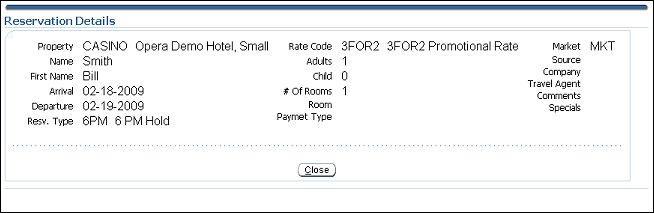
View. Select to view the details of the reservation. The Reservation Details screen will open.
See Also