AR Applying Payments
To apply payments to an invoice, highlight the invoice on the Account Maintenance screen and select the Payment button. The Payment button is only available when you select an invoice having an outstanding balance.
Note: When Payments are Applied to an AR Account, this is recorded in the Accounts Receivable Activity Group of the User Activity Log and contains the following details:
- Invoice Number
- Account Name
- Account Number
- Payment Type
- Original Open Amount
- Transaction(s) Applied and amount
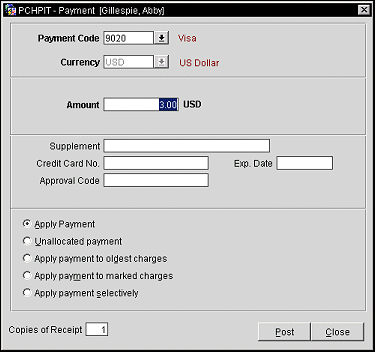
The Payment screen appears, with the Amount field showing the amount of the invoice you selected.

The Payment screen displays the following fields, depending on the method of payment.
Payment Code. The transaction code for the method of payment being used. Select the down arrow to display the Payment Code list of values. Options typically include:
Note: When the credit card interface has the Enable Resend check box selected in its configuration (see Understanding the General Tabbed Area for details), if a credit card payment fails to post to OPERA because of a disruptive event, such as a session disconnect or an error occurred before the posting could be made, and the settlement was sent to the interface, then OPERA will check on the posting when the reservation is accessed again. When the reservation is accessed, OPERA searches for any payments that were sent to the interface, but not posted to OPERA. These postings will then be resent to OPERA from the interface.
An AR Posting is checked if it is pending or not from the following different points in OPERA:
- Accessing an AR Account on the Account Maintenance (ARPOSTDET) screen.
- Prior to generating an AR Reminder for an account from the Generate AR Reminders (ARREMINDER) screen.
- Prior to generating an AR Statement for an account on the Statement (ARBATCH) screen.
(Your complete list of payment types is configured in Configuration>Cashiering>Payment Types.)
The description of the code displays to the right of the field.
Currency. The currency code for the currency being used to pay the account. The local currency for this property is shown by default. The description of the currency code displays to the right of the field. For cash or check payments you may select a new currency from the Currency list of values. For payment methods other than cash or check, or if the Cashiering>Foreign Currency Handling application function is not enabled at this property, this field may not be changed.
Amount. Enter the amount of the payment in the currency selected in the Currency field. If a currency other than the local currency is selected for payment, the exchange rate between the selected foreign currency and the local currency is displayed to the right of the amount.
When a negative number is entered, the Reference field becomes mandatory and at least a 6 character reference must be entered when the Cashiering>Mandatory Reference for Negative Payment application parameter is set to Y for any payment type, including credit cards. But, the Reference field is also mandatory for a negative credit card payment when the Cashiering>Credit Card Rebate Validation application parameter is set to Y.
Supplement Info. Enter a comment relevant to the payment being entered.
Reference. Enter any reference information relevant to the payment being entered. This field becomes mandatory and at least a 6 character reference must be entered when the Cashiering>Mandatory Reference for Negative Payment application parameter is set to Y and a negative payment amount is entered for any payment type, including credit cards. But, this field is also mandatory for a negative credit card payment when the Cashiering>Credit Card Rebate Validation application parameter is set to Y.
Credit Card No. For credit card payments, enter the credit card number. The default is the credit card number provided on the AR account profile. You may enter a different credit card number, if you wish. OPERA verifies that the number you enter is valid.
Note: For security reasons, if a credit card is swiped with the cursor in this field, the information associated with the credit card is initially displayed as a series of asterisks. This is also true if you manually type a credit card number beginning with a % sign (e.g., %9238...). The asterisks will resolve to the masked credit card number or to the actual credit card number if the user has been granted the Reservation>Credit Card Information View permission.
Expiry Date. For credit card payments, enter the credit card expiration month and year. The default is the credit card expiration date provided or the credit card on the AR account profile.
Approval Code. Displayed when the Online Credit Card Settlement is active for credit cards and the AR>External Auth CC AR Payment application function is active. The Approval Code field allows a user to enter a manual authorization code for the credit card payment. If a code is entered here, it is then sent along with the payment information to the bank for processing and will not require additional authorization when posting the payment.
Reference. Enter any reference information relevant to the payment being entered. This field is not available when the Payment Code is selected as a credit card type.
The following options are available for applying payments to an account. Provide the requested information and select Post to post the payment.
Note: When the OPV_<version number> OPERA Vacation Ownership license is active, only the Unallocated Payment option will be active.
Note: These options will not be available if the last AR invoice transaction date month/year (MM/YY) falls on the current business date month/year.
Apply Payment. This option is selected by default. The amount will be applied to the invoice highlighted on the AR Account screen.
Unallocated Payment. Apply credit to the account at large. For information on later applying these payments, see Applying Unallocated Payments, below.
Apply Payment to Oldest Charges. The payment will be applied to whichever outstanding invoice has the earliest date. If the amount of the payment is greater than the outstanding amount of the oldest invoice, the remainder of the payment will be applied to the next oldest invoice which has an outstanding balance, and so on, until the payment is completely allocated. Any remaining payment amount will be credited to the account as an unallocated payment.
Apply Payment to Marked Charges. This option is automatically selected if you marked two or more invoices to which to apply the payment prior to selecting the Payment button. The payment will be equally divided among the invoices you marked. When you select more than one invoice for payment, the total outstanding for all selected invoices is shown in the Payment screen Amount field. If the amount is changed to less than the total of all selected invoices, the payment will be applied to the greatest outstanding balance. If there is any part of the payment remaining after the greatest outstanding balance is paid, it will be applied to the next largest outstanding balance, and so on. If the payment is larger than the total outstanding balance on the selected invoices, the remainder will be applied to the account at large.
Apply Payment Selectively. This option lets you see a list of open invoices so that you can select those to which you wish to apply payment, and the applicable portion of the payment. See Applying Payment Selectively, below.
Copies of Receipt. The Cashiering>Print Receipt application setting determines the options available to you for printing receipts. The settings are:
Always - (This is the default.) Always create and print a receipt. The Copies of Receipt field allows you to specify the number of copies of the receipt you wish to print. The default is 1. When you select the Post button, the payment is posted and one or more receipts are printed.
Note: If the Cashiering>Print Receipt application setting is set to Always, a payment receipt will not be generated for payments made to the direct bill Payment Code (that is payments associated with the transaction code specified by the Cashiering>AR Settlement Trn Code application setting).
Ask To Print - You have the option of printing or not printing a receipt. If you wish to print one or receipts, enter the number of copies in the Copies of Receipt field. The default is 1. When you select the Post button, you will be prompted to indicate whether you wish to print a receipt. Select Yes or No. The payment will be posted and, if you responded Yes to the Print prompt, one or more receipts will be printed.
Do Not Print - Never print a receipt. The Copies of Receipt field will not appear on the screen. When you select the Post button, the payment is posted but no receipt is printed.
Note: Payment receipts can be printed in the guest's language as specified on the guest's profile if the General>Profile Language application function is set to Y. You must also have set up payment receipt reports in the appropriate languages and associated each with a language (see System Configuration>Setup>Report Setup).
You are given an opportunity to apply payments to invoices selectively when you are applying new payments to the account; or when you are applying existing unallocated payments to specific invoices (see Applying Unallocated Payments, below).
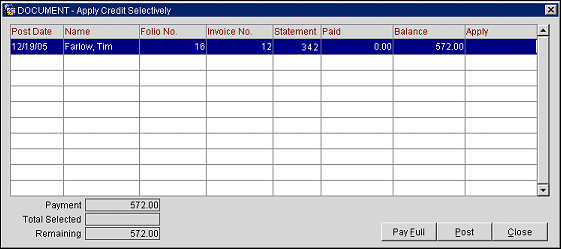
In either situation, the Apply Credit Selectively screen appears.

The screen shows the following information:
Post Date. The date when the invoice was posted.
Name. The guest in whose name the reservation was made.
Folio No. Folio number.
Invoice No. Invoice number.
Statement. Statement number. Available when the AR>Statement Numbering application function is set to Y.
Paid. The amount paid on the invoice to date.
Balance. The outstanding balance on the invoice.
Apply. Highlight the invoice record to which you wish to apply payment and directly enter the amount you wish to apply to the invoice in this field.
Note: When posting a payment in an AR Account using a foreign currency and selecting to apply this payment selectively to different invoices, the foreign currency amount is first converted to the local currency amount and then the local currency amount is the one that will be available for applying to the invoices.
As you enter amount(s) in the Apply field for each invoice, the following fields in the lower part of the screen track the allocation of the payment:
Payment. The total amount of the payment being applied to invoices.
Total Selected. The total amount of the payment applied to invoices so far.
Remaining. The amount of the total payment remaining to be applied.
If the remaining amount is sufficient to pay the invoice in full, the Pay Full button becomes available when that invoice is highlighted. Select this button to enter the full amount of the highlighted invoice in the Apply field.
When you are finished allocating the payment to one or more of the listed invoices, select the Post button. Any portion of the payment not applied to an invoice will remain as an unallocated payment.
Unallocated payments or unallocated portions of payments continue to be displayed on the Account Maintenance screen. If the AR >Unallocated Payment on Reminder application parameter is set to Y, unallocated payments will be shown as credits reported to account holders on reminder letters.
If the account includes unallocated payments, you may apply those payments to selected invoices or to the oldest invoice(s).
If you wish to apply one or more unallocated payments to a specific invoice, mark both the unallocated payment(s) and the invoice with an X in the X column of the Account Maintenance screen. When you select the Payment button, the payment or payments are immediately applied to the selected invoice. If the total payment applied is greater than the outstanding balance of the invoice, an unallocated payment will remain, containing the overage.
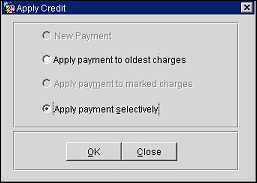
If you wish to apply an unallocated payment to more than one selected invoice, or if you wish to apply an unallocated payment to the oldest invoice(s) (when doing this, only one unallocated payment may be applied at a time), mark the payment you wish to allocate from the Account Maintenance screen. Select the Payment button. The Apply Credit screen appears.
Note: When Unallocated Payments are Applied to an AR Account, this is recorded in the Accounts Receivable Activity Group of the User Activity Log and contains the following details:
- Invoice Number
- Account Name
- Account Number
- Payment Type
- Original Open Amount
- Unallocated Transaction(s) Applied and amount

The following options are available. Make a selection and click OK to proceed.
Apply Payment to Oldest Charges. The unallocated payment will be applied to whichever invoice has the earliest date. If the amount of the payment is greater than the outstanding amount on the oldest invoice, the remainder of the payment will be applied to the next oldest invoice which has an outstanding balance, and so on.
Apply Payment Selectively. Select this option if you decide to apply the payment selectively to one or more invoices. (See Applying Payment Selectively, above.)
To unapply one or more payments made to an invoice on today's business date, highlight the invoice to which the payment(s) were applied and select the Unapply option from the Account Maintenance screen right-click Quick Menu. The Unapply screen appears.
Note: When Payments are Unapplied to an AR Account, this is recorded in the Accounts Receivable Activity Group of the User Activity Log and contains the following details:
- Invoice Number
- Account Name
- Account Number
- Payment Type
- Original Open Amount
- Transaction(s) Unapplied and amount

Select the payment(s) you wish to unapply. If you are unapplying one payment, you may highlight that payment then select the Unapply button. To unapply two or more payments, click in the X column to mark the payments you wish to unapply, then select the Unapply button. To unapply all payments listed on the Unapply screen, select the Unapply All button.
The following fields are available on this screen:
X. An X in this column indicates that the payment is selected to be unapplied. Click in the X column to select the record. Or you may select the record by highlighting it and selecting the spacebar. If you are choosing only one record for a function, you may simply highlight the record without placing an X in this column.
Invoice. The number of the invoice to which the payment was applied, if applicable.
Type. How the payment was entered into the OPERA system. (O = Old Balance Entry; P = Posting; CO = Check Out; ECO = Early Check Out).
Transaction Code. The transaction code for the payment method.
Description. Description of the payment method transaction code.
Posting Date. The date on which the payment was posted.
Amount. The amount of the payment.
Applied Amount. The amount of the payment applied to the current invoice. (The payment may have been split between invoices, with only part being applied to the current invoice.)
Reference. Reference information for this payment. The credit card number appears here if a credit card was used for payment.
Once unapplied from the current invoice, the payment may be applied to another invoice, left as an unallocated payment, or transferred to another account.
To "undo" a payment that has been applied to the account, select the Payments Only check box on the Account Maintenance screen to search for and display payments made to the account. Mark the payment you wish to reverse with an X in the X column and select the Reverse Payment option from the Account Maintenance screen right-click Quick Menu. A reverse payment transaction will be added to the account.
Note: When Payments are Reversed for an AR Account, this is recorded in the Accounts Receivable Activity Group of the User Activity Log and contains the following details:
- Account Name
- Account Number
- Payment Type being Reversed
- Original Open Amount
See Also