Configuring the Concept Interface for OXI
Note: No functionality is used here; we only require this to exist.
- Go to OXI and select the Interface down arrow and choose the CONCEPT interface from the list of values.
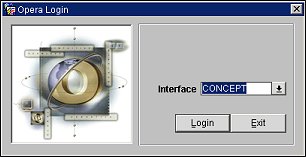
- Select the Login button.
- To configure the Concept interface, go to menu option Interface Configuration>New Interface. The New Interface Setup screen will open.
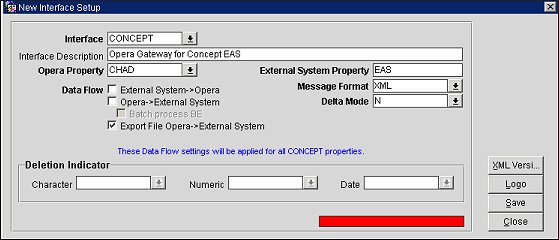
- Select the Interface down arrow and choose the CONCEPT interface from the list of values.
Note: All existing interfaces (in the currently installed release) will display.
- Select the Opera Property down arrow and choose your property from the list of values.
Note: All existing properties (in your schema) will display
- In the External System Property field, enter "EAS." This is the external system ID configured for this interface.
- Select the Message Format down arrow and choose "XML" from the list of values. This is the message format used by the Concept interface.
- For Data Flow, select the Export File Opera->External System check box.
- Select the Delta Mode down arrow and choose N. This is set to N so that Concept will always send the entire message for changes. This is called a "full overlay" of data.
Note: As a precaution, Delta Mode must be set to N as only full overlay works for profile changes.
- Select Save.
