
|
|
|
Reports
Reports are a valuable tool for managing, tracking and analyzing OPERA data. To view OPERA reports, select Miscellaneous>Reports from the OPERA main menu. The Reports screen appears. (The Reports screen also appears when you select the Print button from the Profile screen Options menu for company, travel agent, source, and contact type.)
At the Reports screen, you can:
When the application function General>Stream Reporting is active, reports can be sent directly from the print server for multiple purposes, including email, fax, client printing and direct printing. Refer to Stream Reporting for more details.
OPERA ships with a number of predefined standard reports, each containing a descriptive Report Name (e.g., Deposit Activity Report) in an REP format (e.g., deposit_activity). Both the Report Name and REP Name are displayed in a grid on the Reports screen for easy identification.
Users at individual properties (using PMS) and those at a central reservation office (using ORS) can change a sample report title and other details. If a title is changed, the new name appears in the Report Name column on the Reports screen.
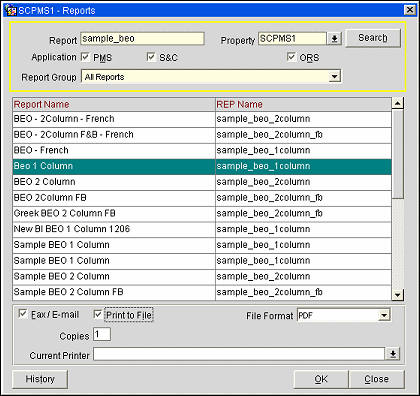
To search for a report, enter your search criteria and select the Search button:
Property. Select the down arrow to choose the property from which you wish to select a report. This feature is available if the OPP_MHOT Multi-Property PMS add-on license is active.
Report. Enter the report file (REP) name (e.g., creditcard_history, deposit_activity, etc.) or the report descriptive name (e.g., Credit History Report, Deposit Activity Report) to search for a specific report.
Application. Select the check box or boxes that correspond to the applications for which you wish to locate reports. All licensed applications are selected by default. When you select the Print button from the Profile screen Options menu, the Application check boxes are not available; the application is automatically determined by the OPERA product with which you are working when you selected the Print option.
Report Group. Select the down arrow to filter the search results by the report group (e.g., Accounts Receivable, Financial, Profiles, etc.) in which you are interested. All report groups are shown by default.
Note: When you select the Print button from the Profile screen Options menu, the Report Group filter is not available; the group is automatically determined by the type of profile from which you selected the Print option.
OK. When a report is highlighted and you select OK (or double click on the report name), an individual report options screen appears. From this screen you have an opportunity to select more display options, filters, and ranges for the selected report. You can preview the report and/or print hard copy in addition to faxing, e-mailing, and creating an output file.
When the OPR <version number> ORS license code is active: When a report is highlighted and you select OK (or double click on the report name), you have an opportunity to select a specific property or multiple properties from within the CRO for which you want the report. If only one property is assigned to the CRO, you are not presented with this option and the report automatically prints information for the single property. Additionally, a report options screen appears where you can select more display options, filters, and ranges for the selected report. You can preview the report and/or print hard copy in addition to faxing, e-mailing, and creating an output file.
Each report offers you the option to fax or e-mail the report output to one or more recipients, or to print the output to a file. Set up the generic output functionality here.
Fax/E-mail. (Permission Controlled by User) Automatically selects the Print to File check box. You may then select the appropriate file format. If you are e-mailing the report, the file will be attached to an email message (e.g., as a PDF or HTML file. If you are faxing the report, the file will be rendered in the selected format and the image will be faxed. When faxing or e-mailing a report, you can select the recipient from existing profiles or create a new recipient. See Email/Fax Destination for details.
Print to File. (Permission Controlled by User) Exports a report in your choice of the following file formats. HTML, PDF, RTF, Delimited, Delimited Data, XML, or Spreadsheet. If you select Delimited or Delimited Data, you are prompted to select the field delimiter character you wish to use (e.g., comma, tab).
Copies. Enter the number of copies for printed reports. By default, the number of copies specified in the Report Setup appears here. The minimum number of copies is 1. You may change the number of copies before printing the report.
Current Printer. Select the down arrow to choose the printer for printed reports. By default, the reports printer that was set up for the current workstation in Configuration>Setup>Workstations>Print Tasks appears here. Select another printer from the drop down list, if desired.
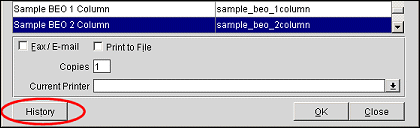
History. When the General>Report Scheduler application function is set to Y, this option takes you to the reports component of the Report Scheduler screen. When you select the History button from the Reports screen, the Reports Scheduler displays the history details of the highlighted report on the Reports screen. For more details on viewing report history, see Reports Scheduler.
Note: When printing and displaying currency information in reports, currency-related fields will, in general, display up to 16 characters (including commas, periods or other punctuation). The 16-character space made available for currency information in PMS report layouts is based on the use of the Arial Unicode MS font and report generation in PDF format (and not HTML, text, etc.). Also note that use of the Arial Unicode MS font, which is provided with OPERA installations, may be changed by the property via app server settings; doing so may modify the number of characters supported by currency fields.
When running a report in the currency configured for the property, if the reservation/block are in the configured currency, then this is the currency that is displayed on the report. But if the reservation/block is in a foreign currency, the foreign revenue will be converted based on the current date, the fixed rate at check-in, the fixed rate when the reservation is created, or the fixed rate when the block is created. The following is an example that will show the functionality in more detail:
The following elements will be considered:
Currency Code
Exchange Rate Flag and Exchange Date
Current Date - Exchange Date remains blank.
Fixed at Check In - Exchange date remains blank until the reservation is checked in in which the exchange date will be updated with the check in date.
Fixed at Reservation - Exchange date is the reservation creation date.
Fixed at Block - Exchange date is the block creation date.
Revenue Amounts in Foreign Currency
Exchange Date
1. If it is Fixed at Reservation or Fixed at Block then the revenue amounts will be in the local currency if the exchange date is less than the current business date. If the exchange date is the current business date, then the foreign currency amounts will be converted to the local currency.
2. If it is the Current Date, the foreign currency amounts will be converted to the local currency using the current business date as the exchange date.
3. If it is Fixed at Check In and the guest is checked in, then Option 1 above is used. If it is Fixed at Check In and the guest is not checked in, then Option 2 will be used.
When running a report in a foreign currency, if the reservation/block is in the local currency, it will be converted into the local currency. But if the reservation/block are in the same foreign currency as the report, then no conversion is necessary. And, if the reservation/block is in a different foreign currency than the report is, then the reservation/block currency is converted based on the current date, the fixed rate at check- in, the fixed rate when the reservation is created, or the fixed rate when the block is created. The following is an example that will show the functionality in more detail:
The following elements will be considered:
Currency Code
Exchange Rate Flag and Exchange Date
Current Date - Exchange Date remains blank.
Fixed at Check In - Exchange date remains blank until the reservation is checked in in which the exchange date will be updated with the check in date.
Fixed at Reservation - Exchange date is the reservation creation date.
Fixed at Block - Exchange date is the block creation date.
Revenue Amounts in Foreign Currency
Exchange Date
1. If the currency code of the reservation is the same as the one for the report, the foreign currency amounts will be taken.
2. If the currency code of the reservation is in the local currency, then the currency will be converted to the report currency using the exchange rate of each individual reservation date.
3. I the reservation is in a different foreign currency than the report currency, then the revenue amounts will directly be converted into the report currency using the exchange date.
OPERA stores the record-selection criteria with a report. Each time you run the report, OPERA retrieves the selected set of data records. You can select different records to run your report by specifying a new value, or run a report with all of the data records in the data source. Reports associated with a Report Form will display no parameter information.
Parameter Label. Database field name, or a placeholder for data that might change in a report.
Default Value. Alpha or numeric data filter.
Current Value. Same value as the default value prior to entering a new value. This field reflects the changed value when different from the default value.
New Value. Enter a new value other than the one displayed in the default value field. If you change existing text or values, the field changes to reflect the new data. To select all of the data records in the data source, make sure this field is empty and press OK.
The highlighted parameter changes background color indicating a new value has been entered.
Note: After you load the new value, records associated with that value are available to the report only during this preview or print session. When you're finished running the report, the report parameters are returned to the default values.
Default. Accept the original parameter settings for this report.
OK. Confirm a new value.
Cancel. Withdraw from making changes to the default value.
Pressing Tab, Shift + Tab or the Up and Down arrows to move through the Reports list, select a report with parameter labels.
Double-click a parameter label to display the Edit Parameters dialog.
Enter a new value other than the one displayed in the default value field. If you change existing text or values, the default value field changes to reflect the new data.
To select all of the data records in the data source, make sure this field is empty and press OK.
After you load the new value, records associated with that value are available to the report only during this preview or print session.
When you're finished running the report, the report parameters are returned to the default values.
Many OPERA reports may require you to enter certain values or parameters with which it then performs its ORStions. You can edit parameter labels and default values for reports to run the report for all records, or for select records using two different methods. Reports associated with a Report Form display no parameter information.
Select a report containing parameter labels and default values, select the parameter label and/or default value you want to edit, and double-click on this field to display the Edit Parameters dialog, or right-mouse click on this field to display a shortcut menu. The shortcut menu that appears displays the available commands for the selected form.
Edit Parameters. Displays the Edit Parameters dialog. Here you can change the entry in the Default Value field by entering a different value, or clearing the field. Clearing the field lets you run the report for all matching records.
Default Value. To change the default value, clear the field by backspacing and entering a different value. The selection bar color changes to indicate a different value has been specified.
Parameter Name. Displays an information dialog box specifying the parameter name; for example, the parameter name is 'P_Trxdate.' Click the OK button to clear the dialog box. This information is useful if you will be customizing this report.
Parameter Data Type. Displays an information dialog box specifying the parameter data type; for example, the data type of the parameter 'p_trxdate' is 'VARCHAR2.' This information is useful if you will be customizing this report.
Report Logos
You can add your property logos to your reports. This step requires you to create a picture or drawing stored as a .gif file (a file with a .GIF extension) in the directory (\runtimes) where all OPERA images are stored. Graphics can be simple drawings or elaborate scanned photographs. If (your organization is a multi-chain property, and the logo is different for each of your properties, create a logo image file for each property. The logo file should be available in the directory where images are stored, and the file name must be the same name as your Property Code.
For example, if your property is The Inn Of Naples, and your property code is TION, the logo file you create should also be named: TION.GIF
To use logo graphics files for your reports, keep the following rules in mind:
Creating a Logo Image File
If you haven't already scanned your property logo file, or used another graphic application to create one, you can use the Paint applet distributed with Windows.
When you select one of the Reports groups, the left side of the screen displays a list containing the available reports for that Report group. In this menu you can move the cursor up and down to find the desired report (they are listed alphabetically). When you have found the report you require you can Print a report, Preview the report on your screen or send it to a File on disk (for retrieval later).
Reports associated with a Report Form provide the page orientation option and now have the ability to print in portrait, landscape, or default (originally configured) mode.
Report filenames are displayed in the report caption for each report view in Online Help. Report filenames also appear at the bottom right side of the printed report.
Preview. Display a report on the screen without printing it.
The report will be formatted and sent to the printer. Depending on the report the messages Preparing data, Searching, and/or Printing may appear on the screen. If the system does not find data corresponding to the search criteria, then No records found appears. Before a report is printed, OPERA asks you how many copies you want to have. The default is 1.
File. Store a report in a file so that you can access the report later. Click the down arrow next to this filed and type a file name. The file will have an automatic extension of .PRN. Press Save. The printing of the report is possible with the reports system or at the level of the operating system.
Close. Exit from the Form display.
Select the desired radio button category in the Sections area: Guests in House, Reservations, Profile, Financial, End of Day Routine, Statistic, Shift Report, System Configuration, or Special.
Note: To print specific records, enter the values for parameters such as date range, group name, transaction, cashier number or other information defined by the selected report if required. To print a report for all records, ignore or delete the default information from the parameters fields. Select OK to print the report.
See Also