
|
|
|
File Imports/Import Dynamic Codes
When the EXTERNAL CONFIG >IMPORT FILES permission is granted, users can access the OPERA Import Utility in ORS/ OCIS by selecting the Miscellaneous>File Import menu option or the Utilities>Import Dynamic Codes menu option in Utilities. With the OPERA Import Utility, users can import data into OPERA from a flat text file (.txt). If the import is successful, the information from the text file will be inserted into the appropriate OPERA tables as defined by the control file.
The OPERA Import Utility currently supports the import of the following data files:
Select the Miscellaneous>File Import menu option to open the Import Configuration screen and begin configuring the import file.
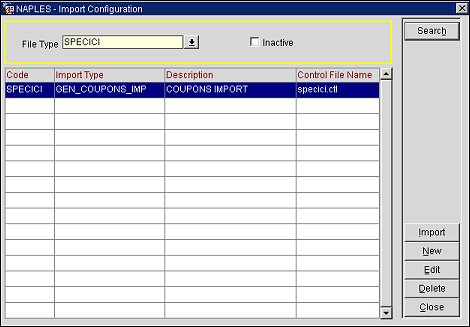
File Type. Select the down arrow to open a list of values of import file types and choose a file type for the search or select the New button to create a new file.
Inactive. Select to limit the search to inactive file types.
Code. The unique code that is linked to the import file.
Import Type. The file type for the import file.
Description. The description of the import file.
Control File Name. The name of the control file. The control file contains information describing how the file data will be loaded into the database. This can contain information such as the table name, column datatypes, and field delimiters.
Search. Select to begin a search based on the defined search criteria.
Import. Select to import a file that is highlighted in the grid. The OPERA Import Utility screen will open.
New. Select to create a new file type that you want to link to a unique code and import. The Import Configuration-New screen will open.
Edit. Select to edit a file that is highlighted in the grid. The Import Configuration-Edit screen will open.
Delete. Select to delete a file that is highlighted in the grid.
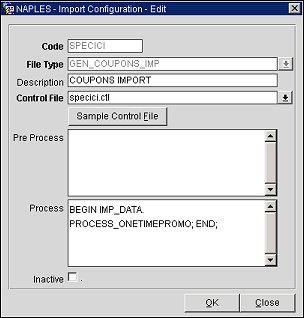
Code. Enter a unique code that will be linked to the import file.
File Type. Select the down arrow and choose a file type. Based on the template for the file type, the description, control file, and process procedures will automatically load into the Import Configuration screen.
Note: API-A IMPORT (profile flat files) is a file type template available for selection if you want to import profiles into OCIS. When this file type is selected, the associated control file and pl/sql process procedures will auto populate into their respective fields.
Description. Enter a short description of the import file.
Control File. Select the down arrow to search for the control file for the file import. When the down arrow is selected, a File Upload window will open. On the File Upload window, in the Select File field, select the down arrow and choose a control file from a local or network drive. Select the Upload button to populate the control file into the Control File field. This control file is used to specify the format of the data that will be loaded into the database.
Note: Your control file must match your data file.
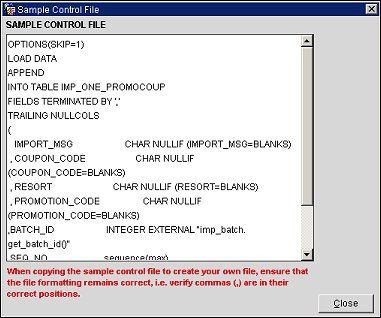
Sample Control File. Select to open the Sample Control File window and view the correct formatting required for the control file.
Tip: For the API-A IMPORT file type, you can copy and paste the sample control file into Notepad and save it as a .txt file. You can open this saved text file and customize it to match your data file. It is important to note that your control file must match your data file.
Pre Process. The pl/sql pre-process procedures for the import. This will auto populate if a procedure exists for the file type template.
Process. The pl/sql process procedures for the import. This will auto populate if a procedure exists for the file type template.
Inactive. Select to make the import file inactive.
Select the Import button on the Import Configuration screen to open the OPERA Import Utility. The OPERA Import Utility is used to upload a data file and import it into the OPERA database using SQL*Loader to import the file data.
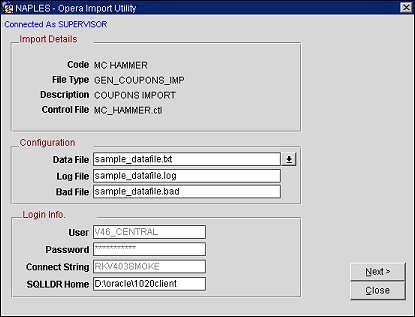
Code. The unique code that is linked to the file import.
File Type. The file type for the file import.
Description. The description that was entered for the file import.
Control File. The name of the control file that was uploaded. The control file contains information describing how the file data will be loaded into the database.
Data File. The name of the file that contains the data to load. Select the down arrow and choose a data file using the File Upload window. On the File Upload window, select the down arrow and choose a data file from a local or network drive and select the Upload button to upload the file.
Note: Once the Data File is loaded, the Log File and Bad File fields will auto-populate with the Data File name. After these fields auto-populate, users can edit the Log and Bad file names accordingly.
Log File. Enter the log file. The Log File is the name of the file that will be used by SQL*Loader to log the import results, and SQL*Loader will write messages to the specified file. The log file will contain information about the SQL*loader execution.
Bad File. Enter the bad file. Any data records that were rejected during the import will be placed into this file.
User. Enter the username credential for accessing the database.
Password. Enter the password credential for accessing the database.
Connect String. Enter the string that will be used for connecting to the database.
SQLLDR Home. Enter the path to the location of SQL*Loader.
Next. Select to go to the next step in the import.
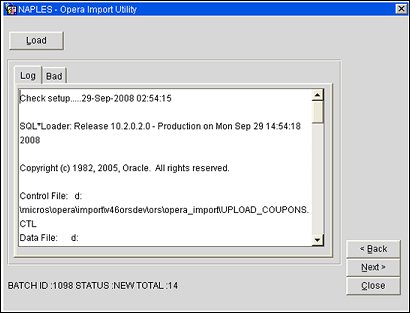
Log. Select this tab to display the log data. This data will display in the pane below the tab.
Bad. Select this tab to view any data that was discarded during the load. This data will display in the pane below the tab.
Back. Select to return to the previous step in the import.
Next. Select to go to the next step.
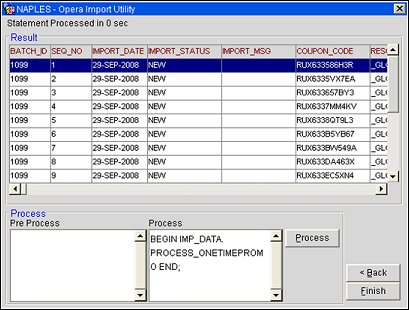
If no errors were found, the Next button can be selected to go to the step in the process. When the Next button is selected, the OPERA Import Utility will display a grid showing the data that was successfully uploaded from the data file. Below the grid, the Pre Process and Process panes display the procedures that are used to execute the pl/sql block of code. These panes will auto-populate if this code exists.
Pre Process. The pl/sql pre-process procedures for the import.
Process. The pl/sql process procedures for the import.
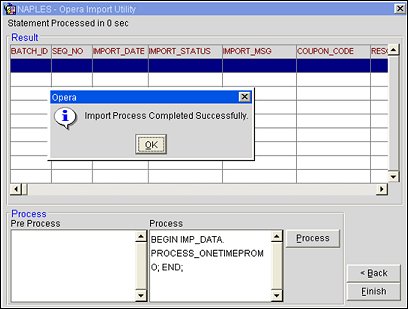
Process. Select to start the process of inserting data from the data file.
Back. Select to return to the previous step in the import.
Finish. Select to finish the import process.
See Also