
|
|
|
Folio XML Layout
The Folio XML Layout screen is accessed by selecting the Layout button from the Edit Folio Print Tasks screen (Configuration> Cashiering>Folio Print Tasks). The Layout button is available when the Cashiering>Fiscal Folio Printing application function is set to Y and a value has been assigned to the Cashiering>Fiscal Program Name application setting. If a value is not assigned to the Cashiering>Fiscal Program Name application setting and it is left blank, then the Layout button is hidden.
Use this screen to select, name and position the data columns that will be included in the fiscal folio XML files sent to the Fiscal printer, and to select, name, and position the data columns that will be included in the XML response files returned to OPERA via the local fiscal application. The layout configured here will apply only to the current folio type.
Use the tree view to navigate to the XML elements you wish to work with. Click on the plus sign next to the top-level elements in the tree view to expand the display. Then highlight an entry to see the data columns available for that entry in the grid to the right. The grid shows the column name (Description) and the Begin Tag and End Tag that enclose that kind of data.
Select columns from the Response group in the tree view in order to add and edit elements in the response XML file. Select columns from the Folio Header, Folio Detail, and Folio Footer groups in the tree view in order to add and edit elements to the folio XML file. When you select a group, the enclosing XML tags for the elements in that group are shown for reference in the Begin Tag and End Tag fields in the lower part of the screen.
Use the up arrow and down arrow to the right of the grid to change the position of any column in the XML file.
Note: The <CREDIT_CARD_NO> tag in the Folio Detail section stores a credit card ID (that is, the last 4 digits of the credit card number which has been masked with X's). The <CREDIT_CARD_EXP_DATE> tag stores the expiration date.
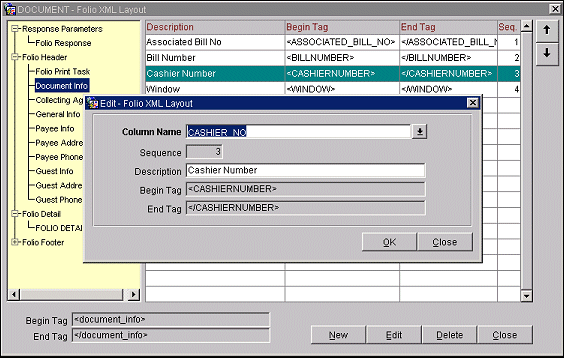
To edit a column that has already been added to the XML file, display the column in the grid by highlighting the appropriate entry in the tree view. Then highlight the column in the grid and select the Edit button. The Edit Folio XML Layout screen appears.
To add a new column to an XML file, highlight the appropriate entry in the tree view and select the New button. (For example, to add a column to the Folio Header's Document Info, highlight Document Info and select the New button.) The New Folio XML Layout screen appears.
The Sequence, Begin Tag, and End Tag for the column are shown view-only for your reference.
Provide the following information and select the OK button.
Column Name. Select the down arrow to display the List of Columns LOV. This LOV shows the begin tags and descriptions of all columns belonging to the highlighted tree view entry.
Description. The description for the column selected in the Column Name field appears here. This description is set using the Folio XML Configuration screen (Configuration> Cashiering> Folio XML Configuration); however, this default may be changed for the current print task.
See Also