
|
|
|
Membership Export
You can export membership data from the OPERA database into files. In PMS, select Configuration > Profile > Memberships > Export to open the Export File List window. In ORS (OPR<version number>ORS license code active), select Miscellaneous > File Export > Membership Export.
Note: When the OPI<version number>OIS license code is active, you may export centrally managed membership data. After reviewing this topic, refer also to Membership Statements - Export.
The location of the directory where OPERA export files are stored is defined in the default_<schema>.env file environment variable (default_brisbane.env), FORMS90_OUTOUT. At installation, this variable is set to D:\micros\opera\export. Use oappcfged.exe to make configuration changes.
As an alternative to mapped drives, UNC (Universal Naming Convention) network share paths (e.g., \\app_server1\micros\opera\export) are also supported. This is also applicable for the zipping of the export files if the zip file name is defined in the export file details.
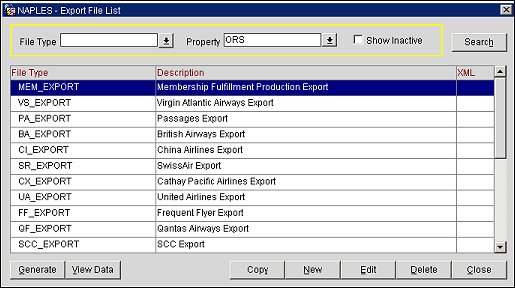
File Type. Select from the lists of values the file type to be exported, explained in the Grid below.
Property. If Multi Property or ORS is active, select the property you want to export file type information from. (In ORS, the ORS database is selected by default.)
Show Inactive. Display all inactive file types.
Search. Search for the selected file type in the File Type List.
Grid. The grid (file type and description) will display only those templates that you select.
Generate. Start the export data generation (See Export Files for generation details).
View Data. View the export data which has already been created.
Copy. Copy one setup to another.
New. Create a new export setup.
Edit. Edit an export setup.
Delete. Delete an export setup only if an export file has not been generated for this export.
The following Membership Export files are system integrated data (SID).
File Type |
Description |
BA EXPORT |
British Airways Export |
CI EXPORT |
China Airlines Export |
CX EXPORT |
Cathay Pacific Airlines Export |
FF EXPORT |
Frequent Flyer Export |
FF EXPORT PC |
Frequent Flyer Export |
GL1 EXPORT |
Airline Guests Reservations Export |
GV1 EXPORT |
Gold Passport Reservations Export |
MEM EXPORT |
Membership Fulfillment Production Export |
OCIS AMERICAN |
OCIS American Airline Export |
OCIS ALASKA |
OCIS Alaska Airline Export |
OCIS DL EXP |
OCIS DL Export |
PA EXPORT |
Passages Export |
QF EXPORT |
Qantas Airways Export |
SCC EXPORT |
SCC Export |
SR EXPORT |
Swiss Air Export |
UA EXPORT |
United Airlines Export |
VS EXPORT |
Virgin Atlantic Airways Export |
To create a new membership export, select New. You may create the export file by copying an existing export file as a template, and editing it, if necessary, or by "starting from scratch" with a blank Export File Details screen. If you select the template option, you are prompted to select the export file type(s) to be copied as templates. If the OPP_MHOT Multi-property license code or OPR<version number>ORS license code is active, you are prompted to select the property or properties to which you want to copy them. (In PMS, the current property is selected by default. In ORS, the ORS database is selected by default.)
The Export File Details screen allows you to specify the particular features of the export file.
Provide the following information and select the OK button.
File Type. Name of the export. To create a new file type, select New from the Export File List and enter a new file type name for the export.
File Description. Long description of the file type.
Export Source. Select the down arrow to choose from a list of available views for the export procedure.
Note: MEMBERSHIP_TRX_EXP_VW view runs membership exports without the need of running a statement beforehand (which had been the previous process). The new view looks at the following tables:
- Membership_trx_view (All available fields start with TRX_ )
- Stay_Records (All available fields start with ST_ )
- Name_view (All available fields start with NAM_ )
- Membership_view (All available fields start with MEM_ )
Source Description. The description will be automatically populated when the Export Source view is selected.
Pre Export Procedure. Internal setup procedure which will be executed before the data export is done. Value should be membership_misc.set_export_yn_flag('Y').
Post Export Procedure. Internal setup procedure which will be executed after the data export is done. Value should be membership_misc.set_export_yn_flag('N').
Parameter Form. Commonly used for exports that can be manually generated. This field contains the parameter form, which is used to generate a manual export. The parameter form, would take the required input from the user in order to generate a manual export. An example of the required parameters is the date range for which the export needs to be run. Each pre-export procedure has a unique parameter form, as the procedure is hard- coded within the form. Normally, if the parameter form is used, the pre-export procedure need not be used, but this can vary depending on the definition of the export.
Night Audit Export. Check this box if the export is to be run during the night audit.
Frequency. When the Night Audit Export check box is selected, select the down arrow to select the frequency of how often the export is to be run during the night audit process. Will it be run Daily, End of month, End of Year, or Weekly.
HTTP Upload. Not available if the OXI Export option is selected. Select this check box to use an HTTP upload of the export file. This file can be uploaded and automatically transferred to the HTTP address during End of Day processing or on demand (for more current information).
Note: If the export is configured to run during End of Day processing and the HTTP transmission fails, the night audit will continue to run to complete the End of Day. But, an error message will display in the naweather.rdf report to notify the user of the transmission failure. As this report is non-mandatory, properties using the HTTP transmission must configure the report.
HTTP Address. (Available when HTTP Upload is selected.) Type the database HTTP address where the export file will be uploaded to.
Protocol. (Available when HTTP Upload is selected.) If you are communicating with a Web Service, select the down arrow to choose the protocol used for extracting XML (e.g., SOAP) from the uploaded file. If you are not communicating with a Web Service, leave this field blank.
SOAP Action. (Available when SOAP is selected in the Protocol field.) Enter the SOAP action, if any, to be applied by the Web Service.
Filter Condition. Condition for the export. By default, depending on the view all data will be exported. But if a certain type of data only requires to be exported, then the condition can be filled. Technically, this is the where clause in the select statement. For example, market codes statistics export, if only certain market codes statistics are required, like FIT, COM and IND, then the condition Market code IN (FIT,COM,IND) can be entered, where market code would be one of the column names in the Export source view/table.
When clicking OK, the export setup is saved and now the columns can be defined. When the export setup is saved, the button option Export Columns will now be available.
Select this button and the entire list of columns, which are available in the view, will be brought up. This occurs the first time, when setting up a new export. If the columns are already defined, then the option Export Columns will list out the columns, which have been selected. New columns can also be added.
File Name Formula. Name of the ASCII export file which will be created when the option to generate file is selected. This field can accept SQL formula so that the file name can include dates or other program specific exports information (First5Characters of Property Code +Current System Month+F would be SUBSTR(property code,5)||MM||F). This should be a valid SQL formula. On clicking the list of values box, a list of all the columns defined in the Export Source View/Table will appear. These are the columns that can be used to create the File Name Formula. The name of the ASCII text file can be made from any of these values or can also be any string of characters. If the file has to be always called WY P296, then enter 'WY P296' (the single quotes are necessary). If the file has to depend on the business date of the property, then enter the following, for example:
'WY'||TO CHAR(PMS P.BUSINESS DATE,'MMDD')||'EXP'
which would give the name WY1103EXP for a business date of November 3.
File Extension Formula. Used to create any file extension for the daily export. This field can accept SQL statements so that the extension can include dates or other program specific export information (Current System Month +Day MM||DD). Examples for the file extension name would be TXT or EXP. The single quotes are necessary.
Zip File Name. The name of the zipfile if the export files are to be zipped. To make use of this functionality, the EXPORT ZIPPROGRAM parameter must be filled in with the zip program namezip. The Zip Program name parameter EXPORT ZIPPROGRAM is already set up in User Set-up > Application Parameter > OPERA > General. The Zip Program name (executable file) must be present in the \RUNTIMES directory.
Note: In order for zipping of export files to work correctly, the FORMS60_OUTPUT registry setting must use a mapped drive letter on the application server and may not use a UNC (Universal Naming Convention) path. This is a limitation of PKZIP, a DOS utility, which does not recognize UNC pathing. For example, the path could be D:\MICROS\OPERA\EXPORT but may not be \\machinename\MICROS\OPERA\EXPORT.
Compress Data. Select this checkbox to compress all records in the export file. This would be used for delimited ASCII text files. The delimiter can be entered in the box given.
Col. Separator. Displays when the Compress Data check box is selected. Select the Space, Tab, Comma, or Enter (CTRL or carriage return line feed) option as the character column separator. The data column is delimited by the selected character that follows it.
Always Export Header and Footer. Based on the export setup, if no data has been generated within the export and if a header and footer is defined and a file name given in the export setup, OPERA will always generate the export file that contains no information other than the header and the footer.
Inactive. Mark this check box to make a file type Active or Inactive. If the box is checked, the file type will be Inactive. If the box is not checked the file type will be Active. The box will be unchecked by default.
Auto Export. Select to setup the membership files to auto export. When selected, the Frequency list of values and the Auto Export button become available. When the down arrow is selected, a password window will open in which a password can be entered to encrypt the configuration.
Frequency. Available when the Auto Export check box is selected. Select the down-arrow to open a list of frequency values and select a frequency for the auto export. This can be either Daily, End of Month, End of Year, or Weekly.
Add Newline. Check this box to have each record displayed on a separate line in the ASCII text file.
Export Columns. Click this button to display the Export Columns Detail screen where the columns to appear on the export are selected.
Auto Export. Available when the Auto Export check box is selected. Select to open the Export File Delivery Configuration screen (see heading below for more information) and setup delivery configuration to either FTP or File System.
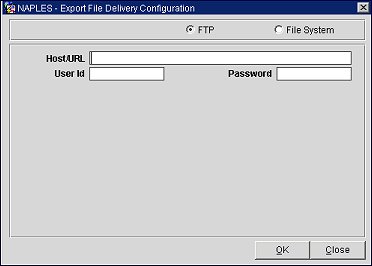
Opens when the Auto Export button is selected. Use this screen to setup the delivery configuration for the auto export of the membership files.
FTP. The file transfer protocol. Select to enter the host or URL destination of the file export.
File System. Select to export to a directory. When selected, enter the directory destination for the file export.
Host/URL. The host or URL destination of the file export.
User Id. Enter the user Id.
Password. Enter the user password.
See Also