
|
|
|
Channel Setup for Versions 5.0+
The Channels Setup screen allows you to configure the various channels used to sell a property's inventory through third parties such as a travel agent on a global distribution system (GDS), or an Internet portal such as Expedia on an alternate distribution system (ADS). The channel you set up here is associated with the GDS/ADS host. Some of the most popular GDSs, ADSs, and switches are already configured for you and can be turned into an Opera channel by selecting the Select button (only minimal configuration is required thereafter).
Opera channel configuration is required to ensure that smooth and accurate transactions are processed between the GDS/ADS and Opera systems. You need to map GDS/ADS host codes to Opera codes, and specify what, how, and when information is sent to GDS/ADS users. This is accomplished by selecting the tabs in the bottom grid.
To create and configure channels, select Setup>Configuration>Channels>Channel Setup. The Channels screen opens.
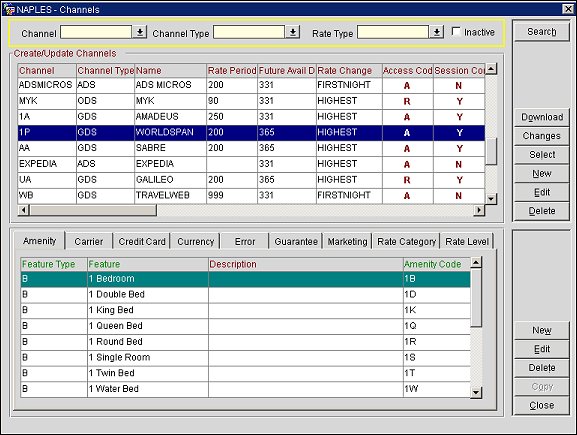
The Channels screen consists of three main areas – the search area, the top grid and the bottom grid.
The search criteria area allows you to find existing channels based on the parameters you enter. Select the appropriate search criteria, then the Search button.
Channel. Enter or select the channels that have been set up in Opera. Leave this blank to see all channels.
Channel Type. Enter or select a channel type set up in the system. Channel types include: ADS, GDS, ON BEHALF, SWITCH, or WEB.
Note: The available channel types are SID data and are not configurable.
Rate Type. Enter or select rate type.
Inactive. Select to display all inactive or invalid channels.
Note: (ADS channels only) With the installation of Opera v5.0.02.03, all ADS channels will be inactive and will require reactivation of their specific add-on licenses as well as the main ADS license (OPA_500). To reactivate an ADS channel, first select the Inactive check box and select Search to view all ADS channels. Highlight a channel in the results grid, select the Edit button, and choose a license for the Add-On License field to associate the channel with its valid license (See the Add-On License field description below for more information.) Once the add-on license is selected, setup for the channel is automatic and no further configuration will be required.
To ensure that all ADS vendors are certified to connect to Opera, each vendor will be issued a specific license.
Search. Select this button to perform the search.
The top grid area provides a list of the channels currently configured in Opera.
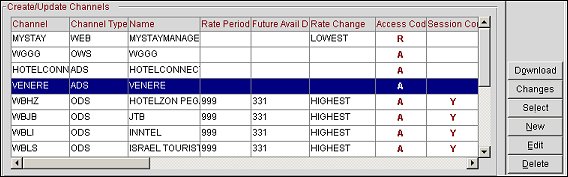
You can create new channels by selecting the New button, or modify existing channels by placing your cursor on the line of the channel and selecting the Edit button. The Opera Channel Configuration window opens. For additional information on how to create or modify a channel, see Creating or Modifying a Channel. You can also delete an existing channel by selecting the Delete button.
Search. Select this button to perform the search.
Download. (Available when the OPX_MYF2 OXI add-on license code is active for at least one ORS Property.) When option is used, external channels of type GDS, ODS, OWS and ADS are downloaded from Myfidelio.
Changes. Select to open the User Activity Log and view the changes channel users have made to the channel.
Select. Select this button to view and choose major (channel specific) ADS, GDS, or switches that are already configured within Opera. These pre-configured channels come from the SID data that is automatically loaded to Opera tables during installation. For additional information on SID data that is automatically loaded into Opera tables during installation, refer to the standard Opera documentation.
New. Select this button to setup a new channel.
Edit. Select this button to modify the selected channel's functionality. The Opera channel configuration window opens.
Delete. Select this button to deactivate the selected channel by entering an end-date. This inactivates everything previously configured for the channel including all child entries in the channel conversion form.
Close. Select this button to close this window.
If necessary, you can add new or change the existing channel-specific configuration settings by selecting the tabs in the bottom grid area.
The bottom grid area allows you to configure channel-specific details for the channel selected in the top part of the grid.
New. Select this button to set up a new configuration item according to the tab selected.
Edit. Select this button to modify the selected configuration item according to the tab selected.
Delete. Select this button to delete the selected configuration item.
Copy. Select this button to copy the code from the selected channel to another channel or to a property. When selected, a Copy screen will open and a "Copy To" channel or property can be selected.
Close. Select this button to close this window.
To configure a specific item for a specific channel, select the channel in the top grid area, then select the relevant tab in the bottom frame. Select the New or Edit buttons to open the New or Edit window for the corresponding tab, as described below.
Select this tab to add amenities that will be sold through the channel at the room or property level.
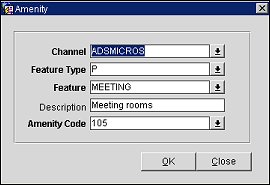
Channel. The channel in which the amenity code will be available. This field will auto-populate with the channel highlighted in the top grid. You can also select or enter a different channel.
Feature Type. Select the down arrow and choose a level. This will specify at what level the feature is available, such as ROOM or PROPERTY.
Feature. Select the down arrow and choose the feature that applies to this amenity code. This list changes according to the Feature Type selected above.
Description. Enter a description for the amenity. This description will appear throughout the channel.
Amenity Code. Enter the GDS specific amenity code. For example, MINIBAR, SHOWER, or CRIB.
Select this tab to enter the channel's incoming code. For example, Worldspan is identified by either "1P" or "TW."
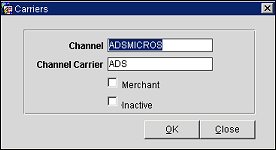
Channel. The channel for the carrier code. This field will auto-populate with the channel highlighted in the top grid. You can also enter a different channel.
Channel Carrier. Enter the two-letter carrier code.
Merchant. Select this check box if the carrier code is being used to setup an independent channel as part of the merchant model functionality.
Inactive. Select this check box if the carrier is inactive.
Select this tab to map the credit card types used in the channel to Opera credit card types.
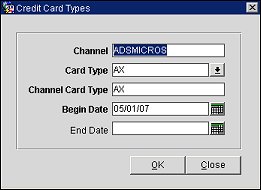
Channel. The channel in which the credit card will be used. This field will auto-populate with the channel highlighted in the top grid. You can also enter a different channel.
Card Type. Select the down arrow and choose a card type code used in Opera, such as VI for Visa, MC for MasterCard or AX for American Express.
Channel Card Type. Enter the two-character code used for the channel. It is recommended to use codes provided by the channel.
Begin Date. Select the calendar button and choose the date when the card becomes available to the channel.
End Date. Select the calendar button and choose the date when the card becomes unavailable in the channel.
Select this tab to map the currency codes used in the channel to the codes used in Opera.
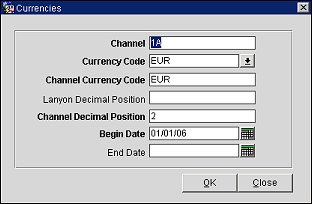
Channel. The channel in which the currency code will be used. This field will auto-populate with the channel highlighted in the top grid. You can also enter a different channel.
Currency Code. Select the currency code used in Opera.
Channel Currency Code. Enter the currency code that is used for the channel. It is recommended to use ISO standards, such as USD for the US Dollar.
Lanyon Decimal Position. If the channel uses Lanyon for rate publication, enter the number of decimals supported by Lanyon/GDS. This is usually 2.
Channel Decimal Position. Enter the number of decimals supported by the channel. This is usually 2.
Begin Date. Select the calendar button and choose the date the currency code becomes available to the channel.
End Date. Select the calendar button and choose the date when the currency code becomes unavailable in the channel.
Select this tab to specify the messages that are transmitted through the channel. Opera provides a standard set of errors under the Fidelio switch. Errors for GDS Channel Types are already included in the SID data. These error codes and descriptions are applicable to the major GDS hosts.
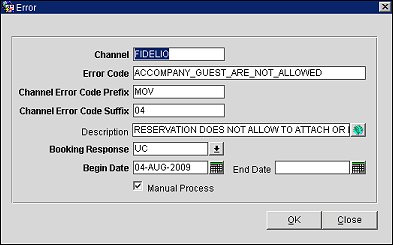
Channel. The channel in which the error code will be used. This field will auto-populate with the channel highlighted in the top grid. You can also enter a different channel.
Error Code. Enter the error code used in this channel.
Channel Error Code Prefix. Enter the prefix used in the GDS error code such as PID.
Tip: For the Prefix, Suffix, and Description fields, Pegasus codes are generally used for the four major GDS Channels.
Channel Error Code Suffix. Enter the suffix used in the GDS error code such as 10.
Description. Enter the description as it is entered in the Error Code field. For example, for the error code PROPERTY_NOT_AVAILABLE enter the description as PROPERTY NOT AVAILABLE.
Booking Response. Select the down arrow and choose a code that must be sent back within the booking response message, such as UC for unconfirmed.
Begin Date. Select the calendar button and choose the date when the error code becomes available to the channel.
End Date. Select the calendar button and choose the date when the error code becomes unavailable in the channel.
Manual Process. Select this check box so that the error code goes to a Type B manual process queue when messages are Type B.
Select this tab to enter the guarantee codes that are accepted through the Channel. For example, 4PM HOLD and CC Guarantee.
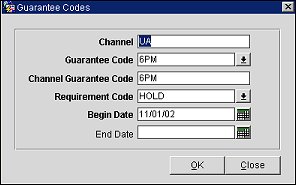
Channel. The channel in which the guarantee code will be used. This field will auto-populate with the channel highlighted in the top grid. You can also enter a different channel.
Guarantee Code. Select the down arrow and choose a guarantee code that is valid for this Channel.
Channel Guarantee Code. Enter the channel conversion Guarantee Type Code.
Requirement Code. Select the down arrow and choose a requirement code. The following values are available: Company, Corporate, Credit Card, Guarantee, Hold, Not Accepted and Travel Agent. A requirement code specifies the requirement for the guarantee type being used. For example, a Credit Card requirement code indicates that a credit card is required to guarantee the reservation.
Note: The requirement code values are not configurable in OPERA. They are populated in the database as SID data during installation.
Begin Date. Select the calendar button and choose the date when this guarantee becomes available to the channel.
End Date. Select the calendar button and choose the date when this guarantee becomes unavailable in the channel.
Select this tab to enter the marketing text that is returned to the channel.
Tip. It is recommended to use the pre-populated messages attached to the Fidelio switch. The Fidelio switch is based on the Pegasus USW® standards which are accepted throughout the electronic distribution industry.
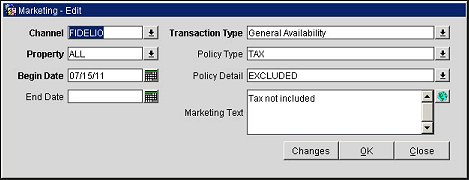
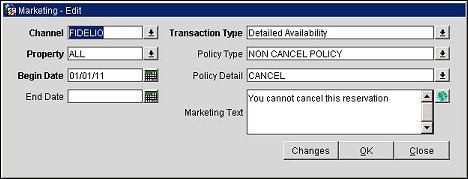
Channel. The channel in which the marketing text will appear. This field will auto-populate with the channel highlighted in the top grid. You can also select or enter a different channel.
Property. Select the property where the marketing text applies.
Begin Date. Select the calendar button and choose the date when the marketing text becomes available to the channel.
End Date. Select the calendar button and choose the date when the marketing text becomes unavailable in the channel.
Transaction Type. Enter the Transaction type for the message. For example, IA DETAIL for Detailed Availability requests (or rate rules); IA LIST for General Availability requests; BLABLA for Reservation General; or GUDPCN for Reservation Policies.
Policy Type. Enter the policy type for the message. For example, COMMISSION, CANCEL POLICY.
Policy Detail. Enter the policy detail that triggers the message to be sent for the transaction type. For example, a value of “Y” for the policy type COMMISSION sends a message indicating that the rate is commissionable. Conversely, if the policy detail value is “N,” the message sent to the channel indicates the rate is non-commissionable.
Marketing Text. Enter the text you want to return for the specific channel.
Note: The marketing text description will be translated and returned to the channel based on the primary language ID sent in the header of the OWS CreateBooking, General Availability and Detailed Availability request messages.
Changes. Select to open the User Activity Log and view changes channel users have made to the marketing text.
Select this tab to enter the rate categories used in the channel. Travel agents use these rate categories to narrow down their search for a property based on rate categories.
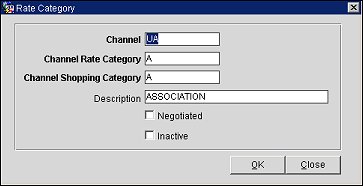
Channel. The channel in which the rate category will be used. This field will auto-populate with the channel highlighted in the top grid. You can also enter a different channel.
Channel Rate Category. Enter the rate category used by the channel. For example, COR for Corporate, GOV for Government, or NEG for Negotiated Rates.
Channel Shopping Category. Enter the shopping category code used by the channel.
Description. Enter the description for the rate category, such as FAMILY PLAN or MILITARY.
Negotiated. Select this check box to identify the rate category as negotiated.
Inactive. Select this check box to make the rate category inactive.
This option is equivalent to the Rate Category option as described above.
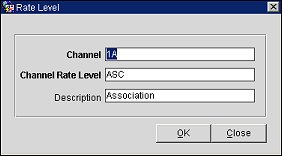
Channel. The channel in which the rate level will be used. This field will auto-populate with the channel highlighted in the top grid. You can also enter a different channel.
Channel Rate Level. Enter the rate level code used by the channel, such as P for Promotional or N for Negotiated.
Description. Enter the description for the rate level such as FAMILY PLAN or MILITARY.
Select this tab to specify the percentage of inventory that will be sold through the channel. The open and close percentages represent the inventory points that determine when the hotel begins and stops selling your property.
Open Per. Enter the percentage of inventory that must be open or available to allow sells to go through channels. It is recommended to enter a value of 100%. For example, if 100% is entered here, you can sell through GDS even if only one room is available - the property is considered Open until the last room is sold.
Close Per. Enter the percentage of inventory that needs to be sold before sells to the channel are stopped (close availability for channel). It is recommended to enter a value of 100%. For example, if a property is set at 100% Closed your property can be sold through the channel until the last room is booked. After the last room is booked, the property is considered Closed and sells through channels are stopped.
Begin Date. Enter the date when the threshold becomes applicable for the channel.
End Date. Enter the date when the threshold becomes inactive for the channel.
See Also
|
See Also |