
|
|
|
External Database Setup
The External Database Setup in OPERA is essential for OXI_HUB to run. Its purpose is to link each property in ORS to its respective PMS Type and Database ID. The PMS Type in turn is directly linked to the External System ID for which business events can be created in ORS. To give you an overview of the context:
Property ID>link to PMS Type V6, V7, or OPERA>link to external system ID OXI-V6, OXI- V7, or OXI-OPERA>create business events for this hotel within this interface ID.
In OPERA, go to Setup>System Configuration>Setup>External Databases.
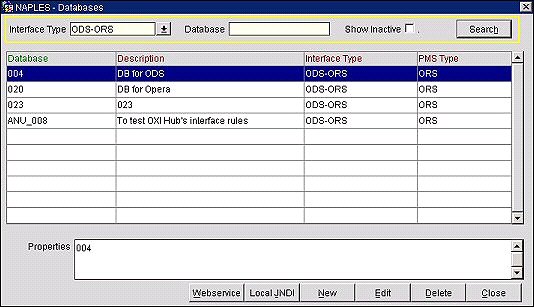
Interface Type. Select the down arrow and choose an Interface Type from the list of values. This will filter the search results by an Interface Type already configured, which can then be highlighted in the results grid and edited by selecting the Edit button.
Database. Enter the Database Name to filter search results based on a specific property database. The property database can include multiple properties, depending on its existing configuration and name.
Show Inactive. Select to filter search results to display only inactive database/interface types. Inactive Databases are configured but were made Inactive from the Database-New or Database-Edit screen. These configurations can be made Active by unselecting the Inactive check box on the Databases-New or Edit screens.
Search. Select to begin search and display results.
Database. Name of the configured External Database, entered during the New or Edit selection (see below, Creating and Editing an External Database Configuration).
Description. Full Database Name explaining its location and use, entered during the New or Edit selection (see below, Creating and Editing an External Database Configuration).
Interface Type. This was selected on the Databases - New or Edit screens (see below, Creating and Editing an External Database Configuration).
PMS Type. The PMS Type associated with the Interface Type.
Util. This button only displays when either an inactive OXI-OPERA or ODS-ORS interface type is highlighted in the results grid. Select this button to open the Change Database Resorts screen, where users can schedule an OPERA job to update profile subscriptions from an old database to a newly created one. To learn more about this process, see the topic Creating a New External Database and Transferring Profile Subscriptions to It.
Webservice. Configure the web service for the selected Database/Interface Type. (ORS) This button and functionality appears in ORS for Databases (Properties) with Interface Type OXI-OPERA. (PMS) In OPMS, this button and functionality appears for Databases with Interface Type ORS. See the Web Services Connection Information heading below for more information.
Local JNDI. Select this button to view the name of the Java Naming and Directory Interface (JNDI) on your local drive. This name is entered in the Web Services Connection Information screen when configuring webservices.
New. Create new entries for external databases to be available for configuration in OXI- HUB.
Edit. Edit an existing external database configuration. See Databases-Edit screen below.
Delete. Permanently remove an entry. Please be aware not to delete if properties are still in use.
Select New or Edit from the Databases screen to create or edit an External Database configuration, respectively. The Databases-New or Edit screen opens.
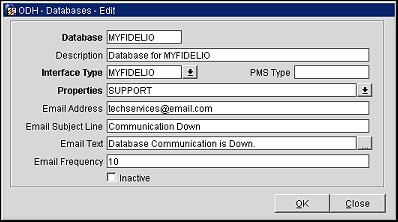
Database. Name of the Property Database. In OPERA, you may have multiple properties within one database, and a more meaningful acronym or name may be used to identify the database. The database name is seen when you look into profile subscriptions, which is an option under profiles.
Description. Full database name to explain its location and use.
Interface Type. Select from the LOV the interface type.
PMS Type. When the Interface Type is selected, the PMS Type automatically populates. The PMS Type determines what interface ID will be used for this property.
Properties. A list of values provides only properties that are currently configured in ORS. For a multi-property database, select all properties that apply. For V6, V7, and CLS a single selection per database will be made.
Email Address. Enter the email address of the person who will receive the email messages when the database communication is down.
Email Subject Line. Enter the subject line for the email that is sent when communication is down.
Email Text. Enter the text that will be contained within the email message for down communication.
Email Frequency. Enter the number, in minutes, that an email will be sent when communication is down. For example, if 10 is entered in this field and the communication is down, then an email is sent every 10 minutes until the communication is back up and running.
Inactive. Select this check box if the database entry is configured but not currently activate or is no longer required. This check box does not delete the configuration from the system. Those configurations marked as Inactive can still be searched for (select Inactive at the Databases screen) and made active again.
OK. Save the entries and close the screen.
Close. Quit the screen and abort the entry being configured.
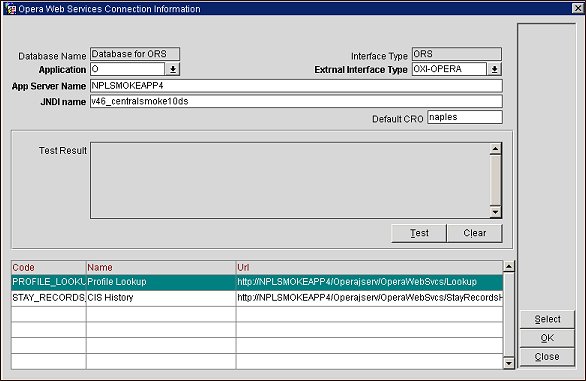
Setup OPERA Web Services in the remote property (Configuration>Setup>External Databases) by selecting the Webservice button at the bottom of the Databases screen. The Web Services Connection Information screen opens. On the Web Services Connection Information screen, verify that the App Server Name and JNDI Name fields are populated with the correct values for the external database with which the interface is to be configured. Select the Test button to verify the connection setup is completed correctly. A message will indicate the status of the test in the Test Result pane.
The following usage notes pertain directly to remote attachment storage and transmission as discussed in the Attachment Handling for SFA help topic.
The Web Services Connection Information screen is opened by selecting the Webservice button on the Databases screen. This screen is used to set up webservices for the selected Database/Interface Type.
The following application settings must be configured for the web service functionality:
Database Name. Read-only field, populated with the highlighted Database from the Databases screen.
Interface Type. Read-only field, populated based on the interface type highlighted from the Databases screen.
Application. Select the down arrow and choose an application where webservices will be applied.
External Interface Type. Select the down arrow and choose an external interface type.
App Server Name. Enter the name of your application server.
JNDI Name. Enter the JNDI (Java Naming and Directory Interface) name of the external remote server/environment that you want to use with your webservices.
Default CRO. Enter the default CRO for the web service.
Test. Select to verify the connection setup is completed correctly. A message displayed in the Test Result pane will indicate the status of the test.
Clear. Select to clear the test result status in the Test Result pane.
Select. Select to open a list of values of available web services and choose the web services that you want to make available for the database/interface type. The grid at the bottom of the Web Services Connection Information screen displays the names of the web services along with their codes and URLs.
OK. Select to save newly selected web services and close the screen.
See Also