
|
|
|
Passer By
The Passer By feature is primarily used to handle transactions for non-guests when a printed folio is requested. For instance, a businessman comes to the front desk and wants to send a fax to his office. He will pay for the fax charge on the spot, and wants a printed folio. Similarly, you can use the Passer By feature to handle transactions for in- house guests who wish to pay for services that they do not want posted on their folios. The Passer By feature can also be used when issuing refunds to guests who have stayed in the past; the passer by transactions can be linked to existing guest profiles.
When the 9700 and GuestConnection systems are integrated with OPERA, passerby stay records (guests who dine in the restaurant but are not hotel guests) can be uploaded from 9700 into PMS. When passerby charges in 9700 are for GuestConnection profiles that are linked to a profile in OPERA, they will be uploaded into PMS as passerby stay records. When the End of Day sequence is run, these passerby charges will also upload into OCIS when there is an active OPI<version number>OCIS license. The requirements for this feature are an active OPX_GSTC license code for Guest Connection and an active IFC_M87 POS I/F - MICROS 8700/9700 ENHANCED license for 9700. In addition to normal room charges, the 9700 MICROS system must be configured to send cash and credit card tenders through the OPERA/9700 interface.
When you select Cashiering>Passer By and enter your Cashiering password, the Passer By Today screen appears. This screen shows all of the passer by transactions you have posted today. It also allows you to add new passer by transactions.
Note: The Cashiering>Bypass Cashier Login application parameter may be used to speed access to Cashiering functions for users having a cashier ID associated with their user ID. If the Cashiering>Bypass Cashier Login application parameter is set to Y, and if you have previously logged in to Cashiering and the Cashier is still open, the Cashier Login screen does not appear when subsequently accessing Cashiering functions. If Bypass Cashier Login is set to N (the default), you are prompted for a Cashier Login each time a Cashiering function is accessed.
When you open the Passer By function, the Passer By Today screen displays.
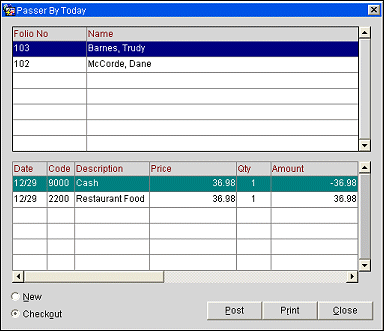
The radio buttons at the bottom of the screen control the display as follows:
New. Select the New radio button if you are creating a new passer by. (If this button is selected, the upper and lower grids will be empty.) When you select Post, the New Passer By screen appears.
Checkout. Select the Checkout radio button if you wish to see the passer by folios that have been created for current business date, or to post another transaction for a passer by who has already initiated a folio today. When this radio button is selected the top grid displays a list of all today's passer by folios. Highlight a passer by on the top grid to see the details of the transaction in the lower grid. To make another passer by transaction, highlight the name of the passer by for whom the transaction is to be posted and select the Post button. You are taken directly to the Transaction Posting screen, without searching for a profile.
The top grid displays the folio number and name of the profile for whom each passer by transaction was created.
The lower grid displays the details of the folio (the individual charges) fo9r the guest who is highlighted in the top grid. The details may include several postings in the lower grid: all transactions including the payment.
Information fields in the lower grid are as follows:
Date. Date of the transaction (the current business date)
Code. Transaction code for the posting.
Description. Description of the transaction code.
Price. Unit price of the transaction item.
Quantity. Number of items consumed.
Amount. Total amount of the posting.
Supplement. Supplemental information regarding this posting.
Reference. Internal reference information regarding this posting.
Currency. Currency in which the transaction was posted.
User. Cashier ID of the cashier who posted the transaction.
Time. Time of the posting.
Group. Transaction code group.
Subgroup. Transaction code subgroup.
Post. Select Post to post a transaction. If the Checkout radio button is selected, you will be taken immediately to the Transaction Posting screen where you may post another transaction for the passer by whose name is highlighted in the upper grid. When you have posted the charge and closed the Transaction Posting screen, the Payment screen appears. Complete the Transaction Posting and Payment screens as you normally would. If the New radio button is selected, the New Passer By screen (described below) appears, allowing you to first identify the profile for whom the transaction is being posted.
Note: If an EFT interface is active for the property, and/or if an external fiscal device is used (in such case the Cashiering>Fiscal Folio Printing application parameter and/or the Cashiering>Fiscal Payments application parameter would be active as in the Latin American countries), the default posting room specified by the IFC>Default Posting Room application setting must be checked-in in order to post charges using the Passerby feature.
Print. If the Checkout radio button is selected, print a folio for the passer by whose name is highlighted in the upper grid. (Print is not available if the New radio button is selected.)
Note: When the General>Profile Language application function is set to Y, if the specific folio does not exist for the Language that is attached to guest profile, then the following error message is displayed and the printing is stopped:
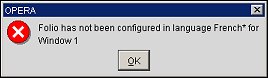
When the General>Profile Language application function is set to N, then the report will continue processing the printing using the Language configured for the property.
Note: When the Cashiering>Permanent Folio Storage application parameter is set to Y, the Cashiering>Folio Printing application setting is set to ALWAYS, and a folio is generated, an exact copy of the folio that is generated is stored in a subfolder of the Export folder at a location, for example D:\micros\opera\export\<schema_name>\<resort>\folios\<business date>, and will be titled by either the business date or the file name convention that was configured by the Cashiering>Permanent Folio Storage File Name Format application setting when the folio was generated and an internally generated FOLIO_ATTACHMENT_LINK_ID will always be added to the end of the file name to ensure that the file name is unique. But if the Cashiering>Folio Printing application is set to YES, then when the folio is printed, emailed or faxed at the time of generation it will be stored. If the Cashiering>Folio Printing application is set to NO, then the folio will not be stored.
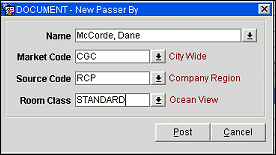
The New Passer By screen appears when you are posting a transaction for a profile for whom you have not yet posted a transaction on the current business date. (This screen also appears when you are posting cancellation charges. See Reservation Deposits for details.)
The following fields are presented on this screen.
Name. Select the down arrow to display the Profile Search screen. This screen allows you to search for the appropriate profile or to create a new profile before posting the transaction.
Note: Your property may wish to set up special passer by profiles to represent common passer by transactions such as photocopy, fax, or telephone.
Market Code. A default Market Code for passers by can be set for your property by using the Application Settings>Cashiering>Passerby Market Code (Default Market code when creating a passerby) setting. If you wish, select the down arrow to choose a market code from the list of values. The description of the market code appears next to the field.
Source Code. A default Source Code for passers by can be set for your property by using the Application Settings>Cashiering>Passerby Source Code (Default Source code when creating a passerby) setting. If you wish, select the down arrow to choose a source code from the list of values. The description of the source code appears next to the field.
Room Class. This field appears if the Application Settings>General>Room Class (Activate Room Class Functionality) function is set to Y. Select the down arrow to choose a room class from the list of values. The description of the room class appears next to the field.
Print. Select this check box to print a folio for this passer by.
Post. The Transaction Posting screen appears, allowing you to post the charge. When you have posted the charge and closed the Transaction Posting screen, the Payment screen appears. Complete the Transaction Posting and Payment screens as you normally would.
Note: If you are given a credit card as a method of payment when processing a passer by transaction, and the credit card is declined, when you select the OK button on the Credit Card Authorization screen the following message appears: "All postings and payments made for this passer-by will be reversed. Do you want to continue?". Select Yes to reverse the posting and return to the Passer By Today screen. Select No to return to the Payment screen to select another method of payment.
See Also