Room List and Function Space List
In room setup and function space setup (if you are configuring meeting rooms and catering rooms) you define characteristics for each sellable room in the property in order for it to be used by OPERA.
Before you can define rooms and function spaces, you must have already defined room types, room classes and preferably room features.
You must define each sellable room unit. That means that for a two bedroom parlor suite, you must create each of the two bedrooms and the parlor separately as long as it is likely that each of the three rooms might be sold separately. If there is only one outside door, then the suite must be created as only one room. If the suite is sold as a single unit 99% of the time, then create the suite as one room rather than as a combination of two or three.
Note: Your OPERA Front Office License code is linked to the number of rooms in your property. Before adding rooms to your configuration, you will need to contact your MICROS OPERA distributor and apply for a new license code. The same applies for deleting rooms. Your license code is valid for a range of rooms always starting on the ten reaching through the next nine rooms, e.g., 0-9, 10-19, 20-29, etc. If you add rooms above, or delete rooms below, this range, you will receive a license code violation and will be unable to access OPERA.
The Rooms List screen appears when you select Configuration>Reservations>Room Classifications>Rooms. This screen shows those rooms that have already been configured for the property. From this screen you may edit existing room configurations, create new ones, and delete those which are no longer needed.

To find a specific room or group of rooms, enter your search options and select the Search button.
Property. Available when the MHT2 Multi-Property license code is active. Select the down arrow to choose the property at which you wish to search for rooms. The default is your log-in property.
Room Type. Select the down arrow to choose the room type for which you wish to search.
Room Class. Select the down arrow to choose the room class for which you wish to search.
Room. Enter the room number for which you wish to search. This filter will search the Room and the Room Description fields.
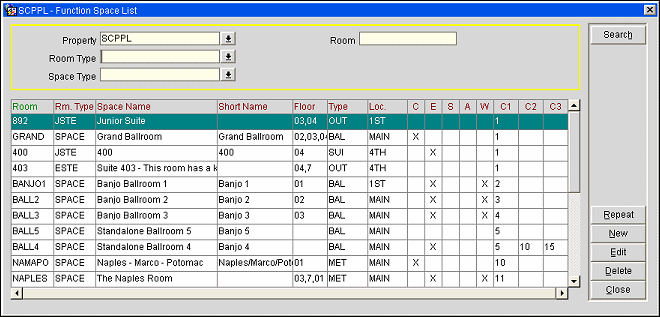
The Function Space List screen appears when the OPERA Sales & Catering license code (OPS <version number>) is active and you select Configuration> Reservations> Function Space Classifications>Function Space; or when the S&C license is not active, but the Blocks>Diary (Function Diary) application function is set to Y and you select Configuration> Reservations> Catering> Function Space.

Property. Available when the MHOT Multi-Property license code is active. Select the down arrow to choose the property at which you wish to search for rooms. The default is your log-in property.
Room Type. Select the down arrow to choose the room type for which you wish to search.
Space Type. Select the down arrow to select a function space type for which you wish to search.
Room. Enter the room number for which you wish to search.
Room. Displays the room number or room code of the selected room. This filter will search the Room and the Space Name fields.
Rm. Type. Displays the room type.
Space Name. Displays the space name of the selected room.
Short Name. Displays the short description of the selected room.
Floor. Displays the floor number where the room is located.
Type. Displays the space type for the selected function space (e.g., LOBBY, BALLROOM, etc.). This column is not visible when the Blocks>Diary application function is set to Y.
Loc. Displays the location of the selected room. This column is not visible when the Blocks>Diary application function is set to Y.
C. An X in this column indicates that the space is a Combo room.
E. An X in this column indicates that the space is a Combo Element.
S. An X in this column indicates that the space is Shareable.
A. An X in this column indicates that the space requires an alternate space when the application function Catering>Alternate Space is set to Y.
W. An X in this column indicates the space is bookable via the web when the license code WCC_<version number> or WCS_<version number> is active.
C1. Custom Order 1.
C2. Custom Order 2.
C3. Custom Order 3.
To delete a room, highlight your choice on the Room List screen and select the Delete button. (Alternatively, you may highlight the room, select the Edit button, then select the Delete button from the Rooms - Edit screen.) The following situations prohibit the deletion of a room; appropriate messages will be displayed.
Use the Repeat button to save time when you have many similar rooms or function spaces to define. For example, if rooms 202, 206, 302, 306, 402, 406, 502, 506 have exactly the same features in your property, configure room 202 with all necessary field information. Highlight room 202 and select Repeat to create the similar rooms. A prompt appears giving you the opportunity to copy room features to the new rooms. The Copy Rooms screen appears. The original room is shown in the Prv. Room field.

Enter the following information and select the OK button to add or select the Delete button to delete.
Room. Enter the room number(s) for the new room(s) which you wish to pattern after the room you highlighted.
Feature. To add or delete features from the room, select the down arrow next to the Feature filed. When setting up function spaces, this column is not displayed as function spaces do not use features. See Function Space Tab for details
Key Options. Select the down arrow to choose key options. Key options may, for example, direct the key interface to encode the room key so that it enables access to an exercise room or to the pool, as well as to the guest room. The default options for the guest's room appear here if a room has been assigned and if the room has default key options associated with it.
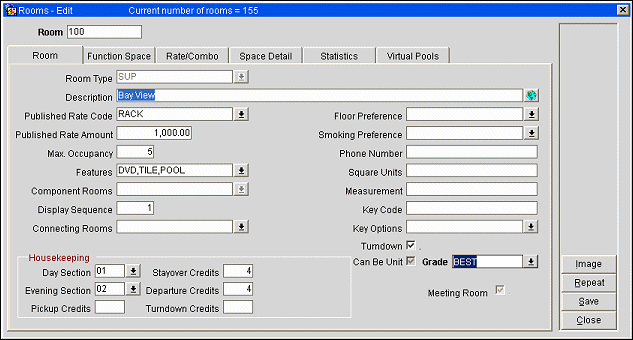
Select the New button on the room List screen to set up a new room, or highlight your choice and select the Edit button to change the attributes of an existing room. The Rooms - New or Rooms - Edit screen appears.

When editing a room, OPERA shows the total Current number of rooms in inventory in the screen title bar.
The tabs available on this screen differ depending on whether you are working with sleeping rooms or function spaces. The links under See Also provide details about the various tabs that may appear on this screen.
Note: If you decide to change a room number, OPERA automatically updates all pertaining files (reservations, out of order and room type files). Whenever you change a room number, make sure that any room-related interfaces are also updated so that charges coming from interfaces will be posted to the correct room.
Note: Whenever you add, delete or change a room, OPERA will recalculate the number of rooms belonging to each room type and generic room type automatically.
Image. (Available at the Property Level in Multi-Property PMS where the OPP MHT2 add-on license is active, and at ORS installations.) Select this button to display the Image Maintenance screen. Use this screen to view available images of rooms and select an image to be displayed. Room images are available from the Cross Reservations and Sales screens by selecting the Rm. Image button. Images may also be displayed from the Room Blocking screen, the Room Plan screen and the Floor Plan screen. Only images with the file extension of .jpg, .bmp, .gif, .cals, .jfif, .pict, .ras, .tiff, and .tpic can be used.
Repeat. The Repeat feature appears on the Rooms - New and Rooms - Edit screen, and it is used to quickly configure multiple rooms that are similar. Select the Room field down arrow to choose the number of the room you wish to copy and select the Repeat button. See Copying Room Setup, above, for details.
New. Select the New button to set up a new room. The links under See Also provide details about the various tabs that may appear on this screen.
Delete. Select this button to delete a room setup record.
Note: Only delete a room when you are absolutely sure that you do not need it anymore.
The tabs available on this screen differ depending on whether you are working with sleeping rooms or function spaces. The links under See Also provide details about the various tabs that may appear on this screen.
See Also