
|
|
|
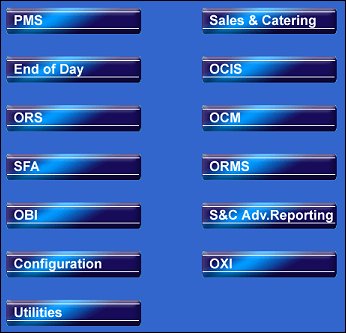
Single Sign On Screen
The OPERA single sign-on feature gives users access to all their OPERA applications from one screen with one login. The OPERA Single Sign-on screen displays when you first connect your workstation to OPERA. Once logged in, the applications licensed at your property which you may access are displayed as buttons on the screen. Click any of the buttons to go directly into the application with no additional login required. Use the Single Sign-on screen's Log Out link to immediately close all open windows and log out of all active sessions. You may continue to use F8 to call up the OPERA Login screen as before.
The OPERA Login box displays in the upper left-hand section of the OPERA Single Sign-on screen when you first connect your workstation to OPERA. Use the Login box to provide the "credentials" that will allow you to access the OPERA applications licensed at your property and available to your user ID.
Provide the following information and select the Login button to log in to OPERA. Your user name and password must be entered before access to OPERA is permitted.
Username. Enter your user name as assigned by your system administrator.
Password. Enter your password. As you enter your password, asterisks appear in this field to prevent anyone from seeing what you type.
Your system administrator will set your initial password. Once you have logged in to OPERA and you have launched an OPERA application (for example, OPERA PMS), you can change your password at any time by selecting Miscellaneous>Change Password from the menu bar options. Depending on your system configuration, you may be required to change your password at specified intervals. See Change Password for details.
Schema. If more than one OPERA database schema is available to you, select the down arrow to choose the OPERA schema you wish to log into. The last-accessed schema is selected by default.
Once you have logged in, the Login box looks like this.
The screen shows your name, the schema you are logged into, and your property. (If you are logging into an ORS schema, "ORS" displays as your property.)
If you are logging in as a Supervisor in a multi-property PMS environment, a property is not shown here. You will be prompted to select a property once you have chosen the OPERA licensed product you wish to work with. (See OPERA Main Menu, below.)
While you are working with OPERA, this screen will remain open in the background. To log off at any time, return to this screen and select the Log Off link (or simply close the browser). Selecting Log Off closes all open OPERA screens.
Language. Your user language (set as part of your user configuration) is selected by default in the Language field. To display OPERA screens and messages in another language, select the down arrow to choose another of the languages configured for your property.
When the OPP_MHOT Multi-property license is active, users can be granted access to multiple properties. Use of this feature allows users access to multiple properties using the same login credentials (including their Cashier ID) with a customizable set of permissions for each property. Once multiple properties have been enabled for a user (see Edit Users) and the user has selected a module from the login screen, the Property field on the OPERA Login dialog box display a single-select list of values.
Use the down arrow to select from a list of properties for which the user has access. See User Property Permissions for further details on configuring a custom set of permissions for each property.
The Available Sessions indicator appears below the Login area once you have logged in. You are allowed to have 5 OPERA sessions running concurrently per browser. When no sessions have been started, all 5 blocks are green because 5 sessions are available to you. A green block turns red for each OPERA session that is running for the logged in user. A session starts each time one of the licensed OPERA products (e.g., OPERA PMS, OPERA Sales & Catering, ORS, OCIS, OPERA Utilities, etc.) is selected from the Main Menu area in the right-hand part of the screen. A session is also started while you are working with OPERA and you open a new screen that is not directly accessed from the buttons on an already-opened screen. For example, if you are working with a reservation and you select F5 to open the Rate Query screen, a new session is started and remains active until you close the Rate Query screen.
![]()
Note: Pay very close attention when working with multiple sessions at one time. For example, if a user is logged into Property A and is reviewing the Detailed Availability (CTRL+F2) for it, but then views the Detailed Availability for Property B and F5 is selected, then the Rate Query will be for Property B, not Property A. In order to complete the Rate Query for Property A, the user will need to focus back on the original session, by clicking on it with the mouse for example.
Note: The General>Application Parameter>Login Timeout setting determines if OPERA Login will timeout after the last session is closed for all OPERA sessions or if OPERA Login Timeout will only be enforced for the initial Login into the OPERA Login screen and will not timeout after the last session is closed. For more information, see General>Application Parameter>Login Timeout.
With stream printing, print jobs are "streamed" directly from the report server to your PC where the Adobe Acrobat Reader assembles the document and sends it to the printer. The advantage is that printing can be done in the background, allowing you to perform other tasks while the document is printing. One additional advantage is that Stream Printing can also be used to generate PDFs for Email, Faxes, Files and previewing. All print jobs will display in the Windows Taskbar.
Note: Adobe Acrobat Reader 8.1.1 is required for stream reporting and is available in the Webhtml directory of the Application server.
The licensed OPERA applications you may access are shown in the Main Menu area to the right of the OPERA Login area. Click on the button for the product you wish to work with. You may come back to this screen and click on a button to open another session for any of the licensed products available to you. Another login is not required.
Note: Which applications are available to you depends on the application access rights granted by the Application Access Controls on the Edit User screen.
Note: While you are working in OPERA, you may also select F8 to display a Login window that you may use to log out the currently logged in user and execute a new login. See Login screen for details.
If you have Supervisor permissions in a multi-property PMS environment, or if you are logging into ORS and have access to multiple CROs, an additional prompt appears once you have selected a product. For ORS, you may select the CRO you wish to log into.
Note: When the General>ORS CM (hidden) application parameter is set to Y, a GENERIC CRO can only be logged into by clicking on the ORS button on the OPERA Main Menu screen.
For other OPERA products, you may select the property. (Non-supervisor users will be automatically logged in to the property where their user ID was created.) Depending on the Main Menu button you selected, you may be prompted to make other choices at this point.
Once the Login screen has been opened in your browser, please refrain from using the browser's navigation buttons (i.e., Forward, Back, Refresh, etc.).
When you launch an OPERA application from the Login screen, please complete the login process for that instance of the application prior to selecting additional OPERA applications from the Login screen.
For security purposes, you may want to disable the forms AutoComplete option in your browser. To do so, select Tools>Internet Options from the Internet Explorer toolbar. Select the Content tab and click on the AutoComplete button. On the AutoComplete Settings screen make sure the Forms check box is unselected, then select OK to save.
Note: Since SpellCheck Anywhere is a 3rd party software, when you click on the button to download it you will receive the following disclaimer to confirm that you want to continue.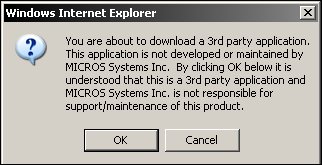
Select the OK button to continue with the download or select Cancel to exit out without downloading the software.
SpellCheck Anywhere can be installed on your PC by clicking the Install Spellchecker button on the Single Sign-on screen. By default, selecting F11 will launch the spellcheck feature when you are working in OPERA. To change hot keys and to otherwise customize the spellchecker, right-click on the checkmark icon found in the system tray along the bottom of your desktop to open the Setup menu.
Note: Since adobe Reader is a 3rd party software, when you click on the button to download it you will receive the following disclaimer to confirm that you want to continue.
Select the OK button to continue with the download or select Cancel to exit out without downloading the software.
Adobe Reader can be installed on your PC by clicking the Get Adobe Reader button on the Single Sign-on screen.
See Also