Titles
Select Configuration>Profile>Titles>Title to create and define the title and courtesy greeting to be used when addressing the guest verbally, in confirmation letters, and mailings. The titles and default salutations you see on the Profile screen are set up here.
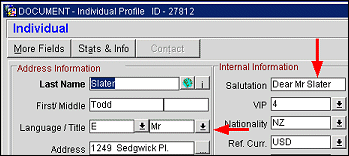
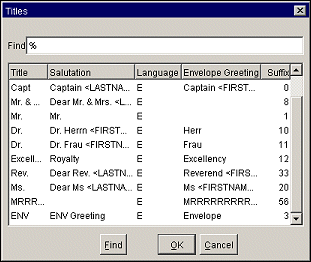
Each individual profile and contact profile contains a field for the person's Title (e.g., Mr, Mrs, Herr, Dr, etc.) on the Profile screen. The titles available when you select the Title field down arrow on the Profile screen depend on the language selected for the profile in the Language field. In other words, if you select E, for English, the available titles might be Mr, Mrs, or Ms. If you select F, for French, the available titles might be Mlle, Mm, or M. Additionally, when you select the title, a pre-configured default salutation for guests having that title appears in the Salutation field. For example, if you select the title "Mr" for Michael Summers, the default salutation might be "Dear Mr Summers." The default salutation may be edited for this profile directly in the Salutation field.
Note: When the OPX_GHA or OPX_GHA2 add-on license is active, updates made by the GHA interface to a profile's title will only be accepted in PMS when the title is null. When the profile already has a title attached at the property level, the property will ignore updates to the title sent by GHA.


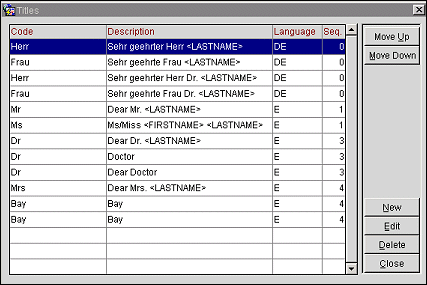
To access the Titles Screen (where you can begin configuring titles), select Configuration>Profiles>Titles>Title.

This screen shows the following information for the titles you have configured.
Code. The title code for the courtesy greeting (e.g., Mr, Ms, Mrs, Capt, Rev, Hon).
Description. The default salutation to be used with the title. The salutation may include merge codes for variable information such as the guest's first name and last name (e.g., Dear Mr <LASTNAME>, Monsieur <FIRSTNAME> <LASTNAME>, or Sehr geehrter Herr <LASTNAME>).
Language Code. A language code selected from a predefined list of values set up in Configuration> Profile> Geographical Data>Languages. All titles associated with a specified language code will be available for selection when that language is chosen in the Language field on the guest Profile screen. The language shown here is the language which you use to exchange correspondence with the guest, rather than the guest's native language.
Sequence. The number here controls the position of the title when displayed in a list of values.
Move Up. Select this button after a title code is highlighted to move it up in the sequence of the list of values.
Move Down. Select this button after a title code is highlighted to move it down in the sequence of the list of values.
New. Opens the Title - New screen where you can create a new title code and description.
Edit. Opens the Title - Edit screen where you can edit a title code description and other values.
Delete. Deletes the highlighted Title Code/Description from the system.
Note: If a title or extended title has been assigned to a profile, you may delete it from configuration. However, deleting the title from configuration does not remove the title/extended title from the profile(s) where it has been assigned. The deleted title/extended title will also be kept on stationery and reports where it has been used. Once deleted, however, the deleted title/extended title will not be available for selection from LOVs going forward.
TITLE and EXTENDED_TITLE are stored in the ENTITY_DETAILS table and are not property specific.
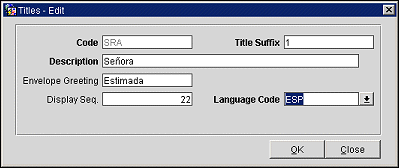
To create a new title, select the New button. The Title - New screen appears. To edit an existing title, highlight the title you wish to modify and select the Edit button. The Title - Edit screen appears.

Provide the following information and select OK to save your changes.
Code. Enter the code identifying the title (e.g., Mr, Ms, Mrs, Capt, Rev, Hon). Up to 20 characters are supported. This field is read-only when editing.
Title Suffix. (Advanced Title only) This field is available when the Advanced Title functionality is activated.
With Advanced Title functionality, users can define and configure several different title suffixes for the same title and language. This feature is available when the Advanced Title application parameter is activated (Profiles>Advanced Title application parameter is set to Y). The advanced title feature meets the needs of certain countries, such as Germany, where a social title such as Herr may be combined with a professional title, such as Doctor. Advanced Title also provides the opportunity to convert to the correct titles when a profile comes from a legacy PMS system, such as from Fidelio V6.
Here are two situations where the Advanced Title arrangement might be used:
• In the salutation of a confirmation letter, “Herr Dr. Bernd Barysch”
• In an address, where the Title (Herr) appears on a separate line.
Herr
Dr. Bernd Barysch
Street
Zip, City
In the Title Suffix field, enter a suffix number that identifies the unique combination of Title Code, Description, and Language. Users cannot insert the same Title Code more than once without a Title Suffix. You can create as many descriptions and envelope greetings as necessary for the same Title Code and Language Code. Using German as an example, the user can create several Title Codes=Herr and Language Code=DE that may or may not have envelope greetings. Each combination of Title Code and Description must have a unique Title Suffix number that identifies it, however. For example:
Note: When Global>Profiles>Parameters>Advanced Title = Y, the Title Suffix functionality will be available, and the “Title Suffix” field will be displayed on the Titles-New/Edit screen. With Title Suffix, by assigning a different suffix number, a user can configure many different salutations and envelope greetings for the same Title Code. When Global>Profiles>Parameters>Advanced Title = N, the “Title Suffix” field will not display and the Advanced Title functionality is not available. However, with the Advanced Title application parameter set to N, a user can still create different titles using the same title code. The difference is that with Advanced Title parameter set to Y, a Title Suffix is required when creating titles with the same title code. For examples on how this works, please refer to the tables below:
When Advanced Title = N, a user can configure the following:
Title Code |
Description (Salutation) |
Language Code |
MR |
Mr.<LAST NAME> |
E |
MR |
Mr.<LAST NAME> |
E |
When Advanced Title = Y, a user must assign a Title Suffix to duplicate titles:
Title Code |
Description (Salutation) |
Language Code |
Title Suffix |
MR |
Mr.<LAST NAME> |
E |
21 |
MR |
Mr.<LAST NAME> |
E |
22 |
MR |
Mr.<LAST NAME> |
E |
23 |
Description. Enter the default salutation to be used with the title. The salutation may include merge codes for variable information such as the guest's first name and last name (e.g., Dear Mr <LASTNAME>, Monsieur <FIRSTNAME> <LASTNAME>, or Estimada Señora <LASTNAME>). When Advanced Title is activated, the salutation may include the envelope greeting along with merge codes for variable information such as the guest's <FIRSTNAME> and <LASTNAME>.
Envelope Greeting/Business Title. When the Advanced Title application setting is activated (Profiles>Parameters>Advanced Title), the label name here is Envelope Greeting. When Advanced Title is not activated, the label is Business Title. This field identifies the name of the envelope greeting or business title that will be used along with the social title, such as Doctor. When this field is populated, the envelope greeting or business title will appear in the Titles screen at the Profile Screen, ensuring that the correct envelope or business title and Code are entered when creating or selecting a profile.
Note: Envelope Greetings are printed based on the Title Code. If a Title Code is not selected, envelopes will only print a profile's first and last name fields.
In addition, the Envelope Greeting or Business Title field can be screen painted onto the Profile screen and the Reservation screen header. When a title is selected for the guest on the Profile screen, the Envelope Greeting associated with it (in the profile language) will populate to this field on the Profile screen and on the Reservation screen. Finally, when the Envelope Greeting is provided on the Profile screen, the applicable Billing screen window title bar(s) will include the envelope greeting as well as the guest's social title and name in the format: <LASTNAME>, <FIRSTNAME>, Title, Envelope Greeting (for example, Friedrich, Gudrun, Frau Dr.). Should the Envelope Greeting field on the Profile screen be blank (no envelope greeting is associated with the social title), the Billing screen window will display the guest's name as: <LASTNAME>, <FIRSTNAME>, Title.
Display Seq. Enter a number to control the position of this title when a list of titles is presented. If more than one title has the same Display Sequence number, the titles will be presented in alphabetical order.
Language Code. Select the down arrow to display a list of Language Codes. Choose the code to be associated with this title. All titles associated with a specified language code will be available for selection when that language is chosen in the Language field on the guest Profile screen. The language selected here is the language which you use to exchange correspondence with the guest rather than the guest's native language.
See Also