Trace Texts Configuration
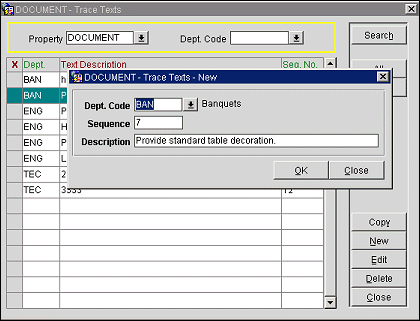
Select System Configuration>Reservations>Codes>Trace Texts to set up the standard default texts that will be available when you create traces. When you create a trace, these texts can be selected and used as-is, or they can be customized as necessary. When you create a trace text it must be associated with a department.

Property. Available when the OPP_MHOT Multi-property add-on license is active. Select the down arrow to choose the property for which you wish to search for texts. The default is your log-in property.
Dept. Code. Select the down arrow to choose a department for which you wish to search for texts. The default (blank) is all departments.
The following information is available on this screen.
X. An X in this column indicates that the text has been selected for the Copy or Delete action. Use the All and None buttons to select all items or to un-select all selected items.
Dept. Department associated with the trace text.
Text Description. Default trace text message.
Seq. No. Number that determines the position of the trace text in lists.
To add a new trace text, select the New button. To modify an existing trace text, highlight your choice on the Trace Texts screen and select the Edit button. The Trace Text - New or Trace Text - Edit screen appears.
Provide the following information and select the OK button.
Department Code. Select the down arrow and choose the department associated with this trace text.
Sequence. Enter a number that determines the position of this trace text in lists.
Description. Enter the text of the trace message. Up to 256 characters are accepted. For example: Call manager upon arrival, Charge full deposit, Extra bed to be set up, Unlock interconnecting door, Charge back requested. Please send credit application form, VIP to meet and greet on arrival, Rooming List is Due.
In multi-property environments, trace texts can be configured as “templates” that you may copy to other properties. Once the trace is copied to a new property, you may edit the trace text and change the department association, if desired. (If the department attached to the trace text being copied does not exit at the target property, it is automatically created.)
To copy trace texts to one or more properties, select the texts you wish to copy by placing an X in the X column. Select the Copy button. The Properties screen appears. From the Properties screen select your target properties and select the OK button. A message informs you when the copy action has completed.
See Also