
|
|
|
User Groups
User groups are a way to classify OPERA users by their need to access specific OPERA features in doing their jobs. You assign OPERA permissions to the user group based on the job responsibilities of group members. By assigning users to user groups, it is easier to manage user rights: Adding or removing a permission from the user group immediately affects the system rights for all users in that group.
User groups are not property specific, but global with regards to all of the properties in the schema. This being the case, user groups can't be copied to other properties. If a user group is created while logged into a property, not only will this property see it, but as will all of the other properties that are part of the schema. Individual permissions for each property can then be associated to the configured user groups. For example, the Reservation group can have all Reservation permissions granted at Property A, but only permissions to view the reservations at Property B. Users from multiple properties can be associated to the same user group as this is intentional making the assigning of individual permissions quicker for multiple properties in the same schema. In this situation, modifying permissions associated to a user group will in fact affect all users associated to the group. And if the user group is deleted, it will be deleted from all users who were previously associated to the group.
For users with no need to utilize OPERA for anything other than administering users and user groups, such as Help Desk or IT staff, user groups can be assigned to users without the administering user having to also have the same permissions or belonging to the same groups. For instance Help Desk personnel and IT staff, whom would normally have no need to have access to any modules within OPERA, would still have a need to assign, modify and revoke user permissions and user groups to users. This feature is controlled by the application function General>User Group Administration. When this application function is set to active, a check-box appears on the User Group - Edit screen that allows for the permissions attached to the selected user group to be administered to other users. Because this feature is designed to be utilized by those users with limited access within OPERA, the user permission User Group Administration, must be granted and the application function General>User Group Administration must be set to Y prior to creating user groups that can be administratively attached to users. See User Group Administration below for further details.
For users with cashiering responsibilities, user groups may also be used to manage the user's ability to manually post to specific transaction codes. This feature is active when the Cashiering>Transaction User Groups application function is set to Y. The user may only post against transaction codes assigned to the user group(s) to which the user belongs. This feature is useful if you wish to restrict posting ability according to a person's job.
Note: Users assigned to the OPERA Supervisor user group may post to all transaction codes.
When the General>Report Group Access by User Group application parameter is set to Y, Report Groups can be assigned to specific User Groups using this option also. A user belonging to a specific user group will only be able to view the report groups that have been assigned to their user group.
In multi-property environments (when the OPP_MHOT Multi-property PMS add-on license is active) user groups are global values. A user group set up while logged into Property A will also be available from Property B. But although user groups are global, they can have property-specific attributes associated. Here are some examples.
Hold Room Codes. When selecting the Hold Room Codes LOV while logged into Property A, the LOV will display the hold room codes from Property A only because hold room codes are property specific. Similarly, when selecting the Hold Room Codes LOV while logged into Property B, the LOV will display the hold room codes from Property B only. A Property A user who is assigned to this user group will have access to the hold room codes for Property A only, while a user assigned to the same user group at Property B will have access to the hold room codes for Property B only.
Transaction Codes. The above logic also holds for transaction codes associated with user groups because transaction codes are also property specific.
Report Groups. Report groups are global; however, their associated reports are property specific. When selecting from the User Group configuration screen's Report Groups LOV while logged into Property A, the list will display all report groups configured for both Property A and Property B. You may select report groups from either or both properties. Individual users logged into Property A and Property B may belong to the same user group which is associated with report groups selected from both Property A and Property B. Nevertheless, the actual reports that each user can access will depend on which reports are associated with those report groups at their property.
In SFA, module access can be used to determine if a user can start SFA (or configuration with SFA selected as the application), making that user an SFA for that session. The same user can access both SFA and ORS based on the selected application. This feature provides property specific access based on the user group the logged in user belongs to; making the "SFA user" obsolete. Additionally when the user permission IGNORE ACCESS PERMISSIONS FOR LEADS is assigned, access to all properties for lead sending is granted.
Property Specific SFA Access can be granted by:
To access the User Groups screen, select Configuration>Setup>User Configuration>User Groups or Setup>User Configuration>User Groups.
The group(s) to which a user is assigned can be used to determine the tasks the user may perform in OPERA. You may create user groups that reflect the ways each group of users will work with the OPERA features, then assign personnel to the appropriate user group or groups. When users log on to the system with their user IDs and passwords, OPERA automatically recognizes the features that each user can access based on their user groups. Only those menu items that the particular user may choose, and only those function buttons that the user may select, are made available.
This makes the system secure and flexible. Think carefully about the groups you want to create and which permissions each group should have. The security of your system depends on this decision.
Note: The OPERA Supervisor group is provided as part of SID data. Users assigned to this group will have full rights to use all OPERA features. The Supervisor group cannot be deleted and the permissions cannot be changed. Because members of this group have far-reaching powers, including system configuration rights, cashiering permissions, and user management capabilities, you should be careful when assigning users to this group.
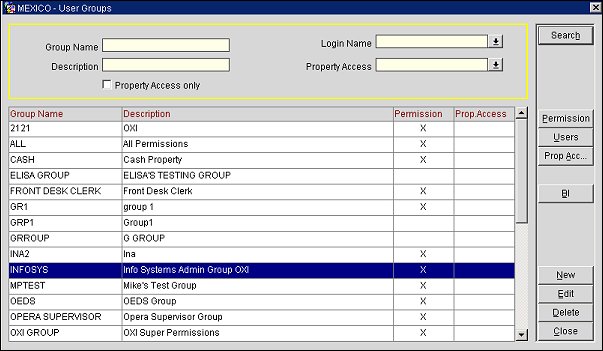
Enter your search options and select the Search button to find a specific user group. By default all user groups for the property are displayed.
Group Name. Enter the name (or first part of the name) of the group you wish to find.
Group Description. Enter the description (or first part of the description) of the group you wish to find.
Login Name. Select the down arrow to choose the login name of a user to find the user groups to which that user belongs.
Property Access. Select the down arrow to choose a property to find user groups that have access to that property granted to them.
Property Access Only. Select this check-box to return search results which are marked as 'Property Access Only'.
The User Groups screen shows the following information. (You may click on the column heading to sort the information in the column in alphabetical order.)
Group Name. Name of the user group.
Description. Description of the user group.
Permission. Select this button to choose the permissions that will be available to users belonging to the highlighted user group. See User Permissions for details.
Users. Select this button to go to the Users for Group screen where you may select the users who will belong to the highlighted user group. The Users button is only active when the logged in user is associated to the user group that is highlighted in the grid or is part of the OPERA Supervisor Group. The logged in user must also have Setup Config>Grant Revoke Group permission. See Users for Groups for details.
Prop. Acc. Select this button to go to the Property Access screen where you may choose the properties that will be accessible to users belonging to the highlighted user group. Available when the OPR_<version_number> ORS license code is active and when LDAP login is configured. See LDAP Integration for details.
BI. Users with the permission DATAMART>Manage BI Access can set up access for other users for property levels and subject areas in OBI and S&C Advanced Reporting. Select this button to display the BI Options screen where you can assign access level, access permissions, and BI subject areas to user groups. Please see OBI User Access for more information.
Note: When a user has already been assigned an access level, access permissions and BI subject areas through the Edit Users screen and then becomes a member of a user group, the permissions are combined. Users have the permissions that they initially had plus the ones from the group they now belong to. For example:
Individual user has:
BI Access Level = Property B
BI Groups = Reservation History and Reservation Pace cubes
User Group has:
BI Access Level = Property A
BI Groups = Company and Guest Cubes
When the individual user is added to the group, he/she will have:
BI Access Level = Property A and B
BI Groups = Company, Guest, Reservation History, and Reservation Pace Cubes
New. Select to create a new user group for the property.
Edit. Select to modify the highlighted user group.
Delete. Select to delete the highlighted user group. A user group can be deleted even when other users and permissions are associated to the group. For example, if there are no other permissions assigned to the user than the ones granted from the user group being deleted, then the user would need to have individual permissions granted or be re- associated to another user group.
Close. Select to close out of the user group functionality.
CRO Perm. Select this button to go to the CRO Access screen where you may choose the CROs that will be accessible to users belonging to the highlighted user group. Available when the OPR_<version_number> ORS license code is active and when LDAP login is configured. See LDAP Integration for details.
To add a new user group, select the New button. To edit an existing user group, highlight your choice and select the Edit button. The User Group - New or User Group - Edit screen appears. Provide the following information and select the OK button.
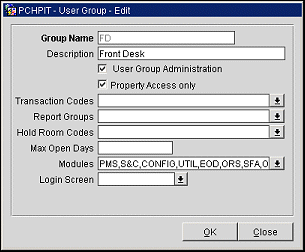
Group Name. User group name. If a User Group or User name already exists as the same one that was entered when creating a new one, a warning of "User Group or User already exists" is displayed and the user is forced to enter another name.
Description. Text description of the user group.
User Group Administration. Selecting this check-box will allow for the administration of this group's permissions to other users without the administering user having to also have the same permissions or belonging to the same groups.
Note: Although there is no limitation on the number of user groups that can be configured for administrative attachment to users, this feature can NOT be used with the OPERA Supervisor Group and as such, this option will NOT display when the OPERA Supervisor Group user group is edited.
Property Access Only. This check box can only be checked if no permission is assigned to the User Group, otherwise it will be grayed out.
Transaction Codes. (Available when the Cashiering>Transaction User Groups application function is set to Y.) Select this button to choose the transaction codes that may be posted manually by users belonging to the highlighted user group.
The user must belong to a user group having a specific transaction code assigned in order to post to that transaction code. For example, you might set up three user groups called Bellman, Frontdesk, and Accounting. By assigning specific transaction codes to each group you can control the transactions which may be posted by members of each group.
Note: Keep these points in mind when using Transaction User Groups:
— If the Cashiering>Transaction User Groups application function is set to Y, user groups must be configured with transaction codes in order to post. If a user group has no transaction codes attached, members of the group cannot post.
— End of day procedures do not have to be changed; automatic posting is not controlled by user groups.
— Users belonging to the Supervisor user group may post to all transaction codes. You do not need to manually attach transaction codes to this group.
Report Groups. (Available when the General>Report Group Access by User Group application parameter is set to Y.) Select the drop down arrow to display the report group list of values and choose the report groups that will be assigned to the user group. If the user belongs to the Supervisor user group, then the user can view all of the report groups and none have to be manually attached.
A user belonging to a specific user group will only be able to view the report groups that have been assigned to their user group. When assigning the report groups to the user groups in a multi-property environment (the OPP_MHOT add-on license code is active), all of the report groups and user groups will be displayed for all of the properties, as these groups are not property specific. Deleting a report group is not property specific either, so no user groups from any property can be linked to a report group once it has been deleted.
Note: The Protected Reports functionality will not change due to this new parameter and will override any existing report groups assigned to a user group. For example, if John is part of the Front Desk user group, he will have access to the Arrival Report Group. Within the Arrival Report Group, a protected report exists and John can access it because he has been granted permission. On the other hand, Mary is also part of the Front Desk user group, but has not been granted permission to view protected reports. So, she will be able to view the Arrival Report Group, but not the protected report.
Hold Room Codes. Available when the application function Front Desk>Hold Rooms is active. Select which hold room codes, if any, should be assigned to this user group. Hold Room codes allow users to specify the time frame for which a room can be held; for instance 5 minutes, 30 minutes or 1 hour. When the OPP_MHOT Multi-property PMS license code is active, only the hold room codes available at the login property are available for selection.
Max Open Days. Available when the Cashiering>Open Folio application parameter is set to Y. Number of days following check out during which a folio may be reopened. If the user is attached to multiple user groups with different Max. Open Days, the greatest number of days assigned to any of the user's groups will be assumed. For example, if User A is attached to the Front Desk user group that has 3 set for this value, but User A is also attached to the Administration user group who has 5 set for this value, then User A could reopen a closed folio up to 5 days after the guest had checked out.
Modules. This field is available on the User Group - New and User Group - Edit screen when an active LDAP System is configured for the property (Configuration>Setup>LDAP Configuration). Select the down arrow to choose the OPERA applications to which the logged in users belonging to this user group will have access.
Login Screen. This field is available on the User Group - New and User Group - Edit screen when an active LDAP System is configured for the property (Configuration>Setup>LDAP Configuration). Select the down arrow to choose the default login screen for users belonging to this user group.
See Also