
|
|
|
Using OPERA - Outlook Integration
Integrating OPERA S&C with Microsoft Outlook® allows you to exchange Contact and Activity information between the two applications. OPERA - Outlook integration is enabled through the separately available Microsoft Outlook Interface.
Note: This feature requires that the application setting Activity>PIM Interface Type be set to Outlook to enable access from the S&C menu bar.
Note: When synching OPERA and Outlook with the Outlook interface, the message "The date and time formats defined in the regional settings are not supported. Please refer to the online documentation" appears if the date and time formats defined in your Windows regional settings are not convertible into Oracle date and time format. The Outlook interface is compatible with the AM/PM time format; however, the AM and PM symbols must be AM and PM and cannot be localized characters. For example, the Greek regional setting for AM (µµ) cannot be used.
The Outlook Synch screen is the starting point for most OPERA - Outlook integration activities. This screen appears when you select Customer Management>Outlook from the main S&C menu bar.
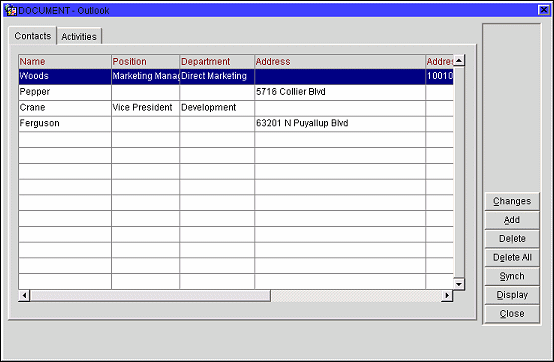
The Outlook Synch screen has two tabs: Contacts and Activities.
Name. The name of the Contact.
Position. The Contact's position in the organization
Department. The Contact's department.
Address. The Contact's Primary street address - the one that will synch with Outlook.
Address 2. Line two of the Primary address. Can often contain additional address information, such as an apartment number.
City. The Contact's Primary city.
State. The Contact's Primary state.
Zip. The Contact's Primary Zip code or other postal code.
Country. The Contact's Primary country.
Purpose. The purpose or description of the Activity or To Do item.
Start Date/Time. The activity start date and time.
Done. An X appears in this column when the Activity or To Do item has been completed.
Property. The property with which the Activity or To Do item is associated.
Type. The Activity Type.
Account. The Account with which the Activity or To Do item is associated.
Contact. The Contact associated with the Activity or To Do item.
Phone. The Contact's phone number.
Manager. The Sales Manager responsible for the Activity or To Do item.
Changes. Launches the User Activity Log (Outlook Interface) and displays all changes to the selected contact or activity.
Add. Choose an OPERA Activity or Contact, depending on which tab is open, to be added to the Contacts or Activities that are synchronized with Outlook.
Delete. Delete the highlighted Activity or Contact. You are prompted to confirm your decision.
Delete All. Delete all Activities or Contacts shown in the grid, depending which tab is open. You are prompted to confirm your decision.
Synch. Run the OPERA - Outlook synchronize program and exchange database information between OPERA and Outlook.
Display. View the highlighted OPERA Activity or Contact.
Close. Close the Outlook Synch screen.
Exchanging information between OPERA and Outlook is called "synchronization" or "synch." The first time you select the Synch button from the Outlook Synch screen OPERA creates three new subfolders in your Outlook Folder List. Under Calendar, OPERA creates the 'OPERA Activities' folder. This is where the Activities shared between OPERA and Outlook will be filed. Under Tasks, OPERA creates 'OPERA Tasks' folder. This is where the ToDo Activities shared between OPERA and Outlook will be filed. Under Contacts, OPERA creates the 'OPERA Contacts' folder. This is where the Contacts shared between OPERA and Outlook will be filed.
Thereafter, whenever you select the Synch button from the Outlook Synch screen, any information that is awaiting transfer from OPERA to Outlook, or from Outlook to OPERA, will be exchanged.
The following sections provide detailed instructions for adding, updating and deleting information between Outlook and OPERA.
Use this procedure to create an Outlook Activity or Task which is synchronized with an OPERA Activity or To Do item.
Note: ONLY the following Activity Classes may be selected for to Synch with Outlook: APPOINTMENT, MEETING and TODO. As such, the Activity Search will limit you to searching for only these Activity Classes when calling it from the Outlook form.
Note: Selecting the Private check box on the OPERA Activity ![]() will set the lock feature on the Outlook Task or Activity
will set the lock feature on the Outlook Task or Activity ![]() .
.
Use this procedure to create an Outlook Contact which is synchronized with an OPERA Contact.
When you have updated an OPERA Activity or To Do item, use this procedure to update the corresponding Outlook Activity or Task.
Note: The Activity or To Do item must have already been added to the Outlook 'OPERA Activities' or 'OPERA Tasks' folder.
When you have updated an OPERA Contact, use this procedure to update the corresponding Outlook Contact.
Note: The Contact must have already been added to the Outlook 'OPERA Contacts' folder.
Use this procedure to delete an OPERA Activity or To Do item and at the same time delete the corresponding Outlook Activity or Task from the Outlook 'OPERA Activities' or 'OPERA Tasks' folder.
Use this procedure to delete an OPERA Contact and delete the corresponding Outlook Contact from the Outlook 'OPERA Contacts' folder.
Use this procedure to create an OPERA Activity or To Do item which is synchronized with an Outlook Activity or Task.
Note: Selecting the lock feature on the Outlook Task or Activity ![]() will set the Private check box on the OPERA Activity
will set the Private check box on the OPERA Activity ![]() .
.
Use this procedure to create an OPERA Contact to synchronize with an Outlook Contact.
When you have updated an Activity or Task in Outlook, use this procedure to update the corresponding OPERA Activity or To Do item.
When you have updated Contact in Outlook, use this procedure to update the corresponding OPERA Contact.
When you have deleted an Activity or Task in Outlook, use this procedure to delete the corresponding OPERA Activity or To Do item.
When you have deleted a Contact in Outlook, use this procedure to delete the corresponding OPERA Contact.
OPERA allows an unlimited number of address types to be configured, while Outlook supports three address types: Business, Home, and Other.
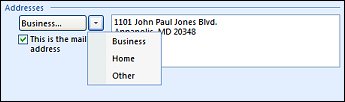
If you configure the HOME, BUSINESS, and OTHER address types in OPERA they can then be synched with the like-named Outlook address types.
When Sych is run between OPERA and Outlook, matching address types will be exchanged. For example, if a HOME, BUSINESS, and/or OTHER address type is configured for a contact in OPERA, the information will be downloaded to Outlook as a Home, Business, and/or Other address type. Because OPERA supports multiple addresses of the same address type, the last created or last updated address of each address type will be downloaded, unless one of them is marked as the Primary, in which case that one will be downloaded.
Similarly, if a Home, Business, and/or Other address type is configured for an Outlook contact, the information will be uploaded to OPERA as a HOME, BUSINESS, and/or OTHER address type. The HOME, BUSINESS< and OTHER address types are automatically created in OPERA if they do not already exist.
See Also