Table of Contents Previous Next PDF


Appendix B: The Simple App Application

Appendix B: The Simple App Application
This chapter contains the following topics:
Introduction
This chapter is intended to be a step by step guide to rehosting the Simple App Application. It will walk you through each step in using the Oracle Tuxedo Application Rehosting Workbench (Tuxedo ART Workbench) to rehost the application. In order to begin any rehosting project you must obtain the source code located on the mainframe. Appendix 4 - Extracting and Transferring Mainframe Components is a guide to achieving this. The source code and data was copied to your machine during the installation of the Oracle Tuxedo Application Rehosting Workbench. By default it will be in …/art_wb12cR1/samples/STFILEORA. It is recommended that you copy this directory to a work area before using the Workbench so that you will have a clean copy that you can always go back to should something go wrong during the rehosting process or if you or somebody else would like to do the sample rehosting again. For the purpose of this exercise, we will assume that …/art_wb12cR1/samples/STFILEORA has been copied to /lab.
Description of the Simple App Components
This section describes the Simple App component architecture and the online and batch interactions.
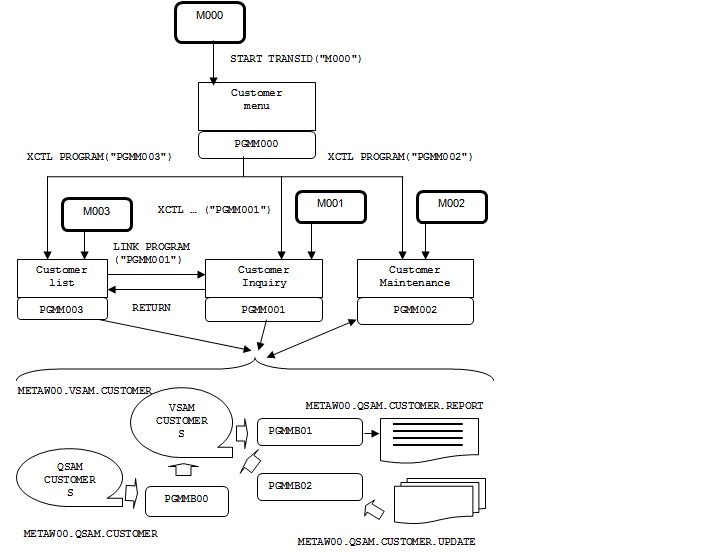
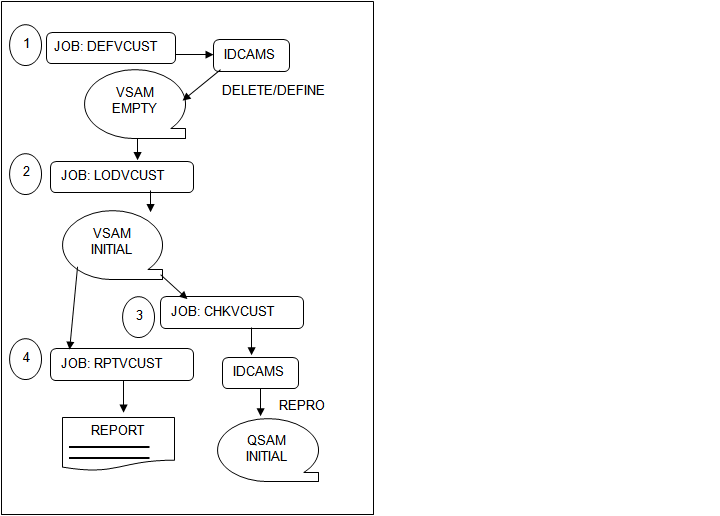
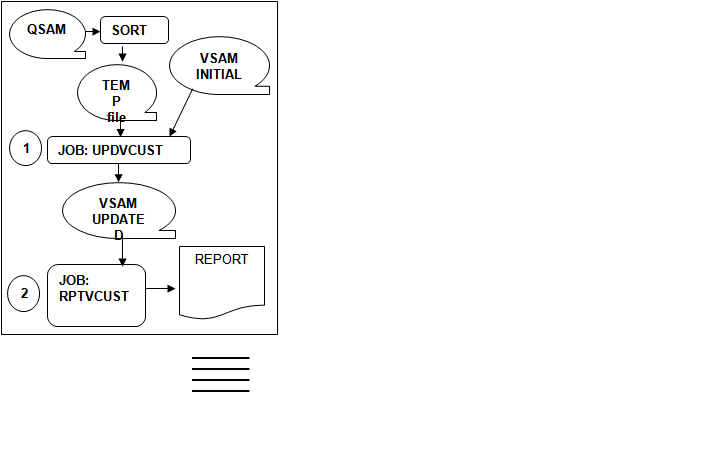
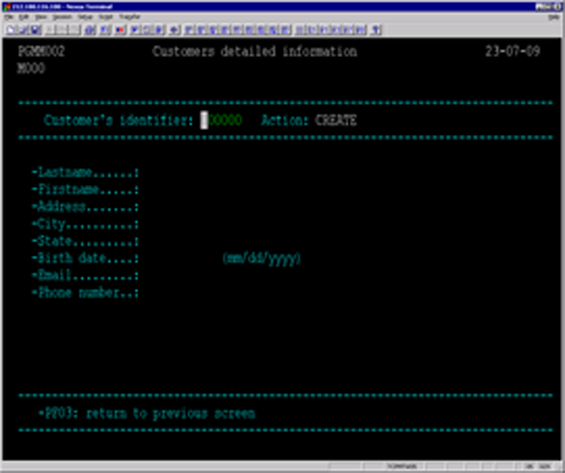
Figure 0‑1 Simple App Component Architecture
List of Components by Type
CICS Screens
 
CICS Programs
 
Batch Programs
 
Initial load of the VSAM file. This file is loaded from a QSAM file.
Transaction Codes
 
Jobs
 
This job runs an IDCAMS utility and REPRO the VSAM file into a QSAM which can be easily read and checked.
Map Descriptions
Listing 0‑1 MAPM000 - Simple App Main Menu
....+....1....+....2....+....3....+....4....+....5....+....6....+....7....+....8
MAPM000 Simple sample application 07/17/2009
M000
-------------------------------------------------------------------------------
Customer’s identifier: àààààà
PF04 – Customer’s List
PF05 – Add a new customer
PF06 – Modify an existing customer
PF07 – Delete an existing customer
PF08 – Customer’s inquiry
PF03 – Quit application
-------------------------------------------------------------------------------
Info: Type a customer number, select an action and press Enter.
-------------------------------------------------------------------------------
@@@@@@@@@@@@@@@@@@@@@@@@@@@@@@@@@@@@@@@@@@@@@@@@@@@@@@@@@@@@@@@@@@@@@@@@@@@@@@@
Listing 0‑2 MAPM003 - Customer List
....+....1....+....2....+....3....+....4....+....5....+....6....+....7....+....8
MAPM003 Customers list 07/17/2009
M003
 
-------------------------------------------------------------------------------
Sel ID Last name First name Birth date
-------------------------------------------------------------------------------
 
@ @@@@@@@@@@ @@@@@@@@@@@@@@@@@@@@@@@@@@@@@@ @@@@@@@@@@@@@@@@@@@@ @@/@@/@@@@
@ @@@@@@@@@@ @@@@@@@@@@@@@@@@@@@@@@@@@@@@@@ @@@@@@@@@@@@@@@@@@@@ @@/@@/@@@@
@ @@@@@@@@@@ @@@@@@@@@@@@@@@@@@@@@@@@@@@@@@ @@@@@@@@@@@@@@@@@@@@ @@/@@/@@@@
@ @@@@@@@@@@ @@@@@@@@@@@@@@@@@@@@@@@@@@@@@@ @@@@@@@@@@@@@@@@@@@@ @@/@@/@@@@
@ @@@@@@@@@@ @@@@@@@@@@@@@@@@@@@@@@@@@@@@@@ @@@@@@@@@@@@@@@@@@@@ @@/@@/@@@@
@ @@@@@@@@@@ @@@@@@@@@@@@@@@@@@@@@@@@@@@@@@ @@@@@@@@@@@@@@@@@@@@ @@/@@/@@@@
@ @@@@@@@@@@ @@@@@@@@@@@@@@@@@@@@@@@@@@@@@@ @@@@@@@@@@@@@@@@@@@@ @@/@@/@@@@
@ @@@@@@@@@@ @@@@@@@@@@@@@@@@@@@@@@@@@@@@@@ @@@@@@@@@@@@@@@@@@@@ @@/@@/@@@@
@ @@@@@@@@@@ @@@@@@@@@@@@@@@@@@@@@@@@@@@@@@ @@@@@@@@@@@@@@@@@@@@ @@/@@/@@@@
@ @@@@@@@@@@ @@@@@@@@@@@@@@@@@@@@@@@@@@@@@@ @@@@@@@@@@@@@@@@@@@@ @@/@@/@@@@
 
 
-------------------------------------------------------------------------------
-PF7: Page up -PF8: page down -PF3: return to previous menu
-Info: Enter a non blank character and press enter to view customer's data
-------------------------------------------------------------------------------
@@@@@@@@@@@@@@@@@@@@@@@@@@@@@@@@@@@@@@@@@@@@@@@@@@@@@@@@@@@@@@@@@@@@@@@@@@@@@@@
Listing 0‑3 MAPM001 - Customer Detailed Information
....+....1....+....2....+....3....+....4....+....5....+....6....+....7....+....8
MAPMM01 Customer's detailed information 07/17/2009
M001
 
-------------------------------------------------------------------------------
Customer's identifier: àààààà
-------------------------------------------------------------------------------
-Last name_____: àààààààààààààààààààààààààààààà
-First name____: àààààààààààààààààààà
-Address_______: àààààààààààààààààààààààààààààà
-City__________: àààààààààààààààààààà
-State_________: àà
-Birth date____: àà/àà/àààà
-Email_________: àààààààààààààààààààààààààààààààààààààààà
-Phone number__: àààààààààà
 
-------------------------------------------------------------------------------
-PF03: return to previous screen
-------------------------------------------------------------------------------
@@@@@@@@@@@@@@@@@@@@@@@@@@@@@@@@@@@@@@@@@@@@@@@@@@@@@@@@@@@@@@@@@@@@@@@@@@@@@@@
Listing 0‑4 MAPM002 - Customer Maintenance
....+....1....+....2....+....3....+....4....+....5....+....6....+....7....+....8
MAPM002 Customer's maintenance 07/17/2009
M002
 
-------------------------------------------------------------------------------
Customer's identifier: àààààà Action: @@@@@@
-------------------------------------------------------------------------------
 
-Last name_____: àààààààààààààààààààààààààààààà
-First name____: àààààààààààààààààààà
-Address_______: àààààààààààààààààààààààààààààà
-City__________: àààààààààààààààààààà
-State_________: àà
-Birth date____: àà/àà/àààà
-Email_________: àààààààààààààààààààààààààààààààààààààààà
-Phone number__: àààààààààà
 
-------------------------------------------------------------------------------
-PF11: clear screen
-PF12: confirm action
-PF03: return to previous screen
-------------------------------------------------------------------------------
@@@@@@@@@@@@@@@@@@@@@@@@@@@@@@@@@@@@@@@@@@@@@@@@@@@@@@@@@@@@@@@@@@@@@@@@@@@@@@@
Program Descriptions
CICS Program Descriptions
PGMM000 (customer maintenance main menu)
PGMM000 is the Simple Sample Application (access) main menu program. From this screen, one may access the following functions:
Each function can be reached by entering a specific function key. At the end of the called function, a return is performed back to this main menu.
Controls:
This program checks that a valid customer identification number is entered when accessing the inquiry and maintenance functions.
PGMM001 (customer detailed information inquiry)
This program receives – thru the communication area – a customer identification number. The program accesses the VSAM customer file in order to display the customer data when known.
Controls:
Assuming that no data can be modified by this program, no control is performed.
PGMM002 (customer data maintenance)
This program enables the maintainance of the VSAM customers file:
PGMM002 receives an action code and, when needed, a customer identification number. The action to be performed is displayed on the screen (CREATE, UPDATE or DELETE).
Controls:
The controls carried-out depend on the action to perform.
When creating a new customer, the programs checks that:
When updating an existing customer, the controls are the same as the ones used when creating a customer except for the customer identification number, which cannot be modified.
There is no control performed on a customer deletion request.
PGMMM03 (customer list)
This program lists the customers stored in the VSAM file. A limited number of customers are displayed on each screen – the PF7 and PF8 keys give access to the previous and next pages. A non-blank character at the beginning of a customer's line gives access to the detailed customer information screen (see program PGMM001).
Batch Program Descriptions
PGMMB00 (VSAM file initial load)
This batch program reads a sequential file containing data to be stored in the VSAM file. For each record in the entry file, a VSAM record is created. The VSAM file must have been DELETED and DEFINED prior to executing this program. All data from the entry file is supposed to be valid: hence, no control is performed within this program.
PGMMB01 (customer report)
PGMMB01 reads all the customer record from the VSAM file and produces a report. An example of the report produced is included in this document.
PGMMB02 (batch customer maintenance program)
Each input sequential file record contains a three characters action code (ADD, UPD or DEL) and the customer data required when creating a new customer or updating an existing one. Each input line updates the VSAM customer file. Customer data from the sequential file is supposed to be valid so that no control is performed by the PGMMB02 batch program.
Using Oracle Tuxedo Application Rehosting Workbench to Rehost the Simple App
Create Project
The Tuxedo ART Workbench Plug-in is an add-in to Eclipse which was installed along with the other components of the Oracle Tuxedo Application Rehosting Workbench. The Workbench is started by clicking on the Tuxedo ART Eclipse IDE icon on your desktop.
If you not in the "Tuxedo ART Workbench and Runtime" perspective, you can switch it manually, Click Window->Open Perspective->Other, and then select "Tuxedo ART Workbench and Runtime", then click "OK".
To create a new ART project click File>New>Project and choose "ART->Tuxedo ART Project" in the list, then click Next.
On the Create an ART Project screen enter the name of your project and either leave Use default location checked or uncheck it and enter the location of the work area that the Workbench will use for the project, then click Next.
On the next screen enter the Workbench Install Directory if it is different from the default already shown and click Next.
On the next screen enter the location of the Application Source Folder. This is the location that you copied the provided application source and data to as outlined in the Introduction above. You can use the Browse button to locate the source directory. Append the directory "source" to this location to indicate where the actual source files are located and click Next.
On the next screen the "Target Database Type" and "COBOL Compiler Type" are shown. These can be modified if necessary, we user the default value in the case. Click Finish to continue.
Once you click Finish, the ART Project Wizard will create a new project and populate the work area which was specified. The Workbench also creates additional working directories and populates them with parameter files and scripts. The structure of the work area is shown below.
Figure B‑1 Work Area Structure
 
 
The Create Project phase is now complete.
Import
The import phase copy source files into the project. All the sub-directories of the directory which you specified while creating project will be showed in the table as shown below.
Figure B‑2 Import Wizard
Select all of them, then click "Finish". All the selected sub-directories will be imported into project.
Prepare
The Prepare phase makes the source ready for further processing by the other components of the Workbench. Since source from different mainframes may have been gathered in various ways, the Prepare process allows you to choose the proper processing for your source. If after going through the prepare process you realize that something is still not correct, you can execute ART>Reset>Clean Prepare, which will be discussed later, to delete the output of the Prepare phase and execute it again with different options.
To execute the Prepare phase, from the menu bar click ART>Prepare…
The Preparation Page will be displayed. On this screen you can check MBCS code page conversion if required. For details on MBCS please reference the Appendix 3 - Tuxedo ART Workbench MBCS Support. If during file transfer from the mainframe, <CR> characters were inserted before the end of each line, you can check dos2unix conversion to remove these.
This is typically the case when the source files are transferred to a Windows machine. Check Rename source file name to UPPER CASE, all the source file's base name will be change to upper case . Since none of this preparation is necessary for this application, click "Finish" to complete.
Figure B‑3 Preparation Wizard
Analyze
The Analyze phase reads all of the sources and searches for missing components, dependencies, and creates an abstract representation of the source which is used in the Migrate step that follows. Reports are generated for each component type highlighting areas which must be addressed before executing the Migrate phase.
Before executing the Analyze phase, you must define the data migration required for the application. To do this, go to the STFILEORA Properties page by right clicking STFILEORA then clicking Properties. Click File Converter,and complete the table below as follows (The table we need to be scrolled to the left to show all fields.):
The Simple APP Application includes two files as described in the Data Description section of the Simple App Functionalities section above. Their names are
"QS-ODCSF0-RECORD" and "QS-ODCSFU-RECORD" respectively are the Record Names specified in the COPYBOOK.
"ODCSF0" and "ODCSFU" respectively are the Logical Names used by Tuxedo ART Workbench internally.
The Organization of PJ01AAA.S2.QSAM.CUSTOMER is Indexed. The Organization of PJ01AAA.S2.QSAM.CUSTOMER.UPDATE is "sequential". The Key Offset and Key Length for PJ01AAA.S2.QSAM.CUSTOMER are 0 and 6 respectively. Since PJ01AAA.S2.QSAM.CUSTOMER.UPDATE is a QSAM file, there is no key.
The Converted property is True if the file will be migrated to an Oracle table or False when it is left as a file.
The Transferred property means it's a permanent file with data that needs to be transferred from mainframe to open system. When set to True, Workbench will generate unload JCL, EBCDIC-to-ASCII transcoding programs, and reloading scripts.
The record structures of these files are defined in two COBOL copybooks and are entered in the Include field:
Once these properties are entered, click Apply. The status of the Properties for STFILEORA are shown below.
Figure B‑4 Properties Page
All information in the table is required to generated the datamap file and mapper file used by file converter.
To make the clear meaning of each column in the table, refer to "Datamap file" and "mapper file" section in the Oracle Tuxedo Application Rehosting WorkbenchReference Guide.
Before executing catalog, we must configure scope.
Click ART->Analyze->Configure Scope, all the source files are recognized successfully, and all of them will be process default.
Let's configure the library path of COBOL programs. Select "BATCH" and click "Advanced settings for sub-directory: BATCH", click "Libraries" tab-folder, click "New" to add a library, change it to "COPY". Similar to above steps, we set "COPY" as the "Library" of sub-directory "CICS".
Figure B‑5  
To execute the Analyze phase, from the menu bar click ART>Analyze>Catalog.
When the Catalog process is complete, review the console logs and the generated reports in the Reports window as shown below. The reports are also available in CSV Format in the …/workspace/STFILEORA/Reports directory.
Figure B‑6 Reports View
If it is necessary to rerun the Cataloger, it is necessary to delete the generated POB files. This can be accomplished by clicking ART>Analyze>Clean POB Repository from the menu bar.
Convert
This phase converts the COBOL programs and other source artifacts so that they will be ready for compilation and execution. It uses the abstract representation created during the Catalog phase. It also creates JCL decks for unloading data on the mainframe and various scripts for future steps in the rehosting process. You can Convert individual types of components or all components at once. To execute the Migrate phase, from the menu bar click ART->Convert ->Convert Components, and choose components to convert as need.
The Convert process will execute incrementally as additional files are added to or modified in the source directory. However, if it is necessary to rerun the Convert phase, all of the target files created can be deleted by clicking ART>Convert>Clean Target from the menu bar.
Configure
The Configure phase provides the capabilities to create makefiles for compiling components and configuration files for the Oracle Tuxedo Application Runtime for CICS and Batch. It provides options to create configuration for Tuxedo, CICS, and Batch independently. To execute the Configure phase, from the menu bar click ART>Configure as shown in following wizard.
Figure B‑7 Configuration Wizard
The Configure Wizard is used to create the required configuration files. Including makefiles which will ultimately be used to build the rehosted application, the data migration utilities created during the Migrate phase, and files to setup the environment.
"Database" tab allows you to specify the target database; "Compiler" tab allows you to specify the COBOL compiler options and PDKSH location; "Others" tab allows you to specify the ART CICS Pre-compiler and the ART CICS mapgen configuration. "MBCS Translate" can also be configured here.
The Tuxedo/CICS/Batch/IMS tabs allow you to either choose the default configuration or customize for your environment.
For more information, see Oracle Tuxedo Domain/CICS Runtime/Batch Runtime documentation.
Build
This phase compiles application components and data reloading programs and so on. To execute the build phase, from the menu bar click ART->Build then choose one or more of the build options. You can convert individual types of components or all components at once.
Deploy
The Deploy phase creates tar files of all of the programs, scripts, JCLs and configuration files that were created in the previous steps and are now ready for Deployment. You can also choose Local Deploy to compile and execute the rehosted application on the machine where the Workbench has been running. The Deploy phase also reloads data into file or database. Deployment to a different machine requires some manual intervention, the scope of which is beyond this section. To execute the Deploy phase, from the menu bar click ART>Deploy then choose one of the Deploy options.
Click "ART->Deploy->Pack and Deploy", “Pack“ generates four tar files which will be placed to pack directory under project.
“Deploy Application" will un-tar the tar files into deploy directory.
Click "ART->Deploy->Setup Runtime" to setup BATCH, CICS, and IMS runtime environment.
Click "ART->Deploy->Reload File Data" to launch the wizard. Choose the data source location, for example "/home/artuser/oracle/art_wb12110/samples/STFILEORA/data_source", then click the "Data Source File" column in the table, all the files in the front path will be listed, choose the matched one. Choose the deploy location, then click "Finish" as show below.
Figure B‑8 Reload File Data
Run
Click "ART->Batch Runtime->Start" to start Batch runtime. You can manipulate jobs by further clicking "ART->Batch Runtime->Manipulate Jobs".
Click "ART->CICS Runtime->Start" to start CICS runtime. You can open 3270 terminal to connect CICS runtime and invoke your transaction.
Click "ART->IMS Runtime->Start" to start IMS runtime. You can open 3270 terminal to connect IMS runtime and invoke your transaction.
Simple App Functionalities
Batch Processing
Batch programs and utilities are used to populate, update and list the VSAM customer file that hosts the data managed within the application. Five jobs are delivered with the application. This chapter describes how they are used.
VSAM Customers File Initial Load
1.
Step 1: VSAM file definition
First, define the VSAM customer file thru the IDCAMS utility using DELETE/DEFINE commands.
2.
Step 2: VSAM file initial load
The batch program PGMMB00 is used to populate the VSAM file.
3.
Step 3: VSAM file check
IDCAMS is used to REPRO the VSAM file into a sequential file which can easily be read in the z/OS environment.
4.
Step 4: VSAM file report
Batch program PGMMB01 produces a list of the customers stored in the VSAM customer file.
Figure 0‑2 VSAM Customers File Initial Load
 
VSAM Customer File Update
1.
Step 1: VSAM file update
Batch program PGMMB02 reads a sequential file containing updates to be performed on VSAM customers file. The input file is sorted by the IBM standard sort utility.
2.
Step 2: VSAM file report
Batch program PGMMB02 is used again in order to check that the updates were correctly applied to the VSAM customers file.
Figure 0‑3 VSAM File Update
Data Description
Simple Sample Application relies on only one VSAM main customer file. In order to keep the migration process as simple as possible, the data is stored in displayable formats (in COBOL syntax, this means that only "X" and "9" USAGE DISPLAY pictures are used).
The VSAM customer file contains the following information:
 
This VSAM file is a Key Sequenced Data Set (KSDS) based on the customer's identification number. Each record contains 266 characters and the key is stored from position 1 to position 6.
VSAM Customer File COBOL Description
Listing 0‑5 VSAM Customer File COBOL Description
01 ODCSF0-RECORD.
05 CUSTIDENT PIC 9(006).
05 CUSTLNAME PIC X(030).
05 CUSTFNAME PIC X(020).
05 CUSTADDRS PIC X(030).
05 CUSTCITY PIC X(020).
05 CUSTSTATE PIC X(002).
05 CUSTBDATE PIC 9(008).
05 CUSTBDATE-G REDEFINES CUSTBDATE.
10 CUSTBDATE-CC PIC 9(002).
10 CUSTBDATE-YY PIC 9(002).
10 CUSTBDATE-MM PIC 9(002).
10 CUSTBDATE-DD PIC 9(002).
05 CUSTEMAIL PIC X(040).
05 CUSTPHONE PIC 9(010).
05 FILLER PIC X(100).
 
Report Layouts
The following report is produced by program PGMMB01 that lists the customers from the VSAM file (METAW00.VSAM.CUSTOMER) after the initial load.
Listing 0‑6 Simple App Initial Report
PGMMB01 Simple Sample Application 07/16/2009
 
_ ID _ _ LAST NAME _ _ FIRST NAME _ _ CITY _ _ PHONE _ _B. DATE _
------ ----------------------------------- -------------------- ---------- ----------
1 Richardson Bobby New Orleans 5553557901 09/07/1961
2 Roberts Sammy San Francisco 5559827383 01/24/1973
3 Douglas Burt Atlanta 5556531100 10/12/1981
4 Ewing Samantha New York 5558762763 07/27/1962
5 Prince Anne Fresno 5553410156 12/25/1991
 
PGMMB01 Simple Sample Application 07/16/2009
 
_ ID _ _ LAST NAME _ _ FIRST NAME _ _ CITY _ _ PHONE _ _B. DATE _
------ ------------------------------ -------------------- -------------------- -------
6 Colombus Christopher Colombus 5557811021 07/27/1962
7 Raul Menedez Fresno 5558981572 07/27/1962
8 Doors Bill Seattle 5553122000 01/01/1958
9 Awing Charles San antonio 5559990123 06/29/1929
 
 
The following report is based upon the updated customer file.
Listing 0‑7 Simple App Updated Customer File Report
PGMMB01 Simple Sample Application 07/16/2009
 
_ ID _ _ LAST NAME _ _ FIRST NAME _ _ CITY _ _ PHONE _ _B. DATE _
------ ----------------------------------- -------------------- ---------- ----------
1 Richardson Bobby New Orleans 5553557901 09/07/1961
2 Roberts Sammy Jr San Francisco 5559827383 01/24/1973
3 Douglas Burt Atlanta 5556531100 10/12/1981
4 Ewing Samantha New York 5558762763 07/27/1962
5 Prince Anne Fresno 5553410156 12/25/1991
_ ID _ _ LAST NAME _ _ FIRST NAME _ _ CITY _ _ PHONE _ _B. DATE _
------ ----------------------------------- -------------------- ---------- ----------
6 Colombus Christopher Colombus 5557811021 07/27/1950
8 Doors Bill Seattle 5553122000 01/01/1958
9 Awing Charles San antonio 5559990123 06/29/1929
10 Simms Arthur New Orleans 5551298373 01/17/1969
11 LaFayette Eric Plesanton 5554653213 02/12/1995
12 Jackson Mic Fresno 5559800727 01/01/1959
 
Using the Simple App Application
This section provides an example use of the Simple App Application in order to illustrate how to use the application.
Viewing A Customer Record
1.
2.
The Main menu is displayed. Enter 000003 in the Customer identifier field and press the PF08 key to inquire on the customer.
3.
Updating A Customer Record
1.
From the Main menu enter 000003 in the Customer identifier field and press the PF06 key to update customer information.
2.
In the update screen all data may be modified. The screen header shows the action UPDATE. Change the customer’s address and press ENTER.
3.
Press PF12 to confirm the updates. A Maintenance OK message is displayed in the screen footer. To cancel your input, press PF03 in order to return to the Main menu.
Printing Customer Reports
1.
From the Main menu, press PF04 to access the Customer List first page.
2.
Note:
Adding New Customers
1.
From the Main menu press PF05, the following screen is displayed.
Action is set to CREATE in the screen header and fields are unprotected.
2.
The program validates the record; when no errors are found, a confirmation message is displayed.
3.
A New customer added message is displayed.
4.
Simple App APIs
This section lists the CICS APIs which are used within the Simple App application programs.
MAP APIs
SEND
EXEC CICS
SEND MAP('MAPM000') MAPSET('MAPM000') ERASE
END-EXEC.
EXEC CICS
SEND MAP('MAPM000') MAPSET('MAPM000') CURSOR ERASE
END-EXEC.
EXEC CICS
SEND MAP('MAPM001') MAPSET('MAPM001') FROM(MAPM001O) ERASE
END-EXEC.
RECEIVE
EXEC CICS
RECEIVE MAP('MAPM000') MAPSET('MAPM000')
END-EXEC.
EXEC CICS
RECEIVE MAP('ORDMAP1') MAPSET('ORDSET1') INTO(ORDMAP1)
END-EXEC.
NAVIGATION APIs
RETURN
EXEC CICS
RETURN
END-EXEC.
EXEC CICS
RETURN TRANSID('M000') COMMAREA(COMM-RECORD)
LENGTH(LENGTH OF COMM-RECORD)
END-EXEC.
XCTL
EXEC CICS
XCTL PROGRAM(PGM-DEST) COMMAREA(COMM-RECORD)
LENGTH(LENGTH OF COMM-RECORD)
END-EXEC.
ABEND
EXEC CICS
ABEND ABCODE('META')
END-EXEC.
VSAM APIs
STARTBR
EXEC CICS STARTBR DATASET ('ODCSF0')
RIDFILD (CUST-FILE-KEY)
EQUAL
RESP (RESPONSE-CODE)
END-EXEC.
EXEC CICS STARTBR DATASET ('ODCSF0')
RIDFILD (CUST-FILE-KEY)
GTEQ
RESP (RESPONSE-CODE)
END-EXEC.
READ
EXEC CICS
READ FILE('ODCSF0')
INTO(VS-ODCSF0-RECORD)
RIDFLD(CUST-FILE-KEY)
LENGTH(LENGTH OF VS-ODCSF0-RECORD)
EQUAL
RESP(RESPONSE-CODE)
END-EXEC.
EXEC CICS READ DATASET ('ODCSF0')
INTO (READ-ODCSF0-RECORD)
LENGTH (LENGTH OF READ-ODCSF0-RECORD)
RIDFLD (CUST-FILE-KEY)
EQUAL
UPDATE
RESP (RESPONSE-CODE)
END-EXEC.
WRITE
EXEC CICS WRITE DATASET ('ODCSF0')
FROM (MAJ-ODCSF0-RECORD)
LENGTH (LENGTH OF MAJ-ODCSF0-RECORD)
RIDFLD (MAJ-CUSTIDENT)
KEYLENGTH (6)
RESP (RESPONSE-CODE)
END-EXEC.
REWRITE
EXEC CICS REWRITE DATASET ('ODCSF0')
FROM (READ-ODCSF0-RECORD)
LENGTH (LENGTH OF READ-ODCSF0-RECORD)
RESP (RESPONSE-CODE)
END-EXEC.
READNEXT
EXEC CICS READNEXT DATASET ('ODCSF0')
INTO (CLT-ODCSF0-RECORD)
LENGTH (LENGTH OF CLT-ODCSF0-RECORD)
RIDFLD (CUST-FILE-KEY)
RESP (RESPONSE-CODE)
END-EXEC.
READPREV
EXEC CICS READPREV DATASET ('ODCSF0')
INTO (CLT-ODCSF0-RECORD)
LENGTH (LENGTH OF CLT-ODCSF0-RECORD)
RIDFLD (CUST-FILE-KEY)
RESP (RESPONSE-CODE)
END-EXEC.
ENDBR
EXEC CICS ENDBR DATASET ('ODCSF0')
END-EXEC.
DELETE
EXEC CICS DELETE FILE ('ODCSF0')
RIDFLD (CUST-FILE-KEY)
RESP (RESPONSE-CODE)
END-EXEC.
MISCELLEANOUS APIs
TIME
EXEC CICS
ASKTIME ABSTIME(ABS-TIME)
END-EXEC.
EXEC CICS
FORMATTIME ABSTIME(ABS-TIME)
DDMMYY(VDATEO) DATESEP('-')
END-EXEC.
HANDLE CONDITIONS
EXEC CICS
IGNORE CONDITION MAPFAIL
END-EXEC.
EXEC CICS
HANDLE CONDITION PGMIDERR(PGM-NOTFOUND)
END-EXEC.
Simple App Documentation References
You may find a detailed description of the CICS APIs at the following address:
http://publib.boulder.ibm.com/infocenter/cicsts/v3r1/index.jsp?topic=/com.ibm.cics.ts31.doc/dfhp4/topics/dfhp4_commands.htm
Detailed Description of the CICS APIs
The following CICS APIs are used in the Simple App application.
 
Delete a record from a file - VSAM KSDS, VSAM RRDS, and data tables only.
This document is based upon the following reference guide: CICS Transaction Server for z/OS Application Programming Reference

Copyright © 1994, 2017, Oracle and/or its affiliates. All rights reserved.