| Oracle® Healthcare Data Repository Release 7.0 |
|
 Previous |
 Next |
This chapter contains the following topics:
Set the following environment variables on the Linux machine from where the HDR installer will be run:
JAVA_HOME - JDK1.7 install directory
ANT_HOME - Ant home path (Ant 1.7.1 or later)
ORACLE_HOME - Oracle database home directory
TWO_TASK - Oracle Service Name
ORACLE_HOME_LISTENER - Oracle database listener home directory
PATH - $ORACLE_HOME/bin :$PATH
WL_HOME - WebLogic home directory
This section explains how to install the HDR application using the Oracle Universal Installer. The HDR application has to be installed in two stages:
This section explains how to create CTB and HCT schemas and respective database objects in the CTB and HCT schemas.
To install the HDR database tier, perform the following:
Copy HDR_Installer.zip and artifacts.zip folders to the database server machine.
Extract the files from HDR_Installer.zip and artifacts.zip to a directory.
For example, /home/hdrinstaller.
Navigate to the /hdrinstaller/Disk1 directory using the following command:
cd /hdrinstaller/Disk1
Execute the following script:
./runInstaller.sh
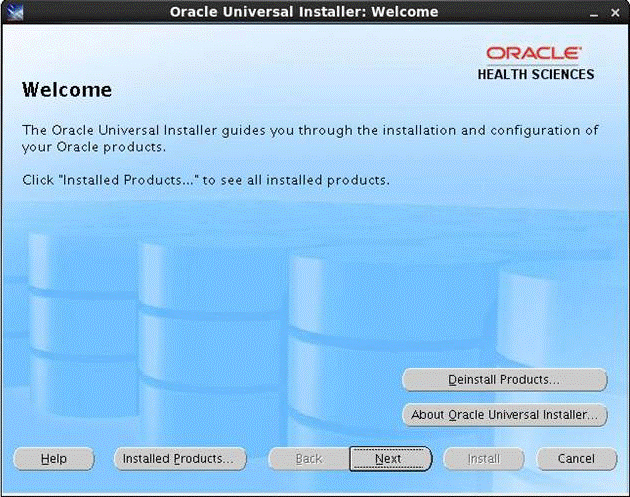
The Oracle Universal Installer screen is displayed.
Click Next.
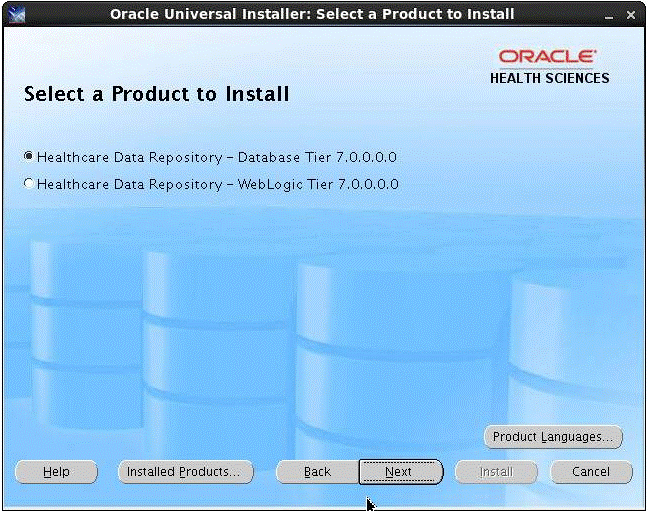
The Select a Product to Install screen is displayed.
Select the Healthcare Data Repository - Database Tier 7.0.0.0.0 option for HDR database schema and click Next.
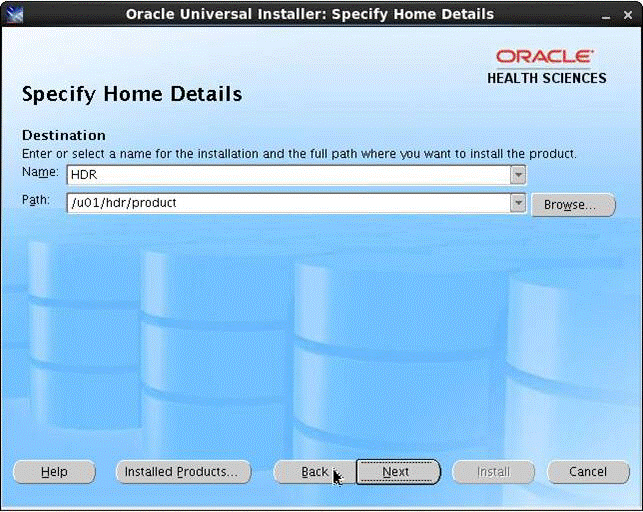
The Specify Home Details screen is displayed.
Enter the following values in the corresponding fields:
Table 2-1 Field Values
| Field | Value |
|---|---|
|
Name |
Enter the name of HDR Home. |
|
Path |
Enter the path for HDR Home. |
This is the location where the HDR product artifacts, including the HDR J2EE application are copied.
|
Note: By default, the Oracle database home directory path is displayed. Ensure to change the values to HDR home and its path. |
Click Next.
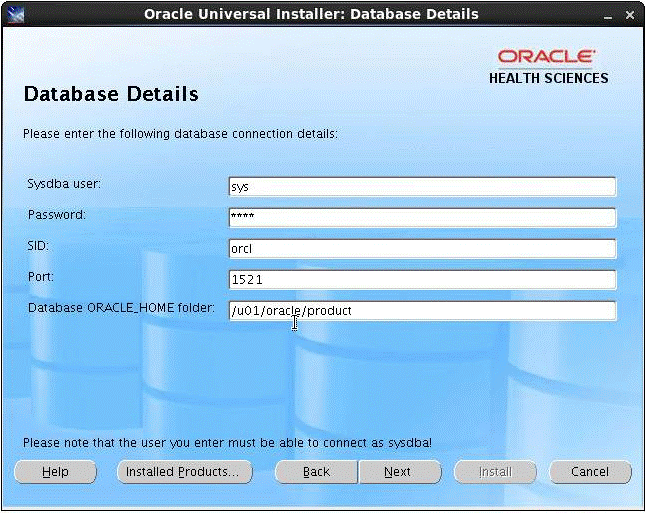
The Database Details screen is displayed
Enter the following values in the corresponding fields:
Click Next.
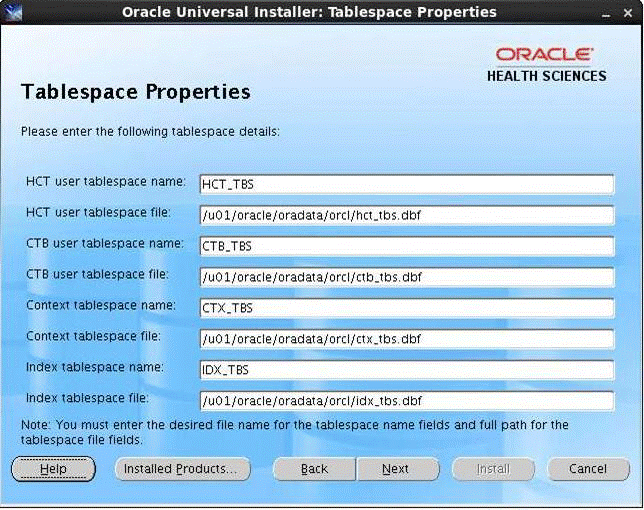
The Tablespace Properties screen is displayed.
Enter the following values in the corresponding fields:
Table 2-3 Field Values
| Field | Value |
|---|---|
|
HCT user tablespace name |
Enter the table space name for the HCT schema. |
|
HCT user tablespace file |
Enter the database file path (.dbf file) of the HCT tablespace. |
|
CTB user tablespace name |
Enter the table space name for the CTB schema. |
|
CTB user tablespace file |
Enter the database file path (.dbf file) of the CTB tablespace. |
|
Context tablespace name |
Enter the table space name for ETS context indexes. |
|
Context tablespace file |
Enter the database file path (.dbf file) of the Context tablespace. |
|
Index tablespace name |
Enter the tablespace name for all CTB and HCT indexes. |
|
Index tablespace file |
Enter the database file path (.dbf file) of the Index tablespace. |
Click Next.
The HCT User Password screen is displayed.
Enter the following values in the corresponding fields:
Enter Password - Enter the HCT user password.
Confirm Password - Re-enter the HCT user password to confirm.
Click Next.
The CTB User Password screen is displayed.
Enter the following values in the corresponding fields:
Click Next.
The ETS Concurrent Programs Settings screen is displayed.
Figure 2-6 ETS Concurrent Programs Settings
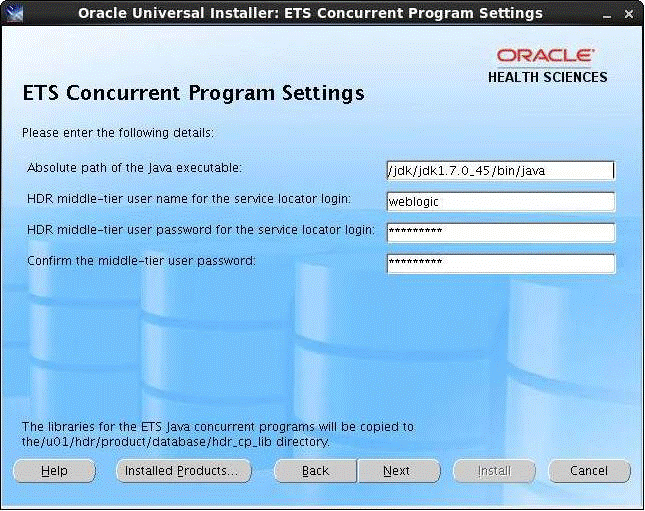
Enter the following values in the corresponding fields:
Table 2-5 Field Values
| Field | Value |
|---|---|
|
Absolute path of the Java executable |
Enter the complete JDK bin/java path. |
|
HDR middle-tier user name for service locator login |
Enter the WebLogic HDR user name. |
|
HDR middle-tier user password for the service locator login |
Enter the WebLogic HDR user password. |
|
Note: The WebLogic HDR user name and password should match the WebLogic domain user name and password mentioned in Running Installer for HDR Middle-Tier Installation. |
|
|
Confirm the middle-tier user password |
Re-enter the WebLogic HDR password to confirm. |
Click Next.
The Summary screen is displayed.
Click Install.
|
Note: Any errors during the installation are logged in the files under the <user_home_dir /oraInventory/logs folder. |
On successful completion of installation, the End of Installation screen is displayed.
Click Exit.
To install the HDR middle-tier, perform the following:
Copy HDR_Installer.zip and artifacts.zip folders to the WebLogic server machine.
Extract the files from HDR_Installer.zip and artifacts.zip to a directory.
For example, /home/hdrinstaller.
Navigate to the hdrinstaller directory using the following command:
cd hdrinstaller/Disk1
Execute the following script:
./runInstaller.sh
The Oracle Universal Installer screen is displayed.
Click Next.
The Select a Product to Install screen is displayed.
Select the Healthcare Data Repository – WebLogic Tier 7.0.0.0.0 option and click Next.
The Specify Home Details screen is displayed.
Enter the following values in the corresponding fields:
Table 2-6 Field Values
| Field | Value |
|---|---|
|
Name |
Enter the name of HDR Home. |
|
Path |
Enter the path for HDR Home. |
|
Notes:
|
Click Next.
The Choose WebLogic Home Directory screen is displayed.
Enter the WebLogic home path in the WebLogic home folder field.
Click Next.
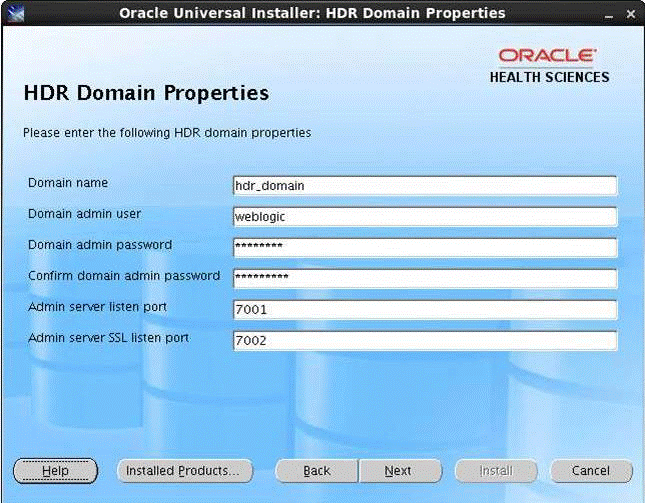
The HDR Domain Properties screen is displayed.
Enter the following values in the corresponding fields:
Table 2-7 Field Values
| Field | Value |
|---|---|
|
Domain name |
Enter the WebLogic domain name under which the HDR application has to be deployed. |
|
Domain admin user |
Enter the WebLogic domain admin user name. |
|
Domain admin password |
Enter the WebLogic domain admin password. |
|
Confirm domain admin password |
Re-enter the WebLogic domain admin password. |
|
Admin server listen port |
Enter the admin port number of the HDR domain. |
|
Admin server SSL listen port |
Enter the SSL port number. |
Click Next.
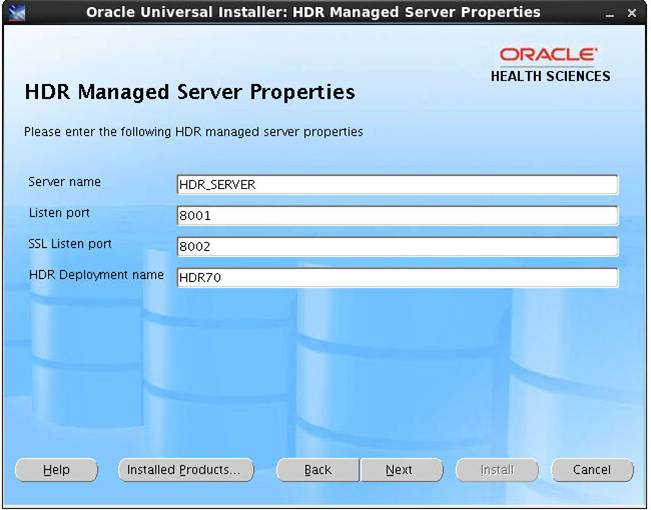
The HDR Managed Server Properties screen is displayed.
Enter the following values in the corresponding fields:
Click Next.
The IHE XDS User Password screen is displayed.
Enter the following values in the corresponding fields:
Click Next.
The DataSource properties screen is displayed.
Enter the following values in the corresponding fields:
Click Next.
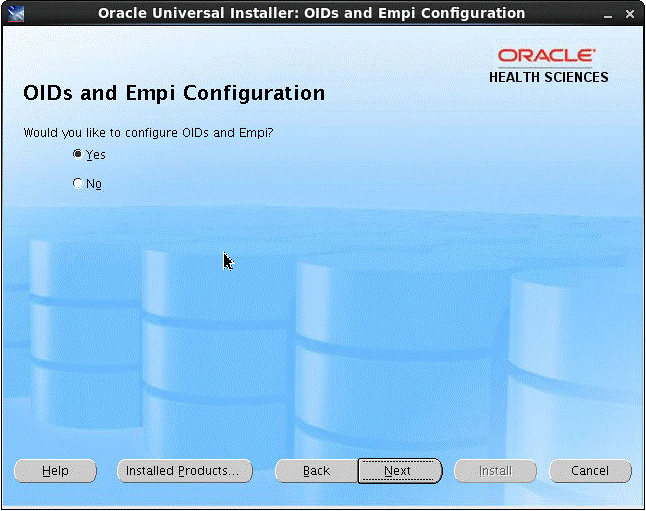
The OIDs and Empi Configuration screen is displayed.
Select one of the following options:
Select Yes, if the HDR database is a fresh installation.
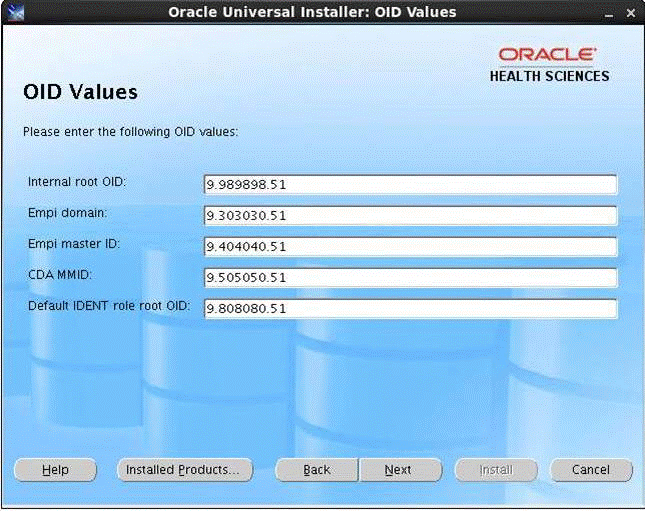
The OID Values screen is displayed.
Select No, if the HDR database is upgraded from HTB 5.3 or 6.1.1.
Enter the values in the fields as required.
Click Next.
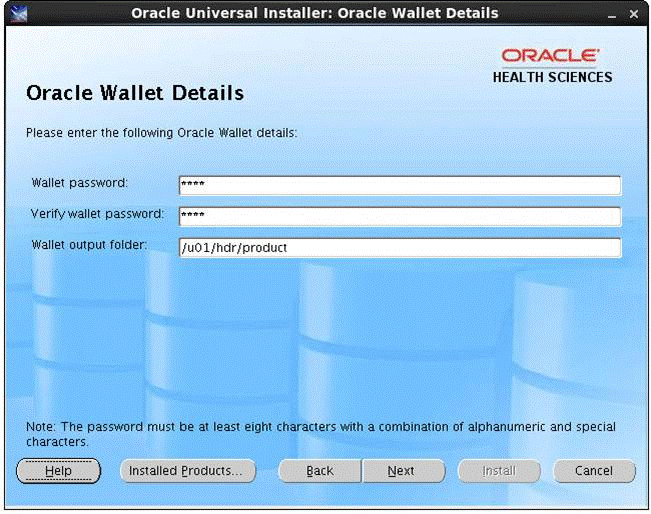
The Oracle Wallet Details screen is displayed.
Enter the values in the fields as required.
Click Next.
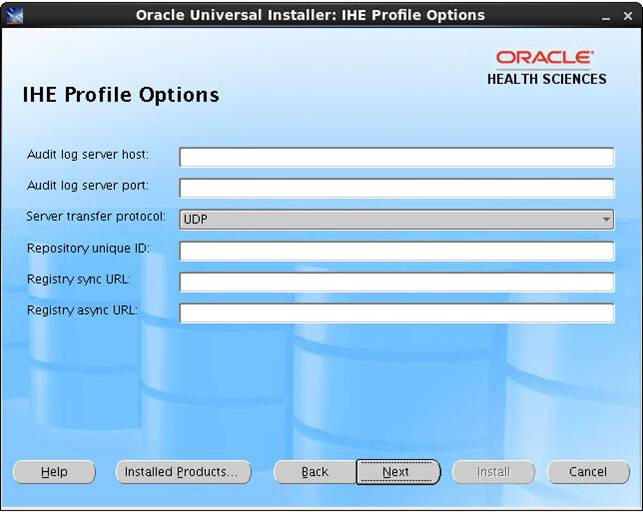
The IHE Profile Options screen is displayed.
To access the IHE Web Services, select Yes. Else, select No.
Select Yes and click Next.
The IHE Profile Options screen is displayed.
Enter the values in the fields as required.
|
Note: For more information on IHE Profile options, see the Oracle Healthcare Data Repository Implementation Guide. |
Click Next.
The Summary screen is displayed.
Click Install.
The following message is displayed after successful installation:
The installation of Oracle Healthcare Data Repository - WebLogic tier was successful.
|
Note: Installer log files are created under the <user_home_dir>/OraInventory/logs folder. Refer these log files for any errors during the installation. |
Click Exit to exit the installer.
Copy all the MTK custom schema/MIFs from HTB 6.1/6.1.1 instance to HDR 7.0 instance by running the following command:
|
Note: This step is applicable when you upgrade from HTB 6.1/6.1.1 to HDR 7.0. |
Copy $JAVA_TOP/oracle/apps/ctb/message/defs/customSchema/* to $HDR_HOME/hdr_exploded_app/oracle/apps/ctb/message/defs/customSchema
Copy the tCDA configuration XMLs from HTB 6.1/6.1.1 instance to the HDR 7.0 instance by running the following command:
|
Note: This step is applicable when you upgrade from HTB 6.1/6.1.1 to HDR 7.0. |
Copy $JAVA_TOP/oracle/apps/ctb/ccd/metadata/configuration/server/*.xml to $HDR_HOME/hdr_exploded_app/oracle/apps/ctb/ccd/metadata/configuration/server
Start the WebLogic hdr_domain admin server.
For example, > nohup ./startWebLogic.sh &
Start the hdr_server managed server.
For example, > nohup ./startManagedWebLogic.sh <hdr-nodemanger>http://<ip-address>:<port -number> hdr_server.log &
You can install HDR without using the Oracle Universal Installer. To install HDR without using the Oracle Universal Installer, perform the following:
Extract the files from artifacts.zip and follow the instructions as mentioned in the /artifacts/docs/HDR_installation_readme.txt file.
Execute the following PL/SQL block by connecting to the HCT schema:
SET VERIFY OFF;WHENEVER SQLERROR EXIT SQL.SQLCODE ROLLBACK;WHENEVER OSERROR EXIT FAILURE ROLLBACK; CREATE OR REPLACE PACKAGE BODY HCT_GATHER_TABLES_STATS AS-- Gather stage table statisticsPROCEDURE gather_stage_tables_statistic(x_gathered_stage_tbs_stats OUT NOCOPY NUMBER) AS v_StageTableName ALL_TABLES.TABLE_NAME%TYPE; --varible stores stage table name v_StageTableOwner ALL_TABLES.OWNER%TYPE; -- varible stores stage table owner CURSOR cur_sttb_name IS select OWNER, TABLE_NAME from all_tables where table_name like 'HCT_ST%' ;BEGIN x_gathered_stage_tbs_stats := 0; OPEN cur_sttb_name ; LOOP FETCH cur_sttb_name INTO v_StageTableOwner, v_StageTableName; EXIT WHEN cur_sttb_name%NOTFOUND; DBMS_STATS.GATHER_TABLE_STATS ( ownname=>v_StageTableOwner, --Stage table owner name. tabname=>v_StageTableName, -- Stage table name. estimate_percent=>DBMS_STATS.auto_sample_size, method_opt=>'FOR ALL INDEXED COLUMNS' ); x_gathered_stage_tbs_stats := x_gathered_stage_tbs_stats + 1; END LOOP; CLOSE cur_sttb_name ;END gather_stage_tables_statistic;-- gather active table statisticsPROCEDURE gather_active_tables_statistic (x_gathered_active_tbs_stats OUT NOCOPY NUMBER) AS v_ActiveTableName ALL_TABLES.TABLE_NAME%TYPE; v_ActiveTableOwner ALL_TABLES.OWNER%TYPE; CURSOR cur_ettb_name IS select OWNER, TABLE_NAME from all_tables where table_name like 'HCT_ET%' ;BEGIN x_gathered_active_tbs_stats := 0; OPEN cur_ettb_name; LOOP FETCH cur_ettb_name INTO v_ActiveTableOwner, v_ActiveTableName; EXIT WHEN cur_ettb_name%NOTFOUND; DBMS_STATS.GATHER_TABLE_STATS ( ownname=>v_ActiveTableOwner, --Stage table owner name. tabname=>v_ActiveTableName, -- Stage table name. estimate_percent=>DBMS_STATS.auto_sample_size, method_opt=>'FOR ALL INDEXED COLUMNS' ); x_gathered_active_tbs_stats := x_gathered_active_tbs_stats + 1; END LOOP; CLOSE cur_ettb_name;END gather_active_tables_statistic;END HCT_GATHER_TABLES_STATS;/commit;show errors;
To verify the HDR installation, execute the SessionTest.java code supplied. This code tests the creation of a session, user login, ETSService, Profile Options Service, and MasterCatalogService.
To execute the SessionTest.java file, perform the following:
Create a folder 'src' on your system and copy the SessionTest.java file and the jndi.properties file to the folder.
Edit application server details in the jndi.properties file.
Install the client-side libraries.
For a list of the client-side libraries, refer to the Healthcare Data Repository Programmer's Guide.
Execute the SessionTest.java file after the compilation.
This section contains the following topics:
To uninstall the database objects (CTB and HCT user schemas), perform the following:
Execute the following SQL scripts from sqlplus/sqldeveloper as sys user:
exec dbms_scheduler.drop_job('HDR_ETS_MAINTENANCE', TRUE);
exec dbms_scheduler.drop_job('HDR_ETS_LOADER', TRUE);
exec dbms_scheduler.drop_job('HDR_ETS_IMPORTER', TRUE);
exec dbms_scheduler.drop_program('hdr_ets_maintenance_program');
exec dbms_scheduler.drop_program('hdr_ets_loader_program');
exec dbms_scheduler.drop_program('hdr_ets_importer_program');
drop user HCT cascade;
drop user CTB cascade;
drop tablespace CTB_TBS INCLUDING CONTENTS and datafiles;
drop tablespace HCT_TBS INCLUDING CONTENTS and datafiles;
drop tablespace IDX_TBS INCLUDING CONTENTS and datafiles;
drop tablespace CTX_TBS INCLUDING CONTENTS and datafiles;
To uninstall the HDR middle-tier application, perform the following:
Stop the hdr_domain and hdr_server node mangers.
Delete the hdr_domain folder completely.
Edit WebLogic Oracle_Home/domain-registry.xml and remove the entry for hdr_domain.
Delete the HDR home directory (that you provided during install) completely.
Previous |
Next |
Copyright © 2008, 2014, Oracle and/or its affiliates. All rights reserved. Legal Notices |
 Contents |