| Oracle® Communications Calendar Server Security Guide Release 7.0.5 E54936-01 |
|
|
PDF · Mobi · ePub |
| Oracle® Communications Calendar Server Security Guide Release 7.0.5 E54936-01 |
|
|
PDF · Mobi · ePub |
This chapter explains the security features of Oracle Communications Calendar Server and the following tasks:
Security requirements arise from the need to protect data: first, from accidental loss and corruption, and second, from deliberate unauthorized attempts to access or alter that data. Secondary concerns include protecting against undue delays in accessing or using data, or even against interference to the point of denial of service. The global costs of such security breaches run up to billions of dollars annually, and the cost to individual companies can be severe, sometimes catastrophic.
The critical security features that provide these protections are:
Authentication
Access Control
Secure Communications
Authentication is the way in which an entity (a user, an application, or a component) determines that another entity is who it claims to be. An entity uses security credentials to authenticate itself. The credentials might be a user name and password, a digital certificate, or something else. Usually, servers or applications require clients to authenticate themselves. Additionally, clients might require servers to authenticate themselves. When authentication is bidirectional, it is called mutual authentication.
Access Control, also known as authorization, is the means by which users are granted permission to access data or perform operations. After a user is authenticated, the user's level of authorization determines what operations the user can perform.
Calendar Server supports LDAP authentication and the use of Access Control Instructions (ACIs) to grant end users permission to search the LDAP directory for other users and resources.
Figure 3-1 shows the protocols and communication flows used by Calendar Server that can be secured. The HTTPS, LDAPS, JMX, and SMTPS protocols must be secured by using SSL. SQL/JDBC connections between GlassFish Server and the database are also secured by using SSL.
Figure 3-1 Calendar Server Protocols Flow
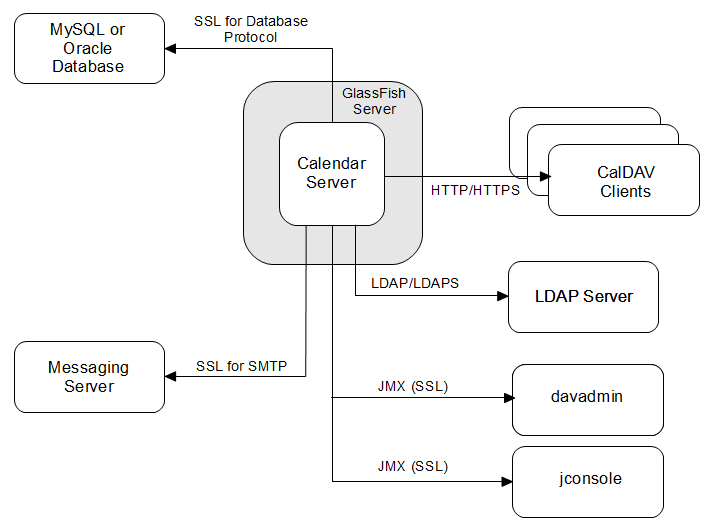
In the preceding figure, HTTPS and SSL provide encryption of data between the server and the respective components. For information on securing SMTP for notifications, see the topic on configuration parameters in Calendar Server System Administrator's Guide for information on the notification.dav.smtp.* parameters. See "Enabling LDAP SSL in Calendar Server" for information on LDAPS. See "Configuring SSL for MySQL Server" or "Configuring SSL for the Oracle Database" for information on securing connections to the back-end database. For more information on designing a secure deployment, see the "Designing for Security" documentation at:
https://wikis.oracle.com/display/CommSuite/Designing+for+Security
Note:
SSL is often used to refer to either SSL or TLS protocols or a combination of the two (SSL/TLS). Throughout this chapter, secure communications may be referred to by the generic term SSL.To configure HTTPS on the front-end GlassFish Server host, perform the following tasks:
The default GlassFish Server installation comes with a self-signed certificate, which is incompatible with production usage. To install an official certificate, see "Configuring GlassFish Server to Use a CA-Signed Certificate."
Most clients assume that the GlassFish Server is running on the default SSL port number (443). If you did not set the GlassFish Server default SSL port to 443 during installation, use this task to do so.
To set the default SSL port to 443:
List all the HTTP listeners. For example:
./asadmin list-http-listeners
http-listener-1
http-listener-2
admin-listener
Command list-http-listeners executed successfully.
Note the SSL listener (which will have an attribute of security-enabled=true).
./asadmin get server.network-config.protocols.protocol.http-listener-1.security-enabled
server.network-config.protocols.protocol.http-listener-1.security-enabled=false
Command get executed successfully.

./asadmin get server.network-config.protocols.protocol.http-listener-2.security-enabled
server.network-config.protocols.protocol.http-listener-2.security-enabled=true
Command get executed successfully.

./asadmin get server.network-config.protocols.protocol.admin-listener.security-enabled
server.network-config.protocols.protocol.admin-listener.security-enabled=false
Command get executed successfully.

./asadmin get server.network-config.network-listeners.network-listener.http-listener-2.port
server.network-config.network-listeners.network-listener.http-listener-2.port=8181
Command get executed successfully.
Set the port number to the correct value. For example:
./asadmin set server.network-config.network-listeners.network-listener.http-listener-2.port=443
server.network-config.network-listeners.network-listener.http-listener-2.port=443
Command set executed successfully.
This change does not require you to restart GlassFish Server.
The default installation of GlassFish Server enables both HTTP and HTTPS (using a self-signed certificate) on the server instance. During the Calendar Server configuration, you can choose to specify only the HTTP port, which sets the davcore.uriinfo.fulluriprefix parameter to http://host:http_port. This results in all URLs constructed by Calendar Server, for example those pointing to attachments, to have the http:// URL. When you reconfigure to use SSL, the host name part of this prefix should match the host name associated with the certificate.
To change the fulluriprefix:
Run the davadmin config command to set the davcore.uriinfo.fulluriprefix parameter to the desired host name and port. For example:
./davadmin config -u admin -o davcore.uriinfo.fulluriprefix -v https://www.example.com:8181
Identify the http-listener for the publicly accessible port that has SSL/TLS enabled (security-enabled=true) on which requests for Calendar Server are received. Ensure that SSLv3 is disabled for this listener by setting the option ssl3-enabled to false.
Identify the HTTP listeners that have SSL/TLS enabled (security-enabled=true) and verify whether SSLv3 is enabled on that listener (ssl3-enabled=true).
./asadmin get configs.config.server-config.network-config.protocols.protocol.* | grep http-listener.*security-enabled=true
configs.config.server-config.network-config.protocols.protocol.http-listener-2.security-enabled=true

./asadmin get configs.config.server-config.network-config.protocols.protocol.http-listener-2.ssl.ssl3-enabled
configs.config.server-config.network-config.protocols.protocol.http-listener-2.ssl.ssl3-enabled=true
Command get executed successfully.
Disable those HTTP listeners.
./asadmin set configs.config.server-config.network-config.protocols.protocol.http-listener-2.ssl.ssl3-enabled=false
configs.config.server-config.network-config.protocols.protocol.http-listener-2.ssl.ssl3-enabled=false
Command set executed successfully.
Restart GlassFish Server.
Disable non-SSL HTTP access to prevent any unsecured communications with Calendar Server.
List all the HTTP listeners and note the ones that do not have security enabled. For example:
./asadmin get configs.config.server-config.network-config.network-listeners.network-listener.http-listener-1.enabled
configs.config.server-config.network-config.network-listeners.network-listener.http-listener-1.enabled=true
Command get executed successfully.
Disable those HTTP listeners. For example:
./asadmin set configs.config.server-config.network-config.network-listeners.network-listener.http-listener-1.enabled=false
configs.config.server-config.network-config.network-listeners.network-listener.http-listener-1.enabled=false
Command set executed successfully.
This change does not require you to restart GlassFish Server.
If you specified to use an LDAPS URL during the Calendar Server initial configuration, the changes described in this section were already performed by the init-config script.
You must have already enabled the back-end Directory Server for SSL, either with a CA-signed certificate or self-signed certificate. Also, copy the cert8.db and key3.db files to the CalendarServer_home/lib/ directory.
To configure Calendar Server to communicate with Directory Server over SSL:
Create a text file, for example, usessl.txt, with the following content:
base.ldapinfo.authldap.ldapport=port_number
base.ldapinfo.authldap.ldapusessl=true
base.ldapinfo.ugldap.ldapport=port_number
base.ldapinfo.ugldap.ldapusessl=true
Change the port_number values to the LDAP SSL port value in your deployment.
Run the davadmin config command to make the configuration change. For example:
./davadmin config -u admin -f usessl.txt
Warning messages appear to restart GlassFish Server.
Restart GlassFish Server.
The Calendar Server notification mechanism relies on a messaging (email) server to deliver email notifications. By default, message submission is unsecured. You can secure this communication by using TLS/SSL transport.
To enable secure notification mail submission for Calendar Server:
Install either a CA-signed SSL certificate or self-signed certificate for your messaging server.
When installing a self-signed certificate, follow these guidelines:
Import the certificate into the Java trustStore file by using the Java keytool command.
Define the javax.net.ssl.trustStore and javax.net.ssl.trustStorePassword variables for the GlassFish Server JVM.
To use TLS, set the notification.dav.smtpstarttls configuration parameter to true.
./davadmin config modify -o notification.dav.smtpstarttls -v true
To use SSL, set the notification.dav.smtpusessl configuration parameter to true and set the notification.dav.smtpport configuration parameter to the SMTP SSL port, typically 465.
./davadmin config modify -o notification.dav.smtpusessl -v true
./davadmin config modify -o notification.dav.smtpport -v 465
To further enhance security, employ SMTP authentication:
Set the notification.dav.smtpauth configuration parameter to true.
./davadmin config modify -o notification.dav.smtpauth -v true
Specify the user and password of a valid mail user in your deployment by using the notification.dav.smtpuser and notification.dav.smtppassword configuration parameters.
./davadmin config modify -o notification.dav.smtpuser -v smtp_user
./davadmin config modify -o notification.dav.smtppassword -v password
For information on Calendar Server and LDAP authentication, see the topic on provisioning users in Calendar Server System Administrator's Guide.
You can configure Calendar Server for proxy authentication to enable a calendar administrator to log in to Calendar Server on behalf of a calendar user. For a CalDAV client to do so, when providing the user name and credentials for HTTP basic authentication, give the user name admin;user instead of just user. For the password, use the administrator password. For WCAP clients, the login API defines a proxy authentication parameter. See the documentation on the login.wcap command in Calendar Server WCAP Developer's Guide for more information.
For information on configuring access control, see the topic on administering access in Calendar Server System Administrator's Guide.
This section provides sample Access Control Instructions (ACIs) that show the attributes that Calendar Server needs for granting end users permission to search the LDAP directory for other users and resources. Tailor these samples to your individual site's security needs. Add an ACI to the user/group suffix in Directory Server by using the ldapmodify command. For more information on creating ACIs, see the ACI topic in Oracle Directory Server Enterprise Edition Administration Guide 11g Release 1 (11.1.1.5.0) at:
http://docs.oracle.com/cd/E20295_01/html/821-1220/bcanc.html
Sample ACI configurations:
The following sample ACI enables users to search for all other users and resources in the same domain for all domains hosted in the Directory Server, assuming a suffix of o=isp.
dn: o=isp
changetype: modify
add: aci
aci: (target="ldap:///($dn),o=isp")
 (targetattr!="userPassword")
 (targetfilter=(|(objectClass=icscalendaruser)(objectclass=icscalendarresource)))
 (version 3.0; acl "CS User search access to all users and resources in own domain - product=davserver,class=install,num=3,version=1";
 allow (read,search)
 userdn="ldap:///[$dn],o=isp??sub?(objectclass=icscalendaruser)";)
To control domain access at a finer level, add individual ACIs instead of using the $dn macro. For example, to allow search for only one domain, set the following ACI on the domain organization entry.
dn: domainA.orgdn
changetype: modify
add: aci
aci: (targetattr!="userPassword")
 (targetfilter=(|(objectClass=icscalendaruser)(objectclass=icscalendarresource)))
 (version 3.0; acl "CS User search access to all users and resources in domain A - product=davserver,class=install,num=3,version=1"; allow (read,search)
 userdn="ldap:///domainA.orgdn??sub?(objectclass=icscalendaruser)";)
Replace domainA.orgdn with your organization DN.
When adding ACIs to enable users to search other domains, that is, cross-domain searches, keep the following in mind:
For domain A users to be able to search for users in domain B, you would add an ACI on domain B's node to allow the search from users in domain A. For example, to enable users in example.com to search users in varrius.com, add the following ACI to the domain entry for varrius.com domain o=varrius.com,o=isp by using the ldapmodify command:
dn: o=varrius.com,o=isp
changetype: modify
add: aci
aci: (targetattr!="userPassword")
 (targetfilter=(|(objectClass=icscalendaruser)(objectclass=icscalendarresource)))
 (version 3.0; acl "example.com users access in varrius.com - product=davserver,class=install,num=3,version=1";
 allow (read,search)
 userdn="ldap:///o=example.com,o=isp??sub?(objectclass=icscalendaruser)";)
You might also need to set Domain Access Control Lists (ACLs) to control operations that span multiple domains. For more information, see the topic on managing domain access in Calendar Server System Administrator's Guide.
This section describes how to configure the Secure Sockets Layer (SSL) protocol between the Calendar Server front ends and back ends, including the database and the remote document store.
Topics:
You can enhance your security by configuring SSL communication between the Calendar Server front ends and back ends. To do so, first enable the back-end database servers for SSL by setting up the required trustStore files. Then configure the Calendar Server front ends to connect over SSL by making use of the stored certificates.
You can also configure SSL communication between the Calendar Server front ends and the remote document stores. For more information, see "Configuring SSL for the Remote Document Store."
To configure SSL for MySQL Server:
Create your own Certificate Authority and use it to sign a server certificate for the MySQL server instance and a client certificate for use with the MySQL Connector/J.
For example:
shell> cd /etc/mysql
# Create CA certificate
shell> openssl genrsa 2048 > ca-key.pem
shell> openssl req -new -x509 -nodes -days 3650 \
-key ca-key.pem -out ca-cert.pem
# Create server certificate, remove passphrase, and sign it
# server-cert.pem = public key, server-key.pem = private key
shell> openssl req -newkey rsa:2048 -days 3650 \
-nodes -keyout server-key.pem -out server-req.pem
shell> openssl rsa -in server-key.pem -out server-key.pem
shell> openssl x509 -req -in server-req.pem -days 3650 \
-CA ca-cert.pem -CAkey ca-key.pem -set_serial 01 -out server-cert.pem
# Create client certificate, remove passphrase, and sign it
# client-cert.pem = public key, client-key.pem = private key
shell> openssl req -newkey rsa:2048 -days 3650 \
-nodes -keyout client-key.pem -out client-req.pem
shell> openssl rsa -in client-key.pem -out client-key.pem
shell> openssl x509 -req -in client-req.pem -days 3650 \
-CA ca-cert.pem -CAkey ca-key.pem -set_serial 01 -out client-cert.pem
# Verify both the self-signed client and server cert
shell> openssl verify -CAfile ca-cert.pem server-cert.pem client-cert.pem
server-cert.pem: OK
client-cert.pem: OK
Enable SSL in the MySQL instance.
Stop the MySQL instance, if running.
In the [mysqld] section of the my.cnf file, add the following configuration parameters:
ssl-ca=/etc/mysql/ca-cert.pem
ssl-cert=/etc/mysql/server-cert.pem
ssl-key=/etc/mysql/server-key.pem
To verify that the MySQL instance is now enabled for SSL, run the mysql command-line tool to check the global variable have_ssl.
For example:
shell> /opt/mysql/mysql/bin/mysql -uroot -p
Enter password:
Welcome to the MySQL monitor. Commands end with ; or \g.
Your MySQL connection id is 10079
Server version: 5.5.28-enterprise-commercial-advanced MySQL Enterprise Server - Advanced Edition (Commercial)
Copyright (c) 2000, 2012, Oracle and/or its affiliates. All rights reserved.
Oracle is a registered trademark of Oracle Corporation and/or its
affiliates. Other names may be trademarks of their respective
owners.
Type 'help;' or '\h' for help. Type '\c' to clear the current input statement.
mysql> show variables like 'have_ssl';
+---------------+-------+
| Variable_name | Value |
+---------------+-------+
| have_ssl | YES |
+---------------+-------+
1 row in set (0.00 sec)
mysql> quit
Bye
shell>
If you want to run the mysql command-line tool with SSL, use the --ssl-ca option.
For example:
shell> ./mysql --ssl-ca=/etc/mysql/ca-cert.pem -uroot -p
Enter password:
Welcome to the MySQL monitor. Commands end with ; or \g.
Your MySQL connection id is 10089
Server version: 5.5.28-enterprise-commercial-advanced MySQL Enterprise Server - Advanced Edition (Commercial)
Copyright (c) 2000, 2012, Oracle and/or its affiliates. All rights reserved.
Oracle is a registered trademark of Oracle Corporation and/or its
affiliates. Other names may be trademarks of their respective
owners.
Type 'help;' or '\h' for help. Type '\c' to clear the current input statement.
mysql> \s
--------------
./mysql Ver 14.14 Distrib 5.5.28, for solaris10 (sparc) using EditLine wrapper
Connection id: 10089
Current database:
Current user: root@localhost
SSL: Cipher in use is DHE-RSA-AES256-SHA
Current pager: stdout
Using outfile: ''
Using delimiter: ;
Server version: 5.5.28-enterprise-commercial-advanced MySQL Enterprise Server - Advanced Edition (Commercial)
Protocol version: 10
Connection: Localhost via UNIX socket
Server characterset: utf8
Db characterset: utf8
Client characterset: latin1
Conn. characterset: latin1
UNIX socket: /tmp/mysql.sock
Uptime: 2 days 23 hours 55 min 2 sec
Threads: 25 Questions: 104093 Slow queries: 0 Opens: 58 Flush tables: 1 Open tables: 51 Queries per second avg: 0.402
--------------
mysql> quit
Bye
shell>
The output from the \s command shows that SSL is in use with the cipher information.
For the MySQL Connector/J in GlassFish to communicate with the MySQL server in SSL, put your Certificate Authority and the client certificate into a JKS trustStore and keystore respectively, and use them in the JDBC connection pool setup.
For example, while remaining in the /etc/mysql directory, perform the following commands:
shell> keytool -importcert -file ca-cert.pem -keystore cacerts.jks -storepass secret -storetype JKS
shell> keytool -importcert -file client-cert.pem -keystore keystore.jks -storepass secret -storetype JKS
Stop GlassFish Server.
Add the following parameters in the domain.xml file to the existing caldavPool and ischedulePool JDBC connection pool definition:
<property name="useSSL" value="true"/>
<property name="requireSSL" value="true"/>
<property name="trustCertificateKeyStoreUrl" value="file:///etc/mysql/cacerts.jks"/>
<property name="trustCertificateKeyStoreType" value="JKS"/>
<property name="trustCertificateKeyStorePassword" value="secret"/>
<property name="clientCertificateKeyStoreUrl" value="file:///etc/mysql/keystore.jks"/>
<property name="clientCertificateKeyStoreType" value="JKS"/>
<property name="clientCertificateKeyStorePassword" value="secret"/>
Optional: To log the SSL communication with GlassFish Server, add the following to the JVM options in the domain.xml before starting GlassFish Server.
<jvm-options>-Djavax.net.debug=ssl</jvm-options>
This setting causes messages such as the following to appear in the GlassFish Server server.log file:
[#|2013-03-25T16:11:52.799-0700|INFO|sun-appserver2.1|javax.enterprise.system.stream.out|_ThreadID=39;_ThreadName=Timer-8;|
Timer-8, WRITE: TLSv1 Handshake, length = 163|#]

[#|2013-03-25T16:11:52.846-0700|INFO|sun-appserver2.1|javax.enterprise.system.stream.out|_ThreadID=39;_ThreadName=Timer-8;|
Timer-8, READ: TLSv1 Handshake, length = 74|#]

[#|2013-03-25T16:11:52.846-0700|INFO|sun-appserver2.1|javax.enterprise.system.stream.out|_ThreadID=39;_ThreadName=Timer-8;|
*** ServerHello, TLSv1|#]
Start GlassFish Server.
You can enhance security by configuring SSL communication between the Calendar Server front and back ends. First, you enable the Oracle back-end database server for SSL by setting up the required Oracle wallet and Oracle Net Listener. Then, you configure the Calendar Server front ends to connect over SSL by setting the properties on the JDBC connection pool setting.
You can also configure SSL communication between the Calendar Server front ends and the remote document stores. For more information, see "Configuring SSL for the Remote Document Store."
For more information about configuring Oracle Database with SSL, see the SSL with Oracle JDBC Thin Driver documentation at:
http://www.oracle.com/technetwork/database/enterprise-edition/wp-oracle-jdbc-thin-ssl-130128.pdf
You can install the Oracle Database server certificate in an Oracle wallet that is accessible by the Oracle Net listener:
Use the orapki tool to create the Oracle wallet and a server certificate signing request. For more information about creating wallets, see Managing Oracle Wallets with the orapki Utility in Oracle Database Advanced Security Administrator's Guide 11g Release 1. For specific commands, see {{orapki}} Usage Examples in Oracle Database Advanced Security Administrator's Guide 11g Release 1.
When the certificate is signed by a trusted certificate authority, add it to the wallet for the Oracle Net configuration. For more information about using orapki to add a certificate to a wallet, see "orapki Utility Syntax" in Oracle Database Advanced Security Administrator's Guide 11g Release 1.
If the certificate authority is not known to the GlassFish Server instance hosting the Calendar Server front end, import the certificate authority's certificate into the GlassFish Server JVM. Depending on the GlassFish Server version, this is located in one of the following:
In the JRE CA certificate store that is typically available at:
javahome/jre/lib/security/cacerts
where javahome is the location of the JDK used by GlassFish Server.
In the GlassFish Server instance config /cacerts.jks store:
GlassFish_home/domains/domain1/config/cacerts.jks
Or, you can use a self-signed certificate:
Use the orapki tool to create the root and server certificates, and use the root certificate to sign the server certificate.
The Oracle wallet and the self-signed server certificate are used in the Oracle Net configuration.
On the GlassFish Server machine hosting the Calendar Server front end, import the root certificate into the GlassFish Server JVM as described in Step in the previous task.
To enable the Oracle Net listener for SSL communication, you must modify three configuration files for Oracle Net Services as shown in the following examples.
Manually edit the sqlnet.ora, tnsnames.ora and listener.ora files in $ORACLE_HOME/network/admin. In the following examples, replace values for host name, wallet location, and port numbers to match your configuration:
sqlnet.ora
# sqlnet.ora Network Configuration File:
# Generated by Oracle configuration tools.
SQLNET.AUTHENTICATION_SERVICES= (BEQ, TCPS)
SQLNET.CRYPTO_CHECKSUM_TYPES_SERVER= (SHA1, MD5)
SSL_VERSION = 0
TRACE_LEVEL_CLIENT = SUPPORT
NAMES.DIRECTORY_PATH= (TNSNAMES, EZCONNECT)
SSL_CLIENT_AUTHENTICATION = FALSE
TRACE_LEVEL_SERVER = SUPPORT
SQLNET.CRYPTO_SEED = 'kjlkwebflk090kj92hjkky9hsjkhdhhhwjk'
SQLNET.ENCRYPTION_TYPES_SERVER= (3DES168, AES256, RC4_256, AES192, AES128, RC4_128, 3DES112)
WALLET_LOCATION =
(SOURCE =
(METHOD = FILE)
(METHOD_DATA =
(DIRECTORY = /local/oracle/wallet/server)
)
)
SSL_CIPHER_SUITES= (SSL_RSA_WITH_AES_256_CBC_SHA, SSL_RSA_WITH_AES_128_CBC_SHA, SSL_RSA_WITH_3DES_EDE_CBC_SHA, SSL_RSA_WITH_RC4_128_SHA, SSL_RSA_WITH_RC4_128_MD5, SSL_RSA_WITH_DES_CBC_SHA)
ADR_BASE = /u01/app/oracle
tnsnames.ora
# tnsnames.ora Network Configuration File:
# Generated by Oracle configuration tools.
LISTENER_ORCL =
(ADDRESS = (PROTOCOL = TCP)(HOST = dbhost.example.com)(PORT = 1521))
(ADDRESS = (PROTOCOL = TCPS)(HOST = dbhost.example.com)(PORT = 2484))
ORCL =
(DESCRIPTION =
(ADDRESS_LIST =
(ADDRESS = (PROTOCOL = TCPS)(HOST = dbhost.example.com)(PORT = 2484))
(ADDRESS = (PROTOCOL = TCP)(HOST = dbhost.example.com)(PORT = 1521))
)
(CONNECT_DATA =
(SERVER = DEDICATED)
(SERVICE_NAME = orcl.example.com)
)
)
listener.ora
# listener.ora Network Configuration File:
# Generated by Oracle configuration tools.
SSL_CLIENT_AUTHENTICATION = FALSE
WALLET_LOCATION =
(SOURCE =
(METHOD = FILE)
(METHOD_DATA =
(DIRECTORY = /local/oracle/wallet/server)
)
)
LISTENER =
(DESCRIPTION_LIST =
(DESCRIPTION =
(ADDRESS = (PROTOCOL = IPC)(KEY = EXTPROC1521))
)
(DESCRIPTION =
(ADDRESS = (PROTOCOL = TCP)(HOST = dbhost.example.com)(PORT = 1521))
)
(DESCRIPTION =
(ADDRESS = (PROTOCOL = TCPS)(HOST = dbhost.example.com)(PORT = 2484))
)
)
ADR_BASE_LISTENER = /u01/app/oracle
TRACE_LEVEL_LISTENER = SUPPORT
Restart the listener using the lsnrctl command.
Or, if you prefer, you can use the Oracle Net Manager graphical user interface (GUI) tool to configure the Oracle Net Services values for profile, name service, and listener. Refer to the examples above when entering values in the GUI.
Run netmgr from the command line.
Expand Oracle Net Configuration, and select Profile under the local configuration icon.
Under the Oracle Advanced Security pull-down menu, click the SSL tab.
Type the path to the Oracle wallet for the server. You can also add various cipher suites for use in the SSL negotiation.
Click the Encryption tab. Choose an encryption method for your SSL configuration.
Click the Integrity tab. Choose a data integrity method for your SSL configuration.
Under Oracle Net Configuration, expand Service Naming and select the local service icon.
Under Address Configuration, click the Address 1 tab, choose the TCP/IP with SSL protocol, and type the host name and port number.
To add the additional TCP/IP with SSL address to the listener, under Oracle Net Configuration, expand Listeners and select the listener icon.
Click the Address 3 tab, choose the TCP/IP with SSL protocol, and type the host name and port number.
From the File menu, choose Save Network Configuration.
Install and configure Oracle Communications Calendar Server to communicate with the Oracle database using the non-SSL port.
Modify the caldavPool and iSchedulePool JDBC connection pool settings to use the TCPS protocol to communicate in SSL.
Change the URL property in the JDBC connection pool setting by editing the HOST, PORT, and SERVICE_NAME according to your deployment.
For example:
jdbc:oracle:thin:@(DESCRIPTION=(ADDRESS=(PROTOCOL=tcps)(HOST=dbhost.example.com)(PORT=2484))(CONNECT_DATA=(SERVICE_NAME=orcl.example.com)))
You can use SSL to secure transmission of data between Calendar Server and the remote document store. Configuring SSL between Calendar Server and the document store consists of the following high-level steps:
Create a self-signed or Certificate Authority (CA) signed certificate.
Create or update the SSL keyStore file on the document store host.
Configure the document store to accept SSL connections.
Install the certificate on the Calendar Server host, if necessary.
Make Calendar Server configuration changes to support SSL for the document store.
After creating either a self-signed or CA-signed certificate, you must import that certificate into a KeyStore file on the document store host. If you created the certificate in a KeyStore on the server host, you can use it "as is." If you created the certificate on some other host, or obtained a CA-signed certificate, you must import it into a KeyStore on the document store host as described in "Creating, Exporting, and Importing SSL Certificates."
To update the document store configuration with the location of the KeyStore file, and to enable SSL, edit the config/ashttpd.properties file. This file was previously created by the configure-as script when you initially configured the remote document store. The full path to the ashttpd.properties file is displayed when the configure-as script finishes.
To update the asshttpd.properties file for SSL:
Open the ashttpd.properties file.
Set the store.usessl property to true.
store.usessl=true
Set the store.sslkeystorepath property to the KeyStore file's path. For example:
store.sslkeystorepath=/myconfig/mykeystore.jks
Run the davadmin passfile command to set the document store SSL passwords, if you have not done so previously.
./davadmin passfile modify -O
When prompted by the command, type the document store and KeyStore (certificate) passwords.
Stop then restart the document store for the changes to take effect.
./stop-as
./start-as
If you are using a CA-signed certificate, you do not need to install the certificate on the Calendar Server host, as long as the instance of GlassFish Server you are using contains the root certificate of that CA.
If you are using a self-signed certificate, you must import the certificate into the trustStore file that is used by GlassFish Server on the Calendar Server host. For more information, see "Installing the Self-Signed Certificate on the Client."
To configure Calendar Server to use SSL for the document store:
On the Calendar Server host, set the store.document.usessl configuration parameter to true.
./davadmin config modify -o store.document.usessl -v true
Restart GlassFish Server.
Topics in this section:
Using GlassFish Server, you can prevent a Denial of Service (DoS) attack against the server by:
Limiting the size of a POST request
Specifying a request timeout value
Creating a blacklist of host names and/or IP addresses
For more information, see the topic on DoS prevention in Calendar Server System Administrator's Guide.
GlassFish Server does not enable the JMX port with SSL by default. If you want to make the JMX communications secure, you need to enable security for GlassFish, either through the GlassFish Administration Console, or through the asadmin command.
The davadmin command uses the JMX protocol to connect to GlassFish Server. This section describes how to create secure communications between the davadmin command and the Calendar Server host over SSL. To do so, you need to create a trustStore file for davadmin. If you are using SSL for communicating with GlassFish Server, it is mandatory to also configure JMX to use SSL
To create secure communications between davadmin and Calendar Server:
Export the server certificate that GlassFish Server is using for SSL.
Depending on the GlassFish Server version, you might use the Java keytool command or the NSS certutil command to export the certificate.
Example keytool command:
keytool -exportcert -keystore keystore.jks -storetype JKS -alias s1as -rfc -file /tmp/s1as.txt
Example certutil command:
/usr/sfw/bin/certutil -L -d . -n s1as -a > /tmp/s1as.txt
In these examples, the current directory is the GlassFish Server configuration directory and the certificate is named s1as.
Import the GlassFish Server certificate into a Java keystore for use by the davadmin command with the -s option.
For example:
keytool -importcert -alias s1as -file /tmp/s1as.txt -keystore /var/opt/sun/comms/davserver/config/davtruststore -storetype JKS
Modify the /var/opt/sun/comms/davserver/config/davadmin.properties file to reflect the new trustStore file created in the previous step.
Add the following line:
secure=/var/opt/sun/comms/davserver/config/davtruststore
Alternately, you could specify the explicit path to the trustStore file in the davadmin command with the -s option.
For example:
./davadmin db backup -k /tmp/backup_file -O -A docstore_host.example.com:8008 -s /my_home/my_truststore -u mysql
In the GlassFish Server Administration Console, enable secure JMX.
Navigate to Configurations.
Navigate to server-config.
Navigate to Admin Service.
On the JMX Connector tab, select the Enabled box for Security.
You can use the Calendar Server log files to look for security problems. This section lists a few security-related log messages.
Login errors resemble the following:
INFO [2014-01-08T11:20:44.529-0600] <...LDAPLoginModule.lookupUser> Error while retrieving user info for user <user>: No results found
If you have the logging level set to FINEST, then you see messages resembling the following when a login error occurs:
FINEST [2014-01-08T11:36:56.304-0600] <...WCAPServlet.service> failed login or session timeout
If a user is trying to bypass the data parsing, you see warnings such as the following:
FINE [2014-01-08T11:39:53.426-0600] <...RESTServlet.service> Got a non standard condition: failed to parse - Error at line 4:Illegal property [BEGI]
An unusually high activity of requests (REQ) from the same IP address shows up as the following in the commands log file:
Sample request log entry....
[2014-01-07T03:39:05.454-0700] <3887> DavServlet [REQ] REPORT /davserver/principals/jsmith IP_address server:port
|
Copyright © 2015, Oracle and/or its affiliates. All rights reserved. Legal Notices |
|