You are here: Configuration > Segments > Create a New Segment
Oracle® Insurance Rules Palette 10.1.0.0 E55027_01
Create a New Segment
Steps to Create a New Segment
-
Open the Main Explorer tab.
- Navigate to the Company | Plan folder where the segment will be created.
-
Right-click on the segment folder.
-
Select New Segment.
-
Enter the segment name and select Next.
-
Select the TypeCode for
the segment and then select Next. (Please
see Codes Names for further
detail.)
-
Select Finish.
The segment will then appear in the segment folder in blue font. This
indicates that it has been created, but has not yet been saved to the
database. Check-in the segment in order for it
to be saved.
Data Inheritance
Segments overridden at the Product, Child Product and Plan levels are able to utilize data inheritance. Configuration inherited from a higher override level will display in grey, indicating that it is unable to be edited. However, the configuration may still be able to be altered by overriding that piece of configuration entirely.
The following pieces of segment configuration are able to utilize data inheritance:
- Fields
- Events
- ScreenMath
- Actions
- Roles
- RoleViews
General Pane
View the segment properties, such as version number and TYPE, from the
General pane.
Fields Pane
This pane is used to create fields that will display on the Segment’s
screen. The functionality is exactly the same as
the Fields pane described in the rules section of this guide. Please
see the Fields pane for
more information.
Events Pane
This pane is used to create validations that will display on the Segment’s
screen. The functionality is exactly the same as described in the configuration
section. Please see the Events Pane for more information.
Buttons Pane
The Buttons pane allows for the selection of the type of button to be
displayed on the Segment screen. Checking the box
next to the button adds the button name to the right in the Order column.
The Up and Down buttons can be used to change the
order of the buttons on the screen. There is a
preview of the buttons located in the Preview box at the bottom of the
Configuration
Area.
Calculate Button has a drop-down box where
a Calculate business rule can be selected for the segment. When
a segment is calculated, the math configured in a Calculate business rule
takes into account various aspects of the policy and arrives at the values,
which are critical to the policy. Calculate business rules will all start with CalculateGeneral
as a standard.
The Calculate rule selected is then stored in the Segments Calculate
Rule folder in the Main Explorer tab for that plan. The Calculate rule
can be edited from this folder by double-clicking on its XML file.
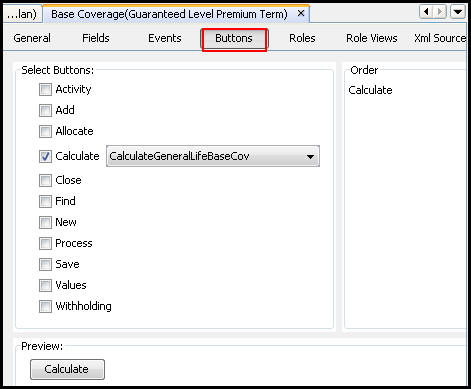
Buttons Pane for a Segment
Button Security
Security is applied to the buttons on the Segment screen in the Admin Explorer. Open the Security folder to reveal the options for applying security.
Steps to Add Security to Buttons
- Open Admin Explorer | Security | Application Security | Security Groups.
- Select the Security Group that has access to the Segment screen.
- Open Plan Security | Name of the Company | Plan Pages.
- Right-click the PolicySegment node and select Check-out to open it in the Configuration Area.
- Check the box next to each button the users in the security group will have access to in OIPA.
- Check-in the file to save the changes to the database.
Roles Pane
The Roles pane is used to add, edit, or remove roles that are associated
with a segment.
Steps
to Add a New Role
-
Select the Roles pane.
-
Right-click on the Roles node in the Navigator menu and select New Role.
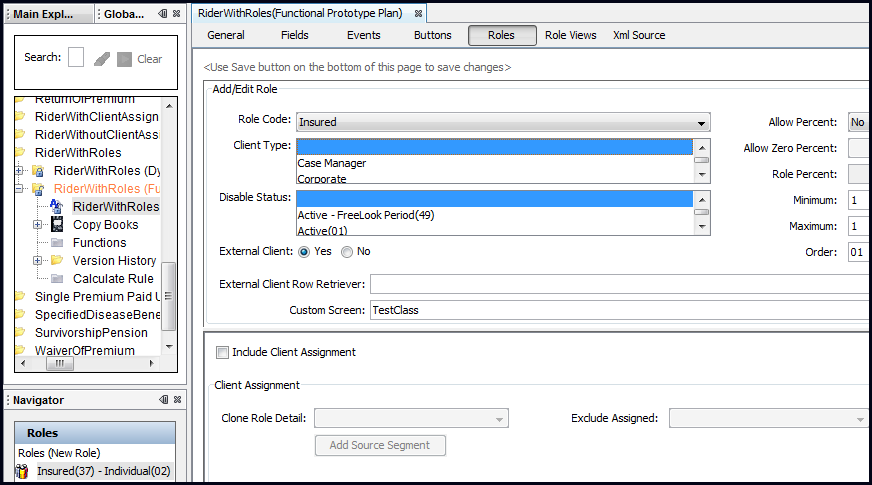
Roles Node in Navigator Window
- Select the desired role name from the available list
in the Role Code drop-down box.
Role
options are populated by AsCodeRole, which can be updated through the
Codes Names folder in Admin
Explorer.
-
Select Yes or No in the Allow Percent drop down box. If Yes is selected, then the AllowZeroPercent drop down box will be enabled.
- Select Yes or No in the AllowZeroPercent drop down box.
-
If applicable, select a Client Type.
This selection defines the client types that can
be assigned to the role. Only these client types will be displayed in
the client type drop-down box on the Client screen for the specific role.
For example, an insured may need to be an Individual
client type for a particular plan.
- Enter a role percent in the
Role Percent field. Percentages
can range from 0% to 100%, or an asterisk ("*") can be used to indicate that the total percent for the role can exceed 100%. Each individual record will still have a maximum of 100%, but the total for multiple records on the same Policy Role will be able to exceed 100%.
Using an asterisk in the Role Percent field will generate a warning message at the bottom of the Roles pane.
-
Select a status from the Disable Status list. This tells OIPA to disable role fields based on policy status. The list is populated by AsCodeStatus.
- Specify whether the role is an external client by selecting the Yes or No radio button in the External Client field. An external client is a client whose data is stored in an external database that cannot be modified within OIPA.
- Yes: Indicates that client data is stored in an external database. If this option is selected, the EXTERNAL attribute with a value of "Yes" is added to the <Role> element in the XML source. Additionally, if the CustomScreen field is populated, then the Client Type field can be left blank. If the CustomScreen field is not populated and no Client Type is chosen, then the system will generate an error message upon saving the role. These conditions apply to both visual and XML source configuration.
- No: The default selection—indicates that client data is not stored in an external database, and can be modified within OIPA. The Custom Screen and External Client Row Retriever fields will be disabled, and a client type must be chosen, or the system will generate an error message upon saving the role. This condition applies to both visual and XML source configuration.
-
If the External Client radio button is set to Yes, type a class name in the External Client Row Retriever field. This should be the name of a class that has been created to implement the external client search.
- If the External Client radio button is set to Yes, and if applicable, type a class in the Custom Screen field. This should be the name of a class that has been created to implement a customized display of external client search results. Note: Refer to the Extensibility document on OTN in the library for this release to access additional information on extending OIPA to include external clients.
- Type a minimum in the Minimum box. This is the minimum number of this type of role that can exist on the segment.
- Type a maximum in the Maximum box. This is the maximum number of this type of role that can exist on the segment.
- Type an order in the Order box. This is the order in which the role will appear on the screen.
- Select Yes or No from the Final drop-down box. Selecting Yes will prevent a lower level override of the segment from altering the role configuration.
- Select Yes or No from the Hidden drop-down box. Selecting Yes will hide the role on the Segment Role screen.
- Check or uncheck the Include Client Assignment checkbox.
- Checked: The Include Client Assignment check box will enable the following source segment fields: Add Source Segment button, Clone Role Detail combo box, Exclude Assigned combo box. The selection of the Include Client Assignment check box will not place any tags into the XML Source until the Save button on the bottom of the editor is clicked.
- Unchecked: If the Include Client Assignment check box is unselected then all of these actions will be done: all Source Segments defined for the role will be removed. The ClientAssignment element will be removed from the XML Source after the Save button is clicked.
- Select Yes or No to Clone Role Detail.
- Select Yes or No to Excluded Assigned.
- Click the Add Source Segment button to add a Source Segment and Segment Role Code fields. The maximum number of additions will be equal to the number of segments for the plan minus one.
-
Select the Save button
at the bottom of the Roles pane when finished.
Note:
To add multiple new roles, you need to select Add Role from the Navigator window before each
new role is entered. This clears the fields. CTRL + click deselects the options
if they are already selected in a drop down list.
Steps
to Remove a Role
-
Click the Roles
pane.
-
Click the role to be removed from the Roles section of the Navigator window. The role will appear highlighted in blue.
-
Right-click the role and select Delete.
Steps
to Edit a Role
-
Select the Roles pane.
-
Select a role from the Navigator window. The role will appear in the Configuration Area.
- Make the necessary changes.
-
Click Save at the bottom of the Roles
pane.
Role Views
The Role Views pane controls two aspects of roles: Role Views and Display Status.
- Display Status: determines the filter status for the role views. Multiple statuses can be selected.
- Role Views: controls the roles that are visible to the user. Multiple roles can be selected.
Steps to Set Display Status
- Check-out a segment.
- Click the Role Views pane. This will open the Navigator window in the bottom right corner of the screen.
- Click Display Status in the Navigator window. This will open the Display status options in the Configuration Area.
- Select the status when the Role Views may be used. Hold the CTRL key down and click to select multiple statuses.
- Click Save when finished.
Steps to Create Role Views
- Check-out a segment.
- Click the Role Views pane. This will open the Navigator window in the bottom right corner of the screen.
- Right-click the Role Views node in the Navigator window and select New Role View. The Role View information will open in the Configuration Area.
- Enter a name for the view in the View Name box.
- Select the roles that will be available to display for that view. Hold the CTRL key down and click to select multiple roles or use the All Roles checkbox.
- Click Save when finished.
Steps to Remove a Role View
- Right-click on the Role View in the Navigator window and select Remove Role View.
- Click OK when the Confirmation Window appears.
XML Source Pane
This pane allows individuals who prefer to configure in XML to do so.
Please see the XML Configuration
Guide topic in this help system for a list of all elements, attributes
and values needed for configuration. View Business Rules | Plan Rules | Segment Screen.
Copyright © 2009, 2014, Oracle and/or its affiliates. All rights reserved. Legal Notices