13 Creating and Commissioning USB Sticks
This chapter provides information on creating and commissioning Media Engine (ME) USB software installation sticks for commissioning third-party servers.
As part of each download, and depending on your actual requirements, Oracle can provide the following:
-
USB Boot Media Creator (BMC) with the ME software
-
Feature licenses
-
Documentation on how to create a USB stick and commission the ME software on your selected hardware
-
Standard set of Oracle ME technical publications
Supported USB Sticks
You must provide a USB stick with at least 4GB storage, and up to 4 GB storage, to handle ME software downloads. Oracle has tested a variety of USB sticks available from current suppliers and manufacturers. Most 1GB USB sticks manufactured today will work.
USB Stick Restrictions
Files that are larger than 2 MB will not be backed up to the USB stick and restored during the upgrade process.
All *.cfg and *.xml files in the current working directory (/cxc) that are less than 2 MB in size are backed up to the stick and restored during the upgrade.
Note:
Oracle recommends manually backing up the config file locally prior to the upgrade process.Running the Boot Media Creator
The Boot Media Creator (BMC) is the program that creates the ME software installation USB stick. Before using the bmc.exe program you must first download both the USB image file you are using to commission your system and the ZIP file containing the BMC tool. Then extract the bmc.exe program from the ZIP file.
The BMC supports the following OS types:
-
Windows XP
-
Windows Vista
-
Windows 7
Note:
If you are running on Windows 7, run bmc.exe as administrator (right-click and select Run as Administrator).
To extract the BMC:
-
Click on the file named nnSE#####-bmc.exe.
-
Click Run.
-
Click Next to start the BMC.
-
Click Next to display the Select Software Image page.
-
Select the External image file radio button.
-
Click the Select... button to browse to the USB image you downloaded and saved. The USB image name is in the format nnSE####-usb.img.gz.
-
Click Next to validate the software image.
-
Insert a USB stick into a USB drive on your PC or workstation.
-
Select the USB stick from the list and click Next to display the Select Options page.
-
For new installations, set the following:
-
Installation Type: Commission
-
Console Port: COM2 (serial1)
Note:
Oracle does not recommend changing the default Console Port setting.
Installation Type options:
-
Rescue: Creates a USB rescue stick. This will boot the system to the Rescue menu.
-
Commission: Copies the system license and configuration file from the ME system to the stick, commissions the system, and then reinstalls the license and configuration file. After commissioning the system, the USB stick becomes a rescue stick.
-
Decommission: Do not use; Oracle use only.
-
Manufacturing: Do not use; Oracle use only.
Console Port options to sets the destination for local management of the system.
-
Default: VGA port
-
COM1 (serial 0): Serial port 0
-
COM2 (serial 1): Serial port 1
During commissioning, when the GNU GRUB window appears, you will have the opportunity to change the port where your console device is connected, if necessary. If you made the correct selection during this step, simply wait 10 seconds for the installation to begin. If you need to make a new console port selection, follow the instructions on the menu to direct management output to the desired console port.
-
-
Check off the Generate installation logs box if you want to generate detailed installation-related messages for troubleshooting purposes. These messages are stored on the USB device in the /logs directory.
Note:
You may continue using the legacy licensing system or you may transition to self-provisioning entitlements. In both cases, ensure that your system's functionality abides by your organization's contractual obligations with Oracle. -
Click Next to display the License Tied to Hardware page.
Note:
If you have purchased royalty-bearing codecs for transcoding, you must specify that license file at this point in the installation process. Check the box next to Include License File and click Select. Browse to the appropriate license file and click OK. -
Click OK to display the Ready to Create Boot Media page.
-
Click Next to display the confirmation page.
-
Click Yes. The Creating USB Flash Boot Disk page appears.
-
Click Next from the Success! page.
-
Click Next from the Finishing Up page.
-
Click Next to display the Finished page.
-
Click Finish.
-
Remove the USB drive from your PC.
-
Reinsert the USB drive into the PC and browse the USB drive to verify that the software and license files are present.
Validating the USB Stick Contents For Existing Systems
If you are running the BMC to create a USB stick to commission an existing system, (a system with an existing configuration file and license), you will need to follow the steps in this section to ensure that the system will be commissioned with the current configuration file and license (if needed for royalty-bearing codecs).
-
Insert the USB stick into the PC and open an Explorer window to view the contents of the USB stick.
-
Open the \setup\cxc directory. You should see the License folder in this directory.
-
Copy the cxc.cfg file into the \setup\cxc directory so that the directory contains the License folder and the cxc.cfg file.
-
Open the License folder to ensure that a license file is present.
Note:
If the license folder is not present, create the directory named License and copy the ME license file to this location. -
Remove the USB stick from the PC.
Important Note About the New USB Stick
The ME USB stick provides three important functions:
-
Commissioning: Boots and licenses a new third-party server using the ME software.
-
Rescue utilities: After you have successfully commissioned the system (booted and licensed), the system automatically rewrites the USB stick so that you can use it to run system utilities in the event of a catastrophic failure. You will not be able to use this USB stick again to license another system. The USB stick can only be used at the specific system from which it was originally written.
Additionally, licensing information is rewritten to the USB stick, directly associating the license with the system. Use the show system-info action to display the box identifier (box-id) to which this USB stick is associated. The USB stick also contains log and debug files that you can use to help diagnose problems associated with the USB licensing process.
-
Rescue stick creation: With the original USB commissioning stick, use the restore-stick-create full-backup action to capture the current software, certificates, and operating system image to the USB stick. Oracle recommends that you use restore-stick-create full-backup to preserve the image prior to performing a system software upgrade, or whenever you have made significant and reliable changes to the system configuration.
Accessing License Files
To manage ME licenses, Select the Tools tab and click Upload License.
If you receive a license file by email, save the license to your local PC, then select the Tools tab and click Upload License file. Browse to the file and click Apply License, then click Upload.
Using WinSCP to Transfer the License
If you do not have access to the ME Management System, Oracle recommends you use WinSCP to transfer the license file to the ME. WinSCP is an open source free SFTP client and FTP client for Windows and is available as a free download from the following URL:
http://winscp.net/eng/index.php
Perform the following steps:
-
At the Hostname field, enter the IP address that you assigned to the management interface at the ME system. Port 22 is the default port number for SSH sessions.
-
At the Username and Password fields, type root for the username and sips for the password.
-
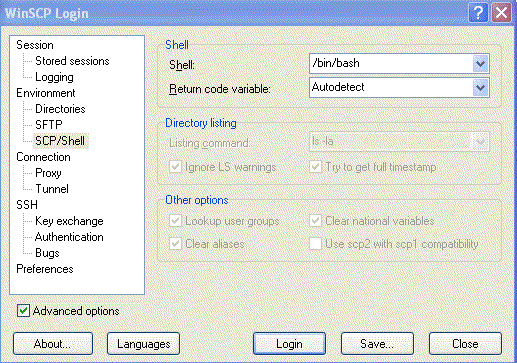
At the Environment menu, select SCP/Shell and select /bin/bash from the pull-down menu, as illustrated in the image below. Leave all other fields at their default settings.
-
Click Login. A series of progress message will appear as the connection is established.
-
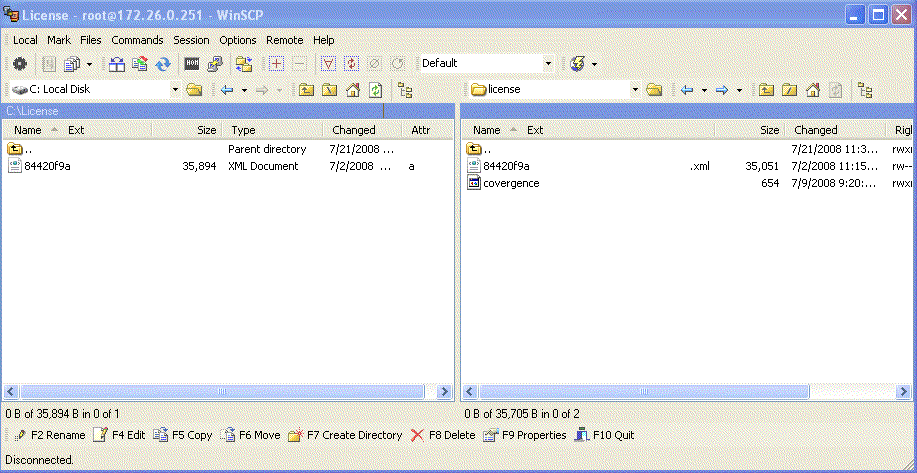
From the left pane, browse and locate the license file, then drag the license to the cxc/license directory, as illustrated in the image below. In this example, the file is copied from the c:\license directory to the cxc/license directory ME.
-
Once the license file is present in the cxc/license folder, you will need to do one of the follow tasks for the ME license to take effect:
-
Perform a physical restart of the ME system, or
-
From a CLI session to the device, execute the license apply action. Note that the following is an example only.
NNOS-E> license apply /cxc/license/84420g9a-da13-3007-8853-z00a7a4d771d.xml
Success!

NNOS-E> show licenses

name: LICENSE for Company.com
description: LICENSE for Company.com
        key: 84420g9a-da13-3007-8853-z00a7a4d771d
    expires:
       file: 84420g9a-da13-3007-8853-z00a7a4d771d.xml
-
ME Commissioning Steps
You will need to perform the steps in this section to properly boot and license new ME systems and third-party servers.
Caution:
Before starting, make sure that you have an operating terminal/console attached to the system. Perform any pre-installation tasks that may involve insertion and removal of the USB stick prior to beginning this sequence of steps.
Note:
For third-party platforms and servers, ensure that you have followed the vendor-supplied instructions for initial setup, followed by any changes to BIOS and other important settings prior to ME commissioning.-
Insert the USB drive into one of the USB ports on the device you are commissioning.
-
Restart or reboot the platform or third-party server.
Refer to the documentation supplied with the platform for specific information on restarting and rebooting the device.
-
The USB and disk lamps may blink during the boot-up process (although not all USBs do this) followed by a series of system messages. Press any key to continue, or perform the appropriate action for specific hardware.
-
When the GNU GRUB window appears, you will have the opportunity to select the port where your console device is connected. If you made the correct selection when you originally created the USB stick with the BMC (see ), simply wait 10 seconds for the installation to begin. If you need to make a selection that is now different, follow the instructions on the menu to direct management output to the desired console port.
GNU GRUB version 0.97 (639K lower / 1045376K upper memory) +-------------------------------------------------------------+ Acme Packet USB Setup (Default) Acme Packet USB Setup (force VGA console) Acme Packet USB Setup (force 1st serial Port @115200,n,8,1) Acme Packet USB Setup (force 2nd serial port @115200,n,8,1) +--------------------------------------------------------------+ Use the ^ and v keys to select which entry is highlighted. Press enter to boot the selected OS, 'e' to edit the commands before booting, or 'c' for a command-line. The highlighted entry will be booted automatically in 10 seconds. -
If a stick needs to be removed because the system will not reboot after the initial installation, reinsert the stick into the system at any point during the following sequence.
Loading Stage 1.5…
Grub Loading Please Wait...
Press any key to continue
Press any key to continue
-
Wait for the series of messages to complete over several minutes.
Note:
If using a VGA console, you will presented with login prompt. Type root and press Enter. -
At the username: and password: prompts, press Enter at each prompt to bypass the login and to display the NNOS-E prompt. Later, you will be able to configure users with appropriate user names and passwords.
Acme Packet, Inc.
Copyright (c) 2004-2009 Acme Packet, Inc.

username: <Enter>
password: <Enter>

Access granted since there are no configured users
Type 'config setup' to configure your system.
-
Execute the show licenses command to display licensing information. The information includes the name, description, key, file name, and the expiration date of the license.
NNOS-E> show licenses

       name: CUSTOMER ONE LICENSE
description: LICENSE FOR CUSTOMER ONE
        key: 84420f9a-da13-4107-8833-d00b7d4d751d
    expires:
       file: 84420f9a-da13-4107-8833-d00b7d4d751d.xml
If show licenses does not display any information, make sure that the USB stick is inserted and perform a restart warm.
-
At the NNOS-E prompt, type umount usb to properly dismount the USB stick. Physically remove the USB stick from the USB port. This is now your utility USB device. Refer to Using the Rescue Utility USB for information.
-
If the platform contains additional drives to be used for data (a physical drive or a logical RAID volume) they need to be added to the system before they can be used. To format and attach the first data drive to the system formatted with the XFS file system format, enter the following command:
format data-1 xfs
Use data-2 if there is a second data driver to be formatted and added, and so on.
If an existing data drive is being added to the system, for example when commissioning an existing system, use the ME add-device to attach drives.
Note:
this only applies to data drives formatted from an existing ME system and not an arbitrarily formatted drive. Ensure you specify the correct file-system type as what the drive was originally formatted.To attach the first data drive to the system formatted with the XFS file system format, enter the following command:
add-device data-1 xfs
-
Configure the ME software for your network. Run the setup script to configure basic IP connectivity and services. See Using the Setup Script.
Using the Setup Script
An optional configuration setup script called cxc.setup is included with the ME software. After installing a new system, you can run the script directly from the NNOS-E> prompt, as shown in the example session below.
The script presents a set of questions to help you with the initial system configuration. The information in the script includes the following:
-
Local hostname
-
IP interface names and addresses
-
SSH and Web access
-
Default route and any additional static routes per interface for remote management
-
User-defined ME
Oracle ME systems have a minimum of two Ethernet interfaces. Any Ethernet interface on the system can be used for management traffic, however, Oracle recommends the use of eth1, as eth0 is reserved for fault-tolerant clustering with other ME systems. Management traffic is also supported on any interface that is carrying private or public network traffic. This means that it would be possible to use eth1 to carry SIP traffic and management traffic.
CLI Session
Example 13-1 shows an example CLI Setup Script.
Example 13-1 Using the Setup Script
NNOS-E> config setup
set box\hostname: <name>
config box\interface: eth1
set box\interface eth1\ip a\ip-address: <ipAddress/mask>
config box\interface eth1\ip a\ssh (y or n)? y
config box\interface eth1\ip a\web (y or n)? y
config box\interface eth1\ip a\routing\route: <routeName>
set box\interface eth1\ip a\routing\route localGateway\gateway:
<ipAddress>
set box\cli\prompt: <newPrompt>
Do you want to commit this setup script (y or n) y
Do you want to update the startup configuration (y or n)? y
Creating a New USB Rescue Stick
The restore-stick-create full-backup action allows captures the current ME software and the operating system image and creates a new USB rescue stick. Oracle recommends that you use restore-stick-create full-backup to preserve the image prior to performing a system software upgrade, or whenever you have made significant and reliable changes to the system configuration.
Perform the following steps:
-
At the NNOS-E prompt, type umount usb.
Ignore the warning about the USB stick not being mounted.
-
Remove the USB stick and wait at least five seconds before reinserting the stick.
-
Invoke the restore-stick-create full-backup action. The resulting USB is a boot device from which you can restart and restore the ME.
Note:
The log event indicating that the operation has completed successfully appears while data is being written to the stick. DO NOT immediately remove the USB stick when you see this log event. Instead, issue the umount usb command again, and wait for it to complete. -
Remove the restore USB when the restore-stick-create action has completed.
Note:
PostgreSQL database, media recordings, system tar files(.gz) are not written to the restore stick with the restore-stick-create action.Note:
Use the restore-stick-create config-backup action to create a restore stick containing the current configuration file only.
Using the Rescue Utility USB
Perform the following steps:
-
Insert the rescue utility USB into one of the USB slots.
-
At the NNOS-E prompt, if available, enter restart cold to do a full restart.
-
The USB and disk lamps will blink during the boot-up process followed by a series of system messages. Press any key to continue, or perform the appropriate action below. On the
-
Sun Netra X3-2: Press F8.
-
HPDL360 G7: Press F11.
-
HPDL585 G7: Press F11.
-
HPDL320 G8: Press F11.
-
HPDL360 G8: Press F11.
-
CXC-350: Press the ESC key.
-
Sun x4150: Press F8.
-
IBM X3650, X3550, X-3350: Press F12.
-
Dell 1950 and 2950: Press F11.
-
Dell R220: Press F11.
-
IBM HS20 and HS21: Press F12.
-
Fugitsu Siemens RX200 S5: Press F12.
-
Fugitsu Siemens RX300 S4: Press F12.
-
ATCA MCLB0040: Press F8.
-
-
The system enters utility mode and the following menu appears:
MAIN MENU
=========
Please select from the following menu below:

1) Save config, install to system drive, restore config
2) Expert mode
3) Debug mode
4) Reboot

Choice:
The choices (by number) are as follows:
-
Save config, install to system drive, restore config
This function saves the current configuration file (cxc.cfg), license, and related files to the USB stick, reinstalls the ME software, and then restores the saved configuration files to the ME system.
-
Expert mode: Displays the following menu:
EXPERT MENU
===========

Please select from the following menu below:

1) Do not format and install to partition 4
2) Commission only the system drive
3) Save configs, license, certs and secrets
4) Restore configs, license, certs and secrets
5) Decommission box (VERY dangerous)

q) Return to main menu

Choice:
-
Debug mode: Displays the debug menu.
Caution:
The selections in the debug menu are diagnostic functions and should only be used with assistance from Oracle Technical Support.
DEBUG MENU
==========
Please select from the following debug menu below:

1) Shell
2) Disable debug mode
3) Disk repair (fsck)
4) Filesystem repair (fsck --rebuild-tree)
5) Check for disk errors (bad blocks)
6) Mount drives (1st system drive - partition 3)
7) Mount drives (2nd system drive - partition 4)
8) Unmount all drives
9) Fix MBR on system drive (ie GRUB)
a) Set default GRUB boot title item
b) Make USB stick bootable
c) Make USB stick un-bootable
q) Return to main menu

Choice:
-
Reboot: Performs a restart cold action.
Using the Expert Mode
The Expert mode provides utilities that allow you to recover from system failures where there is apparent damage to the software and configuration file, and where recovery is necessary to return the ME to normal operation. The Expert mode functions are described below:
-
Do not format and install to partition 3/4
This function reinstalls the ME to partition 3 (System 1) or partition 4 (System 2) on the system disk drive. Using partitions, you can install more than one release and use the set-chassis-config-boot action to select the system (and release) to run at system startup. No formatting of the system drive will occur under this function.
-
Commission only the system drive
If used in conjunction with the ”Do not format and install to partition 3/4” option above, this function installs the ME software and leaves the current configuration file and licenses intact. See ME Commissioning Steps.
Warning:
If you did not choose the ”Do not format and install to partition 3/4” option first, the system drive WILL BE formatted and all configuration and related data will be lost.
-
Save configs, license, certs and secrets
This function saves the current configuration file(s), license, certificates, and secrets from the current partition to the USB rescue stick. Oracle recommends that you use this function on a frequent basis to create an up-to-date rescue stick.
-
Restore configs, licenses, certs, and secrets
This function copies the configuration file(s), license, certificates, and secrets from the USB rescue stick to the current ME partition. Use this function, for example, to replace the current configuration file with a previous version, or if there was damage to any of the files (licenses, certs, secrets) during a system failure.
-
Decommission box (VERY dangerous)
This function removes the ME software, configuration files, license, certificates, and secrets. The resulting system will not be bootable after using this function. You will then be required to commission the device from scratch.