2 Configuring WebRTC Session Controller Signaling Properties and Media Nodes
This chapter describes how to configure the Signaling Engine and the Media Engine in the Oracle Communications WebRTC Session Controller web console.
About WebRTC Session Controller Console Configuration
You use the WebRTC Session Controller console for configuring Signaling Engine properties and Media Engine nodes. Additionally, you manage WebRTC applications, packages, and scripts in the console. See Oracle Communications WebRTC Session Controller Extension Developer's Guide for more information on managing applications, packages, and scripts.
You can also configure WebRTC Session Controller console options using configuration Mbeans. See the oracle.wsc.core.configuration.admin.mbean package page for more information on using these MBeans in Oracle Communications WebRTC Session Controller Configuration API Reference.
Accessing the WebRTC Session Controller Console Configuration Tab
The WebRTC Session Controller console resides on the same domain as your WebRTC Session Controller installation. When you start your domain, both the Oracle WebLogic Administration Console an the WebRTC Session Controller console become available.
You configure Signaling Engine and Media Engine parameters in the Configuration tab of the WebRTC Session Controller console. To access the WebRTC Session Controller console Configuration tab:
-
Start the WebRTC Session Controller domain server.
-
Open a web browser.
-
Access this URL:
http://host:port/wsc-console
where host:port represents the server and administration port number used by your domain server. If your environment uses HTTP security, use https.
The WebLogic user login screen appears.
-
Enter the Username and Password you set when creating the WebLogic domain.
-
Click Login.
The WebRTC Session Controller console window appears.
-
Select the Configuration tab.
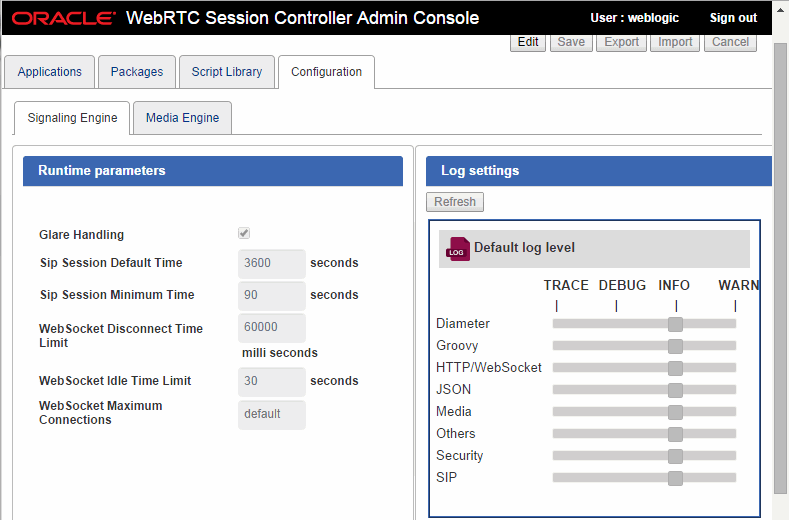
The Signaling Engine parameters and Media Engine node window are displayed as shown in Figure 2-1.
Figure 2-1 WebRTC Session Controller Console Configuration Tab

Description of "Figure 2-1 WebRTC Session Controller Console Configuration Tab"
About Signaling Engine Properties and Log Settings
You configure the Signaling Engine run-time parameters in the WebRTC Session Controller console. Table 2-1 describes the configurable Signaling Engine parameters.
Table 2-1 Configurable Signaling Engine Run-time Parameters
| Parameter | Description |
|---|---|
|
Glare Handling |
Selecting glare handling enables the Signaling Engine to avoid race conditions that arise when a caller and callee send simultaneous invitations, re-invitations, or session updates. By default, glare handling is selected and enabled. |
|
Sip Session Default Time |
The default SIP session time (in seconds). The default value is 3600 seconds. |
|
Sip Session Minimum Time |
The minimum SIP session time (in seconds). The default value is 90 seconds. |
|
WebSocket Disconnect Time Limit |
The time interval after which the websocket times out (in milliseconds). The defalt value is 60000 milliseconds. |
|
WebSocket Idle Time Limit |
The idle time interval after which the websocket times out (in seconds). The default value is 30 seconds. |
|
WebSocket Maximum Connections |
The maximum number of websocket connections allowed. Set this value to -1 for unlimited connections. The default value is -1. |
You can also specify the logging level for each of the following logging components of the Signalling Engine: Diameter protocol, Groovy scripts, HTTP/WebSocket, JSON, Media, Others, Security, and SIP. The Signalling Engine writes the log records to the domain_name/servers/server_name/logs/wsc.log file where domain_name is the name of the WebRTC Session Controller domain and server_name is the name of the serve.
You can set the logging output for each of these components by moving a slider to one of the following levels:
Table 2-2 Logging Levels for Signalling Engine Components
| Logging Level | Output |
|---|---|
|
Trace |
Logs fine-grained events that are useful for tracing the actions of the application. |
|
Debug |
Logs fine-grained events that would be useful for debugging the application. |
|
Info |
Logs high-level information that indicates the progress of the application. |
|
Warn |
Logs messages that describe situations that are potentially harmful |
|
Default |
Assigns the default log level for the component that is specified in the Default log level panel. For example, if you set the log level for Groovy to Default and the default log level for Groovy is Info, the log level for Groovy is set to Info. |
About Media Engine Nodes Configuration and Status
You configure, remove, and manage Media Engine nodes in the WebRTC Session Controller console. Managing Media Engine nodes includes blocking and unblocking WebRTC network traffic to media nodes, monitoring their availability and ensuring the their load factor remains within acceptable limits.
Table 2-3 describes the configurable and viewable media node properties in the WebRTC Session Controller console.
Table 2-3 Media Node Properties
| Property | Description |
|---|---|
|
User |
The user name required to connect to the Media Engine server. |
|
Password |
The password require to connect to the Media Engine server. |
|
Address |
The IP address of the Media Engine server. |
|
Port |
The port number of the media server connection. |
|
Media Node Traffic Enabled |
Whether traffic is enabled to the media node. |
|
Media Node Status |
Whether a connection to the media node is active. |
|
Load Factor |
The load percentage on a node controlled by the internal load balancer that attempts to distribute load evenly to available media nodes. WebRTC Session Controller will stop sending requests to media nodes with a Load Factor of 100%. |
Configuring Signaling Engine Parameters and Logging
To configure Signaling Engine parameters:
-
ClickEdit in the upper right corner of the screen.
-
Alter the Signaling Engine parameters listed in Table 2-1 as needed for your environment.
-
Click Save.
Configuring Logging
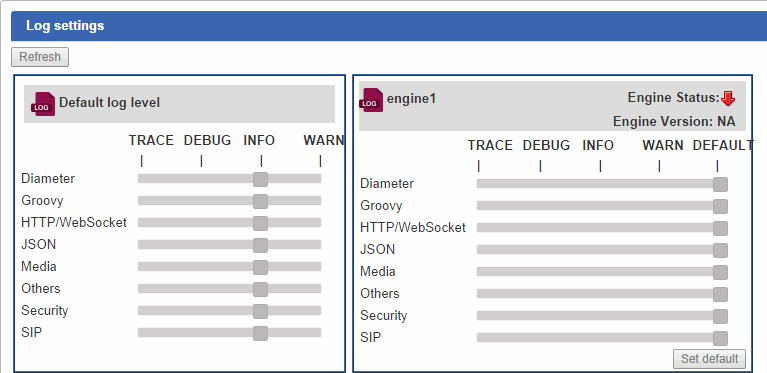
Figure 2-2 shows the Signalling Engine Log settings window, which allows you to set logging levels for the components of the engine that output logging information. The Log settings window consists of a Default log level pane and a pane for each signalling engine in a cluster. The Default log level pane allows you to set default logging levels for each of the engine's logging components. See Table 2-2 for descriptions of each of the logging levels.
Each active engine pane displays the engine status, whether it is running or not, and its version. An upward-pointing green arrow indicates the engine is running; a downward-pointing red arrow indicates it is not.
The Refresh button refreshes the engine status for each engine in the cluster.
Setting Default Logging Levels
The Default log level pane is a template for setting the default logging level for each logging component in the Signaling Engine.
To set the default logging level for a logging component:
Setting Engine Logging Levels
The engine log settings pane allows you to set the log level for each of its logging components.
To set the logging level for an engine logging component:
-
Click Edit in the upper right corner of the screen.
-
In the enginename panel, move the slider for the logging component to one of the logging levels listed in Table 2-2..
-
Repeat step 2 for each logging component that you wish to set.
-
Click Save.
To set the logging levels for all components to their default values, click the Set default button.
Configuring Media Engine Nodes
You can perform the following media node configuration actions in the WebRTC Session Controller console in the Media Engine window:
Adding Media Engine Nodes
To add a Media Engine node:
-
Click Add.
-
Enter the Address and Port of the media server node.
-
Click OK.
-
Click Save.
Removing Media Engine Nodes
To remove a Media Engine node:
-
Click Edit in the upper right corner of the screen.
-
Select the row with the media node you want to remove.
-
Click Block Traffic.
-
Click Remove.
The Remove Media Node window appears.
-
Click OK.
-
Click Save.
Blocking and Unblocking Media Node Traffic
To block or unblock traffic to a media node:
-
Click Edit in the upper right corner of the screen.
-
Select the row with the media node you want to block or unblock traffic to.
-
Click Unblock Traffic or Block Traffic.
-
Click Save.
Refreshing Media Node Information
To refresh media node information:
-
Click Refresh in the Media Engine window.
