5 Installing and Configuring SSO Authentication Integration
This chapter describes the procedure for installing and configuring the Oracle HTTP server. This is an optional part of the RUEI installation process, and is only required if you intend to use the Oracle Single Sign-On (SSO) service to authenticate RUEI users. Note that the Oracle SSO service must be fully installed and configured before it can be used for RUEI user authentication.
The procedure to configure the Reporter system for Oracle SSO user authentication is described in the Oracle Real User Experience Insight User's Guide. Note that RUEI must be fully installed before it can be configured for Oracle SSO user authentication.
5.1 Turning off the Default Web Server
The Oracle SSO server uses its own web server in order to prevent conflicts with the currently installed web server. Therefore, the currently installed web server needs to be turned off by issuing the following commands:
/sbin/service httpd stop
/sbin/chkconfig --del httpd
Note:
It is recommended that you do not un-install the default Linux Apache web server because this would also un-install the PHP module.5.2 Reporter System Without Local Database
The procedure described in this section should only be followed if you are installing and configuring the oracle HTTP server for a Reporter that does not a local database. Otherwise, the procedure described in Section 5.3, "Reporter System With Local Database" should be followed.
5.2.1 Creating the Oracle User
This section is only relevant for RUEI installations configured to use a remote database. In this case, the oracle user does not yet exist, and so must be created by issuing the following commands:
/usr/sbin/groupadd oinstall oinstall
/usr/sbin/useradd -g oinstall oracle
5.3 Reporter System With Local Database
The procedure described in this section should only be followed if you are installing and configuring the oracle HTTP server for a Reporter that is configured with a local database. Otherwise, the procedure described in Section 5.2, "Reporter System Without Local Database" should be followed.
Increase the number of open files limit. Edit the following line in the /etc/security/limits.conf file:
oracle soft nofile 16384
5.4 Installing Oracle HTTP Server
Do the following:
-
Login to the Reporter server as the
oracleuser, and unzip the Oracle HTTP server zip file. Ensure that your X Window environment is properly set up. In addition, when logging on remotely with SSH, ensure X forwarding is enabled. The installation of Oracle HTTP server needs to be performed as theoracleuser (only certain parts of this chapter requirerootprivileges). Issue the following commands:unzip ofm_webtier_11.1.1.6.0_64_disk1_10f1.zip cd webtier/Disk1 export ORACLE_BASE=/u01/app/oracle ./runInstaller
-
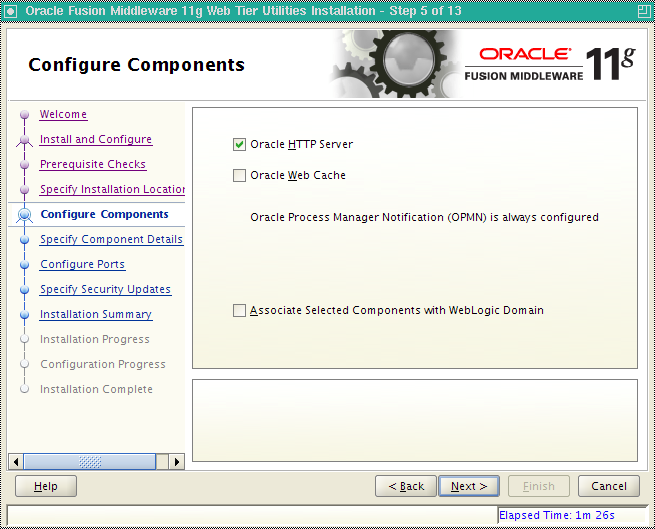
As the installation script runs, you should accept all default values, except for step 5. Here, you must uncheck the two check boxes Oracle Web Cache and Associate selected components with weblogic domain shown in Figure 5-1.
-
After exiting the installation script, set the following environment variables:
export ORACLE_HOME=$ORACLE_BASE/middleware/oracle_WT1
export ORACLE_INSTANCE=$ORACLE_HOME/instances/instance1
-
Stop the Oracle HTTP server and Oracle Process Manager Notification (OPMN) using the following command:
$ORACLE_INSTANCE/bin/opmnctl stopall
-
Edit the
$ORACLE_INSTANCE/config/OPMN/opmn/opmn.xmlfile to use thehttpd.preforkin order so that the PHP module can be loaded. Ensure that the following variables are set in the/etc/ruei.confconfiguration file:<environment> <variable id="TEMP" value="/tmp"/> <variable id="TMP" value="/tmp"/> <variable id="OHSMPM" value="prefork"/> <variable id="TNS_ADMIN" value="/var/opt/ruei"/> <variable id="RUEI_DB_TNSNAME" value="uxinsight"/> <variable id="RUEI_DB_USER" value="uxinsight"/> <variable id="RUEI_HOME" value="/opt/ruei"/> <variable id="RUEI_DATA" value="/var/opt/ruei"/> <variable id="JAVA_HOME" value="/usr/java/jre"/> </environment> -
Logon as the
rootuser, and change the permissions for the .apachectlfile so that the Oracle HTTP server can run as the Apache user. Issue the following commands:chown root $ORACLE_HOME/ohs/bin/.apachectl chmod 6750 $ORACLE_HOME/ohs/bin/.apachectl
-
Add
apacheto theoinstallgroup using the following command:usermod -aG oinstall apache
-
Logon as the
oracleuser and edit the
$ORACLE_INSTANCE/config/OHS/ohs1/httpd.confUser apache Group apache
-
Create the
$ORACLE_INSTANCE/config/OHS/ohs1/moduleconf/php5.conffile, and edit it to contain the following:LoadModule php5_module "/usr/lib64/httpd/modules/libphp5.so" AddHandler php5-script php AddType text/html php
-
Copy the
/etc/httpd/conf.d/uxinsight.conffile, and make it available to the Oracle HTTP server using the following command:cp /etc/httpd/conf.d/uxinsight.conf $ORACLE_INSTANCE/config/OHS/ohs1/moduleconf
-
Start Oracle Process Manager Notification (OPMN) and the Oracle HTTP server using the following command:
$ORACLE_INSTANCE/bin/opmnctl startall
-
Stop the HTTP server using the following command:
$ORACLE_INSTANCE/bin/opmnctl stopproc ias-component=ohs1
-
In order to have RUEI running on the default HTTPS port, edit the
$ORACLE_INSTANCE/config/OHS/ohs1/ssl.conffile, and change the line with theListendirective to the following:Listen 443
In addition, edit the
VirtualHostdefinition as follows:<VirtualHost *:443>
-
Comment out the
LoadModulesettings in theconfig/OHS/ohs1/moduleconf/plsql.confandconfig/OHS/ohs1/mod_wl_ohs.conffiles. -
Create the
$ORACLE_INSTANCE/config/OHS/ohs1/moduleconf/mod_osso.conffile:LoadModule osso_module "${ORACLE_HOME}/ohs/modules/mod_osso.so" <IfModule osso_module> OssoConfigFile /u01/app/oracle/product/11.1.1/as_1/instances/instance1/config/OHS/ohs1/osso.conf OssoIpCheck off OssoIdleTimeout off </IfModule> -
Copy the
osso.conffile that you received after registering RUEI with the Oracle SSO server to the$ORACLE_INSTANCE/config/OHS/ohs1directory. This is described in Section 5.5, "Registering RUEI with the Oracle SSO Server". -
Start the Oracle HTTP server using the following command:
$ORACLE_INSTANCE/bin/opmnctl startproc ias-component=ohs1
5.5 Registering RUEI with the Oracle SSO Server
In order to create the required osso.conf file, you need to register RUEI with the Oracle SSO server. The procedure to do this differs depending on whether you are using Oracle SSO version 10.1.4 or 11.1, and is described in the following sections.
5.5.1 Registering with Oracle SSO Version 10.1.4
Use the 10.1.4 Oracle Identity Manager registration tool ssoreg.sh to update the registration record in the osso.conf file. Do the following:
-
Go to the Oracle Identity Manager directory:
ORACLE_HOME/sso/bin/ssoreg
-
Run the
ssoreg.shtool with the following parameters and values:./ssoreg.sh -site_name hostname:4443 \ -config_mod_osso TRUE \ -mod_osso_url hostname:4443 \ -config_file location
where:
-
hosthamespecifies the full URL of the RUEI Reporter system (for example,https://ruei.us.myshop.com). -
locationspecifies the location to which theosso.conffile will be written (for example,tmp/osso.conf).
-
-
Copy the created
osso.conffile to the$ORACLE_INSTANCE/config/OHS/ohs1directory on the RUEI Reporter system.
Further information is available at the following location:
http://docs.oracle.com/cd/E14571_01/core.1111/e10043/osso.htm#autoId89
5.5.2 Registering with Oracle SSO Version 11.1
To register RUEI as a partner application within Oracle SSO version 11.1, do the following:
-
Within Oracle Access Manager console, click the Policy Configuration tab. The screen shown in Figure 5-2 appears.
Figure 5-2 OAM Policy Configuration Screen.

Description of "Figure 5-2 OAM Policy Configuration Screen."
-
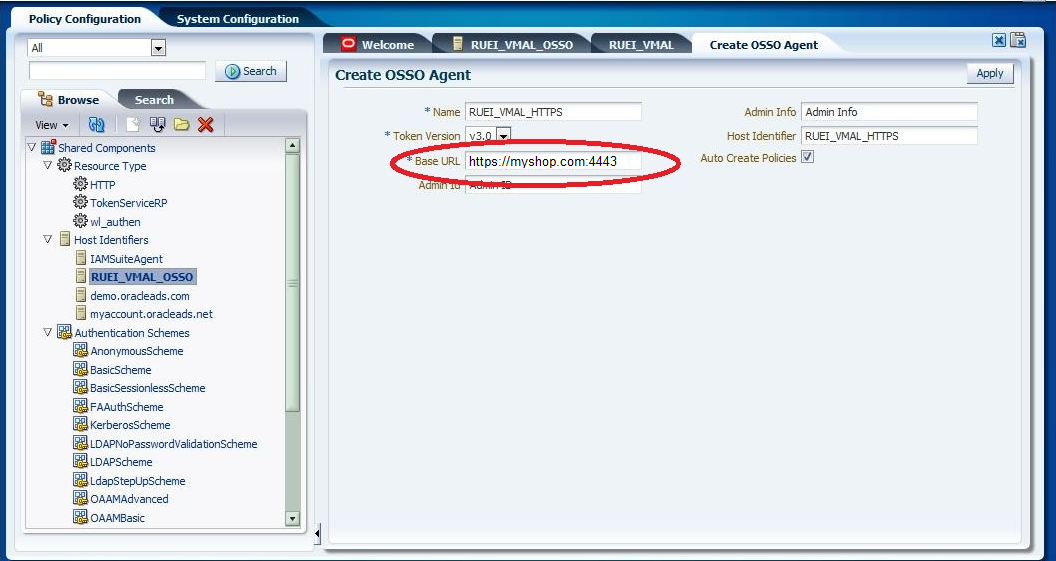
Click the New OSSO Agent item. The screen shown in Figure 5-3 appears.
-
Specify the required parameters. When ready, click Apply. The screen shown in Figure 5-4 appears.
Figure 5-4 OSSO Agent Creation Confirmation.
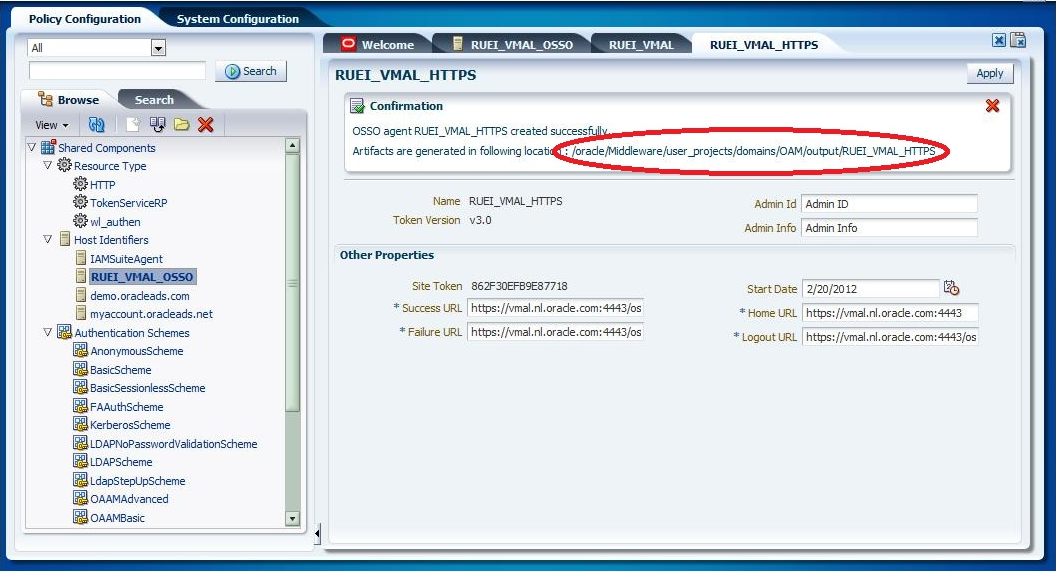
Description of "Figure 5-4 OSSO Agent Creation Confirmation."
-
Copy the
osso.conffile from the indicated location to the$ORACLE_INSTANCE/config/OHS/ohs1directory on the RUEI Reporter system.
Further information is available from the following location:
http://docs.oracle.com/cd/E23943_01/doc.1111/e15478/agents.htm#BABGIDAB
5.6 Verifying the Oracle HTTP Server Configuration
You can test the Oracle HTTP server for integration with RUEI by directing your browser to https://Reporter/ruei. When you select System, then User management, the Configure SSO connection option should be enabled.
For information about enabling Oracle SSO user authentication within RUEI, see the Oracle Real User Experience Insight User's Guide.