2 Applying Oracle Exalytics Release 1 Patchset 5 (1.0.0.5)
This chapter provides information on applying Oracle Exalytics Release 1 Patchset 5 (1.0.0.5) on the Exalytics Machine.
This chapter includes the following sections:
2.1 About Oracle Exalytics Patchsets
An Oracle Exalytics Patchset for X2-4, X3-4, and X4-4 Exalytics Machines consists of system software components which are delivered regularly.
For system software components, an Oracle Exalytics Patchset might contain updates to one or all of the following:
-
Exalytics Base Image for Linux x86-64
-
Exalytics Base Image for Oracle VM x86-64
-
Exalytics VM Template (Guest)
Oracle Business Intelligence, Oracle Enterprise Performance Management, Oracle TimesTen for Exalytics, Oracle Database In-Memory, and Oracle Endeca software releases are certified on Exalytics patchsets. These software updates may contain new capabilities built for Exalytics only. Customers are advised to update the application software stack with the latest Exalytics certified version.
For detailed information on system components and supported application product components, see Oracle Exalytics Certification Matrix at the following location:
http://www.oracle.com/technetwork/middleware/ias/downloads/fusion-certification-100350.html
2.2 Applying the Oracle Exalytics Release 1 Patchset 5 (1.0.0.5)
This section consists of the following topics:
-
Section 2.2.1, "About the Oracle Exalytics Release 1 Patchset 5"
-
Section 2.2.2, "Applying the Oracle Exalytics Release 1 Patchset 5"
-
Section 2.2.4, "Deinstallation Instructions for the Oracle Exalytics Release 1 Patchset 5"
2.2.1 About the Oracle Exalytics Release 1 Patchset 5
The Oracle Exalytics Release 1 Patchset 5 comprises of updates to the system components that are listed in listed in Table 2-1.
Table 2-1 System Components and Supported Versions in Oracle Exalytics Patchset 5
| System Component | Version in Patchset 5 Release |
|---|---|
|
Oracle Exalytics Base Image |
1.0.0.7 |
|
Oracle Exalytics Base Image for Oracle VM |
2.0.1.4 |
|
Oracle Exalytics VM Template (Guest) |
2.0.1.4 |
For the latest information on the supported Application Software Components, see Oracle Exalytics Certification Matrix at the following location:
http://www.oracle.com/technetwork/middleware/ias/downloads/fusion-certification-100350.html
2.2.2 Applying the Oracle Exalytics Release 1 Patchset 5
This section consists of the following topics:
2.2.2.1 Applying Oracle Exalytics Release 1 Patchset 5 (1.0.0.5) on a Non-Virtual Exalytics Machine
This section contains the following topics:
-
Section 2.2.2.1.1, "Who Should Install Oracle Exalytics Release 1 Patchset 5?"
-
Section 2.2.2.1.2, "Guidelines for Installing Oracle Exalytics Release 1 Patchset 5"
-
Section 2.2.2.1.3, "Installing Oracle Exalytics Release 1 Patchset 5"
-
Section 2.2.2.1.4, "Upgrading or Patching Application Software Components."
2.2.2.1.1 Who Should Install Oracle Exalytics Release 1 Patchset 5?
The Patchset is available for all Oracle Exalytics customers who are currently on Oracle Exalytics Release 1 Patchset 4 (Oracle Exalytics Base Image 1.0.0.6).
Note:
If you are on a release prior to Oracle Exalytics Release 1 Patchset 4, you must upgrade to Oracle Exalytics Release 1 Patchset 4 (Base Image 1.0.0.6) before you can upgrade to Oracle Exalytics Release 1 Patchset 5. For information on applying Oracle Exalytics Release 1 Patchset 4, see "Chapter 2 Patching" in Oracle Exalytics In-Memory Machine Installation and Administration Guide for Linux available at the following location:2.2.2.1.2 Guidelines for Installing Oracle Exalytics Release 1 Patchset 5
Review the following guidelines before installing the Patchset:
-
Ensure that you are currently on Oracle Exalytics Release 1 Patchset 4 (Oracle Exalytics Base Image 1.0.0.6).
-
Before applying the patches that are included in the Patchset, ensure that you back up your current installation, configuration files, and any user-specific artifacts, and stop all applicable services.
-
If you have installed Oracle Enterprise Performance Management components on the Exalytics Machine, stop all Enterprise Performance Management services before applying the patch. Also, ensure that you start all services after applying the patch. For more information, see "Chapter 12, Starting and Stopping EPM System Products" in Oracle Enterprise Performance Management System Installation and Configuration Guide Release 11.1.2.3 at the following location:
http://docs.oracle.com/cd/E40248_01/epm.1112/epm_install.pdf -
When installing Oracle Exalytics Release 1 Patchset 5 on Oracle Exalytics Release 1 Patchset 4, delete aggregates in Oracle TimesTen using the nqcmd utility. For more information, see "Creating and Persisting Aggregates for Oracle BI Server Queries" in Oracle Fusion Middleware Metadata Repository Builder's Guide for Oracle Business Intelligence Enterprise Edition.
-
For late-breaking information, see Oracle Exalytics In-Memory Machine Release Notes for Linux.
2.2.2.1.3 Installing Oracle Exalytics Release 1 Patchset 5
To install Oracle Exalytics Release 1 Patchset 5 on Oracle Exalytics Release 1 Patchset 4, perform the following steps:
-
"Step 2: Download and Mount the Exalytics Base Image 1.0.0.7"
-
"Step 3: Run the Oracle Exalytics Base Image 1.0.0.7 Upgrade Script"
-
"Step 5: (Optional) Configure Exalytics Host for Enterprise Manager Cloud Control Discovery"
Note:
This step is for X2-4 and X3-4 customers only. If you are on a X4-4 Exalytics Machine, you can ignore this section. X4-4 customers must use ILOM 3.2.4.18 or higher version.If not already done, upgrade your firmware to 3.1.2.24.d. Oracle Integrated Lights Out Manager 3.1.2.24.d (ILOM) has a new user interface and navigation.
Note:
To check the ILOM version, in ILOM, click the About button.For information about Oracle Integrated Lights Out Manager (ILOM) consult the Sun Server X2-4 Documentation manuals which are available in the Oracle Exalytics Library at:
http://docs.oracle.com/cd/E27027_01/index.htm
For the latest Exalytics certified ILOM versions, see the Oracle Exalytics Certification Matrix. The Oracle Exalytics Certification Matrix is located at:
http://www.oracle.com/technetwork/middleware/ias/downloads/fusion-certification-100350.html
To upgrade firmware:
-
Navigate to My Oracle Support and download patch number 18391569.
The patch zip file contains the ILOM-3.1.2.24.d_r86253-Sun_Fire_X4470M2.pkg.
-
Extract the zip file into a temporary folder.
-
On the Exalytics Machine, connect and log on to Oracle Integrated Lights Out Manager (ILOM).
-
In the left pane of the ILOM, expand ILOM Administration, then select Maintenance, then select the Firm Upgrade tab.
-
Click Enter Upgrade Mode.
-
Click OK.
-
Click Browse, navigate to the temporary folder, and select the ILOM-3.1.2.24.d_r86253-Sun_Fire_X4470M2.pkg that you downloaded.
-
Click Upload.
-
If not already selected, select Preserve Existing Configuration.
-
Select Delay BIOS upgrade until next server poweroff.
Note:
If you do not select the Delay BIOS upgrade until next server poweroff option, the system host will shutdown during the upgrade. -
Click Start Upgrade.
-
Click OK.
After the upgrade completes successfully, ILOM restarts automatically.
Step 2: Download and Mount the Exalytics Base Image 1.0.0.7
To download and mount the Exalytics base image 1.0.0.7:
-
Navigate to the Oracle Software Delivery Cloud web site at the following link:
-
For Product Pack, select Oracle Business Intelligence.
-
For Platform, select Linux x86-64.
-
Click Go.
-
Select and click Oracle Exalytics Software Media Pack for Linux x86-64 (Release 1.0.0.5.0).
-
Download V56223-01.iso (Oracle Exalytics X2-4/ X3-4/X4-4 Base Image 1.0.0.7 for Linux x86-64).
-
Depending on the Exalytics Machine configuration, perform one of the following actions:
-
For X2-4 and X3-4 machines, from the menu bar, select Devices, then CD-ROM Image to link the V56223-01.iso as a remote virtual CD-ROM in ILOM.
-
For X4-4 machines, from the menu bar, select KVMS, then Storage. Click Add to link to the V56223-01.iso as a remote virtual CD-ROM in ILOM. Click Connect.
-
-
To create a directory, enter the following command:
# mkdir /mnt/exalyticsPS5 -
To mount the base image on the directory, enter the following command:
# mount -t iso9660 -o loop,ro V56223-01.iso /mnt/exalyticsPS5/
Step 3: Run the Oracle Exalytics Base Image 1.0.0.7 Upgrade Script
You run the upgrade script to upgrade Oracle Exalytics base image to 1.0.0.7.
Note:
If you are installing Oracle Exalytics Release 1 Patchset 5 (Base Image 1.0.0.7) on Oracle Exalytics Release 1 Patchset 4 (Base Image 1.0.0.6), the script installs new rpms without affecting your existing installation.To run the Oracle Exalytics Base Image 1.0.0.7 Upgrade Script:
-
Stop and backup all Oracle Business Intelligence, Oracle TimesTen, and (if installed) Enterprise Performance Management services.
For information on stopping Oracle Business Intelligence services, see "Starting and Stopping Oracle Business Intelligence" in Oracle Fusion Middleware System Administrator's Guide for Oracle Business Intelligence Enterprise Edition.
For information on starting and stopping Oracle TimesTen services, see "Working with the TimesTen Data Manager Daemon" in Oracle® TimesTen In-Memory Database Operations Guide.
For more information on starting and stopping Enterprise Performance Management services, see "Chapter 12, Starting and Stopping EPM System Products" in Oracle Enterprise Performance Management System Installation and Configuration Guide Release 11.1.2.3 at the following location:
http://docs.oracle.com/cd/E40248_01/epm.1112/epm_install.pdf -
Navigate to My Oracle Support and download patch number 19849524: Exalytics Patchset Upgrade 1.0.0.5 Upgrade Utility for Exalytics Bare Metal into a directory of your choice.
The patch contains the p19849524_10050_Linux-x86-64.zip file.
-
Unzip the file into a temporary (/tmp) directory.
The unzipped file contains various rpm (RPM Package Manager) files.
-
To navigate to the temporary (tmp) directory, enter the following command:
# cd /tmp -
To install the upgrade script (exalytics-scripts-1.0.0.7-27.noarch.rpm), enter the following command:
# rpm -Uv --replacefiles exalytics-update-1.0.0.7-27.noarch.rpmThe script is installed.
The output looks similar to the following:
Preparing packages for installation...
exalytics-update-1.0.0.7-27
postInstall (exalytics-scripts) 1 ...
[EXALYTICS_INFO:GENERAL] starting; Day Month Date HOUR:MIN:SEC YEAR ...
[EXALYTICS_INFO:GENERAL] Updating exalytics-node-config file to set EXALYTICS_INSTALL_TYPE=BM ...
[EXALYTICS_INFO:GENERAL] finished; Day Month Date HOUR:MIN:SEC YEAR
postInstall (exalytics-scripts) 1; done
-
To remove the mkinitrd-devel package (which can cause upgrade conflict), run the following commands:
# rpm -e --nodeps mkinitrd-devel-5.1.19.6-75.0.9.el5.i386# rpm -e --nodeps mkinitrd-devel-5.1.19.6-75.0.9.el5.x86_64 -
To navigate to the Oracle Exalytics bin directory, enter the following command:
# cd /opt/exalytics/bin -
To upgrade the Oracle Exalytics base image, enter the following command:
# ./update_bm_1.0.0.6_to_1.0.0.7.sh file:///mnt/exalyticsPS5/Server -
Optional: View the log files at /var/log/exalytics/update-1.0.0.7.log and /var/log/exalytics/exalytics.log.
-
To restart the Exalytics Machine, enter the following command:
# /sbin/shutdown -r nowNote:
You can also start the Exalytics Machine using Integrated Lights Out Manager (ILOM). -
Restart the Oracle Business Intelligence, Oracle TimesTen, and Enterprise Performance Management services.
-
To confirm the base image, enter the following command as a root user:
# /opt/exalytics/bin/exalytics_imageinfoThe output looks similar to the following:
Image version : 1.0.0.7
Creation timestamp : Day Date Month YEAR HOUR:MIN:SEC
Kernel version: 2.3.39-400.128.17.el5uek

RPM versions:
kernel-uek-2.6.39-400.128.17.el5uek
kernel-2.6.18-308.24.1.0.1.el5
exalytics-container-bm-1.0.0.7-2
exalytics-scripts-1.0.0.7-18
exalytics-flash-1.0.0.7-11
exalytics-domain-configure-1.0.0.7-4
exalytics-deps-exact-1.0.0.7-2
exalytics-deps-minimum-1.0.0.7-2
Note:
Even though the build numbers may be different than the ones listed above, ensure that the updated kernel version is the same as the one displayed above.
Step 4: (Optional) Configure ASR
To configure ASR:
-
If you installed Oracle Exalytics Release 1 Patchset 5 on a new machine, then configure ASR as follows:
-
Follow instructions detailed in "Installing Auto Service Request (ASR)" in Oracle Exalytics In-Memory Machine Owner's Guide, but change the following steps:
-
Replace Step 5 in "Section 9.3 Before You Begin" with the following steps:
-
Navigate to the /opt/exalytics/asr directory and add the following line to the /etc/inittab file
emh1:345:respawn:/opt/exalytics/asr/bda_mon_hw_asr.pl -server
-
At the command line, enter the following command to initialize and start the bda_mon server
init q
-
-
Replace the commands in Step 2 in "Section 9.7 Configuring Telemetry Sources" with the following commands:
# cd /opt/exalytics/asr# ./setup_asr_ilom.pl -host <hostname OR ip>
-
-
If you installed Oracle Exalytics Release 1 Patchset 5 on Oracle Exalytics Release 1 Patchset 4 and ASR is already configured, complete the following step to verify that ASR is running:
-
Execute the
ps -ef | grep bdacommand to ensure that bda_mon_hw_asr_pl is running.For more information, see "Installing Auto Service Request Software" in Oracle Exalytics In-Memory Machine Owner's Guide.
-
Step 5: (Optional) Configure Exalytics Host for Enterprise Manager Cloud Control Discovery
To configure Exalytics Host for Enterprise Manager Cloud Control Discovery:
-
If you installed Oracle Exalytics Release 1 Patchset 5 on a new machine with Enterprise Manager Cloud Control (EMCC) deployed, then perform the following steps to configure EMCC to identify the Exalytics host.
-
Confirm that a SP System Identifier is set for the Exalytics Machine by performing the following steps:
-
Log on to Oracle Integrated Lights Out Manager (ILOM).
-
Expand System Information.
-
Select Summary.
Confirm that a SP System Identifier is displayed.
-
-
Log on to ILOM and in the left pane of the ILOM, expand ILOM Administration, then select Identification. Ensure that the SP System Identifier value is populated with a unique value, such as "Oracle Exalytics AK00026925".
-
Log on to the Exalytics Machine.
-
Execute the command
chmod +x exalytics_configure_for_emcc.shto grant execute permissions. -
Execute the following command as a root user to create the file:
./exalytics_configure_for_emcc.sh -
Review the output and ensure that the contents of the /var/exalytics/info/em-context.info file correctly displays the system identifier for the Oracle Exalytics machine. The system identifier should be identical to the system identifier you saw in Step (b) of this procedure.
-
-
If you installed Oracle Exalytics Release 1 Patchset 5 on Oracle Exalytics Release 1 Patchset 4 with Enterprise Manager Cloud Control (EMCC) deployed, then complete the following step to verify that EMCC identifies the Exalytics host:
-
Review the contents of the /var/exalytics/info/em-context.info file and ensure that it correctly displays the system identifier for the Oracle Exalytics machine.
The system identifier should be identical to the system identifier displayed in the Oracle Integrated Lights Out Manager (ILOM) in Step (a) above.
-
2.2.2.1.4 Upgrading or Patching Application Software Components
Depending on your deployment upgrade or patch the newly certified application software components for this release.
Note:
This section is for existing Exalytics customers that are already running application software components. New Exalytics customers, proceed to Chapter 4, "Installing Software on an Exalytics Machine."Before you upgrade or patch the application software components, ensure you are installing the latest Exalytics certified application software versions. See Oracle Exalytics Certification Matrix for the latest certifications. The Oracle Exalytics Certification Matrix is located at:
http://www.oracle.com/technetwork/middleware/ias/downloads/fusion-certification-100350.html
This section includes the following topics:
Download and Install Oracle BI EE 11.1.1.7.x
To apply the latest Oracle BI EE 11.1.1.7.x Patchset to Oracle BI EE 11.1.1.7.0 installation, see the instructions in the ReadMe file for patch 19261194 (the top-level patch of the Oracle BI EE 11.1.1.7.141014 Patchset).
Note:
If you are installing Oracle Exalytics for the first time, you must install Oracle BI EE 11.1.1.7.0. For information, see Chapter 4, "Installing Software on an Exalytics Machine." See also, Oracle Fusion Middleware Installation Guide for Oracle Business Intelligence.If you are running an Oracle BI EE 11.1.1.6.x installation, you must upgrade to an Oracle BI EE 11.1.1.7.0, see Oracle Fusion Middleware Upgrade Guide for Oracle Business Intelligence.
Note:
You cannot use the Exalytics Domain Management Utility to install or manage an Oracle BI EE 11.1.1.6.x installation. You must first upgrade the Oracle BI EE 11.1.1.6.x installation to Oracle BI EE 11.1.1.7.0 and then register the installation as an existing primary domain using the Exalytics Domain Management Utility.Download and Install Oracle Timesten 11.2.2.7.x
Before you download and install Oracle TimesTen, ensure you are installing the latest Exalytics certified Oracle TimesTen version. See Oracle Exalytics Certification Matrix for the latest certifications. The Oracle Exalytics Certification Matrix is located at:
http://www.oracle.com/technetwork/middleware/ias/downloads/fusion-certification-100350.html
To download and install Oracle TimesTen:
-
Navigate to My Oracle Support.
-
Search for and download the latest Exalytics certified version of Oracle TimesTen.
Note:
If you are installing Oracle Exalytics for the first time, you can install the latest Oracle TimesTen certified version instead of applying patches to previous Oracle TimesTen versions.During the installation of Oracle TimesTen, answer "Yes" to the question: Would you like to upgrade this instance?
Also, ensure that you do not delete existing files. For example, during the installation, answer "No" to the following questions:
-
Would you also like to remove all files in <installation_directory>/TimesTen/tt1122/network/admin/samples?
-
Would you like to replace the existing cluster.oracle.ini file?
-
Would you like to replace the existing <installation_directory>/TimesTen/tt1122/info/sys.odbc.ini file?
-
Would you also like to remove all files in <installation_directory>/TimesTen/tt1122/info?
For more information, see "Performing an in-place database upgrade" and "Performing an offline upgrade" in Oracle TimesTen In-Memory Database Installation Guide.
Note:
If required, you can install Oracle Database In-Memory for Oracle Exalytics. For instructions on installing Oracle Database In-Memory for Oracle Exalytics, see Section 4.8, "Installing Oracle Database In-Memory for Oracle Exalytics."Download and Install Oracle BI Applications 11.1.1.8.1
If deploying Oracle BI Applications 11.1.1.8.1, install Oracle BI Applications 11.1.1.8.1. For information, see Section 4.5, "Installing and Configuring Oracle BI Applications 11.1.1.8.1 on an Exalytics Machine."
Download and Install Oracle Endeca 3.1
To install Oracle Endeca 3.1, see "Oracle Endeca Information Discovery" documentation, the link to which is available from the Oracle Exalytics Documentation Library.
2.2.2.2 Applying Oracle Exalytics Release 1 Patchset 5 (1.0.0.5) on an Exalytics Machine Configured for Virtualization
You apply the Oracle Exalytics Release 1 Patchset 5 (1.0.0.5) on an Exalytics Machine configured for virtualization. The Oracle Exalytics Release 1 Patchset 5 (1.0.0.5) consists of Flash drivers, Flash utilities, and the Exalytics Domain Management Utility.
This section contains the following topics:
-
Section 2.2.2.2.4, "Applying the Release 1 Patchset 5 on a Virtualized Environment"
-
Section 2.2.2.2.5, "Configuring Flash on an Exalytics Machine Configured for Virtualization"
2.2.2.2.1 Who Should Install the Oracle Exalytics Release 1 Patchset 5 on an Exalytics Machine Configured for Virtualization?
This Patchset is available to all Exalytics virtualization customers who are running Oracle VM server 3.0.3 or later version and Oracle VM Manager 3.0.3 or later version.
Note:
Oracle recommends that all current customers running Exalytics virtualization upgrade to Oracle Exalytics Release 1 Patchset 5 (1.0.0.5).2.2.2.2.2 Prerequisites for Applying Oracle Exalytics Release 1 Patchset 5 on an Exalytics Machine Configured for Virtualization
The following prerequisites must be met before you can apply Oracle Exalytics Release 1 Patchset 5 on an Exalytics virtualization:
-
You have one or more Exalytics Machines configured for virtualization.
-
You have upgraded to Oracle VM Server 3.2.8 and Oracle VM Manager 3.2.8 or later version.
-
You have added Oracle VM Server to your Oracle VM Manager environment. To add Oracle VM Servers to your Oracle VM Manager, see Section 3.1.2.2.2, "Discovering Oracle VM Servers."
2.2.2.2.3 Upgrading Oracle Exalytics for Oracle VM 3.0.3 or Later Version to Oracle VM 3.2.8
Note:
If you have already upgraded to Oracle VM 3.2.8, you can ignore this section and go directly to Section 2.2.2.2.4, "Applying the Release 1 Patchset 5 on a Virtualized Environment."This section consists of the following topics:
-
"Upgrading Oracle VM Manager 3.0.3 or Later Version to Oracle VM Manager 3.2.8+"
-
"Upgrading Oracle VM Server 3.0.3 (Base Image 2.0.1.1) or Later Version to Oracle VM Server 3.2.8"
Upgrading Oracle VM Manager 3.0.3 or Later Version to Oracle VM Manager 3.2.8+
Oracle VM Manager provides a graphical user interface to manage Oracle VM Servers, virtual machines, and resources.
Note:
If you are installing Oracle VM Manager for the first time, you can install Oracle VM Manager 3.2.8 directly. For information, see Section 3.1.2.2, "Installing and Configuring Oracle VM Manager 3.2.8."To upgrade Oracle VM Manager 3.0.3 or later version to 3.2.8+:
-
Navigate to
http://edelivery.oracle.com/oraclevmand perform the following steps:-
In the Select a Product Pack list, select Oracle VM.
-
In the Platform list, select x86-64 bit.
-
Click Go.
-
Select Oracle VM 3.2.8 Media Pack for x86-64 bit, and click Continue.
-
Download Oracle VM Manager 3.2.8 - Upgrade only (Part Number V44602-01).
-
-
Follow the readme instructions for upgrading Oracle VM Manager.
Upgrading Oracle VM Server 3.0.3 (Base Image 2.0.1.1) or Later Version to Oracle VM Server 3.2.8
Note:
If you are configuring Exalytics Machine for virtualization for the first time, you can install Oracle VM Server 3.2.8 directly. For information on installing Oracle VM Server 3.2.8, see Section 3.1.2.1, "Installing and Configuring Oracle VM Server 3.2.8."Upgrading Oracle VM Server 3.0.3 (Base Image 2.0.1.1) or later version to Oracle VM Server 3.2.8 consists of the following steps:
This section consists of the following topics:
Editing the Grub Configuration File to Increase Memory
Edit the Grub configuration file to increase the allocated memory from 2 GB to 16 GB.
To edit the Grub configuration file to increase memory:
-
Log on as the root user.
-
Open the /etc/grub.conf file in a text editor.
-
Change the allocated memory from 2 GB to 16 GB.
-
Modify the kernel /xen.gz line in grub.conf file so it displays as follows:
kernel /xen.gz dom0_mem=16384M allowsuperpage dom0_vcpus_pin dom0_max_vcpus=20 no-bootscrub
-
Modify the module/vmlinuz line in the grub.conf file so it displays as follows:
module /vmlinuz-2.6.39-300.32.6.el5uek ro root=UUID=5d6c3568-1894-41cd-80d9-5d190b4529f5 no-bootscrub swiotlb=131072
-
Stop and start Oracle VM Server. For instructions, see "Stopping and Starting Oracle VM Server".
Stopping and Starting Oracle VM Server
To stop and start Oracle VM Server:
-
To stop and start Oracle VM Server, perform the following steps:
-
Stop all applicable processes running on the Exalytics Machine.
-
Stop all virtual machines running on the server.
-
Connect to Oracle VM Manager.
-
Select the Servers and VMs tab.
-
In the left pane, expand Server Pools, and then select the server pool containing the Exalytics Machine.
-
Right-click the Exalytics Machine, and select Restart Server.
The Oracle VM Server stops and starts automatically.
-
-
Confirm that Oracle VM Server has restarted.
Upgrading Oracle VM Server 3.0.3 (Base Image 2.0.1.1) or Later Version to Oracle VM Server 3.2.8
Before you upgrade Oracle VM Server, ensure that you have upgraded Oracle VM Manager.
To upgrade Oracle VM Server 3.0.3 (Base Image 2.0.1.1) or a later version to Oracle VM Server 3.2.8:
-
Stop Oracle VM Server, by performing the following steps:
-
Stop all applicable processes running on the Exalytics Machine.
-
Stop all virtual machines running on the server.
-
Connect to Oracle VM Manager.
-
Select the Servers and VMs tab.
-
In the left pane, expand Server Pools, and then exalytics_server_pool.
-
Right-click the Exalytics Machine, and select Stop Server.
For more information, see "Section 6.10.7 Stopping Oracle VM Servers" in Oracle VM User's Guide for Release 3.2.
-
-
In a web browser, display the following URL:
http://edelivery.oracle.comand download unzip the Oracle Exalytics Base Image 2.0.1.4.0 for Exalytics Oracle VM x86-64 file (part number V 56222-01.zip) to a local directory.The zip file contains the following iso file:
-
Exalytics_Upgrade_OVS3.2.8_09252014.iso: You use this iso file to upgrade to Oracle VM Server 3.2.8.
-
-
On the Exalytics Machine, connect and log on to Oracle Integrated Lights Out Manager (ILOM).
Note:
If you are upgrading to Oracle VM Server 3.2.8 on an X2-4 or X3-4 Exalytics Machine, you must use ILOM 3.1.2.24.d. If you are upgrading to Oracle VM Server 3.2.8 on an X4-4 Exalytics Machine, you must use ILOM version 3.2.4.18 or later version.For the latest Exalytics certified ILOM versions, see the Oracle Exalytics Certification Matrix. The Oracle Exalytics Certification Matrix is located at:
http://www.oracle.com/technetwork/middleware/ias/downloads/fusion-certification-100350.html -
On the Summary Information screen, under Actions, click Launch to launch the Remote Console.
The ILOM remote console is displayed.
-
Depending on the configuration of the Exalytics Machine, perform one of the following actions:
-
For X2-4 or X3-4 Exalytics Machine, in ILOM version 3.1.2.24.d, from the menu bar, select Devices, then CD-ROM Image to link the Oracle VM Server 3.2.8 upgrade image (Exalytics_Upgrade_OVS3.2.8_09252014.iso) as a remote virtual CD-ROM in ILOM.
-
For X4-4 Exalytics Machine, in ILOM version 3.2.4.18, from the menu bar, select KVMS, then Storage. Click Add to link to the Oracle VM Server 3.2.8 upgrade image (Exalytics_Upgrade_OVS3.2.8_09252014.iso) as a remote virtual CD-ROM in ILOM. Click Connect.
-
-
In the left pane of the ILOM, expand Host Management, then click Host Control. In the Next Boot Device list, select CDROM, then click Save.
-
Restart the machine by expanding in the left pane of the ILOM, Host Management, then click Power Control. In the Select Action list, select Power Cycle, then click Save.
The Exalytics Machine restarts and the CD Found screen is displayed.
-
Press OK to start the media test.
The Media Check screen is displayed.
-
Press Test to test the CD in the drive.
At the conclusion of the test, the Media Check Result screen is displayed.
-
Press OK.
The Media Check screen is displayed.
-
Press Continue.
The Keyboard Selection screen is displayed.
-
Select the model keyboard attached to the Exalytics Machine, and click OK.
The OVS EULA screen is displayed.
-
Press Accept.
The System to Upgrade screen is displayed.
-
Select the currently installed Oracle VM Server, and press OK.
The Upgrade Boot Loader Configuration screen is displayed.
-
Select Skip updating boot loader configuration, and press OK.
-
Press OK.
-
Confirm the upgrade completes successfully, and then press Reboot.
The Exalytics Machine restarts.
-
Perform the following steps to rediscover the upgraded Oracle VM Server:
-
Connect to Oracle VM Manager.
-
Select the Servers and VMs tab.
-
In the left pane, expand Server Pools, and then exalytics_server_pool.
-
Right-click the Exalytics Machine and select Rediscover Server.
-
Enter the following information for the server:
- Oracle VM Agent Port. The default port number is 8899.
- Oracle VM Agent Password. The default password is "oracle".
- IP Address.
-
Click OK.
-
For more information, see "Section 6.10.7 Stopping Oracle VM Servers" in Oracle VM User's Guide for Release 3.2.
2.2.2.2.4 Applying the Release 1 Patchset 5 on a Virtualized Environment
This section consists of the following topics:
Upgrading Exalytics Base Image for Oracle VM to 2.0.1.4
You upgrade the Exalytics Base Image for Oracle VM 2.0.1.4 by applying the patch on Oracle VM Server. The patch upgrades the Base Image to 2.0.1.4, installs Flash drivers and utilities.
To upgrade Oracle Exalytics Base Image for Oracle VM to 2.0.1.4:
-
Navigate to My Oracle Support and download patch number 18961186: Patchset Upgrade Utility for Exalytics Base Image 2.0.1.4 Oracle VM for Linux x86-64. The patch contains the p18961186_10050_Linux-x86-64.zip file.
The zipped file contains Flash drivers and Flash configuration scripts.
-
Log on to the Exalytics Machine as the root user.
-
Extract the contents of the file into an appropriate directory on the Exalytics Machine.
-
Unzip the file into a temporary (/tmp) directory.
The following directory is created:
exalytics_ovs_server_base_image_upgrade_to_2.0.1.4.0.
-
Navigate to the directory by entering the following command:
# cd exalytics_ovs_server_base_image_upgrade_to_2.0.1.4.0 -
To upgrade the Base Image to 2.0.1.4 and to install Flash, enter the following command:
# ./exalytics_ovs_server_base_image_upgrade_to_2.0.1.4.0.shThe output looks similar to the following:
OS Version check passed.. Update to 2.0.1.4.0 starting at Mon Sep 15 10:41:28 EDT 2014 Skipping removing rpm kernel-ib-devel as it doesn't exist... Skipping removing rpm kernel-ib as it doesn't exist... Skipping removing rpm ibvf-config as it doesn't exist... Done Applying rpm exalytics-flash-1.0.0.6-3.x86_64.rpm Preparing... ########################################### [100%] 1:exalytics-flash ########################################### [100%] postInstall (exalytics-flash) 1 ... [EXALYTICS_INFO:GENERAL] Updating exalytics-flash-config file to set FLASH_INSTALL_TYPE=OVS ... postInstall (exalytics-flash) 1; done Applying rpm openib-1.5.4.1-4.0.16.el5.noarch.rpm warning: ./rpms/openib-1.5.4.1-4.0.16.el5.noarch.rpm: Header V3 DSA signature: NOKEY, key ID 1e5e0159 Preparing... ########################################### [100%] 1:openib ########################################### [100%] Applying rpm ovsvf-config-1.0-10.noarch.rpm warning: ./rpms/ovsvf-config-1.0-10.noarch.rpm: Header V3 DSA signature: NOKEY, key ID 1e5e0159 error: Failed dependencies: infiniband-diags is needed by ovsvf-config-1.0-10.noarch sed: cannot rename /etc//sedHbkLxt: Invalid cross-device link Preparing... ########################################### [100%] 1:infiniband-diags ########################################### [100%] Preparing... ########################################### [100%] 1:exalogic.tools ########################################### [100%] -------------------------------------------------------- Successfully installed exalogic.tools -------------------------------------------------------- .....[exalogic.tools] := Post Transaction called............... Preparing... ########################################### [100%] 1:libibumad ########################################### [100%] Preparing... ########################################### [100%] 1:libibmad ########################################### [100%] Preparing... ########################################### [100%] 1:opensm-libs ########################################### [100%] Preparing... ########################################### [100%] 1:opensm ########################################### [100%] [EXALOGIC_INFO:GENERAL] Configuring Xen bridge... [EXALOGIC_INFO:GENERAL] Adding GATEWAY to /etc/sysconfig/network-scripts/ifcfg-xenbr0... grep: /tmp/cur_network.conf: No such file or directory [EXALOGIC_INFO:GENERAL] Xen bridge is configured Running post patch script file /etc/sysconfig/network-scripts/ifcfg-bondib0 not found /usr/lib/init-exalogic-node/init-ipoib.sh not exist in /etc/rc.local , nothing to delete Completed post patch script Expected base image version number not found in /usr/lib/init-exalogic-node/.image_id so not updating Image name in imageinfo is already uptodate finished; Mon Sep 15 10:41:31 EDT 2014 finished; Mon Sep 15 10:41:31 EDT 2014 -
To verify that the upgrade was successful, enter the following command:
# imageinfoThe output looks similar to the following:
Exalytics 2.0.1.4.0 (build:r)

Image version : 2.0.1.4.0
Image build version :
Creation timestamp : 2014-09-09 11:47:59 -0400
Kernel version : 2.6.32.21-45.6xen
Image activated : 2014-09-02 04:02:58 -0500
Image status : SUCCESS
-
To verify that Flash is installed and the number of Flash cards installed, enter the following command:
# ddcliFor an X2-4 or X3-4 configuration, six Flash cards are displayed. The output looks similar to the following:
****************************************************************************
LSI Corporation WarpDrive Management Utility
Version 107.00.00.04 (2012.06.05)
Copyright (c) 2011 LSI Corporation. All Rights Reserved.
****************************************************************************

ID    WarpDrive     Package Version    PCI Address
--    ---------     ---------------    -----------
 1     ELP-4x100-4d-n    06.05.09.00    00:11:00:00
 2     ELP-4x100-4d-n    06.05.09.00    00:21:00:00
 3     ELP-4x100-4d-n    06.05.07.00    00:31:00:00
 4     ELP-4x100-4d-n    06.05.07.00    00:a1:00:00
 5     ELP-4x100-4d-n    06.05.01.00    00:c1:00:00
 6     ELP-4x100-4d-n    06.05.01.00    00:d1:00:00
Note:
For an X4-4 configuration, three Flash cards are displayed.
Upgrading Oracle VM Guest to 2.0.1.4
Note:
You can either upgrade Oracle VM Guest to 2.0.1.4 or create Oracle VM Guest 2.0.1.4. See "Optional: Creating Oracle VM Guest 2.0.1.4."You upgrade Oracle VM Guest to 2.0.1.4 by applying the patch on each Oracle VM Guest in your system. The patch upgrades Oracle VM Guest to 2.0.1.4.
Note:
You must apply the patch mentioned in this section on each Oracle VM Guest and not on Oracle VM Server.To upgrade Oracle VM Guest to 2.0.1.4:
-
Navigate to My Oracle Support and download patch number 20237669: Upgrade Utility for Exalytics Virtualized Guest from 2.0.1.0.0 to 2.0.1.4.0 that contains the p20237669_10050_Linux-x86-64.zip file.
-
Log in to Oracle VM Guest as the root user.
-
Using FTP, extract the contents of the file into a temporary (/tmp) directory on the Exalytics Oracle VM Guest.
-
Enter the following commands to navigate to the /tmp directory and unzip the zip file:
# cd/tmp# unzip p20237669_10050_Linux-x86-64.zip -
Disable all existing yum repositories (if any), by performing the following actions:
-
Enter the following command to check for any existing repositories:
Check /etc/yum/repos.d/ directory -
Set enabled=0 for each existing repository.
-
-
Enter the following command to run the upgrade script:
# ./update.sh -
Restart Oracle VM Guest from Oracle VM Manager.
-
Enter the following commands to verify the current RPM versions:
# uname - rmThe following output is displayed:
2.6.39-400.215.8.el5uek x86_64
# cat /etc/oracle - releaseThe following output is displayed:
Oracle Linux Server release 5.8
Optional: Creating Oracle VM Guest 2.0.1.4
Note:
You can ignore this section if you have upgraded Oracle VM Guest to 2.0.1.4. See "Upgrading Oracle VM Guest to 2.0.1.4."This section consists of following topics:
To install and configure Oracle VM Guest 2.0.1.4, you must download the latest VM templates.
To download VM templates:
-
Navigate to the Oracle Software Delivery Cloud web site at the following link:
-
In the Select a Product Pack list, select Oracle Business Intelligence.
-
In the Platform list, select Linux X86-64.
-
Click Go.
-
Select Oracle Exalytics Software Media Pack for Linux x86-64 (Release 1.0.0.5.0).
-
Click Continue.
-
Download the Oracle Exalytics Oracle VM Template 2.0.1.4.0 (Part Number: V56221-01).
-
Save it on a web server.
Importing VM Templates into Oracle VM Manager
After downloading the templates, you import them into Oracle VM Manager.
To import VM templates into Oracle VM Manager:
-
Log on to Oracle VM Manager.
-
Select the Repositories tab.
-
In the left pane, select the Repository in which you want to store the template.
-
Select VM Templates.
-
In the toolbar, click Import VM Template to display the Import VM Template dialog.
-
Select the Oracle VM Server and enter the URL or FTP server to the VM template that you downloaded on the web server.
-
Click OK to import the VM template.
Creating Virtual Machines from the VM Template
After importing the template in Oracle VM Manager, you use the template to create virtual machines.
To create virtual machines from the VM template:
-
Select the Servers and VMs tab.
-
Log on to Oracle VM Manager.
-
In the left pane toolbar, click Create Virtual Machine.
The Create Virtual Machine dialog is displayed.
-
Select Clone from an existing VM Template.
-
Perform the following steps:
-
In the Clone Count list, select the number of machines you want to clone.
-
In the Repository list, select a repository for the machine.
-
In the VM Template list, select the VM template from which you want to create the virtual machine.
-
Enter a name for the virtual machine.
-
In the Server Pool list, select a server pool.
-
Enter a description for the virtual machine.
-
-
Click Finish.
The virtual machine is created and is ready to be configured.
To configure and start a virtual machine, configure a network on a virtual machine, configure a virtual machine for HVM with PV drivers, and configure SWAP on a virtual machine, see Section 3.6, "Maintaining Virtual Machines."
For more information, see "Chapter 7, Managing Virtual Machines" in Oracle VM User's Guide for Release 3.2.
Applying the Exalytics Domain Management Utility Patch
You apply the Exalytics Domain Management Utility patch on each Oracle VM Guest.
To apply the Exalytics Domain Management Utility patch:
-
Navigate to My Oracle Support.
-
Download patch number 18961173 - Exalytics Patchset Upgrade 2.0.1.4 EDMU Utility for VM Guest.
The patch number contains the p18961173_10050_Linux-x86-64.zip file.
-
Extract the zip file to a local directory.
-
Log on as root user.
-
Apply the patch by entering the following command:
./exalytics_ovm_guest_edmu_2.0.1.4.0.shThe patch is applied successfully and an output similar to the following is displayed:
OS Version check passed..
Preparing...                ########################################### [100%]
   1:exalytics-domain-config########################################### [100%]
Preparing...                ########################################### [100%]
   1:exalytics-vm-hardware-c########################################### [100%]
Done
2.2.2.2.5 Configuring Flash on an Exalytics Machine Configured for Virtualization
This section is applicable only for the following customers who have Flash storage:
-
Customers running Exalytics X3-4 or X4-4 machines
-
Customers running Exalytics X2-4 machines with Upgrade kits (Flash Upgrade Kit or Memory and Flash Upgrade Kit
Note:
The following customers can ignore this section:-
Oracle Exalytics X2-4 customers who do not have Upgrade kits (Flash Upgrade Kit or Memory and Flash Upgrade Kit).
-
Oracle Exalytics X3-4 or X2-4 customers with Upgrade kits who have already configured Flash.
To verify that you have already configured Flash, navigate to Oracle VM Manager and confirm that the names of the Flash drives in Oracle VM Manager are the same as the names specified in the FlashDriveMappings file.
-
This section consists of the following topics:
Configuring Flash on Oracle VM Server
Each X2-4 and X3-4 Exalytics Machine contains six 400 GB Flash cards. Each Flash card contains four 100 GB drives, for a total of 24 individual drives with a capacity of 2400 GB. Each X4-4 Exalytics Machine contains three 800 GB Flash card. Each Flash card contains four 200 GB drives, for a total of 12 individual drives with a capacity of 2400 GB. You next configure Flash to enable names of the Flash drives on Oracle VM Server to be read by Oracle VM Manager.
Note:
Before Oracle Exalytics X2-4 customers with Flash Upgrade kits can configure Flash, they must have Oracle Field Services engineers install six Flash cards on the Exalytics Machine being used for virtualization.To configure Flash on Oracle VM Server:
-
Log on to the Exalytics Machine as the root user.
-
To create a FlashDriveMappings file, enter the following command:
# /opt/exalytics/bin/exalytics_flashovsrepos.sh -script > ~/flashDriveMappingsThe FlashDriveMappings file extracts the names of the Flash drives on Oracle VM Server into a text file.
-
Navigate to the /root directory to view the text file.
-
On Oracle VM Server, copy the FlashDriveMappings file to the /opt/exalytics/bin/exalytics_ovm_scripts/ folder and then tar the FlashDriveMappings file by entering the following commands:
# cd /opt/exalytics/bin/# tar -cvf exalytics_ovm_scripts.tar exalytics_ovm_scripts/ -
Copy the tar file to the machine where Oracle VM Manager is installed.
-
Connect to machine where Oracle VM Manager is installed.
-
Navigate to the directory where you copied the scripts and the FlashDriveMappings file.
-
To untar the file, enter the following command:
# tar -xvf exalytics_ovm_scripts.tar -
To confirm that the "expect" package is available, enter the following command:
# rpm -qa | grep expectIf the "expect" package is not available, install it before proceeding to Step 10.
-
To rename the Flash drives in Oracle VM Manager, navigate to the exalytics_ovm_scripts folder and enter the following command:
# ./exalytics_ovm_rename_flash.sh<path_to _flashmappingfile> <Oracle VM Manager Username> < Oracle VM Manager Password> <Exalytics_Machine_Configuration>where Exalytics_Machine_Configuration is x2-4, x3-4, or x4-4.
The names of the Flash drives in Oracle VM Manager now appears the same as the names specified in the FlashDriveMappings file.
-
Attach the Flash drives to Oracle VM Manager by performing the following tasks:
-
In Oracle VM Manager, select the Server and VMs tab.
-
In the left pane, select the server pool on which the virtual machine resides.
-
From the Perspective list, select Virtual Machines.
-
In the Management pane, select a virtual machine.
-
In the toolbar, click Edit.
The Edit Virtual Machine dialog is displayed.
-
Click the Disks tab.
-
Under Disk Type, select Physical Disk.
-
Under Actions, select Select a Virtual Machine Disk.
Select a Physical Disk page is displayed.
-
Select the Flash card you want to attach to Oracle VM Guest Machine, and click OK.
-
Repeat the previous step to attach other Flash cards to Oracle VM Guest Machine.
-
-
In Oracle VM Manager, select the Servers and VMs tab.
-
In the left pane, expand Server Pools, and then select exalytics_server_pool.
-
From the Perspective list, select Virtual Machines.
-
In the Management pane, select a virtual machine.
-
Click the expand arrow to the left of the selected virtual machine.
-
Click the Disks tab.
-
Confirm that the Flash drives attached to Oracle VM Guest Machine are displayed.
Configuring RAID1 for Flash in Oracle Virtual Machine
RAID Level 1 is usually referred to as mirroring. RAID Level 1 duplicates data from one drive on a second drive so that if either drive fails, no data is lost. This is useful when reliability is more important than data storage capacity.
Note:
When configuring RAID10, ensure that the Flash drives on RAID10 are from different Flash cards. This ensures that no data is lost if one Flash card fails.The following procedure assumes you have attached the Flash drives to Oracle VM Manager.
Note:
In this example, RAID1 is configured for two (xvdb and xvdc) Flash drives that are on two different Flash cards. Depending on your configuration, you can configure RAID1 for a different number of Flash drives.To configure RAID1 for Flash in Oracle Virtual Machine:
-
Connect as a root user to the Oracle Virtual Machine to which you attached the Flash drives.
-
Identify the Flash drives.
For example: xvdb and xvdc
-
To configure RAID1 for the two Flash drives (xvdb and xvdc), enter the following command:
# /sbin/mdadm --create /dev/md2 --level=1 --raid-devices=2 /dev/xvdb /dev/xvdc -
To add the RAID1 configuration to the RAID configuration file, enter the following command:
# mdadm --detail --scan --verbose >> /etc/mdadm.confThis enables the RAID configuration to be recognized when Oracle VM Manager restarts.
-
To create a file system on the new RAID1 device, enter the following command:
# mkfs -t ext4 /dev/md2 -
To create a new directory (/u02) on the virtual disk, enter the following command:
# mkdir -p /u02 -
To mount the RAID1 on this directory, enter the following command:
# mount /dev/md2 /u02/u02 is created as the new Flash drive.
-
To update the file system, enter the following command:
# echo "/dev/md2 /u02 ext4 defaults 0 0" >> /etc/fstab
Configuring RAID10 for Flash in Oracle Virtual Machine
RAID10 is also known as RAID 1+0. RAID10 combines disk mirroring and disk striping to protect data. A RAID10 configuration requires a minimum of four disks, and stripes data across mirrored pairs. As long as one disk in each mirrored pair is functional, data can be retrieved. To configure RAID10, you combine RAID1and RAID 0. RAID10 provides both redundancy (as RAID1 provides mirroring) and performance (as RAID0 provides striping) and is the best option for critical applications. One disadvantage is that only 50% of the total capacity of the drives is available due to mirroring.
Note:
When configuring RAID10, ensure that the Flash drives on RAID10 are from different Flash cards. This ensures that no data is lost if one Flash card fails.The following procedure assumes you have attached the Flash drives to Oracle VM Manager.
Note:
In this example, RAID10 is configured for four (xvdc, xvdd, xvde, and xvdf) Flash drives that are on two different Flash cards. Depending on your configuration needs, you can create additional RAID1 devices each with two Flash devices (as in step 3), and then raid them with RAID0 (as in step 5).To configure RAID10 for Flash in Oracle Virtual Machine:
-
Connect as a root user to the Oracle Virtual Machine to which you attached the Flash drives.
-
Identify the Flash drives.
For example: xvdc, xvdd, xvde, and xvdf.
-
To configure RAID1 for the four Flash drives (xvdc, xvdd, xvde, and xvdf), enter the following commands:
# /sbin/mdadm --create /dev/md1 --level=1 --raid-devices=2 /dev/xvdc /dev/xvdd# /sbin/mdadm --create /dev/md2 --level=1 --raid-devices=2 /dev/xvde /dev/xvdf -
To create a file system on the new RAID1 device, enter the following commands:
# mkfs -t ext4 /dev/md1# mkfs -t ext4 /dev/md2 -
To configure RAID0, enter the following command:
# /sbin/mdadm --create /dev/md0 --level=0 --raid-devices=2 /dev/md1 /dev/md2 -
To create a file system on the new RAID0 device, enter the following command:
# mkfs -t ext4 /dev/md0 -
To create a new directory (/u02) on the virtual disk, enter the following command:
# mkdir -p /u02 -
To mount the RAID0 on this directory, enter the following command:
# mount /dev/md0 /u02/u02 is created as the new Flash drive.
-
To add the RAID0 configuration to the RAID configuration file, enter the following command:
# mdadm --detail --scan --verbose >> /etc/mdadm.confThis enables the RAID configuration to be recognized when Oracle VM Manager restarts.
-
To update the file system, enter the following command:
# echo "/dev/md0 /u02 ext4 defaults 0 0" >> /etc/fstab
2.2.2.2.6 Upgrading and Patching Application Software Components on an Exalytics Machine Configured for Virtualization
Note:
This section is for existing Exalytics virtualization customers that are already running application software components. New Exalytics virtualization customers, proceed to Chapter 4, "Installing Software on an Exalytics Machine."Depending on your deployment, upgrade and patch newly certified application software components for this release.
Before you upgrade and patch the application software components, ensure you are installing the latest Exalytics certified software application versions. See Oracle Exalytics Certification Matrix for the latest certifications. The Oracle Exalytics Certification Matrix is located at:
http://www.oracle.com/technetwork/middleware/ias/downloads/fusion-certification-100350.html
The process of upgrading and patching application software components on virtual machines is similar to upgrading and patching them on the non-virtualized Exalytics Machine. For more information, see the following:
2.2.3 Postinstallation Instructions for Upgrading or Patching Oracle Business Intelligence Software
Note:
This section is for existing customers that are upgrading or patching Oracle Business Intelligence software. New customers, proceed to Chapter 4, "Installing Software on an Exalytics Machine."To ensure that Oracle Business Intelligence Enterprise Edition and Oracle TimesTen data type mapping and other optimizations are consistent and can be leveraged, you must complete postinstallation steps for the following Oracle Exalytics components:
2.2.3.1 Oracle TimesTen In-Memory Database
This section contains the following topics:
2.2.3.1.1 Configure Oracle TimesTen Checkpoint Frequency
To ensure Oracle Business Intelligence Enterprise Edition sets the Oracle TimesTen checkpoint frequency, perform the following configuration steps after upgrading Oracle TimesTen In-Memory Database. Failure to perform this configuration may adversely affect Oracle TimesTen performance.
To configure Oracle TimesTen checkpoint frequency:
-
Open the timesten-install-dir/info/sys.odbc.ini file.
-
Find the DSN entry for the schema used for Aggregate Persistence.
-
Do one of the following:
-
If you are loading data in Oracle TimesTen database using aggregate persistence, edit the three parameters as follows:
-
CkptFrequency=-1
-
CkptLogVolume=0
-
CkptRate=0
-
-
If you are loading data in Oracle TimesTen database without using aggregate persistence, use a different server DSN and edit the three parameters as follows:
-
CkptFrequency=30
-
CkptLogVolume=0
-
CkptRate=0
-
-
2.2.3.1.2 Other Postinstallation Steps
To complete other postinstallation steps in Oracle TimesTen:
-
Re-create existing datastores for Oracle TimesTen.
-
If you are installing Oracle Exalytics Release 1 Patchset 5 on Oracle Exalytics Release 1 Patchset 3, then rebuild aggregates using the nqcmd utility. For more information, see "Creating and Persisting Aggregates for Oracle BI Server Queries" in Oracle Fusion Middleware Metadata Repository Builder's Guide for Oracle Business Intelligence Enterprise Edition.
2.2.3.2 Oracle Business Intelligence Enterprise Edition
This section contains the following topics:
2.2.3.2.1 Edit the opmn.xml File
For faster aggregation and better performance, Oracle recommends that you edit the opmn.xml file to include the appropriate elements. Ensure that you edit the opmn.xml file on each Exalytics Machine that is configured in a highly available clustered environment.
To edit the opmn.xml file to improve aggregation and performance:
-
Open the opmn.xml file (which is located in MW_HOME/instances/instance1/config/OPMN/opmn).
-
Insert the following child elements under
<ias-component id="coreapplication_obis1" inherit-environment="true"><environment>:-
<variable id="ORACLE_BI_TT_DISABLE_REDO_LOGGING" value="1"/>Creates faster aggregation.
-
<variable id="ORACLE_BI_TT_PARALLEL_INDEX_CREATION" value="1"/>Creates indexes in parallel, thereby creating faster aggregation.
-
<variable id="ORACLE_BI_TT_BACKGROUND_CHECKPOINT_INTERVAL" value="5"/>This BI Server controlled parameter determines the frequency of Oracle TimesTen datastores that are stored to disk (datastore persistence). The default value is every 10 seconds. The smaller the number of the "value", the more often Oracle TimesTen stores datastores to disk.
-
-
Stop and start the Notification Server.
-
Go to the following directory that contains the OPMN command-line tool:
MW_HOME/instances/instance1/bin
-
Enter the following command:
./opmnctl stopallStops OPMN and all Oracle Business Intelligence system components.
-
Enter the following command:
./opmnctl startallStarts OPMN and all Oracle Business Intelligence system components.
-
2.2.3.2.2 Reinstall Oracle Business Intelligence Client Installer
For information about installing Oracle Business Intelligence Client Tools, see "Installing and Uninstalling Oracle Business Intelligence Client Tools" in Oracle Fusion Middleware Installation Guide for Oracle Business Intelligence.
2.2.4 Deinstallation Instructions for the Oracle Exalytics Release 1 Patchset 5
If you experience any problems after installing the patch, then Oracle recommends that you roll back all Oracle Exalytics component patches. Do not rollback one or two individual component patches. Instructions for rollback are included in the component-specific ReadMe files.
If you encounter any issues while applying any patch updates, then contact Oracle Support.
2.3 Configuring Flash and Replacing a Defective Flash Card on a Non-Virtual Exalytics Machine
This section contains the following topics:
2.3.1 License to Receive Open Source Code
The license for each component is located in the documentation, which may be delivered with the Oracle Linux programs or accessed online at http://oss.oracle.com/linux/legal/oracle-list.html and/or in the component's source code.
For technology in binary form that is licensed under an open source license that gives you the right to receive the source code for that binary, you may be able to obtain a copy of the applicable source code at these site(s):
https://edelivery.oracle.com/linux
If the source code for such technology was not provided to you with the binary, you can also receive a copy of the source code on physical media by submitting a written request to:
Oracle America, Inc.
Attn: Oracle Linux Source Code Requests
Development and Engineering Legal
500 Oracle Parkway, 10th Floor
Redwood Shores, CA 94065
Your request should include:
-
The name of the component or binary file(s) for which you are requesting the source code
-
The name and version number of the Oracle Software
-
The date you received the Oracle Software
-
Your name
-
Your company name (if applicable)
-
Your return mailing address and email
-
A telephone number in the event we need to reach you.
We may charge you a fee to cover the cost of physical media and processing. Your request must be sent (i) within three (3) years of the date you received technology that included the component or binary file(s) that are the subject of your request, or (ii) in the case of code licensed under the GPL v3, for as long as Oracle offers spare parts or customer support for that Software model.
2.3.2 Prerequisites for Configuring Flash
The following prerequisites must be met before configuring Flash on the Exalytics Machine:
-
You are running Exalytics Base Image 1.0.0.7 or later version.
-
Oracle Field Services engineers have installed and configured six Flash cards (on an X2-4 and X3-4 Exalytics Machine) or have configured three Flash cards (on an X4-4 Exalytics Machine).
2.3.3 Configuring Flash
When you upgrade to Oracle Exalytics Release 1 Patchset 5, Flash drivers are included in the Exalytics Base Image 1.0.0.7. To improve the performance and storage capacity of the Exalytics Machine you must configure Flash.
Note:
The installed Flash drivers use software RAID.Oracle supports two types of RAID configurations:
-
RAID10: Is usually referred to as stripe of mirrors and is the most common RAID configuration. RAID10 duplicates and stripes data from one drive on a second drive so that if either drive fails, no data is lost. This is useful when reliability is more important than data storage capacity.
-
RAID05: In RAID05 all drives are combined to work as a single drive. Data is transferred to disks by independent read and write operations. You need at least three disks for a RAID05 array.
This section consists of the following topics:
-
Section 2.3.3.1, "Configuring Flash on an X2-4 and X3-4 Exalytics Machine"
-
Section 2.3.3.2, "Configuring Flash on an X4-4 Exalytics Machine"
2.3.3.1 Configuring Flash on an X2-4 and X3-4 Exalytics Machine
Note:
This section is for users who want to configure new Flash, or re-configure existing Flash configuration. If you do not want to re-configure an existing Flash configuration, you can skip this section. Note that reconfiguring Flash will delete all existing data on the Flash cards.An X2-4 and X3-4 Exalytics Machine is configured with six Flash cards. Each Flash card has four 100 GB drives.
Depending on your requirements, you can configure Flash for the following combinations:
-
RAID10
Note:
Oracle recommends that you do not configure RAID05 on an X2-4 or X3-4 Exalytics Machine. -
EXT3 or EXT4 file system
Note:
Oracle recommends you configure Flash on the EXT4 file system.
To configure Flash:
-
Restart the Exalytics Machine using ILOM.
-
Log on to the ILOM web-based interface.
-
In the left pane of the ILOM, expand Host Management, then click Power Control. In the Select Action list, select Power Cycle, then click Save.
The Exalytics Machine restarts.
-
-
Enter the following command as a root user:
# /opt/exalytics/bin/configure_flash.sh --<RAID_TYPE> --<FS_TYPE>For example:
-
To configure Flash for a RAID10 configuration, enter the following command:
# /opt/exalytics/bin/configure_flash.sh --RAID10 --EXT4
Note:
The following procedure assumes configuring Flash for a RAID10 configuration.The following warning, applicable only for software RAID, is displayed: "This flash configuration script will remove any existing RAID arrays, as well as remove any partitions on any flash drives and will create a new RAID array across all these flash drives. This will result in ALL DATA BEING LOST from these drives. Do you still want to proceed with this flash configuration script? (yes/no)"
-
-
Enter Yes at the prompt to continue running the script.
The script performs the following tasks:
-
Erases all existing RAID configuration on the Flash cards.
-
Distributes multiple RAID1 disks so that two parts of the RAID belong to different cards.
-
Stripes all Flash RAID1 drives into a single RAID0.
-
-
To verify that Flash has been configured correctly, enter the following command:
# df -hThe output should look similar to the following:
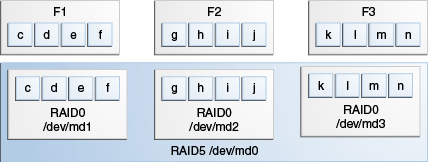
Filesystem  Size   Used   Avail Use%             Mounted on /dev/mapper/VolGroup00-LogVol00
             718G       4.4G   677G   1%   //dev/sda1
             99M   15M     79M   16%  /boottmpfs
            1010G   0     1010G   0%  /dev/shm/dev/md0
            1.1T  199M    1.1T    1%  /u02
Flash is configured as shown in Figure 2-1.
-
Each Flash card (F1, F2, F3, and so on) has four 100 GB drives. Each drive maps to a device, such as /dev/sdg, /dev/sdh, /dev/sdi, /dev/sdj, and so on.
-
Two Flash drives are configured on RAID1 /dev/md1, two Flash drives are configured on RAID1 /dev/md2, two Flash drives are configured on RAID1 /dev/md3, and so on, for a total of twelve RAID1s.
-
The twelve RAID1s are configured on the parent RAID0 /dev/md0.
Figure 2-1 Flash Configuration on RAID10 for an X2-4 and X3-4 Exalytics Machine

Description of "Figure 2-1 Flash Configuration on RAID10 for an X2-4 and X3-4 Exalytics Machine"
-
-
To verify the status of Flash cards, enter the following command:
# /opt/exalytics/bin/exalytics_CheckFlash.shThe output for all the six Flash cards should look similar to the following:
Fetching some info on installed flash drives ....
Driver version :   01.250.41.04 (2012.06.04)

Supported number of flash drives detected (6)

Flash card 1 :
Overall health status : GOOD
Size (in MB) : 381468
Capacity (in bytes) : 400000000000
Firmware Version : 108.05.00.00
Devices:  /dev/sdd /dev/sdc /dev/sdf /dev/sde

Flash card 2 :
Overall health status : GOOD
Size (in MB) : 381468
Capacity (in bytes) : 400000000000
Firmware Version : 108.05.00.00
Devices:  /dev/sdg /dev/sdj /dev/sdi /dev/sdh

Flash card 3 :
Overall health status : GOOD
Size (in MB) : 381468
Capacity (in bytes) : 400000000000
Firmware Version : 108.05.00.00
Devices:  /dev/sdm /dev/sdk /dev/sdn /dev/sdl

Flash card 4 :
Overall health status : GOOD
Size (in MB) : 381468
Capacity (in bytes) : 400000000000
Firmware Version : 108.05.00.00
Devices:  /dev/sdp /dev/sdo /dev/sdq /dev/sdr

Flash card 5 :
Overall health status : GOOD
Size (in MB) : 381468
Capacity (in bytes) : 400000000000
Firmware Version : 108.05.00.00
Devices:  /dev/sdu /dev/sdt /dev/sdv /dev/sds

Flash card 6 :
Overall health status : GOOD
Size (in MB) : 381468
Capacity (in bytes) : 400000000000
Firmware Version : 108.05.00.00
Devices:  /dev/sdx /dev/sdw /dev/sdy /dev/sdz
2.3.3.2 Configuring Flash on an X4-4 Exalytics Machine
An X4-4 Exalytics Machine is configured with three Flash cards. Each Flash card has four 200 GB drives.
Depending on your requirements, you can configure Flash for the following combinations:
-
RAID10 or RAID05
-
EXT3 or EXT4 file system
Note:
Oracle recommends you configure Flash on the EXT4 file system.
To configure Flash:
-
Restart the Exalytics Machine using ILOM.
-
Log on to the ILOM web-based interface.
-
In the left pane of the ILOM, expand Host Management, then click Power Control. In the Select Action list, select Power Cycle, then click Save.
The Exalytics Machine restarts.
-
-
Enter the following command as a root user:
# /opt/exalytics/bin/configure_flash.sh--<RAID_TYPE> --<FS_TYPE>For example:
-
To configure Flash for a RAID10 configuration, enter the following command:
# /opt/exalytics/bin/configure_flash.sh --RAID10 --EXT4 -
To configure Flash for a RAID05 configuration, enter the following command:
# /opt/exalytics/bin/configure_flash.sh --RAID05 --EXT4Flash is configured for a RAID05 configuration as shown in Figure 2-3.
Note:
The following procedure assumes configuring Flash for a RAID10 configuration.The following warning, applicable only for software RAID, is displayed: "This flash configuration script will remove any existing RAID arrays, as well as remove any partitions on any flash drives and will create a new RAID array across all these flash drives. This will result in ALL DATA BEING LOST from these drives. Do you still want to proceed with this flash configuration script? (yes/no)"
-
-
Enter Yes at the prompt to continue running the script.
The script performs the following tasks:
-
Erases all existing RAID configuration on the Flash cards.
-
Distributes multiple RAID1 disks so that two parts of the RAID belong to different cards.
-
Stripes all Flash RAID1 drives into a single RAID0.
-
-
To verify that Flash has been configured correctly, enter the following command:
# df -hThe output should look similar to the following:
Filesystem Size  Used Avail Use% Mounted on/dev/mapper/VolGroup00-LogVol00
           989G   23G  915G   3%   //dev/mapper/VolGroup01-LogVol00
           3.2T   13G  3.0T   1%   /u01/dev/sda1
           99M    25M   70M  27%   /boottmpfs
           1010G   0   1010G  0%   /dev/shm/dev/md0
           1.1T  199M  1.1T   1%   /u02
Flash is configured as shown in Figure 2-2.
-
Each Flash card (F1, F2, and F3) has four 200 GB drives. Each drive maps to a device, such as /dev/sdg, /dev/sdh, /dev/sdi, /dev/sdj, and so on.
-
Two Flash drives are configured on RAID1 /dev/md1, two Flash drives are configured on RAID1 /dev/md2, two Flash drives are configured on RAID1 /dev/md3, and so on, for a total of six RAID1s.
-
The six RAID1s are configured on the parent RAID0 /dev/md0.
Figure 2-2 Flash Configuration on RAID10 for an X4-4 Exalytics Machine
Description of "Figure 2-2 Flash Configuration on RAID10 for an X4-4 Exalytics Machine"
-
-
To verify the status of Flash cards, enter the following command:
# /opt/exalytics/bin/exalytics_CheckFlash.shThe output for all the three Flash cards should look similar to the following:
Checking Exalytics Flash Drive Status

Fetching some info on installed flash drives ....
Driver version :   01.250.41.04 (2012.06.04)

Supported number of flash drives detected (3)

Flash card 1 :
Overall health status : GOOD
Size (in MB) : 762936
Capacity (in bytes) : 800000000000
Firmware Version : 109.05.26.00
Devices:  /dev/sdc /dev/sdd /dev/sde /dev/sdf

Flash card 2 :
Overall health status : GOOD
Size (in MB) : 762936
Capacity (in bytes) : 800000000000
Firmware Version : 109.05.26.00
Devices:  /dev/sdj /dev/sdh /dev/sdg /dev/sdi

Flash card 3 :
Overall health status : GOOD
Size (in MB) : 762936
Capacity (in bytes) : 800000000000
Firmware Version : 109.05.26.00
Devices:  /dev/sdl /dev/sdm /dev/sdk /dev/sdn

Summary:
Healthy flash drives : 3
Broken flash drives  : 0
Pass : Flash card health check passed
You can similarly configure Flash on RAID05. Flash is configured on RAID05 as shown Figure 2-3.
Figure 2-3 Flash Configuration on RAID05 for an X4-4 Exalytics Machine
Description of "Figure 2-3 Flash Configuration on RAID05 for an X4-4 Exalytics Machine"
2.3.4 Replacing a Defective Flash Card
If required, you can replace a failed or defective Flash card. The following procedure assumes you have a defective Flash card in RAID1 /dev/md2, which is installed on the parent RAID0 /dev/md0. See Figure 2-1.
To replace a failed or defective Flash card:
-
To verify the status of Flash cards, enter the following command:
# /opt/exalytics/bin/exalytics_CheckFlash.shIf a defective Flash card is detected, the output displays an "Overall Health: ERROR" message, and the summary indicates the defective card.
-
To locate the RAID that contains the defective Flash card, enter the following command:
# mdadm -D /dev/md0The output should look similar to the following:
UUID : 18fc63ab:10207cf6:8aa02de7:0e6ec818
         Events : 0.1

    Number Major Minor RaidDevice State
       0 9 1 0 active sync /dev/md1
       1 9 2 - faulty spare /dev/md2
       2 9 3 2 active sync /dev/md3
       3 9 4 3 active sync /dev/md4
       4 9 5 4 active sync /dev/md5
       5 9 6 5 active sync /dev/md6
       6 9 7 6 active sync /dev/md7
       7 9 8 7 active sync /dev/md8
       8 9 9 8 active sync /dev/md9
       9 9 10 9 active sync /dev/md10
      10 9 11 10 active sync /dev/md11
      11 9 12 11 active sync /dev/md12
Note:
Notice the defective card in RAID0/dev/md2. Also, make a note of the UUID number at the top of the display. You need the number later when you re-assemble RAID1. -
To view all RAID configurations and their devices, enter the following command:
# mdadm --detail --scan --verboseThe output displays all RAID configurations and the devices used in each RAID. The output should look similar to the following:
ARRAY /dev/md1 level=raid1 num-devices=2 metadata=0.90 UUID=9d897e1a:578c13df:1f72caf0:1e2261ba
   devices=/dev/sde,/dev/sdq
ARRAY /dev/md2 level=raid1 num-devices=2 metadata=0.90 UUID=e472931d:2a0909d8:b7b57f10:8cd05ddf
   devices=/dev/sdr
ARRAY /dev/md3 level=raid1 num-devices=2 metadata=0.90 UUID=7da0fcf8:b20169b5:15c62ef9:b794c207
   devices=/dev/sdf,/dev/sds
ARRAY /dev/md4 level=raid1 num-devices=2 metadata=0.90 UUID=388e4879:6f7ee5fc:f4078446:448da696
   devices=/dev/sdg,/dev/sdp
ARRAY /dev/md5 level=raid1 num-devices=2 metadata=0.90 UUID=1f4841ea:ddded96f:e68a35fb:83c5fe3c
   devices=/dev/sdk,/dev/sdt
ARRAY /dev/md6 level=raid1 num-devices=2 metadata=0.90 UUID=02575fdd:58c3cbfc:f0e48f81:d449fe25
   devices=/dev/sdh,/dev/sdv
ARRAY /dev/md7 level=raid1 num-devices=2 metadata=0.90 UUID=2d626811:500f4c65:d596830e:5ac91cc5
   devices=/dev/sdj,/dev/sdw
ARRAY /dev/md8 level=raid1 num-devices=2 metadata=0.90 UUID=e40b7961:4ca8a017:568003c2:aefc197a
   devices=/dev/sdi,/dev/sdu
ARRAY /dev/md9 level=raid1 num-devices=2 metadata=0.90 UUID=79789ffc:57356f09:c2d9f053:3767b0c9
   devices=/dev/sdo,/dev/sdx
ARRAY /dev/md10 level=raid1 num-devices=2 metadata=0.90 UUID=b2a780e1:b71d14c7:d76556f2:2bdc2f8f
   devices=/dev/sdl,/dev/sdz
ARRAY /dev/md11 level=raid1 num-devices=2 metadata=0.90 UUID=0da9816b:29febfc9:8fe8e0bd:20c6e7b3
   devices=/dev/sdn,/dev/sdaa
ARRAY /dev/md12 level=raid1 num-devices=2 metadata=0.90 UUID=a9ee5637:6702d678:f33f9e4f:a4eed4f0
   devices=/dev/sdm,/dev/sdy
ARRAY /dev/md0 level=raid0 num-devices=12 metadata=0.90 UUID=18fc63ab:10207cf6:8aa02de7:0e6ec818   devices=/dev/md1,/dev/md2,/dev/md3,/dev/md4,/dev/md5,/dev/md6,/dev/md7,/dev/md8,/dev/md9,/dev/md10,/dev/md11,/dev/md12
Note:
The following steps assume that a defective Flash card mapped to device /dev/sdd in RAID1/dev/md2 was detected. In this example, the device /dev/sdd is replaced by device /dev/sdab. -
To display the defective Flash card in RAID0/dev/md2, enter the following command:
# mdadm -D /dev/md2The output should look similar to the following:
UUID : e472931d:2a0909d8:b7b57f10:8cd05ddf
         Events : 0.21

Number Major Minor RaidDevice State
       0 8 48 0 active sync
       1 65 16 1 active sync /dev/sdr
Note:
Notice the missing device (/dev/sdd) at number 0. In this example, this is replaced by /dev/sdab. Also, take note of the other device (/dev/sdr). You need the device to rebuild RAID1 after installing the new Flash card. -
Shut down and unplug the Exalytics Machine.
-
Replace the defective Flash card.
-
Restart the Exalytics Machine.
Note:
You can also start the Exalytics Machine using Integrated Lights Out Manager (ILOM). -
To learn which devices are mapped to the new Flash card, enter the following command:
# /opt/exalytics/bin/exalytics_CheckFlash.shDevices mapped to the new Flash card are displayed. In this example, the old device (/dev/sdd) mapped to the defective Flash card is replaced with a new device (/dev/sdab).
-
To unmount and stop RAID1, enter the following commands:
# umount /dev/md0# mdadm --stop /dev/md0 -
To stop the failed RAID1, enter the following command:
# mdadm --stop /dev/md2 -
To re-assemble the failed RAID1, enter the following command:
# mdadm /dev/md2 --create /dev/sdd /dev/sdabNote:
As previously noted, the old device (/dev/sdd) is replaced with the new device (/dev/sdab).The RAID1 restarts.
-
To check the health of the repaired RAID1, enter the following command:
# mdadm -D /dev/md2 -
Confirm that two active devices are listed.
If the two devices are not listed, run the
/opt/exalytics/bin/exalytics_CheckFlash.shscript again, locate and fix the error and then check the health of the repaired RAID1. Repeat this until the two devices are listed. -
To re-assemble the parent RAID0, enter the following command:
# mdadm /dev/md0 --assemble -u <UUID number> -
To check the health of the repaired RAID0, enter the following command:
# mdadm -D /dev/md0The output from the command shows RAID1 as running, but it shows RAID0 /dev/md2 as missing, which you need to re-add.
-
To re-add the rebuilt RAID1 /dev/md2 into RAID0 /dev/md0, enter the following command:
# mdadm /dev/md0 --re-add /dev/md2 -
To re-check the health of RAID0, enter the following command:
# mdadm -D /dev/md0RAID0 starts rebuilding. Monitor the output and confirm that the process completes. The output should look similar to the following:
Number Major Minor RaidDevice State 0 9 1 0 active sync /dev/md1 1 9 2 1 spare rebuilding /dev/md2 2 9 3 2 active sync /dev/md3 3 9 4 3 active sync /dev/md4 4 9 5 4 active sync /dev/md5 5 9 6 5 active sync /dev/md6 6 9 7 6 active sync /dev/md7 7 9 8 7 active sync /dev/md8 8 9 9 8 active sync /dev/md9 9 9 10 9 active sync /dev/md10 10 9 11 10 active sync /dev/md11 11 9 12 11 active sync /dev/md12 -
To recreate the mdadm.conf configuration file, which ensures that RAID details are maintained when you restart the Exalytics Machine, enter the following command:
# mdadm --detail --scan --verbose > /etc/mdadm.confNote:
If you have other customizations in the mdadm.conf configuration file (such as updating the list of devices that are mapped to each RAID), you must manually edit the file. -
To remount /dev/md0, enter the following command:
# mount /dev/md0 /u02