Producing Academic Advisement Reports
This section discusses how to:
Select general parameters.
Add a what-if course.
Select student and what-if data for processing.
|
Page Name |
Definition Name |
Navigation |
Usage |
|---|---|---|---|
|
Report Request |
SAA_RPT_RQST |
|
Select the type of report and set other general parameters of the report request. |
|
Report Request Log |
SAA_RPT_RQST_LOG |
|
Review report request messages. |
|
Advisement Report Request - Course Search |
SAA_CRSEWHIF_SRCH |
Click the Add a What-If Course link on the Report Request page. |
Select a subject and then search from the course catalog for a course to use during the what-if analysis. |
|
Create What-If Scenario |
SAA_STDNT_WHIF |
Select the Use Career Simulation check box on the Report Request page. Then click the View/Change the Career Simulation link to access the Create What-If Scenario page, which you will use to set up the what-if scenario. |
Set up or review the what-if scenario for the student. |
Access the Report Request page ().
Image: Report Request page
This example illustrates the fields and controls on the Report Request page. You can find definitions for the fields and controls later on this page.

|
Field or Control |
Definition |
|---|---|
| Report Date |
Displays today's date. This date indicates the date the report was requested. |
| As of Date |
Enter the date for the report to reflect all of the relevant student data as of this date. To set the field default to the current date, leave the Transcript Default As of Date field blank on the Installation Student Administration page. A value in this field is required. This field is used to include or exclude future-dated programs, plans, subplans, conditions, and entity groups when you run an academic advisement report. |
| Report Identifier |
Enter the report identifier (for example, ADMIN) from the Report Identifier table. |
Actions
Click the Process Request button when you are ready to submit the request for processing.
|
Field or Control |
Definition |
|---|---|
| View Report |
Click to view the report that was generated. This link appears on the page after the report request is processed. |
|
Field or Control |
Definition |
|---|---|
| View Report as PDF |
Click to view a .pdf version of the advisement report. This button appears on the page after the request is processed. |
|
Field or Control |
Definition |
|---|---|
| Printer |
Enter the path for your local postscript printer. This field appears on the page after the request is processed. |
| Send to Printer |
Click to send the report results to the designated printer. This button appears on the page after the request is processed. |
What-If Information
|
Field or Control |
Definition |
|---|---|
| Use Career Simulation |
Select to indicate that you want to set up a what-if scenario. Note: You do not need to select this check box if you want to set up a course what-if scenario only. If selected, the View/Change the Career Simulation link appears. Click to access the Create What-If Scenario page to create a what-if career scenario. |
| Add a What-If Course |
Click to access the Advisement Report Request - Course Search page. You can use the Advisement Report Request - Course Search page to select a course that you want included in the degree audit. Enter the courses in the order in which you want to simulate their being taken. The number of what-if courses you add has no limit. Click the Add a What-If Course link each time you want to add a what-if course to the setup. You must select a career, term, and then subject before executing the search. After you have selected the course, subject, catalog number, units, requirement designation (if applicable), and topic ID (if applicable), these values appear on the Report Request page. You can change these values as desired. You can also enter a specific academic term. The more data you enter about the what-if course, the more accurately the degree audit can evaluate the what-if course. |
Access the Advisement Report Request - Course Search page (Click the Add a What-If Course link on the Report Request page).
Image: Advisement Report Request - Course Search page
This example illustrates the fields and controls on the Advisement Report Request - Course Search page. You can find definitions for the fields and controls later on this page.
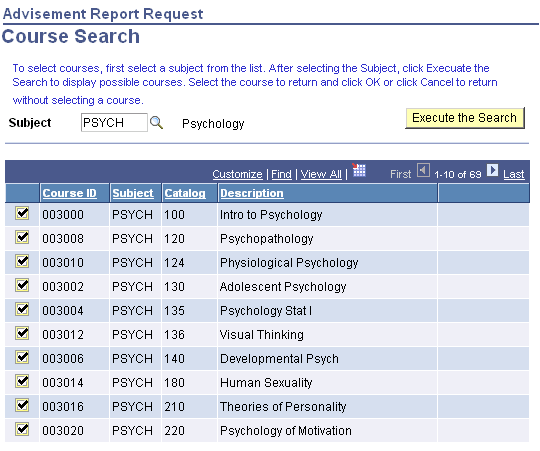
After you enter the required information on the Report Request page and executes the search, the system returns course search results that match the career, term, and subject information. The course search results display the appropriate current row based on the start date of the selected term.
|
Field or Control |
Definition |
|---|---|
| Subject |
Enter the subject. |
| Execute the Search |
Click to display a list of courses. Select the check box next to the required course, and then click the OK button. The course then appears on the Report Request page. |
Access the Create What-If Scenario page (Select the Use Career Simulation check box and then the View/Change Career Simulation link on the Report Request page).
Image: Create What-If Scenario page
This example illustrates the fields and controls on the Create What-If Scenario page. You can find definitions for the fields and controls later on this page.
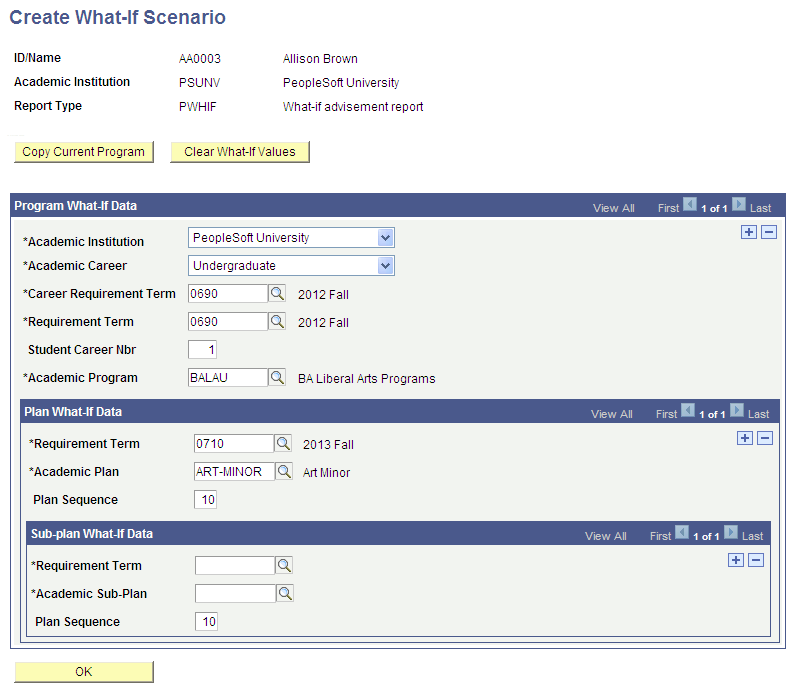
Use this page to enter student and what-if data.
When you access the page, most of the fields are blank. To retrieve the student's existing record, click the Copy Current Program button. You can use these field values to build a program, plan, and subplan what-if scenario. You can change field values and insert rows, as necessary.
If you have defined a what-if scenario and want to clear the field values you entered, click the Clear What-If Values button. This clears most field values so that you can start again.
Program What-If Data
|
Field or Control |
Definition |
|---|---|
| Academic Institution |
This field defaults to the institution for which the report type was defined. Do not change this value. |
| Academic Career |
Enter the value for the what-if career. |
| Career Requirement Term |
Enter a what-if requirement term value for the career override. The system uses this value to select the correct effective-dated career-level requirement groups. |
| Requirement Term |
Enter the what-if program requirement term. The system uses this value to select the appropriate effective-dated program-level requirement groups. |
| Student Career Number |
The default value on this page is 1. You can change the student career number for use in the scenario. |
| Academic Program |
Enter the academic program value that you want to use in the what-if degree audit. You can use one or many programs in the what-if scenario. |
Plan What-If Data
|
Field or Control |
Definition |
|---|---|
| Requirement Term |
Enter the requirement term for the what-if plan. The system uses this value to select the appropriate effective-dated plan-level requirement groups. |
| Academic Plan |
Enter an academic plan for use in the what-if scenario. The system uses this value to select the correct effective-dated plan-level requirement groups. |
| Plan Sequence |
Displays a sequence number. This sequential number is supplied by the system. This number indicates the order or sequence of multiple plans, if any. The plan with the lowest sequence number is considered primary within the plan. You can override the number. |
Sub-plan What-If Data
|
Field or Control |
Definition |
|---|---|
| Requirement Term |
Enter the requirement term for the what-if subplan. The system uses these values to select the appropriate effective-dated subplan-level requirement groups. |
| Academic Sub-Plan |
Enter an academic subplan for use in the what-if scenario. The system uses this value to select the appropriate effective-dated subplan-level requirement groups. |
| Plan Sequence |
Displays a sequence number. This sequential number is supplied by the system. This number indicates the order (or sequence) of multiple subplans, if any. The subplan with the lowest sequence number is considered primary. The user can override the number, if necessary. |
Click the OK button to save the page and return to the Report Request page.