Post Installation Troubleshooting Tips
This section discusses how to:
Verify web service security settings.
Publish the web services.
Refresh the HCM Registry Cache.
Verify Campus Solutions SOA framework setup entries.
Avoid caching issues.
Resolve Microsoft Internet Explorer 7 trusted sites issue.
Resolve Adobe Flex domain security issue.
The service operations for the SAD_ADMISSIONS, SCC_USERREG, SCC_LOV, SSF_EPAYMENT_TRANSACTION, and SCC_SM_SERVICE services are delivered with FULL ACCESS to the HCSPSERVICE permission list.
Note: SCC_SM_SERVICE supports all aspects of the External Search Match feature and was delivered as part of Constituent Web Services (CWS).
To verify whether HCSPSERVICE permission list is assigned to a service operation with FULL ACCESS:
Access the General page ().
Click the Service Operation Security link to access the Web Service Access page.
On the Web Service Access page, verify whether the permission list has full access.
Use the Provide Web Service page to publish the following web services (PeopleTools, Integration Broker, Web services, Provide Web Service):
SAD_ADMISSIONS
SSF_EPAYMENT_TRANSACTION
A new version (1.1) of the Campus Solutions AddPersonCS service has been delivered. This may require the HCM service registry to be refreshed.
To refresh the HCM service registry:
Access the HCM Interface Registry page ().
Image: HCM Interface Registry page
This example illustrates the fields and controls on the HCM Interface Registry page.
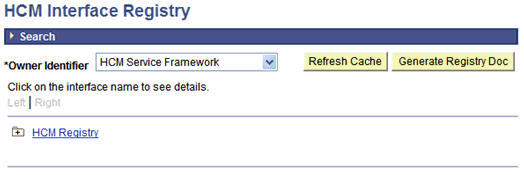
2. Click the Refresh Cache button.
During installation, the system automatically inserts configuration data into the Campus Solutions SOA Framework setup tables.
To verify whether the setup entries exist:
Access the Request Handlers component ().
For all the SAD_ADMISSIONS web service operations, ensure that the fields on the Request Handlers page contain the following values:
Field
Value
Package Name
SCC_OLA
Path
Handlers
Application Class ID
Admissions
For all the SSF_EPAYMENT_TRANSACTION web service operations, ensure that the fields on the Request Handlers page contain the following values:
Field
Value
Package Name
SSF_EPAYMENT_TRANS
Path
HANDLERS
Application Class ID
Admissions
Your web server or browser may cache old content. One way to overcome this issue is to enclose the online application page content in a HTML wrapper as shown in the following code:
<!DOCTYPE HTML PUBLIC "-//W3C//DTD HTML 3.2//EN">
<html>
<head>
<!-- BEGIN INSERT --><META HTTP-EQUIV="Expires" CONTENT="Mon, 04 Dec 1999 21:29:02 GMT"><!-- END INSERT -->
<!-- BEGIN INSERT --><HEAD><META HTTP-EQUIV="PRAGMA" CONTENT="NO-CACHE"></HEAD><!-- END INSERT -->
<title>OLA Demo</title>
</head>
<body bgcolor=white lang=EN-US link="#3366cc" vlink="#9999cc" style='tab-interval:
.5in' leftmargin=10 RIGHTMARGIN=10 alink="#0000cc">
<object width="800" height="500">
<param name="movie" value="OLA.swf">
<embed src="OLA.swf" width="800" height="500">
</embed>
</object>
</body>
</html>
When using Microsoft Internet Explorer 7, you may need to add your web server URL hostname to Microsoft Internet Explorer 7's trusted sites. If you do not add the URL to the trusted sites, you will receive a security error that starts like: Error in line 1 char 2. This is a rather cryptic error, but adding your web server host to the trusted sites setup in your browser will correct this issue.
This issue is applicable if you are using Adobe Flex to develop an online application.
If the user loads this online application from a particular domain, the online application cannot retrieve data from another domain. To avoid this issue, you can create a crossdomain.xml file that allows your online application to load content from other domains. Refer to the Adobe Flash or Adobe Flex website for more information on the crossdomain.xml file.
This is an optional setup.
Use the Logging page to enable and configure the logging feature ().
Image: Logging page
This example illustrates the fields and controls on the Logging page.
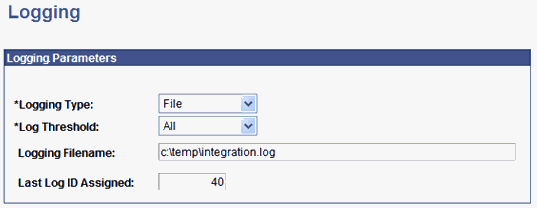
Note: You should not enable logging in a production environment. SOA framework logging is only appropriate for a testing, demo or development environment or when performing critical troubleshooting activities.