Deploying New User Registration
This section presents some examples for deploying New User Registration. Institutions can adopt these examples, only pieces of it, or continue using their own security implementation (for example, with an identity management solution, LDAP or any other user management system).
The New User Registration login page should be accessed from where an unidentified user wants to perform a specific transaction that requires signing in to your system.
New User Registration can be triggered from a:
Launching object on the institution’s web site. For example, a link, a button, or an image.
URL sent through an email notification.
For example, if you deployed an Online Application self-service transaction, your portal may include a button or a link “Click here to apply online.” The URL you configure behind the button or the link can contain information to first transfer the future applicant to the New User Registration login page (or your custom version of it) prior to being transferred directly to your online application page. For these events to occur, the URL must contain information about which context the self-service transaction is performed. Another example for accessing the New User Registration login page is when a user receives an email notification and you include a link in the text so the user can easily sign in to your system and perform a specific transaction. Your system comes with the Delegated Access functionality that uses this deployment: proxies receive an email notification that instructs them how to access the system (includes a hyperlink), accept the terms and conditions, and review the access delegated by a specific person.
The underlying steps involved in providing an anonymous user access to your Campus Solutions system to perform a specific online transaction are as follows:
Use the New User Registration Installation page to generate the generic URL that you embed in the link, button, UI element, or email message. Optionally, if the online self-service transaction requires provisioning the newly authenticated user with application-specific security role or needs to transfer that same user to a specific target page, use the New User Registration Context page to automatically create a URL specific to that transaction.
Have your guests or returning users access the New User Registration login page by either:
Sending them an email notification that contains the link to access your Campus Solutions system. The link is a URL that transfers users to your NUR login page.
Providing a button, link, or any other UI element in your portal or web site to invite users to perform a self-service transaction. The UI element is embedded with a URL that redirects users to your NUR login page. You can place the UI element on a website outside of your Campus Solutions system.
If users already have an account, they can use their existing account to sign in to your system. The authentication occurs through the NUR authenticate service operation, vanilla PeopleTools login page, or a federated login page.
If users do not have an account, they can register a new account through the NUR login page. The user profile creation occurs through the NUR Create Account service operation. The NUR authenticate service operation authenticates users and, if authentication is successful, allows them to sign in.
After a user is authenticated, the Gatekeeper interrogates the URL queryString parameter to determine which context (NUR context ID) the user requests access to. The Gatekeeper uses the user ID (OPRID) and a combination of the SCC_IDM_PROVISN and SCC_IDM_APPS tables to determine whether the user has been given access to the application or needs to be given just-in-time access.
SCC_IDM_APPS contains the setup for the specific NUR context ID, or the setup for the NUR Context ID that is marked as default.
SCC_IDM_PROVISN contains all the user profiles that have been previously provisioned a security role from a specific NUR Context ID.
If a NUR context ID is found and it contains a security role that must be provisioned, the system calls the Campus Identity Manager provisionTran() API method. This method provisions the user profile with the roles contained in the NUR context ID in real time.
If the NUR context ID also contains a target page, the Gatekeeper validates whether the user has the required security to access the target page. If so, the Gatekeeper transfers the user to the target page. Otherwise, an error appears and the user is not transferred.
Note: The New User Registration framework uses the PeopleTools security validation and authentication logic.
The following diagram illustrates where New User Registration (NUR) takes place when it is triggered from a button, link, or any other UI element located outside of your Campus Solutions system, for example, as part of your Online Application (AAWS) transaction; and when it is triggered from a link (a URL) in an email notification, for example as part of the Delegated Access (DA) process:
Image: Example of a Self-Service Transaction using New User Registration
Example of a Self-Service Transaction using New User Registration
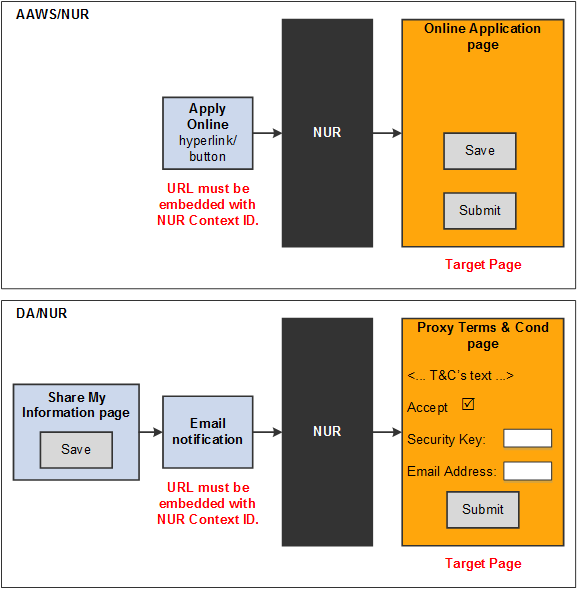
The diagram shows that NUR is considered a black box, independent from any logic specific to the online self-service transactions that are consuming it. New User Registration takes place before performing the self-service transaction. This is because within PeopleTools security management the security must be provisioned before a component is accessed.
The following describes the logic in the New User Registration black block.
Users click a link or button or any other user interface elements configured with a URL that is embedded with a NUR context ID (this link could be on the institution’s website or in an email message).
The login page authenticates the user (and provides the option of creating a user account). An institution can implement this through the NUR service operations. After successful authentication or account creation, the gatekeeper provisions security defined in the NUR context ID that is passed, then redirects the user to the target page to perform the self-service transaction.
The user registration page should be publicly accessible to anonymous users.
4. The New User Registration web service operations inspect the SCC_IDM_PROVISN record to determine which applications the user has access to. The information is then returned to the user interface in the web service operation response message. The user interface may choose to use this information to assist in the user navigation. The <URL> attribute contains the link to access the target page specified for the NUR Context ID in the NUR Context setup page. For example, the following Create Account or Authentication service operation response message shows that the newly authenticated user should be transferred to the SS_CC_DA_TERMS_CON page, which is the target page for the Delegated Access application:
<NUR_REGISTRATION_CONTEXT> <SCC_APPL_CONTXT_ID>SCC_NURCTXT_20120918102441</SCC_APPL_CONTXT_ID> <SCC_APPL_CONTEXT>NUR_DELEGATED_ACCESS</SCC_APPL_CONTEXT> <URL>https://yourCSServerName.yourCSDomainName:1234/psc/ps/EMPLOYEE/HRMS/C/SCC_DA_PROXY.SS_CC_DA_TERMS_CON.GBL&cmd=start?</URL> </NUR_REGISTRATION_CONTEXT>
If you do use the NUR framework as it is delivered, you do not need to configure you user interface to read the response message in order to transfer your user to the proper target page. The Gatekeeper will do it for you.
Note: The <URL> attribute is populated with the link to access the target page defined for the returned NUR Context ID. If the target page was defined as an external URL (a URLID was populated), the same value is populated between the tags. If the target page was defined as a PeopleSoft Architecture (PIA) page, then the link is constructed using the New User Registration Installation values entered for the Production URL and embedded with the specified target page.
If you do not use the NUR context and want to implement real-time application processing, then you must include the logic in your applications to call the Campus Identity Manager IDM interface method API, provisionApp(), to insert a row to the provisioning table, SCC_IDM_PROVISN. This could be done, for example, from an online component.
When a user is successfully authenticated, the URL that contains the context is processed. The Gatekeeper checks the provisioning context defined in the NUR context ID. These are the possible outcomes:
A NUR context ID does not exist. If this is the case, the Gatekeeper responds with an error that is equivalent to an HTTP 403 Forbidden response - Failed attempt.
A NUR Context ID exists with a target page defined, but the user does not have security access to the target page. In this case, the Gatekeeper responds with an error that is equivalent to an HTTP 401 Unauthorized response - Failed attempt.
A NUR Context ID exists with a target page defined and the user has security access to the target page. The Gatekeeper performs a lookup on the NURContext configuration table based on the supplied SCC_APPL_CONTEXT and responds with an HTTP redirect that is equivalent to a 407 Temporary redirect response - Successful attempt.
At this point, control falls within the domain of the individual application.
If an application requires further real-time transaction-level provisioning, then you must include a logic in the application to call the Campus Identity Manager IDM interface method (API, provisionTran(), to insert a row in the SCC_IDM_PROVISN provisioning table. This could be done, for example, from an online component.