Downloading and Viewing SEVIS Results
Before you can view results from SEVIS, you must complete the upload of the XML file to SEVIS, the download of the XML transaction log, and the download of PDF form files from SEVIS (I-20 PDF for F and M visas or DS-2019 PDF for J visas) using the utility program of your choice that supports SSL and HTTPS. Many utility programs (freeware, shareware, and licensed) support SSL and HTTPS data transmissions.
Consult the U.S. Immigrations and Customs Enforcement web site for digital certificate and batch file transmission instructions.
After you send the XML file to SEVIS, you receive the upload results from SEVIS to verify that the information was received. You also receive the processed results of the data file and PDF format files for printing the forms.
Warning! The upload command must include an output statement for receiving the transaction log containing the upload results. If the upload is unsuccessful, the file needs to be loaded using SEVIS Import Results process for the visa type so that the SEVIS Master rows are deleted and the error can be corrected. The events appear on the Alerts Header page in the Select Alerts to Report component again after the Alerts process for the visa type runs.
The following is a sample of a cURL command asking for the upload results for F and M visas: cURL -E seviscert2.pem:sevistest -F orgid=SEA214F00078000 -F batchid=12340000091540 -F userid=tpdso-4140 -F xml=@40000091540SEA214F00078000.xml https://egov.ice.gov/sbtsevisbatch/action/batchUpload -k -v -L -o batch91540.xml
The following is a sample of a cURL command asking for the upload results for J visas: cURL -E seviscert2.pem:sevistest -F orgid=G-2-10128 -F batchid=12340000091530 -F userid=kander6952 -F xml=@12340000091530G-2-10128.xml https://egov.ice.gov/sbtsevisbatch/action/batchUpload -k -v -o batch91530j.xml
This section discusses how to:
Download SEVIS import results.
View results of the XML upload to SEVIS.
View results of the SEVIS download.
View individual student or exchange visitor record results.
View individual dependent record results.
|
Page Name |
Definition Name |
Navigation |
Usage |
|---|---|---|---|
|
Import Process |
RUNCTL_SEV_DOWNLD |
|
Enter SEVIS Download process parameters to import the acknowledgement file and results file from SEVIS. |
|
File Upload Result |
SEV_UPLOAD_RSLT |
|
Review the acknowledgement file. |
|
Download Results |
SEV_DOWNLD_RSLT |
|
Review the transaction log results file. |
|
Student/EV (student/exchange visitor) |
SEV_DOWNLD_RSLT2 |
|
Review the individual transaction record results for a student (F and M visa) or exchange visitor (J visa). |
|
Dependents |
SEV_DOWNLD_RSLT3 |
|
Review the individual transaction record results for a dependent. |
Access the Import Process page ().
Image: Import Process page
This example illustrates the fields and controls on the Import Process page. You can find definitions for the fields and controls later on this page.
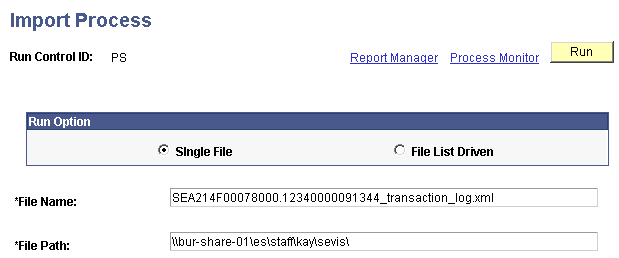
The SEVIS Import Results process loads file acknowledgement and transaction log results obtained from SEVIS into the PeopleSoft Campus Solutions system.
|
Field or Control |
Definition |
|---|---|
| Single File |
Select to load a single transaction log file. |
| File List Driven |
Select to load multiple fields. To load multiple files, you must create a document (for example, .txt) that lists all of the file acknowledgement and transaction log files that you want to load. |
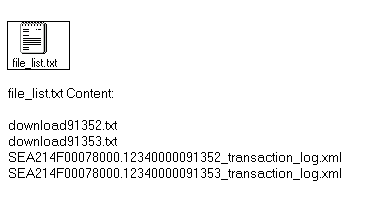
This graphic provides a visual example of the file list produces for the File List Driven option.
Image: Example of a file list for the File List Driven option
Example of a file list for the File List Driven option
|
Field or Control |
Definition |
|---|---|
| File Name |
Enter the file name using the file naming convention approved by SEVIS. |
| File Path |
Enter the path to the file location. |
Access the File Upload Result page ().
Image: File Upload Result page
This example illustrates the fields and controls on the File Upload Result page. You can find definitions for the fields and controls later on this page.
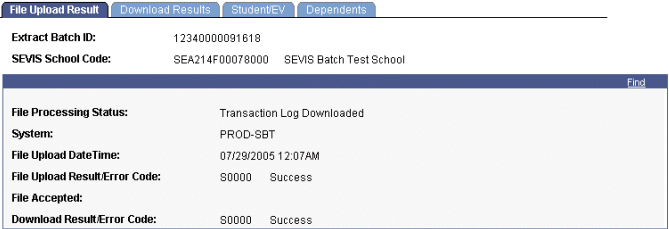
This page reflects the SEVIS upload results status of the overall batch file from the XML document upload. The information is based on results provided in the file acknowledgement returned by SEVIS.
Note: You must run the SEVIS Import Results process for the visa type to load information from the upload results file produced as a result of uploading the XML file to SEVIS.
Image: Example of upload results
This example illustrates the fields and controls on the Example of upload results. You can find definitions for the fields and controls later on this page.

|
Field or Control |
Definition |
|---|---|
| SEVIS School Code or SEVIS Program Number |
The page appears with the SEVIS School Code field displayed for F and M visas, or the SEVIS Program Number field displayed for J visas. |
| File Processing Status |
Displays the status of the file from SEVIS. The possible status values are Exported, Upload Acknowledged, Transaction Log Downloaded, or Processing Complete. Each time the SEVIS export process for a visa type runs, a new row with the extract batch ID and either SEVIS school code for F and M visas or the SEVIS program number for J visas appears with the exported file processing status. After you load the file acknowledgement log from SEVIS, the status changes to Upload Acknowledged. After you load the transaction log from SEVIS, the status changes to Processing Complete. |
| System |
Displays the SEVIS batch system from which the transaction log was requested. Values include PROD, ALPHA, or BATCH. |
| File Upload Date Time |
Displays the date and time that the upload request was processed by SEVIS. |
| File Upload Result/Error Code |
If the file processing is unsuccessful, the file upload error from SEVIS appears. This can be any number of explanations of the error from the File Errors Setup Table. One example is File does not comply with SEVIS XML Schema. You should correct all errors before running the SEVIS Alerts process for that visa type again. |
| File Accepted |
Indicates whether SEVIS accepted the file for processing. This value is not sent with the transaction log, but remains on the page for historical reference. |
| Download Result/Error Code |
If the file download was unsuccessful, the download error from SEVIS appears. The code and description are based on the SEVIS File Errors table. You should correct all errors before running the SEVIS Alerts process for the visa type again. |
Access the Download Results page ().
Image: Download Results page
This example illustrates the fields and controls on the Download Results page. You can find definitions for the fields and controls later on this page.
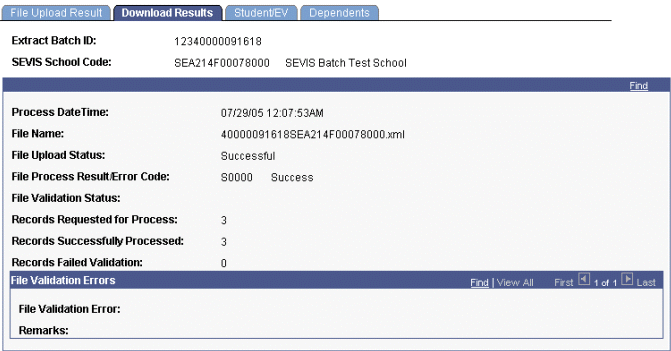
This page shows the status of the batch XML document processed by the SEVIS system. The information is based on results provided in the transaction log returned by SEVIS after the file is accepted and processed.
|
Field or Control |
Definition |
|---|---|
| SEVIS School Code or SEVIS Program Number |
The page appears with the SEVIS School Code field displayed for F and M visas, or the SEVIS Program Number field displayed for J visas. |
| File Upload Status |
Displays the Successful or Unsuccessful file status returned from the SEVIS system. |
| File Process Result/Upload Error Code |
If the file upload is unsuccessful, the file upload error from SEVIS appears here. |
| File Validation Status |
Displays the Pass or No Pass status of the file schema validation performed by the SEVIS system before transaction records are processed. The value is not included in the transaction log, but remains on the page for historical reference. |
| Records Requested for Process |
Displays the number of unique records included in the XML document to be processed. |
| Records Successfully Processed |
Displays the number of records successfully processed by the SEVIS system. |
| Records Failed Validation |
Displays the number of records unsuccessfully processed by the SEVIS system. |
File Validation Errors
|
Field or Control |
Definition |
|---|---|
| File Validation Error |
If the file validation fails, the file validation error code from SEVIS appears here. You should correct all errors before running the SEVIS Alerts process for the visa type again. |
| Remarks |
Displays the SEVIS file validation error description. |
Access the Student/EV page ().
Image: Student/EV (exchange visitor) page
This example illustrates the fields and controls on the Student/EV (exchange visitor) page. You can find definitions for the fields and controls later on this page.
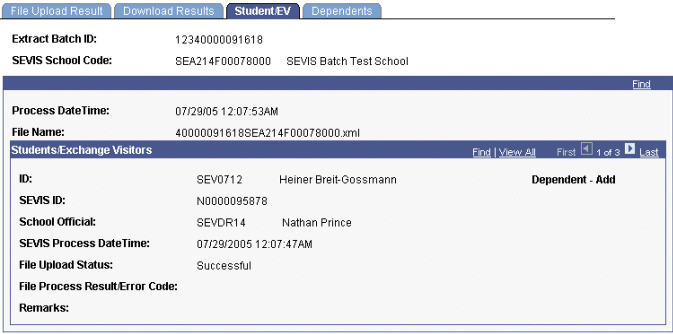
This page shows the results of an individual student or exchange visitor transaction record. The information is based on results provided in the transaction log returned by SEVIS.
|
Field or Control |
Definition |
|---|---|
| SEVIS School Code or SEVIS Program Number |
The page appears with the SEVIS School Code field displayed for F and M visas, or the SEVIS Program Number field displayed for J visas. |
Students/Exchange Visitors
|
Field or Control |
Definition |
|---|---|
| ID |
Displays the ID assigned to the individual in the PeopleSoft system. |
| SEVIS ID |
Displays the ID assigned to the individual by the SEVIS system. For new students or exchange visitors submitted to SEVIS using the Create Student or Create EV event, the SEVIS ID is returned only if the record is successfully processed by the SEVIS system. |
| School Official or Responsible Officer |
Displays the PeopleSoft ID and name of the school official the for F and M visas or the responsible officer for J visas that is assigned to the event. |
| SEVIS Process Date Time |
Displays the date and time that the XML file was processed by SEVIS. |
| File Process Result/Upload Error Code |
If the file upload is unsuccessful, the file upload error from SEVIS appears here. You should correct all errors before running the Process SEVIS Alerts process for that visa type again. |
| Remarks |
Displays the SEVIS file process error description. |
Access the Dependents page ().
Image: Dependents page
This example illustrates the fields and controls on the Dependents page. You can find definitions for the fields and controls later on this page.
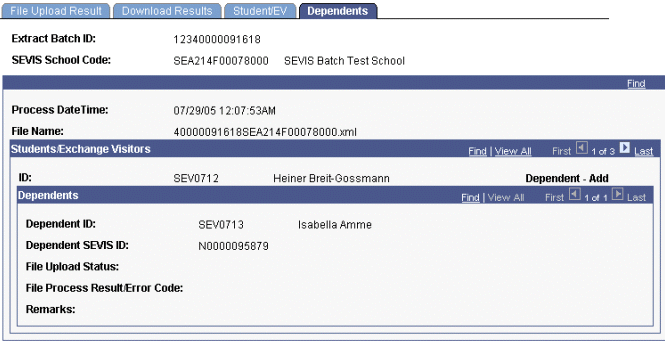
This page shows the results of an individual dependent transaction record. The information is based on results provided in the transaction log returned by SEVIS.
|
Field or Control |
Definition |
|---|---|
| SEVIS School Code or SEVIS Program Number |
The page appears with the SEVIS School Code field displayed for F and M visas, or the SEVIS Program Number field displayed for J visas. |
Students/Exchange Visitors
|
Field or Control |
Definition |
|---|---|
| ID |
The system displays the PeopleSoft ID for the student or exchange visitor. |
Dependents
|
Field or Control |
Definition |
|---|---|
| Dependent ID |
Displays the ID assigned to the dependent in the PeopleSoft system. |
| Dependent SEVIS ID |
Displays the ID assigned to the dependent by the SEVIS system. For new dependents submitted to SEVIS using the Create Student event, Create EV event, or Dependent - Add event, the SEVIS ID is returned only if the record is successfully processed by the SEVIS system. |
| File Upload Status |
Indicates whether the record was processed successfully. This value is not used in the transaction log, but remains on the page for historical reference. |
| File Process Result/Error Code |
If the file upload is unsuccessful, the file upload error from SEVIS appears here. You should correct all errors before running the Process SEVIS Alerts - F/M or Process SEVIS Alerts - J process for that visa type again. |
| Remarks |
Displays the SEVIS file process error description. This value is not used in the transaction log, but remains on the page for historical reference. |