Setting Up File Mapping Definitions
This section discusses how to:
Create a file definition.
Define a file layout.
Map the file and convert the data.
Preview the record tree.
Preview the converted data.
Copy a file mapping definition.
|
Page Name |
Definition Name |
Navigation |
Usage |
|---|---|---|---|
|
File Definition |
SCCFP_FILE_DFN |
|
Map the external file to the context containing the destination records. |
|
File Layout |
SCCFP_FILE_LAYOUT |
|
Identify the fields from the external file, and specify the action to use to convert data and place it on the destination staging table records. |
|
Mapping |
SCCFP_FILE_MAP |
|
Map the fields in the external file to fields in the destination record. |
|
Preview Layout |
SCCFP_FILE_PRVW |
|
View the record tree to determine if the correct data is set to be mapped and converted. |
|
Preview Data |
SCCFP_FILE_PRVW2 |
|
Identify the external file and view the data as it will be converted before running the File Parser process to place the converted data into the destination records. |
|
Copy File Map Definition |
SCCFP_CPY_MAP_DFN |
|
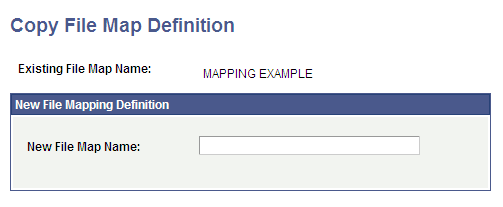
Copy an existing file map definition under a new definition name. |
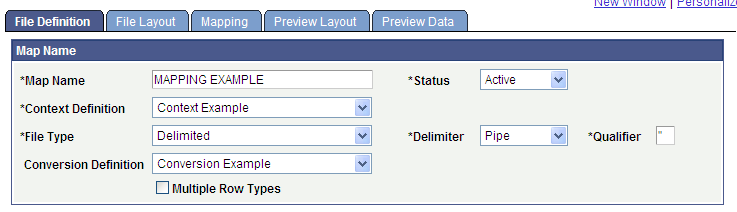
Access the File Definition page ().
Image: File Definition page
This example illustrates the fields and controls on the File Definition page. You can find definitions for the fields and controls later on this page.
This is an example of a File Definition page with multiple row types:
Image: File Definition page – Multiple Row Types
This example illustrates the fields and controls on the File Definition page – Multiple Row Types. You can find definitions for the fields and controls later on this page.

Map Name
|
Field or Control |
Definition |
|---|---|
| Map Name |
Enter a name for this mapping of the external file. |
| Status |
Enter the status of file mapping definition. The default value is Pending when the mapping definition is initially added. Only file mapping definitions with an Active status are available for selection when converting external file data. |
| Context Definition |
Enter the context definition to use for this mapping. Context definitions are set up on the Context Definition page. If a conversion definition is associated with the context on the Context Definition page, the system displays the name of it in the Conversion Definition field. Important! For a saved file mapping definition, if you change this field's value, the system will automatically delete the setup in both the File Layout and Mapping pages. This is because the system assumes that the target records (context) are different. Do not change this field's value unless you want to repeat your setup. |
| File Type |
Specify the type of the external file, either Flat or Delimited. If you enter Delimited, you must also verify or enter values for the delimiter and the qualifier. |
| Delimiter |
Appears only if the file type is Delimited. Enter the item in the external file that signifies the end of one value and the beginning of another. Values are: Comma Pipe Semicolon Tab |
| Qualifier |
Appears only if the file type is Delimited. Enter the character in the external file that qualifies the end of one field and the beginning of another. The default qualifier is " (quotation mark). Note: If the external file does not contain any field qualifier, leave the default value unchanged. This will not have any impact on processing the file. |
| Conversion Definition |
Enter the conversion definition to use. Conversion definitions are set up on the Field Conversion Definition page. If a conversion definition is associated with this context on the Context Definition page, the system displays it as the default value. You can change the conversion definition. |
| Multiple Row Types |
Select if the external file contains multiple row types. For example, the external file might have a header row, a detail row, and a trailer or total row. When Multiple Row Types is selected, the File Row Type Detail group box appears, which is where you must identify each row type to which data is to be converted. Note: The Force Insert functionality is not available when multiple row types are specified. |
Row Types
This group box is available only when the Multiple Row Types check box is selected.
|
Field or Control |
Definition |
|---|---|
| Name |
Enter a name to describe the general purpose or type of the row. |
| Section ID Value |
Enter the type of value that appears in the row. |
| Starting Position and Field Length |
These two fields appear when the file type is Flat. Enter the position in which the field value for the row begins in the Starting Position field, and enter the maximum character length of the field to read in the Field Length field. |
| Field Number |
This field appears when the file type is Delimited. Indicate the field that contains the field value for the row. |
The Field Number (for delimited files), and Starting Position and Field Length (for flat files) indicate the field or column that the File Parser process should look at to determine the row type. For example, shown in the preceding exhibit, if Field Number 1 in the file has a value EVR_HEADER then the row type = Header.
Access the File Layout page ().
Image: File Layout page - Location tab
This example illustrates the fields and controls on the File Layout page - Location tab. You can find definitions for the fields and controls later on this page.
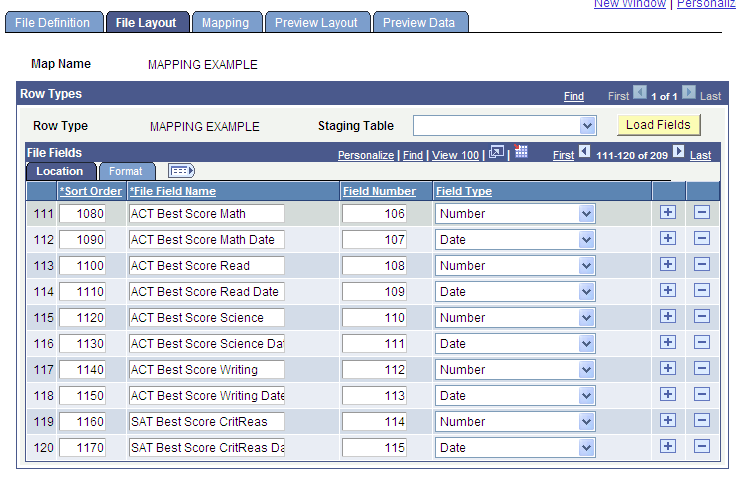
Image: File Layout page - Format tab
This example illustrates the fields and controls on the File Layout page - Format tab. You can find definitions for the fields and controls later on this page.
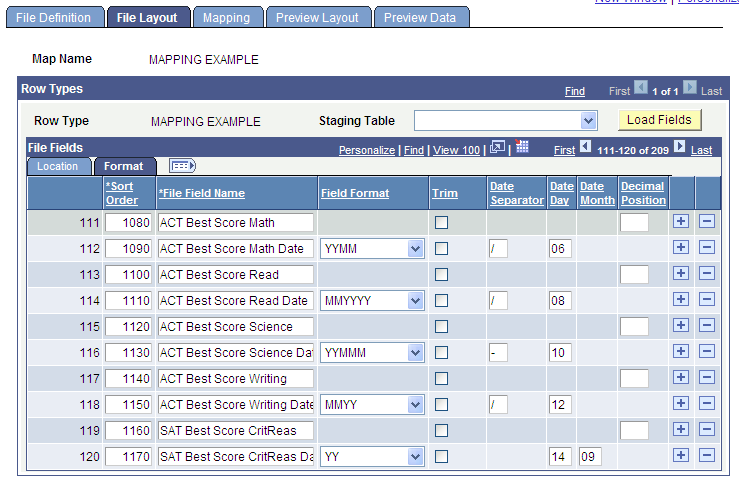
Image: File Layout page - Propagate tab
This example illustrates the fields and controls on the File Layout page - Propagate tab. You can find definitions for the fields and controls later on this page.
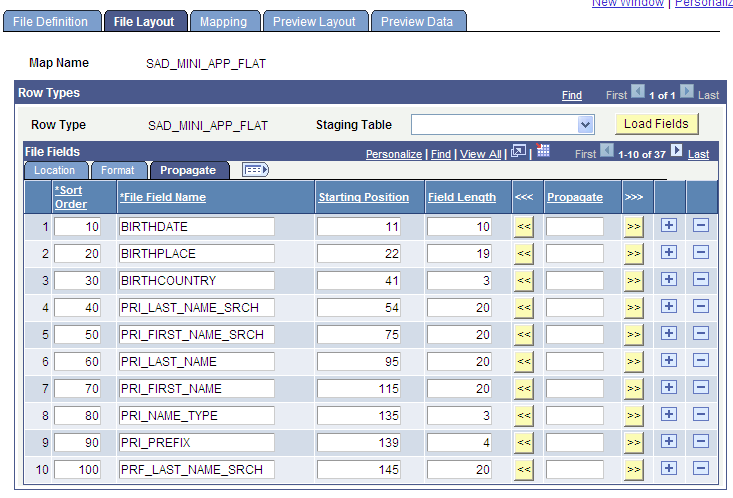
You control the layout of the file by identifying the fields on the external file to be converted. You can either enter file field names from the external file or you can load and populate the fields from the staging table, view the field controls, and make changes as needed.
Row Types
The page contains a row for each row type identified on the File Definition page. Enter data for each row type.
|
Field or Control |
Definition |
|---|---|
| Staging Table and Load Fields |
(Optional) Enter the name of the staging table into which data for this row type is to be placed. Only the staging tables associated with this context are available. Click Load Fields to load a list of the fields from the staging table into the File Fields group box. Loading the fields can save data entry. |
File Fields
The File Fields group box lists the field names to reference in the external file. Use these file names to map to fields on the staging tables on the Mapping page.
File Fields - Location Tab
The Location tab lists the location of the field on the external field. You can view and change the sort order, the field name, and the field type.
For a flat file, the location is the starting position and field length.
For a delimited file, the location is the field number.
|
Field or Control |
Definition |
|---|---|
| Field Type |
Enter the type of field to use. The values are: Character Date Date Time Number Signed Decimal Time Note: The field type that you select here must be applicable to the corresponding field displayed on the Field Mapping Detail section of the Mapping page. For example, if setting up a field for ACT Math Score, the Field Type should be set as Number to correspond with the Field Type of the SCORE field on SCC_STG_TESTCMP. Fields defined with the Field Type of Time must be in the format of hh:mm:ss AM/PM, such as 12:15:42 PM. |
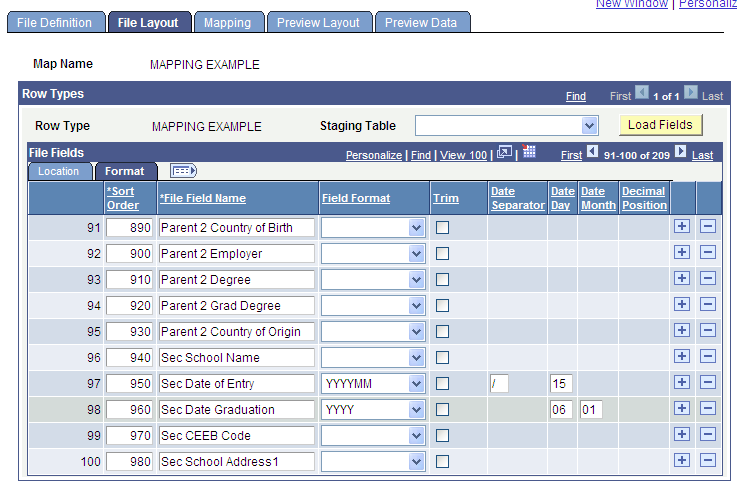
File Fields - Format Tab
The Format tab enables you to view and change field formats, trim leading and trailing spaces, enter date separators for date fields, and change decimal placement for currency amounts.
Image: File Layout page - Format tab
This example illustrates the fields and controls on the File Layout page - Format tab. You can find definitions for the fields and controls later on this page.
|
Field or Control |
Definition |
|---|---|
| Date Day |
This field appears when you define a Field Type of Date and select a date field format that contains only month and year (for example, MMYYYY or YYMMM). Select a value (1-28) of your choice to be assigned to the incoming date value and the subsequent mapped record/field. |
| Date Month |
This field and the Date Day field appear when a date format contains only year (for example, YYYY or YY). For the month value, select a value (1-12) of your choice, and then select a value (1-28) to be assigned to the incoming date value and the subsequent mapped record/field. |
File Fields - Propagate Tab
This tab appears for flat files only. The Propagate tab enables you to adjust the starting position and length of a field when a new field is added to an existing definition.
|
Field or Control |
Definition |
|---|---|
 |
Click to decrease the starting position of the field. |
 |
Click to increase the starting position of the field. |
Note that if you are using a PDF version of this document and the graphics appear unclear, we recommend that you adjust the zoom or magnification tool of Adobe Reader.
Access the Mapping page ().
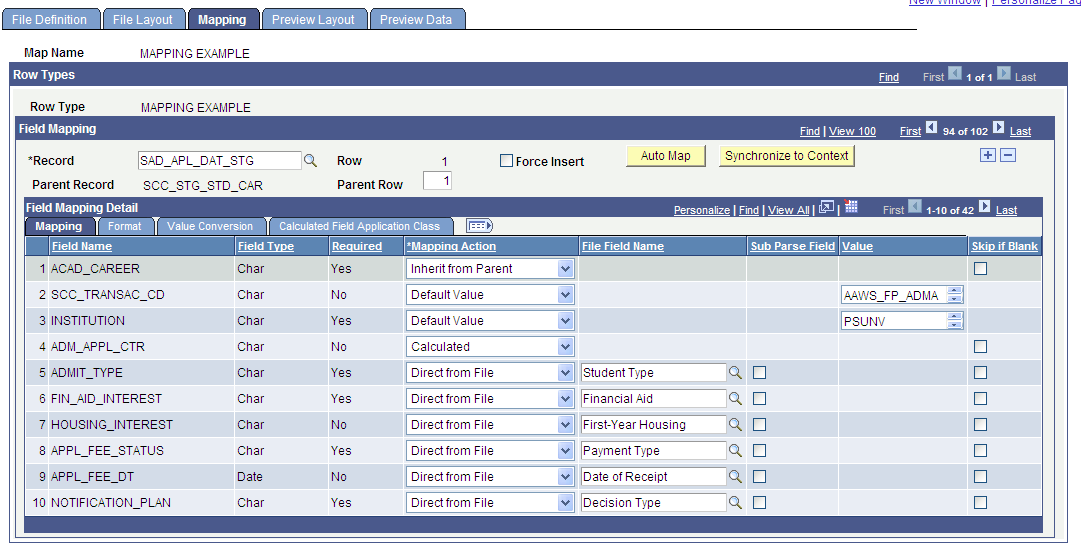
Image: Mapping page - Mapping tab
This example illustrates the fields and controls on the Mapping page - Mapping tab. You can find definitions for the fields and controls later on this page.
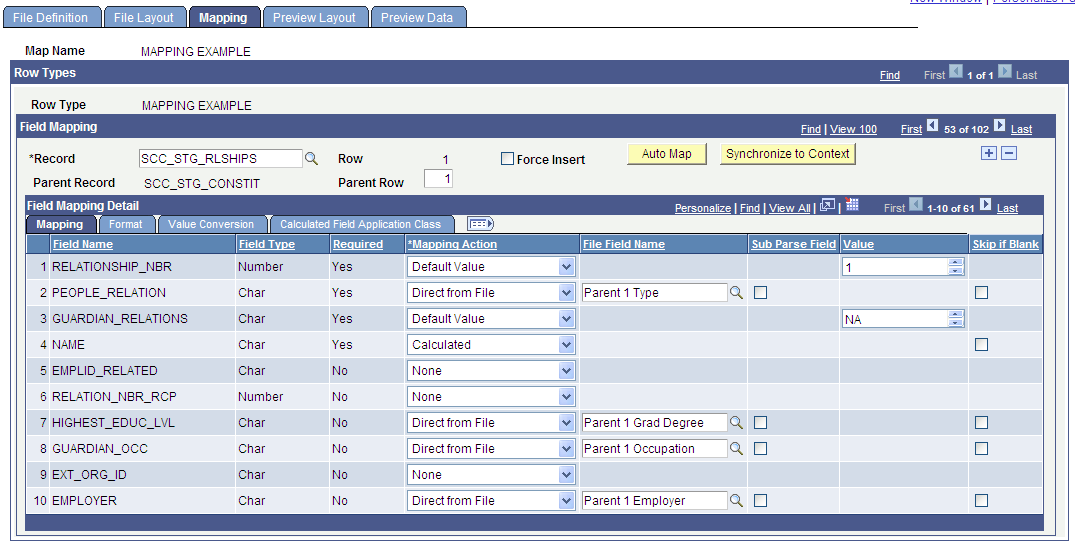
Image: Mapping page - Mapping tab with the Sub Parse Field check box selected
This example illustrates the fields and controls on the Mapping page - Mapping tab with the Sub Parse Field check box selected. You can find definitions for the fields and controls later on this page.
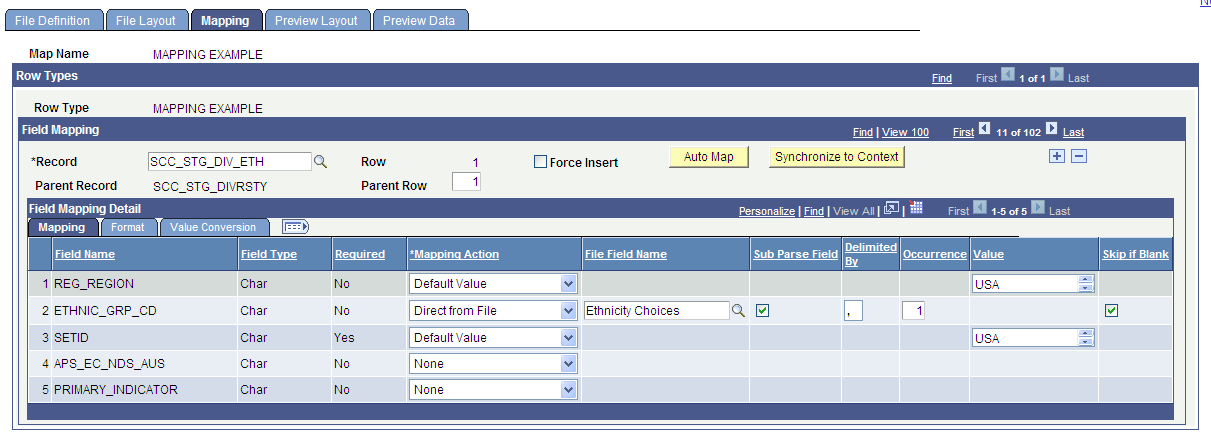
Image: Mapping page - Format tab
This example illustrates the fields and controls on the Mapping page - Format tab. You can find definitions for the fields and controls later on this page.
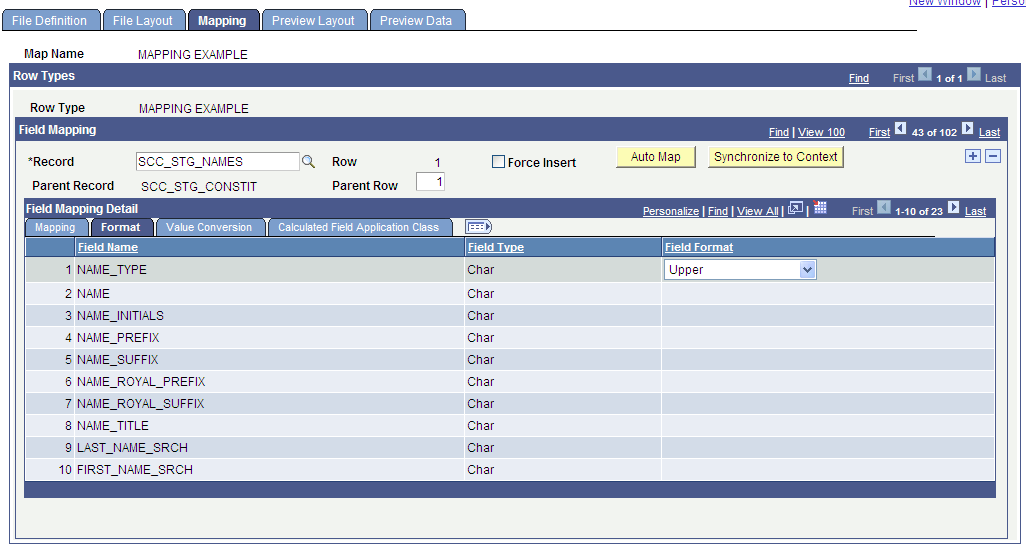
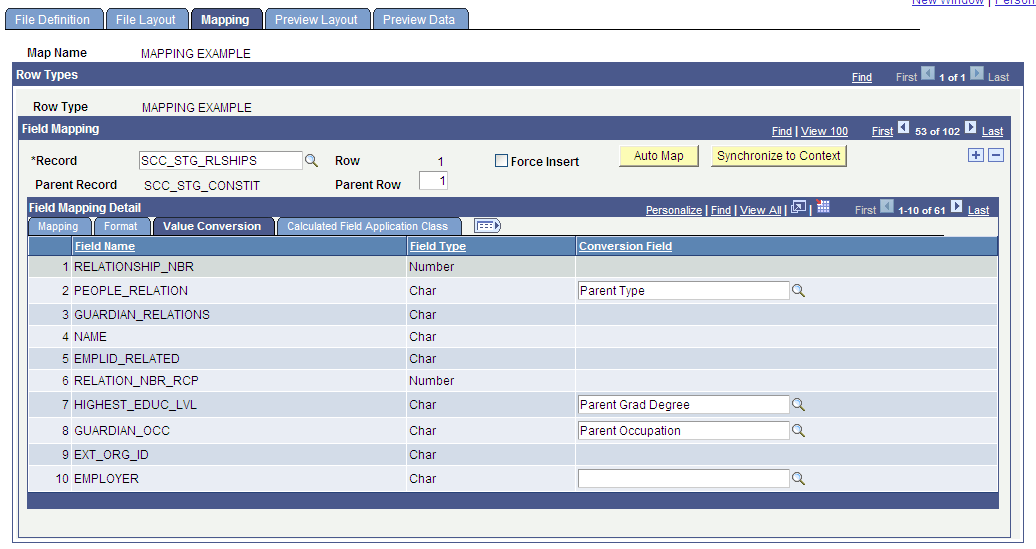
Image: Mapping page - Value Conversion tab
This example illustrates the fields and controls on the Mapping page - Value Conversion tab. You can find definitions for the fields and controls later on this page.
Enter data to define how to update the staging record when the external file is processed. Fields on the staging table may take data directly mapped from the external file or set with a default value when external file is processed.
Note: Click Save on the File Layout page before using the Mapping page. Saving the file mapping definition and layout causes the file field names to be available on the Mapping page.
Row Types
Each row type identified on the File Definition page and designed on the File Layout page is listed in this group box. View or enter mapping instructions for each field to map the field to the staging tables.
Field Mapping
Data in this group box defines how to update the staging tables and fields when the external file is processed.
|
Field or Control |
Definition |
|---|---|
| Record |
Enter the record to use as the staging table. Available records are from the related context definition. When the process runs, it updates the specified staging table with the fields defined in the row type and File Layout page. Once a staging table is selected in the Record field, based on the context definition, all visible fields from the staging table are displayed. Note: If a staging table with mapped file fields has a parent record, you must include the parent record in the field mapping even if the parent has no mapped file fields. If the parent record does not contain any reference to a mapped value (that is, you have selected Direct from File Mapping Action for the parent record), you must select the Force Insert check box. |
| Row |
Identifies the row of the staging table into which the File Parser process will insert the converted data. Note: In most cases, the row number is 1. However, sometimes one row in the file may need to be normalized into more than one row in the staging tables. For example, PeopleSoft Financial Aid's external awards have award files that contain more than one disbursement on a single file row. The External Award staging tables store disbursements in a normalized manner to support a large number of disbursements for each award. To map a single file row to more than one staging table record, you must add rows on the field mapping level. Each of these rows must be mapped to the correct file field. The disbursement table is keyed to a unique sequence and the keys must be correctly mapped. In most cases, set the Mapping Action to Default Value, and enter in the Value field a numeric sequence that equates to the number of disbursements. |
| Force Insert |
Select to have the File Parser process insert a record if you have not selected the Direct From File mapping action for any field in the record. Force Insert functionality allows the end user to write to a staging table while not relying on the existence of mapped value(s) from a specific file. When Force Insert is enabled, File Parser inserts a row into the specified staging table. File Parser presumes that the end user recognizes that the target table is a child to a parent table structure and that there is sufficient data either inherited from the parent and/or defined at the mapped level to insure data integrity. Note: The Force Insert check box is not available when multiple row types are specified. A calculated field must be used to force insert a record in this case. |
| Auto Map |
(Optional) Click for the system to compare fields on the File Layout page to fields in the staging table and place fields with the same name into the staging tables. |
| Synchronize to Context |
(Optional) Click for the system to compare fields on the Context Definition page to fields on the Mapping page and to remove fields from the mapping that are not in the context definition. Synchronizing content is helpful when the context definition has been updated after the file mapping definition is created. Note: If changes have been made to a record definition you are using, it is required that you synchronize content to successfully run the File Parser process. |
Field Mapping Detail - Mapping Tab
The Mapping tab appears for each record and displays all of the visible fields from the staging table and their mapping actions.
|
Field or Control |
Definition |
|---|---|
| Mapping Action |
Enter the mapping action for the process to use when updating the target staging table. Values are: Default Value to enable you to hard code the value when the file is processed. The Value column appears where you can enter the default value to post to staging table. For example, the External Award staging table (SFA_EASTAGE_DTL) requires that a value posts to the external award report SFA_EA_REPORT_CD field. In most cases the external file will not have a corresponding field for this value. Select Default Value and provide appropriate value in the Value column. Direct from File to update the staging table with a field defined on the File Layout page. The File Field Name column appears, and the available values are fields defined in File Layout page. You can click the Auto Map button to cause the system to populate the File Field Name fields with the available values if the File Field Name is the same as the Field Name. Inherit from Parent to carry forward the value from the parent record. None to take no action nor update the staging table field. Process Instance to bring in the current process instance of the batch process. Sequence to assign a unique sequence number, used primarily to create unique key values. Sequencing starts at 1 and increments by 1 for each row retrieved. Unique Counter to assign a unique numeric index created from the next number on the referenced counter record and field. The Population Selection process uses the PeopleTools GetNextNumberWithGapsCommit() function to get the next value and update the record. Calculated to use a PeopleCode application class that calculates the field value. When you select Calculated, the Calculated Field Application Class tab appears. Specify the application class details on this tab. |
| File Field Name |
Available when Mapping Action is Direct from File. Available values are fields defined in File Layout page. |
| Sub Parse Field |
Available when Mapping Action is Direct from File. This attribute is used when an incoming field may contain multiple responses or answers to a specific question. For example: Question: What is your ethnic background. Answer: I am White and Native American Indian. Each of these responses would constitute a separate row in the ethnicity tables. When you select the Sub Parse Field check box, the Delimited By and Occurrence fields are available for entry: Delimited By: Specify the character that is used to separate the values within the incoming mapped field. Occurrence: Specify a numeric value corresponding to the occurrence within the field that you wish to assign to the specific staging table. Repeat this construct for as many responses that could potentially be contained within the incoming mapped field. |
| Value |
Available when Mapping Action is Default Value. Enter the value in the correct format for field. |
| Skip if Blank |
Select if you do not want the File Parser process to insert a blank row if the field value is blank. If you clear this check box, the File Parser process inserts a blank row if the field value has a blank value. For example, if you do not select this check box and a student does not provide a preferred name, the File Parser process will insert a blank name in the staging table with a name type set to Preferred. Note: The Skip if Blank check box is available only for the following Mapping Actions: Direct from File, Inherit from Parent, and Calculated. |
Field Mapping Detail - Format Tab
The Format tab appears when the mapping action is Default Value.
View and enter data to format the mapped fields.
Field Mapping Detail - Value Conversion Tab
The Value Conversion tab appears when the mapping action is Direct from File. You can optionally assign a conversion value to fields that are mapped directly from the external file.
Field Mapping Detail - Calculated Field Application Class Tab
When you select a Mapping Action of Calculated on the Mapping tab, the Calculated Field Application Class tab becomes available.
Image: Mapping page - Mapping tab with a calculated Mapping Action selected
This example illustrates the fields and controls on the Mapping page - Mapping tab with a calculated Mapping Action selected. You can find definitions for the fields and controls later on this page.
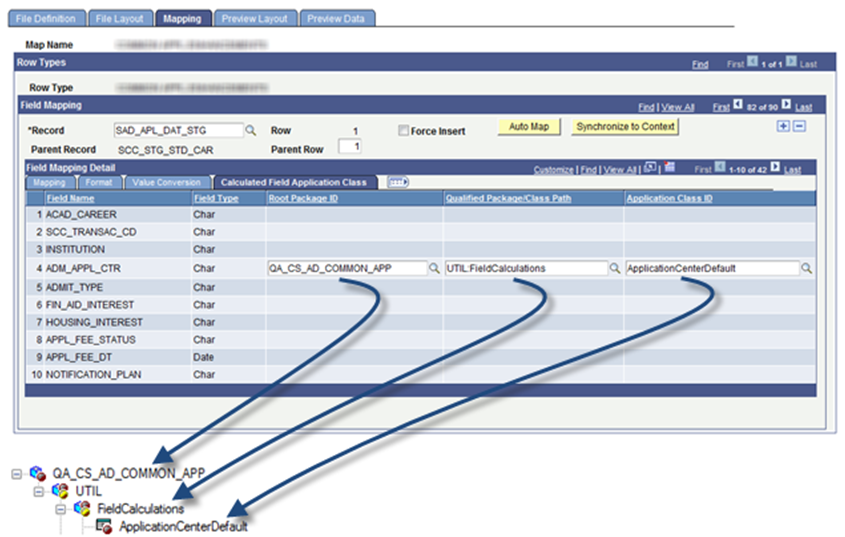
On the Calculated Field Application Class tab, you then need to provide the name of the Application Package that you previously defined in Application Designer under the Root Package ID column:
Image: Mapping page - Calculated Field Application Class tab
This example illustrates the fields and controls on the Mapping page - Calculated Field Application Class tab. You can find definitions for the fields and controls later on this page.
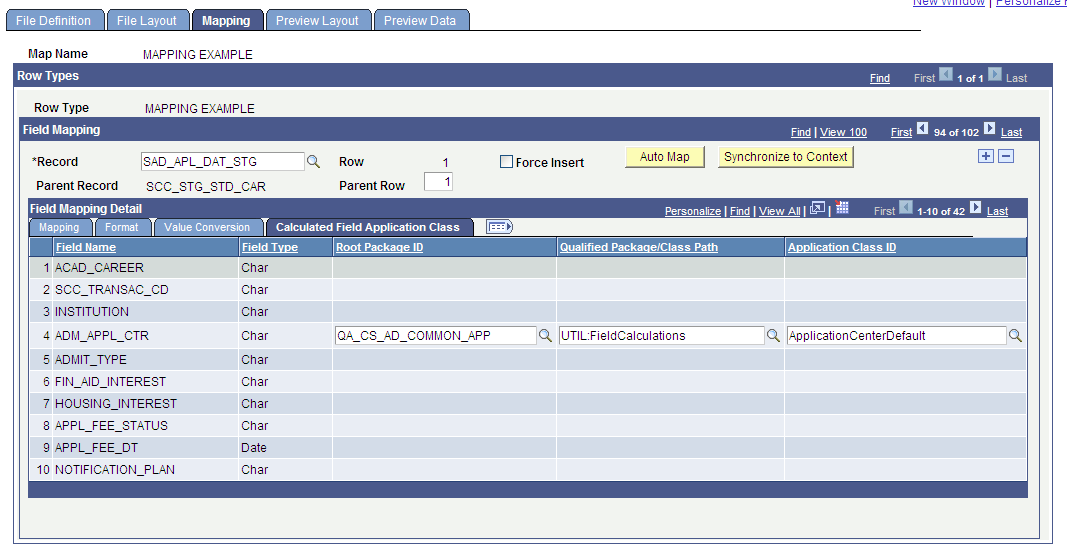
Once you select the application package that pertains to this specific calculation field, you must provide the Qualified Package/Class Path and the Application Class ID.
The following graphic illustrates how the specified field values on the Calculated Field Application Class tab relate to the user defined application package:
Image: Calculated Field Application Class tab values relating to an application package
This example illustrates the fields and controls on the Calculated Field Application Class tab values relating to an application package. You can find definitions for the fields and controls later on this page.
Access the Preview Layout page ().
Image: Preview Layout page
This example illustrates the fields and controls on the Preview Layout page . You can find definitions for the fields and controls later on this page.
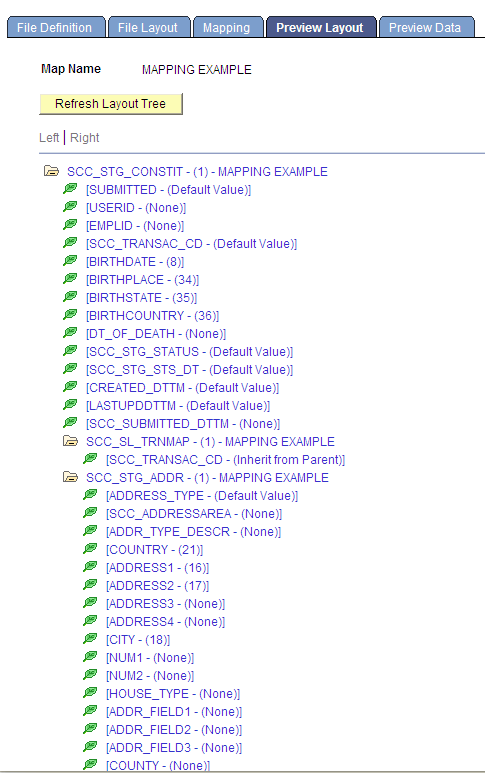
After you design the layout and map the file fields to the staging tables, click the Refresh Layout Tree button to view the hierarchy of the staging tables and fields; and determine how each field will be updated when external file is processed. You should preview the layout before you run the process to move the data into the target tables.
If the Preview Layout page displays a field with one or more numbers in parenthesis, this means the field is mapped with a Mapping Action of Direct From File. For Delimited File Types, the displayed number corresponds to the Field Number on the File Layout page. For example, BIRTHDATE - (8) means that this field is mapped to Field Number 8 on the File Layout page, which is Date of Birth. For Flat File Types, the first number corresponds to the starting position of the field and the second number corresponds to the field length. For example, BIRTHDATE – (11,10) means that this field begins in position 11 and has a length of 10.
Access the Preview Data page ().
Image: Preview Data page
This example illustrates the fields and controls on the Preview Data page . You can find definitions for the fields and controls later on this page.
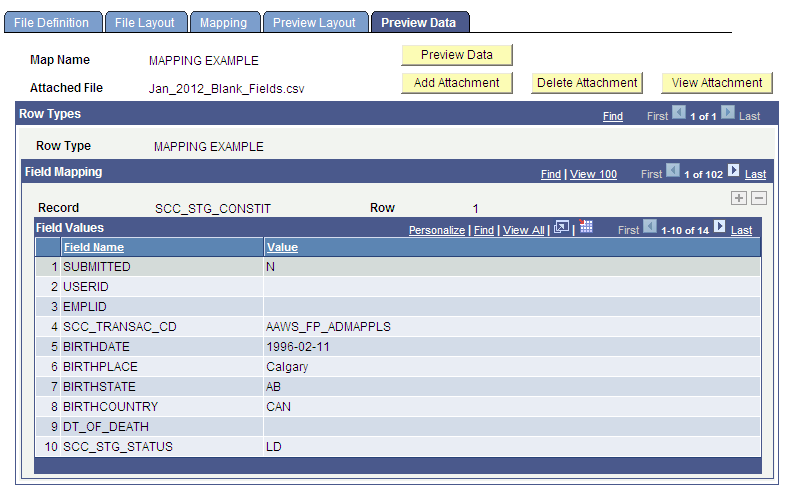
After mapping is complete, you can preview the data with a test file to confirm the file field layout, mapping to staging tables, and field formats and conversions. Perform this preview before you run the process to move the data to target tables. The preview feature shows only the first row of each row type.
Note: Use a small test file. Previewing with a large file would waste system resources, be too large to upload as an attachment, and potentially degrade the application server.
|
Field or Control |
Definition |
|---|---|
| Add Attachment |
Click and browse to attach a sample file. The file to be attached should be small but have at least one row for each file type. |
| Preview Data |
Click to display data in the attached file according to the specifications. |
| View Attachment |
Click to view the sample file with data. |
| Delete Attachment |
Click to delete the sample file. |
Access the Copy File Map Definition page ().
Image: Copy File Map Definition page
This example illustrates the fields and controls on the Copy File Map Definition page . You can find definitions for the fields and controls later on this page.